Table of Contents
Advertisement
Advertisement
Table of Contents

Related Manuals for Teac TE-AV170


Summary of Contents for Teac TE-AV170
- Page 1 CAR CD /DVD /MP3 PLAYER /RADIO RECEIVER /WITH BLUETOOTH MODEL:TE-AV170...
-
Page 2: Copyright Information
Copyright Information ©2009 All rights reserved. This document may not in whole or in part be reproduced, stored in a retrieval system, transmitted in any form or by any means, electronic, mechanical, photocopying, recording, or otherwise, or reduced to any electronic medium or machine-readable form without prior consent, in writing, from [COMPANY]. -
Page 3: Important Safety Instructions
Dear Customer, Thank you for selecting our unit. In order for you to utilize this device and all its options, we recommend that you read the corresponding instructions in this manual before the initial use of the device, even if you’re familiar with handling electronic devices. Please pay particular attention to the chapter “Important safety instructions”. - Page 4 Before the final installation of the device into a DIN insertion compartment in the dashboard, connect the cables and test the connections. Only use the accessories included in the delivery. Usage of unauthorized components can cause damages. If you need to drill holes or make other changes for the installation, consult a specialized workshop in your area.
-
Page 5: Table Of Contents
Table of Contents Copyright Information………………………………………………………………………..1 Important Safety Instructions ..................2 Table of Contents ....................... 4 Accessories ........................ 5 Installation & Connection .................... 6 Operation of the Monitor ..................... 7 Info Display......................... 8 Electrical Connection ....................9 Front Panel ....................... 11 Remote Control ...................... -
Page 6: Accessories
Accessories Package contains the following accessories for installation and operation of the unit. UNIT Open and Closed Mounting Collar 1x Protective Carrying Case for Detachable Front Panel. 1x Mounting Bracket 1x Assemble Bar 1x Unit IR-Remote 1x Screw B15x16 Control with One 4x Bolt M5 CR2025 3Volt Cell 1x Nut M5... -
Page 7: Installation & Connection
Installation & Connection Note: Please observe the following safety instructions for the connection of the device: Read the entire installation section before connecting the device. Disconnect the negative pole of the vehicle battery for the duration of the installation. Observe the safety instructions by the vehicle manufacturer during this task. If you need to drill holes for the installation, make sure that no parts of the vehicle are damaged. -
Page 8: Operation Of The Monitor
8) The device is distinguished by a high degree of output. During operation, this results in a strong heat generation. Therefore no cables or other parts may adjoin the device. If their insulation melts, there is the risk of a short circuit or fire. 9) Removing: Turn off the device. -
Page 9: Info Display
Info Display Info Display when the monitor is closed. The loudspeakers have been The LOUDNESS function MUTE LOUD muted has been activated (Example): RDS program Frequency in the FM range HIT RADIO 100.60 name A broadcast program with A broadcast program with program type information is traffic information is being being received... -
Page 10: Electrical Connection
Electrical Connection 1) Radio Antenna Input (75 Ohm) RCA Connectors 2) Line Output (Rear) (Gray) Left = White 3) Line Output (Front) (Brown) Right = Red 4) Dual Zone Audio Output (Gray) Yellow = Video ISO Connector 5) GPS Antenna 6) Bluetooth ANT 7) Subwoofer Output (Blue) ISO-A... - Page 11 Note: Only use groundless loudspeakers. Use only loudspeakers of minimal 40Watt, using fewer watts may result in damaging your loudspeakers at higher volumes. Use 4~8 Ω (Ohm impedance) loudspeakers only; using higher or lesser impedance may damage the unit. Do not use 3-cable loudspeakers and do not connect the loudspeakers minus to the car body (GND).
-
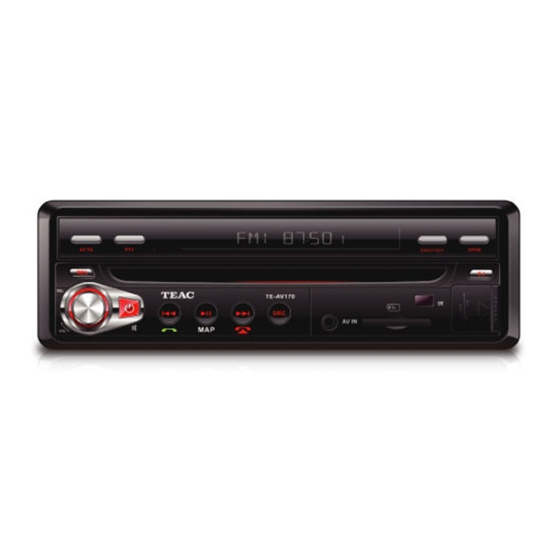
Page 12: Front Panel
Front Panel When the front panel is removed, PLEASE DON’T TOUCH the contacts. 1. REL Button Press to detach and release the front panel, the unit will be switched off automatically after a few second when released. Detach/Attach the Panel: Press REL button and pull out the left side to detach the panel. To attach it, insert the right side first and then press the left side until hear a click sound. - Page 13 SEL I: Short push it to enter SOUND SETTING menu to adjust the sound settings; EQ => BASS => TREBLE = > BALANCE => FADER => EQ. Adjust the level by click touch panel to increase or counterclockwise to decrease. DUAL KEY setting: When DUAL is ON, long press it to choose DUAL-C/C-DZ (Buttons on panel and RC control radio only), DAUL-DZ (Buttons on panel and RC control DVD only) 3.
- Page 14 12. EJECT Button Press to eject a disc. If the disc is not removed for about 10 seconds after eject, the disc is reinserted automatically. 13. AF/TA Button Press and hold for 2 seconds it to enable or disable AF (Alternate Frequency) mode. Press once to make TA sound off, press twice enable or disable TA (Traffic Announcement) mode.
-
Page 15: Remote Control
Remote Control 1: POWER 11: PBC/STOP 21: A-B/ZOOM 2: MODE 12: OSD 22: VOL+/- 3: BAND/RANDOM/C 13: DIGIT NUMBERS 23: SEL 4: UP/DOWN/LEFT/RIGHT 14: PLAY/ PAUSE 24: AUDIO/GOTO 5: ENTER 15: MUTE/BT 25: DUAL 6: EJECT 16: SUBTITLE 26: TILT 7: P.SCN/RPT/# 17: MENU 8: PTY/*... - Page 16 1. POWER Power on or off. 2 MODE Button Press it to select the mode: Radio, DISC (if there is a disc in unit), USB (if there is a USB device in the unit), CARD (if there is a SD/SDHC card in the unit), BLUETOOTH (if the connection is ok).
- Page 17 In RADIO mode, press button to start automatic searching, push and hold for two seconds to start manual searching. button Frequency up, button Frequency down. 11. STOP/PBC Button Press it to Stop playback from the current position, press it again to final stop to the very beginning.
- Page 18 22. VOL+/- Buttons Press to adjust volume level. 23.SEL Button Press it to enter the SOUND SETTING menu, and press Cursor UP/DN buttons to choose an item and press cursor left/right buttons to set the item. Press SEL button again to exit the menu.
-
Page 19: Main Menu
Main Menu The best way to discover the program is to explore each screen in detail, and to find out how to move from one to another. Read this chapter for a guided tour. Unit starts by displaying the Main menu. This is the root of the screen hierarchy, and you can simply access all features by tapping on the touch screen buttons. -
Page 20: File Management
When you touch screen menu, you will not see any buttons while DVD is played. Buttons will appear when you tap on LCD screen. Tap the screen again to hide the buttons. Note: 1. DVD Player will start playing automatically when you insert any DVD disc, SD card or USB device. -
Page 21: Av-In Mode
Press it to activate the intro function. You can play the beginning of every track for 10 seconds in sequence. Press it to repeat REP 1 => REP DIR => REP ALL Press it to play track randomly. Press it to enter previous page. Press it to enter next page. -
Page 22: Auto-Connect - Disconnect
mobile phone and the BLUETOOTH connection will be finished. The BLUETOOTH icon will display on the screen. Auto-connect - Disconnect When power on the unit, the last paired phone will be connected to the device via Bluetooth automatically, after searching about one minute, if the device cannot find the paired phone, it will stop searching. -
Page 23: Voice Transfer
In Call mode, the unit can be used as your phone. Making and receiving calls are possible with BLUETOOTH. Simply tap phone number and tap button to make a call, and tap button to hang up. 1.) Press CLEAR button shortly to delete a wrong digit, press the CLEAR button for 3-4 seconds to delete all the numbers at once. -
Page 24: Setting Control
Setting Control Your device has default system settings. You can customize the settings to suit your personal needs. Once you change settings, your new settings will remain until you change it again. To start SETTING, tap on button from main menu screen. Sound Control 10 different setting is possible through sound control menu. -
Page 25: Eonta
STEREO touch to select OFF or ON LOCAL touch to select OFF or ON TA Volume Control (Radio) touch TA Volume to adjust the level touch to select RETUNE RETUNE LONG/SHORT touch to select MUTE or Tap Down button from RDS & RADIO SOUND menu 1 screen. -
Page 26: Date & Time Control
AF switching or PI SEEK is implemented to the station which have all PI codes the same as current station. REG of individual segment is turned on also together with displaying “REG ON” on numeric display for a few seconds. *In double displaying mode, the individual segment may be deleted in case of not enough- space in display. - Page 27 12 hour Mode/24 Hour Mode Tap CLOCK HOUR button to change time mode to 24 hours, tap it again to 12 hours. DVD Set up Menu Press the DVD button on the set up menu to enter the DVD player setup menu to setup the DVD player operation setting.
-
Page 28: System Information
For DVD discs that support the USA rating system, setting up rating control can prevent children from watching content that might not be suitable for their age. You are asked to enter the password when you change the rating setting. The default password is 0000. Code Description 1.NONE... -
Page 29: Handling Discs
When the target moves to another position, tap and hold at the center of the new target. Repeat each time to complete the calibration process. When completed, tap anywhere in screen to go back to menu screen. Handling Discs Dirty, scratched or warped discs may cause skip ping or noise. µ... -
Page 30: Troubleshooting
Troubleshooting SYMPTOM CAUSE SOLUTION IF THE POWER SUPPLY IS PROPERLY THE CAR IGNITION IS CONNECTED TO THE CAR NOT ON. ACCESSORY SWITCH THE IGNITION NO POWER KEY TO “ACC”. THE FUSE IS BLOWN. REPLACE THE FUSE. PRESENCE OF DISC REMOVE THE DISC IN THE PLAYER DISC CANNOT BE INSIDE THE PLAYER THEN PUT A NEW UPWARD. -
Page 31: Technical Specifications
property of [COMPANY]. Evidence of the warranty must be provided in the form of proper proof of purchase (sales receipt or invoice). Damage caused by improper handling, operation storage or by force majeure or other external influences is not covered by the warranty. The same applies to wearing parts, e.g. rechargeable batteries (6 months). -
Page 32: Gps Antenna Installation
GPS Antenna Installation The Navigation system determines its position by communicating with the Global Positioning Satellites through its GPS antenna. The waterproof antenna may be mounted inside or outside of the vehicle. If you opt for interior mounting, keep in mind that the GPS antenna can normally not "see"...