
Related Manuals for Polar Electro TriFIT 700


Summary of Contents for Polar Electro TriFIT 700
- Page 1 TriFIT...
-
Page 2: Table Of Contents
Table of Contents SECTION 1: SETTING UP YOUR TRIFIT 700 ........3 .................. 4 EQUIREMENTS AND ECOMMENDATIONS FIT 700....................5 NPACKING ..........................6 CCESSORIES Hardware Upgrades....................... 7 Software Upgrades ......................... 8 Available Accessories ......................8 ASSEMBLING THE T FIT 700 ....................9 TriFIT Interface Connections.................... -
Page 3: Section 1: Setting Up Your Trifit 700
Section 1: Setting Up Your TriFIT 700 In this section • The TriFIT System • Facility Requirements • Packing Lists • Unpacking the System • Assembling the System... -
Page 4: Requirements And Recommendations
Requirements and Recommendations The TriFIT 700 evaluation system is designed to gather, process, interpret and display fitness and wellness data. The TriFIT was designed to be used by exercise professionals and physical educators. These items are necessary to operate the TriFIT 700 System: •... -
Page 5: Unpacking Your Trifit 700
– otherwise no claim can be honored by the shipping agent or by Polar/HealthFirst. Unpacking Your TriFIT 700 Once the system is out of the shipping container and on the floor; • Remove all packing materials. -
Page 6: Accessories
7. Hewlett Packard DeskJet printer 8. 6 foot power cord attached for the cart power 9. TriFIT computer installed in the cart (if ordered) 10. TriFIT 700 cart with integrated range of motion (ROM) unit 11. Heart rate receiver and 8’ HR cable (if no bike was purchased). -
Page 7: Hardware Upgrades
Hardware Upgrades • Monark 828E Bicycle Ergometer (includes custom Polar Heart Rate Receiver/RPM interface cable) • Magnum Bike (with serial/USB hook up into computer) • Trackmaster treadmill (includes 15 foot treadmill interface cable) • Lange skinfold calipers • Tanita BF 350 Bioimpedance •... -
Page 8: Software Upgrades
Software Upgrades • Health Risk Appraisal (HRA) module • Group Report module • Meal Planner • Template Builder • Network Version (2-5, 10, 25, 99 user license) • Nutritional Analysis (Nutritionist Pro) Available Accessories • Additional Polar heart rate transmitter belt •... -
Page 9: Assembling The Trifit 700
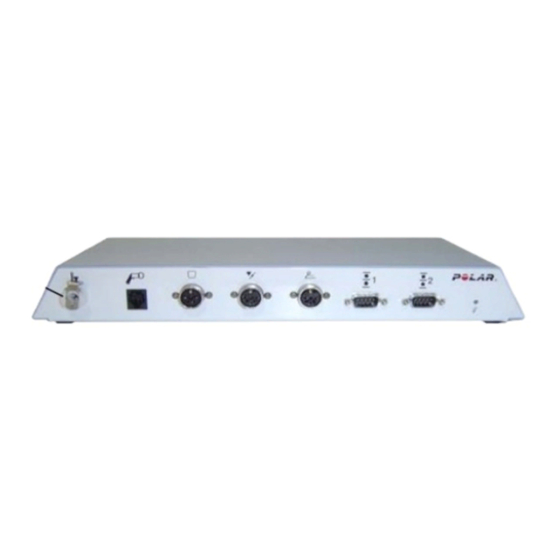
ASSEMBLING THE TriFIT 700 TriFIT Interface Connections Noting that the interface box is secured to the top of the computer with a velcro strip, verify that the following peripherals are connected to the TF700IU interface: • Skinfold Calipers • ROM (Range of Motion) •... -
Page 10: Monark Bike
Monark Bike If a Monark 828E was purchased with your TriFIT 700 system, you will receive a Bike interface split cable. This cable plugs into the TriFIT 700 interface unit where it is labeled with the heart and pedals icon. Position the split end that holds the Polar receiver per the set up instructions included with the cable. -
Page 11: Section 2: Operation Of Your Trifit 700
Section 2: Operation of Your TriFIT 700 In this section: • Recommendations for the operating staff • Turning on the system power • Shutting down the system • Setting up for first time use • Calibration • Testing recommendations • Training of the staff... -
Page 12: Recommendations For Staff
Recommendations for Staff • It is recommended that ALL OPERATORS have a basic understanding of Windows operating system. If not, it is recommended that the primary operator take a course in the basic operation of Windows. • Polar/HealthFirst Corporation recommends that ALL OPERATORS complete the entire TriFIT 4.X tutorials. -
Page 13: Turning On The Power
Turning on the Power • After checking all the cable connections as outlined previously, you are ready to turn on your system. • Turn on the System Main Power switch located at the left side of the cart. Main Power switch •... -
Page 14: Start Up
Start Up You will see the TriFIT software main screen after the TriFIT 700 “boots up”. You can close or minimize the screen to open other programs. Quick Entry Main Screen For testing groups of individuals quickly. Personal View Main Screen... -
Page 15: Shutting Down
Shutting Down To shut down the TriFIT software, click the “x” in the upper right corner, or go to “Client or Student” and “Exit”. Before turning off the power to the system, it is important to shut down TriFIT 700 properly: •... -
Page 16: Setup Defaults For First Time Use
Setup Defaults for First Time Use General Defaults • 620/700 System should be selected NOT 600. • Complete the Company Name or District Name and Facility Name or School Name. These will be printed on the Cover Sheet of the reports you generate and at the bottom of each report page. -
Page 17: Blood Pressure Defaults
Blood Pressure Defaults The Blood Pressure Defaults have been factory set, but if for some reason they have been re-set, follow these instructions. If you do not have the Blood Pressure option, go to the next section. Step 1 While still in Defaults/Environment, click on the Blood Pressure Tab. -
Page 18: Cardiovascular Defaults
Cardiovascular Defaults While still in the Environment Defaults, click on the Cardiovascular Tab. Select the Cardio Device that you will be using and select the Serial Port that it is connected to. It is recommended to keep all other defaults. •... -
Page 19: Calibration
Calibration There are 3 components to calibrate on the Standard TriFIT 700 system: • Load Platform (which calibrates both scale and strength test) • Skinfold caliper • Sit & Reach The Monark 828 Bike is an optional upgrade that may need to be calibrated. It will be covered at the end of this section. -
Page 20: Platform Calibration
Platform Calibration 1. Select “Defaults” from the Main Menu 2. Select “Calibration” 3. Select Load Platform click Calibrate Click Calibrate 4. Make sure nothing is on the scale and click Next>... - Page 21 5. Have someone step on the scale that knows their exact weight. (For instance, have someone who weighs between 150 lbs. and 190 lbs. * weigh themselves on a known good scale. Use them and their recorded weight as the ‘Known weight’ for calibrating the Healthfirst scale.) 6.
-
Page 22: Skinfold Calipers
Skinfold Calipers 1. Select Skinfold Caliper 2. Make sure the caliper jaws are closed and click next. (An upgraded Lange caliper is shown in the calibration wizard) Put the calibration dowel in the jaws of the calipers lengthwise. The length of the calibration dowel is 25.4mm. - Page 23 4. The correct calibration constant is between 14.00 and 17.00 for the Skyndex and between 18.00 and 22.00 for the Lange calipers. MORE INFORMATION: For more information on how to properly perform an accurate skinfold measurement, see the “Taking Accurate Skinfolds” Tutorial.
-
Page 24: Range Of Motion
Range of Motion 1. Select Sit & Reach Click Calibrate. The portable Sit & Reach station calibrates the exact same as the 700 system. 2. Pull the handle slowly out to the foot plate and click the Next> button. 3. Pull the handle out exactly 12” (30cm if using metric units) PAST the footplate*, then click Next>. -
Page 25: Monark 828 Bike
Monark 828 Bike NOTE: Monark Bikes are carefully calibrated at the factory. The need for the end user to calibrate the bike is RARE! Once the bike is assembled, there are 2 adjustments that need to be made to insure accuracy of a sub-max bike ergometer assessment. 1. - Page 26 Calibration of Pendulum Scale 1. Loosen the tension device so the brake belt feels loose. 2. Make sure the “0” on the pendulum scale lines up with the notch in the Pendulum. (see previous page) 3. Detach the front screw in the frame covers.
-
Page 27: Section 3: Training & Registration
Section 3: Training & Registration In this section • Testing Recommendations • Training Recommendations • Registration • Transporting Your TriFIT 700... -
Page 28: Testing Recommendations
Testing Recommendations When exercise testing a client or student you must consider the testing battery order. For example: if a cardiovascular test is given first, then a blood pressure measurement is taken, the blood pressure measurement will be affected by the cardiovascular test. -
Page 29: Step By Step Training For The Trifit 700
Polar/HealthFirst ships the TriFIT 700. You will by contacted by a Polar/HealthFirst customer service representative to answer any initial questions you may have. It is strongly recommended that each person using the TriFIT 700 follow the recommendations for staff operation guidelines BEFORE testing any clients or members. - Page 30 A variety of training courses can be provided for any and all of Polar/HealthFirst products such as the TriFIT 700, 700 or TriFIT software, the Companion, PE Manager and the Wellness Center. Our goal is to provide top quality professional development in order to create competent and successful customers.
-
Page 31: Transporting Your Trifit 700
Transporting Your TriFIT 700 Before transporting your system; • Unplug the following peripherals: Skinfold Calipers, Platform. Leave the bike cable plugged in; coil and store next to the CPU. • Secure the CPU with foam or other materials such as wadded paper or bubble wrap to prevent shifting. -
Page 32: Section 4: Support
Section 4: Support In this section • Troubleshooting • Technical Support • Returns • Warranty • Software license agreement... -
Page 33: Troubleshooting
Troubleshooting Computer will not turn on 1. Turn the main power switch, located on the left side of the computer compartment, off and on. If power is applied, the switch will glow red. 2. Hold the power button on the front of the CPU down for 2 seconds. If the switch glows green, power is applied. -
Page 34: Printer Will Not Come On Or Print
Printer will not come on or print Hardware checks 1. Check the power cable going into the right side of the back of the Hewlett Packard printer. 2. Check the data cable (USB) going into the right side on the back of the Hewlett Packard printer. -
Page 35: On-Line Peripherals
On-Line Peripherals PLATFORM Platform is giving low or high readings 1. Re-calibrate (Defaults/Calibration) being sure to follow the instructions on the screen exactly. 2. Use a person who has a known weight between 150 and 190lbs. 3. Make sure the person DOES NOT step on the scale before it is zeroed. This will cause the platform to be mis-calibrated. - Page 36 3. Remove the only the 2 silver colored upper screws, DO NOT remove the smaller lower black colored screws. 4. Unplug the ROM cable from the TriFIT 700 unit. 5. Remove the ROM unit. Range of Motion is inconsistent 1.