
Related Manuals for Crestron HD-XSP


Summary of Contents for Crestron HD-XSP
- Page 1 Crestron HD-XSP 7.1 High-Definition Professional Surround Sound Processor Operations & Installation Guide...
-
Page 2: Important Safety Instructions
Important Safety Instructions • Read these instructions. WARNING: • Keep these instructions. TO REDUCE THE RISK OF FIRE OR ELECTRIC SHOCK, • Heed all warnings. DO NOT EXPOSE THIS APPARATUS TO RAIN OR • Follow all instructions. MOISTURE. THE APPARATUS SHALL NOT BE EXPOSED •... -
Page 3: Regulatory Compliance
Other trademarks, registered trademarks and trade names may be used in this document to refer to either the entities claiming the marks and names or their products. Crestron disclaims any proprietary interest in the marks and names of others. Crestron is not responsible for errors in typography or photography. -
Page 5: Table Of Contents
Crestron HD-XSP 7.1 High-Definition Professional Surround Processor Contents 7.1 High-Definition Professional Surround Sound Processor: HD-XSP Introduction ..........................1 Features and Functions ....................1 Applications......................... 5 Internal Block Diagram ....................7 Specifications ......................7 Physical Description ....................11 Setup ............................15 Network Wiring ...................... -
Page 7: High-Definition Professional Surround Sound Processor: Hd-Xsp
Support for systems without a center speaker or subwoofer • • High-definition 3D video pass-through via HDMI • Balanced stereo or mono downmix output • Balanced stereo mix input (Continued on following page) Operations & Installation Guide – DOC. 7446A 7.1 High-Definition Surround Processor: HD-XSP • 1... - Page 8 • Single-space rack mountable The HD-XSP from Crestron answers the call for a truly professional surround sound solution that is simple and affordable to implement. The HD-XSP provides the features and performance necessary to enable high-definition 7.1 channel audio for virtually any commercial environment.
- Page 9 Sonnex™ Multiroom Audio System to provide surround sound processing for a single room zone. Via its Mix input and Downmix output, the HD-XSP solves a lot of problems that other processors do not address. The Mix input allows the signal from a microphone mixer to be passed through unprocessed and mixed with the program signal at the output.
- Page 10 7.1 High-Definition Professional Surround Processor Crestron HD-XSP To drive all the room speakers, Crestron AMP Series Commercial Power Amplifiers* offer a high-performance, custom-configurable multichannel amplifier solution for boardrooms, auditoriums, and custom theaters of any configuration — even systems using 70 or 100 Volt ceiling speakers. Or, for the ultimate in ®...
-
Page 11: Applications
Crestron HD-XSP 7.1 High-Definition Professional Surround Processor Applications The following diagrams show a HD-XSP in a residential and a commercial application. HD-XSP in a Residential Application Operations & Installation Guide – DOC. 7446A 7.1 High-Definition Surround Processor: HD-XSP • 5... - Page 12 7.1 High-Definition Professional Surround Processor Crestron HD-XSP HD-XSP in a Commercial Application 6 • 7.1 High-Definition Surround Processor: HD-XSP Operations & Installation Guide – DOC. 7446A...
-
Page 13: Internal Block Diagram
Crestron HD-XSP 7.1 High-Definition Professional Surround Processor Internal Block Diagram The following diagram represents the switching abilities of the HD-XSP. Internal Block Diagram of the HD-XSP Video HDMI HDMI Out 7.1 Audio Optical Downmix Downmix Out S/PDIF 1 Surround S/PDIF 2... - Page 14 Center Gain 0.0 to 1.0, Standard or Wide mode Dolby Pro Logic IIx Music Dimension ±3, Center Width 0 to 7, Settings Standard or Panorama (Continued on following page) 8 • 7.1 High-Definition Surround Processor: HD-XSP Operations & Installation Guide – DOC. 7446A...
- Page 15 Main Volume -80.0 to 0.0 dB plus mute, feeds front left/right outputs Downmix Volume -80.0 to 0.0 dB plus mute, feeds downmix outputs (Continued on following page) Operations & Installation Guide – DOC. 7446A 7.1 High-Definition Surround Processor: HD-XSP • 9...
- Page 16 USB client for setup HDMI Passes CEC and EDID, CEC control system pass-through to HDMI input and output, supports HDCP, provides HDCP key management (Continued on following page) 10 • 7.1 High-Definition Surround Processor: HD-XSP Operations & Installation Guide – DOC. 7446A...
-
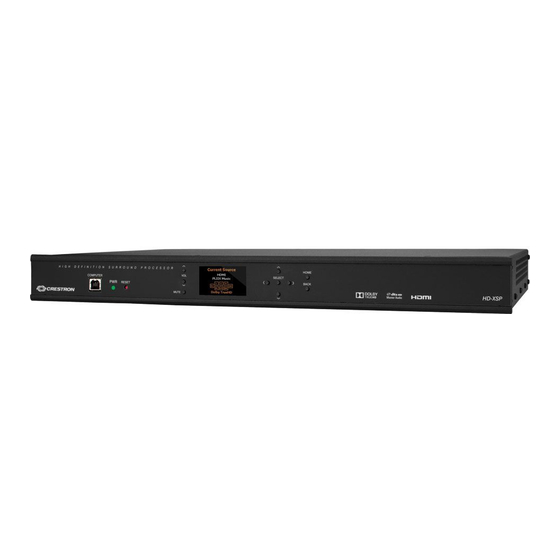
Page 17: Physical Description
HDMI requires an appropriate adapter or interface cable to accommodate a DisplayPort Multimode signal. Physical Description This section provides information on the connections, controls and indicators available on the HD-XSP. HD-XSP Physical View Operations & Installation Guide – DOC. 7446A 7.1 High-Definition Surround Processor: HD-XSP • 11... - Page 18 USB computer console port (cable included); Pin 2 Pin 1 For setup only DESCRIPTION +5 Vdc Data - Pin 3 Pin 4 Data + Ground (Continued on following page) 12 • 7.1 High-Definition Surround Processor: HD-XSP Operations & Installation Guide – DOC. 7446A...
- Page 19 Balanced/unbalanced stereo line level audio input; Input Impedance: 24 kΩ balanced, 12 kΩ unbalanced; Maximum Input Level: 4 Vrms balanced, 2 Vrms unbalanced (Continued on following page) Operations & Installation Guide – DOC. 7446A 7.1 High-Definition Surround Processor: HD-XSP • 13...
- Page 20 24 Vdc power input; Power pack included (1) 6–32 screw, chassis ground lug Interface connectors for MIX, FRONT, SURROUND, BACK, CENTER-SUB and DOWNMIX ports are provided with the unit. 14 • 7.1 High-Definition Surround Processor: HD-XSP Operations & Installation Guide – DOC. 7446A...
-
Page 21: Setup
The HD-XSP can be mounted in a rack or stacked with other equipment. Two “ears” are provided with the HD-XSP so that the unit can be rack mounted. These ears must be installed prior to mounting. Complete the following procedure to attach the ears to the unit. - Page 22 CAUTION: To prevent equipment damage, use only the rack ears Crestron provides for this device. There are screws that secure each side of the HD-XSP top cover. Using a #1 or #2 Phillips screwdriver, remove the three screws closest to the front panel from one side of the unit.
- Page 23 Stacking Four “feet” are provided with the HD-XSP so that if the unit is not rack mounted, the rubber feet can provide stability when the unit is placed on a flat surface or stacked. These feet should be attached prior to the hookup procedure. Refer to the following illustration for placement of the feet.
-
Page 24: Hardware Hookup
Make the necessary connections as called out in the illustration that follows this paragraph. Apply power after all connections have been made. When making connections to the HD-XSP, use Crestron power supplies for Crestron equipment. Hardware Connections for the HD-XSP (Front) - Page 25 (Center & Sub) Shield Shield Shield Right Subwoofer Left Right Left Center Unbalanced Output Unbalanced Unbalanced Output (Center & Sub) Input Jumpers Right Subwoofer Left Right Left Center Operations & Installation Guide – DOC. 7446A 7.1 High-Definition Surround Processor: HD-XSP • 19...
-
Page 26: Uploading And Upgrading
Toolbox help file for details. There are two methods of communication: USB and TCP/IP. USB Communication The COMPUTER port on the HD-XSP connects to the USB port on the PC via the included Type A to Type B USB cable: Click Tools | System Info. -
Page 27: Programs And Firmware
SIMPL Windows help file, or the Crestron Toolbox help file. Crestron Studio / If a Crestron Studio (or SIMPL Windows) program is provided, it can be uploaded to the control system using Crestron Studio (or SIMPL Windows) or Crestron Toolbox. - Page 28 7.1 High-Definition Professional Surround Processor Crestron HD-XSP Edit the control system’s IP table to include an entry for the HD-XSP. The entry should list the HD-XSP’s IP ID (specified on the HD-XSP’s IP table) and the internal gateway IP address 127.0.0.1.
-
Page 29: Configuration
Crestron HD-XSP 7.1 High-Definition Professional Surround Processor Configuration The HD-XSP can be configured with the front panel controls or with Crestron Toolbox. For details on using Crestron Toolbox, please refer to the Crestron Toolbox help file. Otherwise, continue reading below. -
Page 30: Configure Inputs
Outputs: Set the audio parameters for the theater and downmix outputs. • Network: Configure and view the HD-XSP’s Ethernet settings. • Control: Configure and view the HD-XSP’s front panel settings. To exit the “Installer” menu, press HOME. Exit “Installer” Menu Configure Inputs The name and compensation level for each input are set from the Inputs section of the “Installer”... -
Page 31: Configure Outputs
7.1 High-Definition Professional Surround Processor Name the Input The inputs of the HD-XSP are assigned default names from the factory. However a new name can be assigned to the input. To change the name: Press ∧ or ∨ to highlight Name and press SELECT. The sources name screen is displayed. - Page 32 Select the output to configure as described in “Configure Outputs” which starts on page 25. Press ∧ or ∨ to highlight Stereo or Mono and press SELECT. The setting toggles between “Stereo” and “Mono”. 26 • 7.1 High-Definition Surround Processor: HD-XSP Operations & Installation Guide – DOC. 7446A...
- Page 33 Select the output to configure as described in “Configure Outputs” which starts on page 25. Press ∧ or ∨ to highlight Startup Volume and press SELECT. The “Startup Volume” screen is displayed. Operations & Installation Guide – DOC. 7446A 7.1 High-Definition Surround Processor: HD-XSP • 27...
-
Page 34: Configure Network
SELECT. The setting toggles between “Use” and “Ignore”. Configure Network Ethernet settings for the HD-XSP are set from the Network section of the “Installer” menu. To configure the Ethernet settings: Open the “Installer” menu as described in “Open “Installer” Menu” on page Press ∧... -
Page 35: Network Status
Press SELECT to return to the previous menu. Enable/Disable DHCP The HD-XSP can obtain an IP address, subnet mask, and default router information from a DHCP server. To enable or disable DHCP: Open the “Network” menu as described in “Configure Network” on page Press ∧... -
Page 36: Subnet Mask
To save the IP address and return to the “Network Setup” menu, move the cursor to the rightmost octet and press SELECT. To cancel the operation and return to the previous screen, press BACK. If any changes were made, the HD-XSP reboots upon exiting the “Installer” menu. Subnet Mask The subnet mask can be manually set or obtained from a DHCP server. - Page 37 If any changes were made, the HD-XSP reboots upon exiting the “Installer” menu. Control System The “Control System” menu is used to specify the HD-XSP’s IP ID and the IP address of the control system. To specify the IP ID and the control system IP address: Open the “Network”...
- Page 38 “Control System” Menu Control System IP ID IP Address Set the IP ID that identifies the HD-XSP in the Crestron Studio (or SIMPL Windows) program: Press ∧ or ∨ to highlight IP ID and press SELECT. The “IP ID” screen is displayed.
-
Page 39: Configure Front Panel
“Installer” menu. Configure Front Panel Settings for the HD-XSP’s front panel controls are set from the Control section of the “Installer” menu. To configure the front panel controls: Open the “Installer” menu as described in “Open “Installer” Menu” on page Press ∧... - Page 40 When the password is displayed, move the cursor to the rightmost digit and press SELECT to save the password. The “Control” menu is displayed. To restore the HD-XSP to the factory default settings: Restore Defaults Open the “Control” menu as described in “Configure Front Panel” on page Press ∧...
-
Page 41: Operation
7.1 High-Definition Professional Surround Processor Operation When power is applied to the HD-XSP, the “Crestron HD-XSP” screen is displayed, followed by the “Current Source” menu. For details on using the “Current Source” menu, refer to “Select a Source or Decoding Mode”, which starts below. - Page 42 Press ∧ or ∨ to highlight the desired mode and press SELECT. The display returns to the “Current Source” menu showing the selected source and the selected decoding mode. 36 • 7.1 High-Definition Surround Processor: HD-XSP Operations & Installation Guide – DOC. 7446A...
-
Page 43: Volume Control And Mute (Theater Output Only)
Refer to “Mute” on page 41 for details. Additional Functions Controls for the theater output, downmix output and display are available from the “HD-XSP” menu. To display the “HD-XSP” menu: Press HOME. Press SELECT. The “HD-XSP” menu is displayed. - Page 44 35 for details. Theater The Theater section of the “HD-XSP” menu provides controls for managing the audio settings for the theater output. To open the “Theater” menu, press ∧ or ∨ to highlight Theater and press SELECT. The “Theater” menu is displayed.
- Page 45 • Level: Select the level of DRC to be applied. Press ∧ or ∨ to highlight Level and press SELECT. The “DRC Level” menu is displayed. Operations & Installation Guide – DOC. 7446A 7.1 High-Definition Surround Processor: HD-XSP • 39...
- Page 46 Press ∧ or ∨ to highlight Loudness: On or Loudness: Off and press SELECT. The setting toggles between “On” and “Off”. Equalizer The HD-XSP can use a custom equalization setting that is created in Crestron Toolbox. To set the equalization: Open the “Theater” menu as described in “Theater” on page 38.
- Page 47 Open the “Downmix” menu as described in “Downmix” which starts on page 40. Press ∧ or ∨ to highlight Treble and press SELECT. The “Treble” screen is displayed. Operations & Installation Guide – DOC. 7446A 7.1 High-Definition Surround Processor: HD-XSP • 41...
- Page 48 The display can be turned on or off during operation. To switch the display on or off during operation, press ∧ or ∨ to highlight Display Off and press SELECT. The display goes dark. To turn the display on again, press SELECT. 42 • 7.1 High-Definition Surround Processor: HD-XSP Operations & Installation Guide – DOC. 7446A...
-
Page 49: Problem Solving
Crestron worldwide offices on the Crestron Web site (www.crestron.com/offices) for assistance within a particular geographic region. To post a question about Crestron products, log onto the Online Help section of the Crestron Web site (www.crestron.com/onlinehelp). First-time users must establish a user account to fully benefit from all available features. - Page 50 7.1 High-Definition Professional Surround Processor Crestron HD-XSP Check the Crestron Web site periodically for manual update availability and its relevance. Updates are identified as an “Addendum” in the Download column. 44 • 7.1 High-Definition Surround Processor: HD-XSP Operations & Installation Guide – DOC. 7446A...
-
Page 51: Return And Warranty Policies
(property or economic damages inclusive) arising from the sale or use of this equipment. Crestron is not liable for any claim made by a third party or made by the purchaser for a third party. - Page 52 Crestron Electronics, Inc. Operations & Installation Guide – DOC. 7446A (2035043) 15 Volvo Drive Rockleigh, NJ 07647 Tel: 888.CRESTRON 05.13 Fax: 201.767.7576 Specifications subject to www.crestron.com change without notice.