Table of Contents
Advertisement
Inside you will find many helpful hints on how to use and maintain your air conditioner properly. Just
a little preventative care on your part can save you a great deal of time and money over the life of
your air conditioner. Before operating this product, please read the instructions carefully and save this
manual for future use.
Advertisement
Table of Contents

Related Manuals for Sylvania Air Conditioner


Summary of Contents for Sylvania Air Conditioner
- Page 1 Inside you will find many helpful hints on how to use and maintain your air conditioner properly. Just a little preventative care on your part can save you a great deal of time and money over the life of your air conditioner. Before operating this product, please read the instructions carefully and save this...
-
Page 2: Table Of Contents
SAFETY PRECAUTIONS Safety rules ............................2 Operating condition ...........................2 Electrical information .........................3 IDENTIFICATION OF PARTS Accessories ............................3 Names of parts...........................4 AIR CONDITIONER FEATURES Electronic control operating instructions ...................5 OPERATING INSTRUCTIONS Operating instructions ........................6 INSTALLATION INSTRUCTIONS Location ............................10 Window kit installation ........................10 Exhaust hose installation ........................11... -
Page 3: Safety Precautions Safety Rules
Keep blinds/curtains closed during the sunniest part f the day. Keep the filters clean. Keep doors and windows closed to keep cool air in and warm air out. Operating condition The air conditioner must be operated within the temperature range indicated below: MODE ROOM TEMPERATURE COOL >17 C /62 F... -
Page 4: Electrical Information
The power cord is equipped with a three-prong grounding plug for protection against shock hazards. Your air conditioner must be used in a properly grounded wall receptacle. If the wall receptacle you intend to use is not adequately grounded or protected by a time delay fuse or circuit breaker, have a qualified electrician install the proper receptacle. -
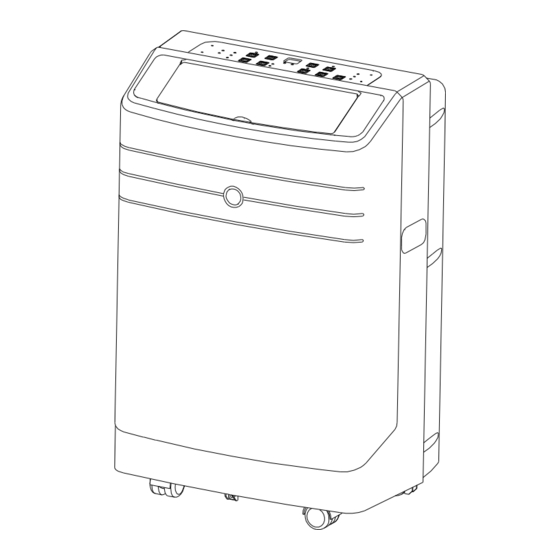
Page 5: Names Of Parts
IDENTIFICATION OF PARTS NAMES OF PARTS Front Operation Panel Horizontal Louver Blade (swing automatically) Caster Carrying Handle (both side ) Fig.1 Model A Operation Panel Horizontal Louver Blade (manually) Remote signal receptor Caster Carrying Handle (both side ) Model B Fig.2 Rear Upper Air Filter... -
Page 6: Air Conditioner Features
The unit can be controlled by the unit control panel alone or with the remote controller. NOTE: This manual does not include Remote Controller Operations, see the <<Remote Controller Instruction>> packed with the unit for details. OPERATION PANEL OF THE AIR CONDITIONER Remote signal receptor (The model has no... -
Page 7: Operating Instructions Operating Instructions
AUTO operation sing this button, the selected temperature will increase(cooling) or decrease(heating) When you set the air conditioner in AUTO by 1 C/2 F in 30 minutes. The temperature mode, it will automatically select cooling or fan will then increase(cooling) or decrease only operation depending on what temperature you have selected and the room temperature. - Page 8 The louver move up to an angle o 6 for each press until it move to a position which would affect the cooling or heating effect of the air conditioner, it would automatically change the swing direction. pressing the SWING button...
-
Page 9: Installation Instructions Location
INSTALLA TION INSTRUCTIONS INSTALLA TION INSTR UCTIONS Location The air conditioner should be placed on a firm foundation to minimize noise and vibration. For safe and secure positioning, place the unit on a smooth, level floor strong enough to support the unit. -
Page 10: Installation In Double-Hung Sash Windows
INSTALLATION INSTRUCTIONS Installation in a double-hung sash windows Foam seal A (adhesive type) 1. Cut the foam seal(adhesive type) to the proper length and attach it to the window s l. Fig.10 2. Attach the window slider kit to the window s . Adjust the Fig.10 length of the window slider kit according to the width of window, short... - Page 11 INSTALLATION INSTRUCTIONS Installation in sliding sash windows Foam seal A 1. Cut the foam seal(adhesive type) to the proper length and (adhesive type) attach it to the window frame. See Fig.14. 2. Attach the window slider kit to the window sill. Adjust the length of the window slider kit according to the length of Fig.14 window, short...
-
Page 12: Exhaust Hose Installation
Adaptor Refer to page 4. Adapter A is available for purchase. JC Global/Sylvania is not responsible for any construction costs. IMPORTANT: max 120CM DO NOT OVER BEND THE DUCT (SEE Fig.22) min 30CM Fig.21... -
Page 13: Water Drainage
INSTALLATION INSTRUCTIONS Water drainage: During dehumidifying modes, remove the drain Remove the plug from the back of the unit, install the drain drain plug connector(5/8 universal female mender) with 3 4 hose(locally purchased). For the models without drain connector, just attach the drain hose to the hole. -
Page 14: Care And Maintenance
CARE AND MAINTENANCE CARE AND MAINTENANCE Air filter (slide out) IMPORTANT: 1) Be sure to unplug the unit before cleaning or servicing. 2) Do not use gasoline, thinner or other chemicals to clean the unit. 3) Do not wash the unit directly under a tap or using a hose. It may cause electrical danger. -
Page 15: Troubleshooting Tips
TROUBLESHOOTING TIPS TROUBLE SHOOTING TROUBLES POSSIBLE CAUSES SUGGEST REMEDIES 1. Unit does not - P1 appears in the display window Drain the water in the bottom tray. Start when Pressing on/off - Room temperature is lower than Reset the temperature. Button the set temperature.(Cooling mode) - The windows or doors in the room... - Page 16 SYLVANIA is a registered trademark of OSRAM SYLVANIA Inc., used under license...