
Related Manuals for Jensen JMC-180


Summary of Contents for Jensen JMC-180
- Page 1 MODEL JMC-180 WALL MOUNTABLE CD SYSTEM WITH AM/FM STEREO RECEIVER PLEASE READ THIS USER MANUAL COMPLETELY BEFORE OPERATING THIS UNIT AND RETAIN THIS BOOKLET FOR FUTURE REFERENCE.
-
Page 2: Important Safety Instructions
TO PREVENT FIRE OR SHOCK HAZARD, DO NOT USE THIS PLUG WITH AN EXTENSION CORD, RECEPTACLE OR OTHER OUTLET UNLESS THE BLADES CAN BE FULLY INSERTED TO PREVENT BLADE EXPOSURE. TO PREVENT FIRE OR SHOCK HAZARD, DO NOT EXPOSE THIS APPLIANCE TO RAIN OR MOISTURE. enclosure of the apparatus. - Page 3 Unplug this apparatus during lightening storms or when unused for a long periods of time. Refer all servicing to qualified service personnel. Servicing is required when the apparatus has been damaged in any way, such as power-supply cord or plug is damaged, liquid has been spilled or objects have fallen into the apparatus, the apparatus has been exposed to rain or moisture, does not operate normally, or has been dropped.
- Page 4 SAVE THESE INSTRUCTIONS Follow the advice below for safe operations. ON PROTECTION AGAINST LASER ENERGY EXPOSURE • As the laser beam used in this compact disc player is harmful to the eyes, do not attempt to disassemble the casing. • Stop operation immediately if any liquid or solid object should fall into the cabinet.
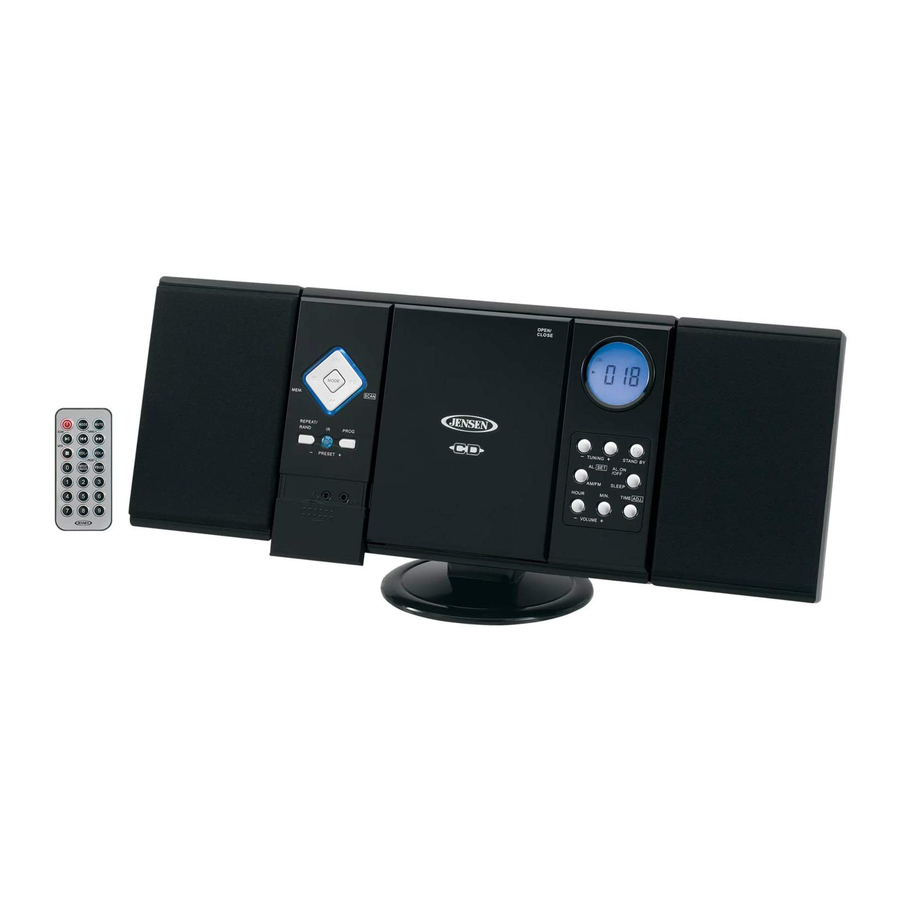
- Page 5 Model Number: JMC-180 This system is equipped with non-skid rubber ‘feet’ to prevent the product from moving when you operate the controls.
- Page 6 1. TUNING CONTROL 2. BAND SELECTOR (AM/FM/FM STEREO) 3. FUNCTION SELECTOR (AUX/RADIO/CD/ALARM) 4. CD DOOR (OPEN/CLOSE) LOCATION OF CONTROLS 16. DOOR 17. PLAY/PAUSE BUTTON 18. SKIP/SEARCH FORWARD 19. STOP BUTTON BUTTON...
- Page 7 5. LCD DISPLAY 6. VOLUME CONTROL (-) BUTTON 7. VOLUME CONTROL (+) BUTTON 8. POWER ON/OFF BUTTON 9. TIME BUTTON 10. ALARM SET BUTTON 11. HOUR BUTTON 12. ALARM SET BUTTON 13. MIN.(MINUTE) BUTTON 14. STEREO HEADPHONE JACK 15. AUX IN JACK REMOTE CONTROL UNIT INSTALLING THE SPEAKERS 20.
- Page 8 WALL MOUNTING Avoid installing the unit in locations described below: • Places exposed to direct sunlight or close to heat radiating appliances such as electric heaters. • Dusty places. IMPORTANT NOTES...
- Page 9 • Places subject to constant vibration. • Humid or moist places. This Music System operates on 120V~ 60Hz. Do not attempt to operate the radio on any other power source. You could cause damage to the unit and void your warranty. Please be sure the power outlet you plug this unit into is working and receives constant (unswitched) power.
- Page 10 The clock has to be set before using the system for the first time. When you connect the System to the AC outlet for the first time the clock display will show "12:00" with the colon flashing and will need to be set. For example set the clock time at 7:30 AM.
- Page 11 While playing, press the PLAY/PAUSE flash. Press the PLAY/PAUSE Adjust the VOLUME BUTTONS (+/-) to the desired volume level. REPEAT MODE REPEAT 1 When the REPEAT BUTTON is pressed once, the REPEAT 1 Indicator, ‘REP 1’, will appear in the LCD DISPLAY.
- Page 12 will automatically show the programmed tracks one by one in their correct sequence starting from the first. At the end of program review, the Program No.,“01”, and the PROGRAM INDICATOR, “PROG” will both flash in the LCD DISPLAY. Press the PLAY/PAUSE programmed sequence.
- Page 13 2. Press and hold the AL SET BUTTON and repeatedly press the MINUTE BUTTON to set the correct wake up Minute. NOTE There is a PM INDICATOR located in the left-hand side of the clock display. Be sure to observe the PM indicator when setting the alarm to make sure the alarm time is set correctly for AM or PM.
- Page 14 wipe the disc from the center outwards with a good soft cleaning cloth. If you experience difficulties in the use of this music system please check the following or call 800 777 5331 for Customer Service and Support. Symptom Noise or sound distorted - Station not tuned properly for AM or on AM or FM broadcast - FM: FM Wire antenna is not...
- Page 15 SPECTRA MERCHANDISING INTERNATIONAL, INC. warrants this unit to be free from defective materials or factory workmanship for a period of 90 days from the date of original customer purchase and provided the product is utilized within the U.S.A. This warranty is not assignable or transferable. Our obligation under this warranty is the repair or replacement of the defective unit or any part thereof, except batteries, when it is returned to the SPECTRA Service Department, accompanied by proof of the date of original consumer purchase, such as a duplicate copy of a sales receipt.