
Related Manuals for Jensen JCR-525


Summary of Contents for Jensen JCR-525
- Page 1 AM/FM STEREO SHOWER RADIO AND CD PLAYER USER MANUAL JCR-525 PLEASE READ THIS USER MANUAL COMPLETELY BEFORE OPERATING THIS UNIT AND RETAIN THIS BOOKLET FOR FUTURE REFERENCE.
-
Page 2: Dear Jensen® Customer
The serial number of this product is found on its bottom cover. You should note the serial number of this unit in the space provided as a permanent record of your purchase to aid in identification in the event of theft of loss. Model Number: JCR-525 Serial Number: ____________________... -
Page 3: Important Safety Instructions
IMPORTANT SAFETY INSTRUCTIONS When used in the directed manner, this unit has been designed and manufactured to ensure your personal safety. However, improper use can result in potential electrical shock or fire hazards. Please read all safety and operating instructions carefully before installation and use, and keep these instructions handy for future reference. -
Page 4: Important Note
SAVE THESE INSTRUCTIONS IMPORTANT NOTE: Avoid installing the unit in locations described below: • Places exposed to direct sunlight or close to heat radiating appliances such as electric heaters. • Places subject to constant vibration. • Sources of electrical noise such as fluorescent lamps or motors. •... -
Page 5: Installation
INSTALLATION The JCR-525 can be placed on a counter or hung from your shower head, shower curtain rod or from a hook attached to the wall or door. USING THE STAND ATTACHING / REMOVING THE STAND To use this unit with the supplied stand, place the unit onto the STAND as shown in the illustration below. -
Page 6: Rear Side
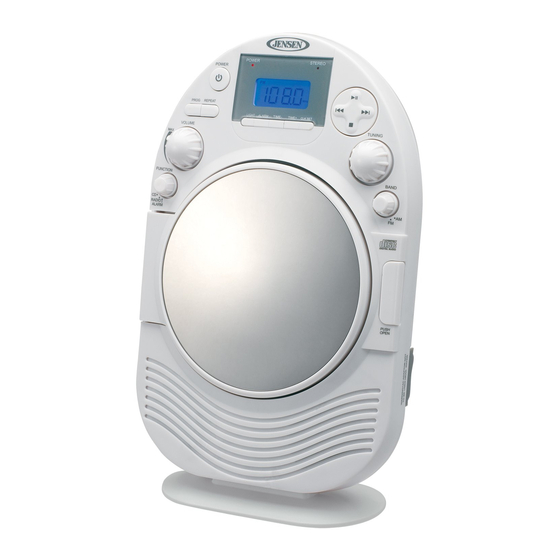
LOCATIONS AND CONTROLS Rear Side Front Side ALARM CLOCK TIME+ TIME 1. POWER Indicator 15. Detachable Stand 2. LCD Display 16. SPEAKER 3. FM STEREO Indicator 17. CD LID & MIRROR 4. TIME - Button 18 FUNCTION Selector 5. TIME + Button 19VOLUME Control Knob 6. -
Page 7: Power Source
POWER SOURCE The JCR-525 operates on 6 X ‘C’ size (UM-2) batteries (not included) or with an external AC-DC adaptor (not included) with a rating of DC 9V, 1000mA . The battery backup for the clock operates on two ‘AAA”... -
Page 8: Setting The Time
SETTING THE TIME In order for the clock to function properly, the clock has to be set before you use it for the first time. After powering up the unit, the clock display will show “12:00”. To set the time, follow the steps below: 1. -
Page 9: Cd Player Operation
CD PLAYER OPERATION Note: This CD player will play not only commercial CDs, but also the self-compiled CD-R/RW discs. Do not attempt to play CD-ROM, CDI, VCD, DVD or computer CDs. Notes on CD-R/RW Discs • Because of non-standardized format definition/production of CD-R/RW, playback quality & performance are not guaranteed. -
Page 10: Alarm Operation
ALARM OPERATION SETTING THE ALARM TIME With the unit in standby mode and the alarm off, press and hold the ALARM SET Button. “ALARM” icon is displayed flashing with hour digits to prompt for input. Tap the TIME +/- Buttons repeatedly and release until the correct hour is displayed. Note: Make sure the hour is set so that AM or PM is correctly displayed. -
Page 11: Care And Maintenance
USING EARBUDS Inserting the plug of your earbuds (not included) into the Jack will enable you to listen to the CD or Earbud Radio in private. When using earbuds, the Speakers will be disconnected automatically. READ THIS IMPORTANT INFORMATION BEFORE USING YOUR EARBUDS Avoid extended play at very high volume as it may impair your hearing. -
Page 12: Troubleshooting Guide
TROUBLESHOOTING GUIDE If you experience difficulties in the use of this music system, please check the following or call 1-800-777-5331 for Customer Service. Symptom Possible Cause Solution No batteries installed or installed Install 6 X “C” batteries or replace the The unit does not respond batteries are exhausted. - Page 13 90 DAY LIMITED WARRANTY AND SERVICE VALID IN THE U.S.A ONLY SPECTRA MERCHANDISING INTERNATIONAL, INC. warrants this unit to be free from defective materials or factory workmanship for a period of 90 days from the date of original customer purchase and provided the product is utilized within the U.S.A.