Black & Decker LDX112 Instruction Manual
12v max* cordless drill
Hide thumbs
Also See for LDX112:
- Instruction manual (41 pages) ,
- Instruction manual (41 pages) ,
- Instruction manual (40 pages)
Advertisement
12V MAX* CORDLESS DRILL
INSTRUCTION MANUAL
Catalog Number
LDX112
*Maximum initial battery pack
voltage (measured without a
workload) is 12 volts. Measured
under a workload, nominal voltage
is 10.8.
Thank you for choosing Black & Decker!
Go to www.BlackandDecker.com/NewOwner
PLEASE READ BEFORE RETURNING THIS
PRODUCT FOR ANY REASON:
If you have a question or experience a problem with your Black & Decker purchase, go to
HTTP://WWW.BLACKANDDECKER.COM/INSTANTANSWERS
If you can t find the answer or do not have access to the internet,
call 1-800-544-6986 from 8 a.m. to 5 p.m. EST Mon. -- Fri. to speak with an agent.
Please have the catalog number available when you call.
SAVE THIS INSTRUCTION MANUAL FOR FUTURE REFERENCE.
VEA EL ESPAÑOL EN LA CONTRAPORTADA.
INSTRUCTIVO DE OPERACIÓN, CENTROS DE SERVICIO Y PÓLIZA DE GARANTÍA.
ADVERTENCIA: LÉASE ESTE INSTRUCTIVO ANTES DE USAR EL PRODUCTO.
to register your new product.
for instant answers 24 hours a day.
Advertisement
Table of Contents

Related Manuals for Black & Decker LDX112


Summary of Contents for Black & Decker LDX112
-
Page 1: Instruction Manual
12V MAX* CORDLESS DRILL INSTRUCTION MANUAL Catalog Number LDX112 *Maximum initial battery pack voltage (measured without a workload) is 12 volts. Measured under a workload, nominal voltage is 10.8. Thank you for choosing Black & Decker! Go to www.BlackandDecker.com/NewOwner to register your new product. -
Page 2: General Power Tool Safety Warnings
General Power Tool Safety Warnings WARNING! Read all safety warnings and instructions. Failure to follow the warnings and instructions may result in electric shock, fire and/or serious injury. Save all warnings and instructions for future reference. The term “power tool” in the warnings refers to your mains-operated (corded) power tool or battery-operated (cordless) power tool. -
Page 3: Specific Safety Rules
b) Do not use the power tool if the switch does not turn it on and off. Any power tool that cannot be controlled with the switch is dangerous and must be repaired. c) Disconnect the plug from the power source and/or the battery pack from the power tool before making any adjustments, changing accessories, or storing power tools. -
Page 4: Safety Guidelines - Definitions
Your risk from these exposures varies, depending on how often you do this type of work. To reduce your exposure to these chemicals: work in a well ventilated area, and work with approved safety equipment, such as those dust masks that are specially designed to filter out microscopic particles. -
Page 5: Functional Description
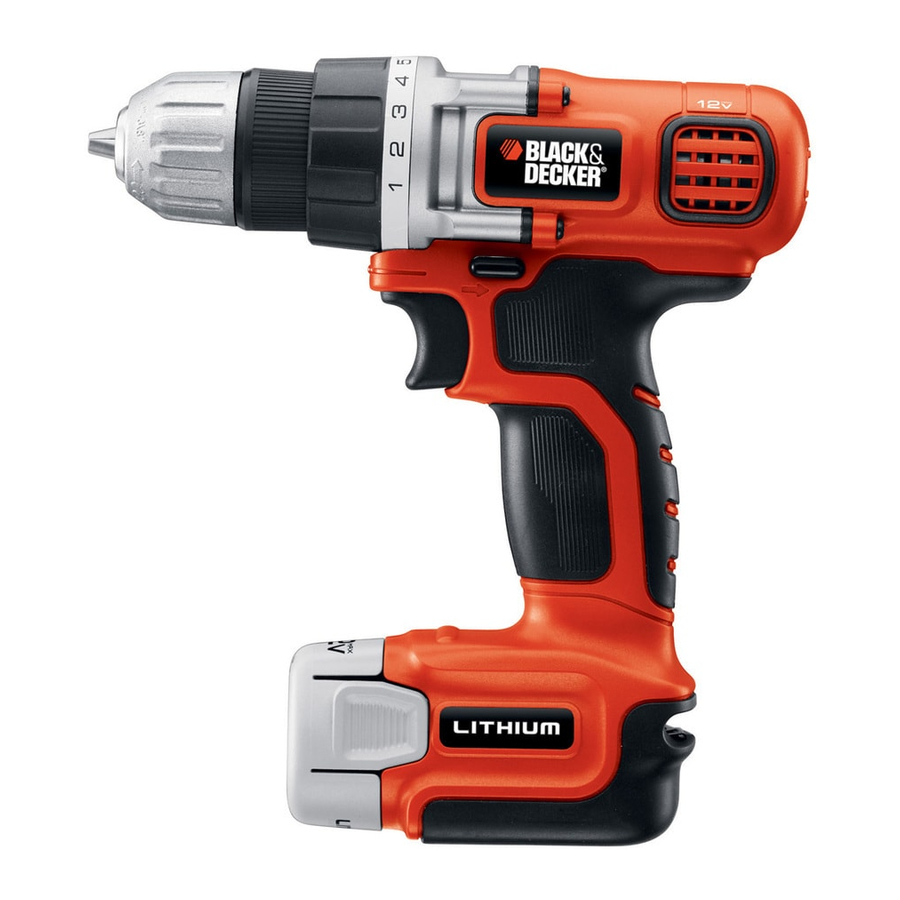
FUNCTIONAL DESCRIPTION 1. Variable speed switch 2. Forward/reverse button 3. Torque Adjustment Collar 4. Keyless Chuck 5. Battery 6. Battery release button 7. Charger 8. Screwdriver bit holder IMPORTANT SAFETY INSTRUCTIONS FOR BATTERY CHARGERS SAVE THESE INSTRUCTIONS: This manual contains important safety instructions for battery chargers. - Page 6 Recommended Minimum Wire Size for Extension Cords Total Length of Cord 25 ft. 50 ft. 75 ft. 100 ft. 125 ft. 150 ft. 175 ft. 7.6 m 15.2 m 22.9 m 30.5 m 38.1 m 45.7 m 53.3 m Wire Size AWG •...
- Page 7 Fire hazard. Do not store or carry battery so that metal objects can WARNING: contact exposed battery terminals. For example, do not place battery in aprons, pockets, tool boxes, product kit boxes, drawers, etc., with loose nails, screws, keys, etc. Transporting batteries can possibly cause fires if the battery terminals inadvertently come in contact with conductive materials such as keys, coins, hand tools and the like.
- Page 8 when you turn out the lights. c. Move charger and battery pack to a location where the surrounding air temperature is approximately 65°F - 75°F (18°- 24°C). d. If charging problems persist, take the tool, battery pack and charger to your local service center.
-
Page 9: Operating Instructions
OPERATING INSTRUCTIONS TRIGGER SWITCH & REVERSING BUTTON (FIGURE D) • The drill is turned ON and OFF by pulling and releasing the trigger switch (1). The farther the trigger is depressed, the higher the speed of the drill. • A forward/reverse control button (2) determines the direction of the tool and also serves as a lock off button. -
Page 10: Maintenance
SCREW DRIVING For driving fasteners, the reversing button should be pushed to the left. Use reverse (button pushed to the right) for removing fasteners. When moving from forward to reverse, or vice versa, always release the trigger switch first. ON BOARD BIT STORAGE A bit storage slot (8) is built-in to the area just behind the battery pack. -
Page 11: Troubleshooting
TROUBLESHOOTING PROBLEM POSSIBLE CAUSE POSSIBLE SOLUTION • Unit will not start. • Battery pack not installed properly. • Check battery pack installation. • Battery pack not charged. • Check battery pack charging requirements. • Battery pack will not charge. • Battery pack not inserted into charger. • Insert battery pack into charger until green LED appears. - Page 12 This Class B digital apparatus complies with Canadian ICES-003. This device complies with part 15 of the FCC rules. Operation is subject to the following two conditions: (1) This device may not cause harmful interference, and (2) this device must accept any interference received, including interference that may cause undesired operation.