
Related Manuals for Miele G 856


Summary of Contents for Miele G 856
-
Page 1: Operating Instructions
Operating instructions for G 856 dishwasher ö] To prevent accidents and machine damage read the Operating Instructions before installing or using the dishwasher. M.-Nr. 05 255 621... -
Page 2: Table Of Contents
Contents Contents Guide to the appliance ..........4 View of the dishwasher . - Page 3 Contents Operating the dishwasher ......... . 29 Adding detergent.
-
Page 4: Guide To The Appliance
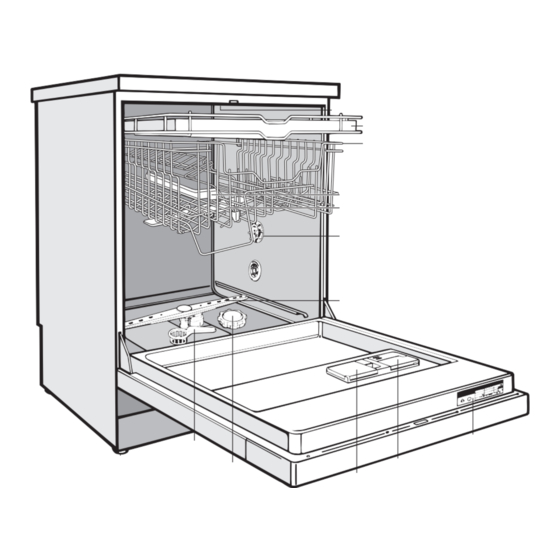
Guide to the appliance Guide to the appliance View of the dishwasher 1 Upper spray arm (not visible) 8 Four height adjustable feet 2 Cutlery tray 9 Filter combination 3 Upper basket 10 Salt reservoir 4 Water feed for middle spray arm 11 Dual compartment detergent dispenser 5 Middle spray arm... -
Page 5: Control Panel
Guide to the appliance Control panel 14 “On/Off” button 20 “Start” button 15 Program sequence indicators 21 Check/Refill indicators 16 “Top Solo” button 22 Child safety lock 17 Time display 23 Door release 18 Program selector 24 Vent for drying fan 19 “Delay Start”... -
Page 6: Important Safety Instructions
IMPORTANT SAFETY INSTRUCTIONS IMPORTANT SAFETY INSTRUCTIONS WARNING Repairs should only be performed by a qualified and competent per- son. Disconnect the appliance from the Please follow all basic safety power supply before servicing (pull out precautions when operating the plug or “trip” the circuit breaker). this dishwasher. -
Page 7: Save These Instructions
IMPORTANT SAFETY INSTRUCTIONS When loading dishes and cutlery: – Place sharp items away from the door seal to prevent damaging the seal. – Load knives pointing down to prevent injuries. Do not wash plastic items unless they are labeled “dishwasher safe”. For items not labeled, check the manu- facturer’s recommendations. -
Page 8: Instructions Importantes Sur La Sécurité
INSTRUCTIONS IMPORTANTES SUR LA SÉCURITÉ INSTRUCTIONS IMPORTANTES SUR LA SÉCURITÉ AVERTISSEMENT Les réparations doivent être effectuées uniquement par une personne compétente. Débrancher Au moment d’utiliser votre l’appareil de la prise de courant avant lave-vaisselle, veuillez ob- d’en faire l’entretien (enlever la fiche de server toutes les mesures de la prise ou fermer le disjoncteur). - Page 9 INSTRUCTIONS IMPORTANTES SUR LA SÉCURITÉ Au moment de remplir le lave-vaisselle : – Mettre les articles pointus de manière à ce qu’ils n’endommagent pas le seau étanche de la porte. – Mettre le tranchant des couteaux vers le bas afin d’éviter les risques de blessure.
-
Page 10: Caring For The Environment
Caring for the environment Caring for the environment Disposal of the packing Energy saving washing material This dishwasher is exceptionally eco- nomical in the use of water and electric- The cardboard box and packing mate- ity. For best results follow these tips: rial protects the appliance during ship- ping. -
Page 11: Before Using For The First Time
If you are not satisfied with the pany, or by using a test kit that can be wash results, try another brand of de- purchased from the Miele Technical tergent. service Department. The salt reservoir must only be filled Load dishes correctly with water and salt. -
Page 12: To Open The Door
Before using for the first time Before using for the first time To open the door Child Safety Lock The yellow key for the Child Safety Lock is shipped on one of the spikes at the front of the upper basket. -
Page 13: Water Softener
Before using for the first time Water softener If the hardness of your tap water is con- sistently lower than 8 gr/gal (140 ppm), For good cleaning results the dish- do not add dishwasher reactivation salt. washer needs to operate with soft wa- However, the dishwasher must still be ter. -
Page 14: Programming And Setting The Water Hardness Level
Before using for the first time Programming and setting the water hardness level Your water hardness level must be pro- grammed into the dishwasher using the buttons on the control panel. The water hardness selector in the wash cabinet must also be set to the water hardness of your area. -
Page 15: Setting The Water Hardness Level Selector In The Wash Cabinet
Before using for the first time ^ Press the “Top Solo” button. The “Top Solo” indicator will light. ^ Turn the program selector to “Stop”. ^ Turn “Off” the dishwasher with the “On/Off” button. The water hardness level is now stored in the program memory. -
Page 16: Checking The Programmed Water Hardness
Before using for the first time Checking the programmed water hardness ^ Turn off the dishwasher. ^ Turn the program selector to “Stop”. ^ Hold the “Top Solo” button in and at the same time turn the dishwasher on with the “On/Off” button. With in 2 seconds release the “Top Solo”... -
Page 17: Before Using For The First Time
Before using for the first time Before using for the first time Filling the salt reservoir To fill the salt reservoir: ^ Remove the lower basket. If your water hardness level is greater than 8 gr/gal, the salt reservoir should ^ Unscrew and remove the salt reser- be filled before the first use and when voir cap. -
Page 18: Salt Indicator
Before using for the first time Salt indicator Bypassing the Salt indicator To bypass the salt indicator, you will When the salt reservoir is empty, the need a screwdriver and needle nose “Salt-PC” indicator will light, indicating pliers. that it should be refilled with reactiva- tion salt. -
Page 19: Rinse Aid
Before using for the first time Rinse aid Adding rinse aid Rinse aid is recommended to prevent spotting on dishes and glassware that normally occurs during the drying cycle. Filling the rinse aid reservoir with detergent will damage the reservoir. Only pour rinse aid formulated for residential dishwashers into the reservoir. -
Page 20: Rinse Aid Indicator
Before using for the first time Rinse aid indicator The rinse aid indicator on the control panel will light when the rinse aid reser- voir needs refilling. ^ Pour liquid rinse aid into the reservoir until it is visible on the surface of the screen. -
Page 21: Setting The Dosage
Before using for the first time Setting the dosage The dosage selector is preset to 3. This dispenses approximately 3 ml of rinse aid per program. It can be adjusted from 1 to 6, depending on your needs. ^ Use a higher setting if spots appear on dry glassware. -
Page 22: Loading The Dishwasher
Loading the dishwasher Loading the dishwasher ^ Small cups and glasses should be Do not wash items soiled with ash, wax, grease or paint in the dish- placed on the cup racks. Taller mugs washer. and glasses can be placed under- Ash does not dissolve and will be neath the rack. -
Page 23: Loading Examples
Loading the dishwasher Loading the dishwasher Loading examples Using “Top Solo” If “Top Solo” has been selected for use Upper basket with a wash program, all items must be loaded into the upper basket and cut- lery tray. If your machine has a cutlery basket, space the items so that water can reach all sides of the cutlery. -
Page 24: Adjustable Cup Racks
Loading the dishwasher Loading the dishwasher Adjustable cup racks Coffee bar (select models) To make room for tall glasses raise To allow water to run off the bottom of the rack and lower it to double stack coffee mugs, place slanted on top of smaller pieces. -
Page 25: Adjusting The Upper Basket
Loading the dishwasher Adjusting the upper basket Depending on the setting of the upper basket, the following plate dimensions The upper basket height is adjustable. can be accommodated: If tall items are being washed, more room can be created by raising or low- Upper Plate diameter ering the upper basket. -
Page 26: Lower Basket
Loading the dishwasher Lower basket Bottle holder For larger and heavier items such as The bottle holder e.g. for milk and baby plates, serving platters, saucepans, bottles, can be inserted into the bottom bowls, etc. Small items such as sucers basket in more than one place. -
Page 27: Cutlery
Loading the dishwasher Cutlery Spoon heads should be placed so that water runs off freely. For best results cutlery should be grouped in zones, one for knives, one for forks, etc. making unloading easier. Place the blades of knives and the tines of forks between the holders. -
Page 28: Items Not Suitable For Dishwashers
Loading the dishwasher Items not suitable for dish- Miele recommends: washers: – Wash delicate glassware using the “Economy” program or the “China & – Cutlery with wooden handles. Crystal” program to reduce the risk – Wooden cutting boards. of clouding. -
Page 29: Operating The Dishwasher
Operating the dishwasher Operating the dishwasher ^ Close the cover. The cover will al- Adding detergent ways be open at the end of a wash Only use powder detergents or tab- program (except “Rinse & Hold” ). lets formulated for residential dish- Generally, filling the dispenser with washers. -
Page 30: Program Selection
Operating the dishwasher Choosing a program Program selection “Energy Saver” Program Approximately 0.20 kWh of electricity is Choose a wash program depending on used during this cycle. the type of dishes and the degree of soiling. ^ Use this program for light to normally soiled dishes. -
Page 31: Turning On The Dishwasher
Operating the dishwasher To prevent children from coming into Turning on the dishwasher contact with detergent, only place it ^ Close the door. in the dispenser immediately before ^ Open the water valve (if closed). starting the program. ^ Press the “On/Off” button (14). When required, the water softener reactivation process is performed The indicator next to the “Start”... -
Page 32: End Of A Program
“Start“ indicator (20) will come on. If the dishes are not needed immedi- ately, leaving the door closed will allow The Miele dishwasher Waterproof the fan to run for a few more minutes for System is designed to shut off the thorough drying. -
Page 33: Interrupting A Program
Operating the dishwasher Interrupting a program Changing a program A program can be interrupted by open- If a program has already started and ing the door. you wish to change it proceed as fol- Once the door is closed, the program lows: will continue from the point it was at ^ Turn the program selector (18) to the... -
Page 34: Additional Features
Operating the dishwasher Additional features Top Solo (16) “Top Solo” is recommended when there “Top Solo” can be used with any wash is only a small load to clean that will fit program as follows: in the upper basket and cutlery tray. ^ Turn on the dishwasher using the With this function most of the water jets “On/Off”... -
Page 35: Delay Start
Operating the dishwasher Delay start (19) ^ “Top Solo” can also be selected now, The start time of a program can be de- layed up to 9 hours, in 1 hour periods. if needed. ^ Press the “Start” button (20). To set a delay time: The display will count down in 1 hour ^ Turn on the dishwasher using the... -
Page 36: Unloading The Dishwasher
Operating the dishwasher Unloading the dishwasher ^ Dishes tend to break and chip more easily when hot. Let dishes cool until they are comfortable enough to han- dle before unloading. ^ Dishes will cool much faster if the dishwasher door is opened a few inches after a program has finished. -
Page 37: Cleaning And Care
Cleaning and care Cleaning and care Cleaning the filters in the wash cabinet The combination filter in the base of the wash cabinet should be regularly in- spected and cleaned, every 4 - 6 months. Any broken glass or dishware should be removed immediately. - Page 38 Cleaning and care ^ Turn the combination filter over and ^ Return the combination filter so that it open the coarse filter cover by pull- lies flat in the base of the dishwasher. ing back on the locking tab. Secure it by turning the handle clock- wise.
-
Page 39: Cleaning The Spray Arms
Cleaning and care ^ Remove the lower basket. Cleaning the spray arms Sometimes particles of food get stuck in the spray arm jets. The spray arms should be inspected and cleaned every 4 - 6 months. ^ Turn off the dishwasher. Remove the spray arms as follows: ^ Take out the cutlery tray. -
Page 40: Cleaning The Wash Cabinet
Cleaning and care Cleaning the wash cabinet Cleaning the control panel ^ Clean the control panel with a damp Generally, the wash cabinet is self cleaning, provided that the correct cloth and mild detergent. amount of dishwasher detergent is used. Do not use abrasive, all purpose, or glass cleaners, they may damage If lime scale or grease deposits form,... -
Page 41: Problem Solving Guide
Problem solving guide Problem solving guide With the aid of the following guide, minor problems can be corrected without a service call. Any work required on the electrical components of the appliance should only be performed by a qualified and trained person in accordance with local and national regulations. - Page 42 Problem solving guide Problem Possible cause Remedy Before searching for the The “Intake/Drain” indi- problem: cator light flashes, and – Turn the program se- the program stops. lector to “Stop”. – Turn the dishwasher off using the “On/Off” but- ton. Not enough water is en- –...
- Page 43 – Press the “Start” but- ton. If the indicator lights flash again: – Call the Miele Techni- cal Service Dept. The spray arm is hitting Interrupt the program and Knocking noise from an item in the basket.
- Page 44 Problem solving guide Problem Possible cause Remedy The dishes were not See “Loading the dish- The dishes are not loaded correctly. washer”. clean. – Were the dishes placed inside of each other? – Could water reach all surfaces? The water feed for the Make sure that dishes middle spray arm was placed at the rear of the...
- Page 45 Problem solving guide Problem Possible cause Remedy The selected wash tem- Select a program with a Tea, coffee, or lipstick perature was too low. higher wash temperature. stains have not been re- Old or non-chlorinated Use fresh detergent con- moved. detergent was used.
- Page 46 Problem solving guide Problem Possible cause Remedy The rinse aid dosage is Reduce the dosage set- There are smears on too high. ting. See “Adding rinse glasses and cutlery, or a aid”. bluish sheen on the sur- face of glasses. The film can be wiped off by hand.
-
Page 47: Solving Problems
^ If your water contains a large number pliers and rinse under running water. of insoluble substances, a filter be- tween the valve and the intake hose connection is recommended. These filters can be purchased from the Miele Technical Service Department. -
Page 48: Checking The Water Level
Solving problems Checking the water level If the water pressure is less than 15 psi, not enough water will flow into the wash cabinet. ^ To check the water level, open the water valve completely and run the “Rinse & Hold” program once (with- out dishes), to bring water into the system. -
Page 49: Increasing The Water Intake Time
Solving problems ^ Turn the program selector to Increasing the water intake “Economy 55 °C/130 °F”. time – If the “Top Solo” indicator does not To increase the water intake time, light, the water intake time is set to proceed as follows: normal. -
Page 50: Cleaning The Drain Pump And Non-Return Valve
Solving problems Cleaning the drain pump and non-return valve Use caution when cleaning the fil- ters, non-return valve or drain pump; glass or bone splinters may be caught in the bottom of the wash cabinet. If the dishwasher is not completely drained at the end of a program, the drain pump or non-return valve may be blocked. - Page 51 Solving problems ^ Pull out the non-return valve. The drain pump is situated under the non-return valve (see arrow). ^ Rinse the non-return valve under run- ^ Before returning the non-return valve, ning water. check to make sure that the drain pump is not obstructed.
-
Page 52: After Sales Service
Program update function - PC or if the appliance is under warranty, The “PC” indicator has the function of please contact your Miele Dealer or the Program Correction (PC). This allows a Miele Technical Service Department. technician to update the programming... -
Page 53: Special Accessories
Special accessories Special accessories To make the most of your dishwasher If you would like... then you need..to wash bottles, ... a bottle holder e. g. milk or baby bottles ... to wash long stemmed glassware ... a glassware insert for the upper basket... -
Page 54: Transport
Transport Transport To transport the dishwasher, e.g. when moving to a new home, note the follow- ing: – Empty the dishwasher, – Secure any loose parts, e. g. hoses, cables, cutlery baskets. – Transport the dishwasher in the up- right position. If unavoidable it may be transported on its back. -
Page 55: Technical Data
Technical data Technical data Series designation HG01 Height 33 1/16" (84 cm [adj + 2"/5.0 cm]) Width 23 9/16" (59.8 cm) Width of cabinet opening 23 5/8" (60 cm) Depth 22 7/16" (57 cm) Depth with door open 47 7/16" (120.5 cm) Weight approx. -
Page 56: Program Chart
Program chart Program chart Program When to use Detergent chlorine containing free chlorine Compart- Compart- Compart- ment ment ment (Wash (Pre-wash) (Wash cycle) cycle) Normal for normal everyday loads 100 % 20 % 80 % 55 °C/130 °F Sani Wash as Normal 55 °C/130 °F 100 % 20 %... - Page 57 Program chart Program cycle Usage Duration Electric Water Minutes (kWh) (approx.) Main Interim Final Drying Cold Liters/ Cold Prelimi- Pre- wash rinse rinse water water Gallons water water nary wash con- con- con- con- pre- nection nection nection nection wash (10 °C/ (49 °C/ (10 °C/...
- Page 60 Alteration rights reserved/ (G856/G857) / 002 1700 These instructions are printed on 100% recycled paper and are completely Biodegradable.