Nortel 1210 User Manual
Cicm ip phone
Hide thumbs
Also See for 1210:
- User manual (120 pages) ,
- Reference manual (6 pages) ,
- Quick reference card (2 pages)

Related Manuals for Nortel 1210


Summary of Contents for Nortel 1210
- Page 1 IP Phone 1210 IP Phone 1210 User Guide — CICM Release: CICM0110 Document Revision: 01.01 www.nortel.com NN10300-902...
- Page 2 While the information in this document is believed to be accurate and reliable, except as otherwise expressly agreed to in writing NORTEL PROVIDES THIS DOCUMENT "AS IS" WITHOUT WARRANTY OR CONDITION OF ANY KIND, EITHER EXPRESS OR IMPLIED. The information and/or products described in this document are subject to change without notice.
-
Page 3: Table Of Contents
How to use the navigation keys 18 Configuring Local Tools Menu Options Preferences 21 Local Diagnostics 22 Network Configuration Lock Menu 23 IP Phone 1210 IP Phone 1210 User Guide — CICM NN10300-902 01.01 23 July 2009 Copyright © 2006-2010 Nortel Networks. All Rights Reserved. - Page 4 Labeling a feature key 59 Using the Options menu 59 Resetting the feature key to the default settings 61 IP Phone 1210 IP Phone 1210 User Guide — CICM NN10300-902 01.01 23 July 2009 Copyright © 2006-2010 Nortel Networks. All Rights Reserved.
- Page 5 Testing the local mode Performing a firmware upgrade Using the dialpad to enter text Access Code summary IP Phone 1210 IP Phone 1210 User Guide — CICM NN10300-902 01.01 23 July 2009 Copyright © 2006-2010 Nortel Networks. All Rights Reserved.
- Page 6 IP Phone 1210 IP Phone 1210 User Guide — CICM NN10300-902 01.01 23 July 2009 Copyright © 2006-2010 Nortel Networks. All Rights Reserved.
-
Page 7: New In This Release
New in this release The following sections detail what is new in IP Phone 1210 User Guide — CICM, (NN10300-902) for this release. • “Features” (page 7) • “Other changes” (page 7) Features This document is new for release CICM0110. - Page 8 8 New in this release IP Phone 1210 IP Phone 1210 User Guide — CICM NN10300-902 01.01 23 July 2009 Copyright © 2006-2010 Nortel Networks. All Rights Reserved.
-
Page 9: Overview
Overview Nortel IP Phone 1210 brings voice and data to the desktop by connecting directly to a Local Area Network (LAN) through an Ethernet connection. When you are logged on the system, the handset and keypad of the IP Phone 1210 operate in the same way as a standard Meridian Business Set (MBS) telephone. -
Page 10: Ip Phone Terminal Description
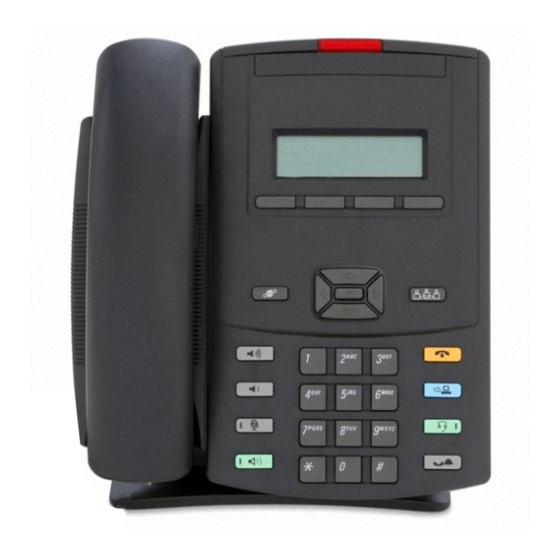
10 Overview Figure 1 IP Phone 1210 components IP Phone terminal description Nortel IP Phone 1210 supports the following telephony features: • four context-sensitive soft keys • volume control bar to adjust ringer, speaker, handset, and headset volume • ability to change the programmable line DN/feature key labels •... -
Page 11: Terminal Display
LCD screen, 5 line x 25 character display with antiglare coating • automatic network configuration • supports standard TFTP or Nortel UFTP (Unistim FTP) for firmware download. Terminal display Nortel IP Phone 1210 display has three distinct areas: •... -
Page 12: Softkey Functionality
Softkey functionality Softkey functionality allows access to a small subset of Centrex features on Nortel IP Phone 1210 softkeys, located below the main display and to the right of the Menu softkey. The administrator has the ability to change, enable, or disable the softkeys. The default features for these softkeys are Transfer, Forward, and Conference. - Page 13 Green (located on the back cover Lit when the link is alive and flashes near the network Ethernet jack) to indicate activity. IP Phone 1210 IP Phone 1210 User Guide — CICM NN10300-902 01.01 23 July 2009 Copyright © 2006-2010 Nortel Networks. All Rights Reserved.
- Page 14 14 Overview IP Phone 1210 IP Phone 1210 User Guide — CICM NN10300-902 01.01 23 July 2009 Copyright © 2006-2010 Nortel Networks. All Rights Reserved.
-
Page 15: Ip Phone 1210 Menu Systems
“Adjusting the contrast level of the display” (page 53). Features Use the Feature menu to access these submenus: IP Phone 1210 IP Phone 1210 User Guide — CICM NN10300-902 01.01 23 July 2009 Copyright © 2006-2010 Nortel Networks. All Rights Reserved. -
Page 16: Language
• reset the time to the defaults “Using the Time menu” (page 65). IP Phone 1210 IP Phone 1210 User Guide — CICM NN10300-902 01.01 23 July 2009 Copyright © 2006-2010 Nortel Networks. All Rights Reserved. -
Page 17: User
“Performing a firmware upgrade” (page 75). Menu hierarchy The following figure shows the hierarchy of the IP Phone 1210 menus. IP Phone 1210 IP Phone 1210 User Guide — CICM NN10300-902 01.01 23 July 2009... -
Page 18: How To Use The Navigation Keys
Press the right key to move the cursor to the right. • send key—select the menu item IP Phone 1210 IP Phone 1210 User Guide — CICM NN10300-902 01.01 23 July 2009 Copyright © 2006-2010 Nortel Networks. All Rights Reserved. -
Page 19: Configuring Local Tools Menu Options
If this happens, contact your system administrator. Your IP Phone 1210 has both local and server-based options. Press the Services key twice to access the Local Tools menu, which is organized into the following submenus: •... - Page 20 Select the highlighted item in the Exit edit mode Enter characters or digits on the dialpad Insert characters or digits at the current cursor position IP Phone 1210 IP Phone 1210 User Guide — CICM NN10300-902 01.01 23 July 2009 Copyright © 2006-2010 Nortel Networks. All Rights Reserved.
-
Page 21: Preferences
From the Preferences menu, select Languages. Press the up/down navigation keys to scroll and highlight the desired language (for example, German [Deutsche]). IP Phone 1210 IP Phone 1210 User Guide — CICM NN10300-902 01.01 23 July 2009 Copyright © 2006-2010 Nortel Networks. All Rights Reserved. -
Page 22: Local Diagnostics
The Network Configuration tool displays information that was configured when the IP Phone was installed. This tool is for administrator use only. IP Phone 1210 IP Phone 1210 User Guide — CICM NN10300-902 01.01 23 July 2009 Copyright © 2006-2010 Nortel Networks. All Rights Reserved. -
Page 23: Lock Menu
Your system administrator can use the lock menu tool to protect the Local Tools menu items from accidental or unwanted changes. This tool is for administrator use only. IP Phone 1210 IP Phone 1210 User Guide — CICM NN10300-902 01.01 23 July 2009 Copyright © 2006-2010 Nortel Networks. All Rights Reserved. -
Page 24: Ip Phone
24 Configuring Local Tools Menu Options IP Phone 1210 IP Phone 1210 User Guide — CICM NN10300-902 01.01 23 July 2009 Copyright © 2006-2010 Nortel Networks. All Rights Reserved. -
Page 25: Ip Phone 1210 User Guide — Cicm Nn10300-902 01.01 23 July
CAUTION Risk of equipment damage Do not plug the IP Phone 1210 into a regular telephone jack. This causes severe damage to the terminal. Consult your system administrator to ensure that you plug your telephone into a 10/100BaseT Ethernet jack. -
Page 26: Procedure Job Aid
The following figure identifies and shows the location of the connectors on the back of IP Phone 1210. Figure 4 IP Phone connectors IP Phone 1210 IP Phone 1210 User Guide — CICM NN10300-902 01.01 23 July 2009 Copyright © 2006-2010 Nortel Networks. All Rights Reserved. -
Page 27: Logging On
The password screen appears. Enter your password. For security, the password characters are displayed as asterisks (*). IP Phone 1210 IP Phone 1210 User Guide — CICM NN10300-902 01.01 23 July 2009 Copyright © 2006-2010 Nortel Networks. All Rights Reserved. - Page 28 Press Ok, or press the send key. You are logged on and the Menu screen appears. --End-- IP Phone 1210 IP Phone 1210 User Guide — CICM NN10300-902 01.01 23 July 2009 Copyright © 2006-2010 Nortel Networks. All Rights Reserved.
-
Page 29: Logging Off
Press Ok, or press the send key. A confirmation screen appears. Confirm the action. You are logged off from the network. --End-- IP Phone 1210 IP Phone 1210 User Guide — CICM NN10300-902 01.01 23 July 2009 Copyright © 2006-2010 Nortel Networks. All Rights Reserved. - Page 30 30 Logging off IP Phone 1210 IP Phone 1210 User Guide — CICM NN10300-902 01.01 23 July 2009 Copyright © 2006-2010 Nortel Networks. All Rights Reserved.
-
Page 31: Making A Call
When the call is answered, begin speaking. --End-- Making a call using handsfree dialing Follow this procedure to make a call using handsfree dialing. Figure 1 "IP Phone 1210 components" (page 10) for the location of the handsfree key. Step Action Press a line key. -
Page 32: Making A Call Using Predial
To delete numbers that appear to the left of the cursor, press Bkspc. • To delete numbers that appear to the right of the cursor, press Delete. IP Phone 1210 IP Phone 1210 User Guide — CICM NN10300-902 01.01 23 July 2009 Copyright © 2006-2010 Nortel Networks. All Rights Reserved. - Page 33 Editing a predialed number 33 Use the dialpad to enter the new number. --End-- IP Phone 1210 IP Phone 1210 User Guide — CICM NN10300-902 01.01 23 July 2009 Copyright © 2006-2010 Nortel Networks. All Rights Reserved.
- Page 34 34 Making a call IP Phone 1210 IP Phone 1210 User Guide — CICM NN10300-902 01.01 23 July 2009 Copyright © 2006-2010 Nortel Networks. All Rights Reserved.
-
Page 35: Answering Calls
Answering calls Follow these procedures to answer calls. Incoming calls cause the telephone to sound and the message indicator lamp to flash. Figure 1 "IP Phone 1210 components" (page 10) for the location of the keys. Answering a call Follow this procedure to answer a call. - Page 36 36 Answering calls IP Phone 1210 IP Phone 1210 User Guide — CICM NN10300-902 01.01 23 July 2009 Copyright © 2006-2010 Nortel Networks. All Rights Reserved.
-
Page 37: Ending A Call
Follow this procedure to terminate an active call. The Goodbye key is useful for dropping out of a conference call or exiting voice mail. See Figure 1 "IP Phone 1210 components" (page 10) for the location of the key. Step... - Page 38 38 Ending a call IP Phone 1210 IP Phone 1210 User Guide — CICM NN10300-902 01.01 23 July 2009 Copyright © 2006-2010 Nortel Networks. All Rights Reserved.
-
Page 39: While On An Active Call
The call is active again. --End-- Transferring a call Follow this procedure to transfer a call to another extension. IP Phone 1210 IP Phone 1210 User Guide — CICM NN10300-902 01.01 23 July 2009 Copyright © 2006-2010 Nortel Networks. All Rights Reserved. -
Page 40: Using Conference Call
--End-- IP Phone 1210 IP Phone 1210 User Guide — CICM NN10300-902 01.01 23 July 2009 Copyright © 2006-2010 Nortel Networks. All Rights Reserved. -
Page 41: Using The Mute Feature
To turn off the feature, press the Mute key again. The light turns off and the feature is disabled. --End-- IP Phone 1210 IP Phone 1210 User Guide — CICM NN10300-902 01.01 23 July 2009 Copyright © 2006-2010 Nortel Networks. All Rights Reserved. - Page 42 42 While on an active call IP Phone 1210 IP Phone 1210 User Guide — CICM NN10300-902 01.01 23 July 2009 Copyright © 2006-2010 Nortel Networks. All Rights Reserved.
-
Page 43: Using Call Forward
To turn off call forward, press the forward key. The feature is deactivated and the icon disappears from the display. --End-- IP Phone 1210 IP Phone 1210 User Guide — CICM NN10300-902 01.01 23 July 2009 Copyright © 2006-2010 Nortel Networks. All Rights Reserved. - Page 44 44 Using call forward IP Phone 1210 IP Phone 1210 User Guide — CICM NN10300-902 01.01 23 July 2009 Copyright © 2006-2010 Nortel Networks. All Rights Reserved.
-
Page 45: Navigating The Menu System
• Select the item, and press Ok, or press the send key. • Press the shortcut key. IP Phone 1210 IP Phone 1210 User Guide — CICM NN10300-902 01.01 23 July 2009 Copyright © 2006-2010 Nortel Networks. All Rights Reserved. -
Page 46: Navigating The Audio Menu
55). • Select and open Label. “Labeling a feature key” (page 59). • Select and open Options. IP Phone 1210 IP Phone 1210 User Guide — CICM NN10300-902 01.01 23 July 2009 Copyright © 2006-2010 Nortel Networks. All Rights Reserved. -
Page 47: Navigating The Time Menu
From the main menu, select and open User. The User menu appears. Perform one of these actions: IP Phone 1210 IP Phone 1210 User Guide — CICM NN10300-902 01.01 23 July 2009 Copyright © 2006-2010 Nortel Networks. All Rights Reserved. - Page 48 “Viewing, disabling, or enabling the auto login feature” (page 70). • Select and open Password. “Changing your password” (page 71). --End-- IP Phone 1210 IP Phone 1210 User Guide — CICM NN10300-902 01.01 23 July 2009 Copyright © 2006-2010 Nortel Networks. All Rights Reserved.
-
Page 49: Using The Audio Menu
Then from the Audio menu, select and open Profile. • If Audio Profile appears in the main menu, select and open it. IP Phone 1210 IP Phone 1210 User Guide — CICM NN10300-902 01.01 23 July 2009 Copyright © 2006-2010 Nortel Networks. All Rights Reserved. -
Page 50: Viewing And Editing The Default Volumes
Press the right cursor key to increase the default volume level of the selected audio device; press the left cursor key to decrease IP Phone 1210 IP Phone 1210 User Guide — CICM NN10300-902 01.01 23 July 2009 Copyright © 2006-2010 Nortel Networks. All Rights Reserved. -
Page 51: Viewing And Editing The Dialpad Feedback
Press Ok, or the send key. The Default Volumes menu appears. Scroll through the menu and select Default. IP Phone 1210 IP Phone 1210 User Guide — CICM NN10300-902 01.01 23 July 2009 Copyright © 2006-2010 Nortel Networks. All Rights Reserved. -
Page 52: Selecting A Ring Tone
Press Stop to stop the ring tone from playing. To select a ring tone, press Apply. --End-- IP Phone 1210 IP Phone 1210 User Guide — CICM NN10300-902 01.01 23 July 2009 Copyright © 2006-2010 Nortel Networks. All Rights Reserved. -
Page 53: Adjusting The Contrast Level Of The Display
Press Ok, or press the send key. The current contrast level is saved and you return to the previous screen. --End-- IP Phone 1210 IP Phone 1210 User Guide — CICM NN10300-902 01.01 23 July 2009 Copyright © 2006-2010 Nortel Networks. All Rights Reserved. - Page 54 54 Adjusting the contrast level of the display IP Phone 1210 IP Phone 1210 User Guide — CICM NN10300-902 01.01 23 July 2009 Copyright © 2006-2010 Nortel Networks. All Rights Reserved.
-
Page 55: Using The Feature Menu
Follow this procedure to open the Assign menu. Step Action From the main menu, open the Feature menu. IP Phone 1210 IP Phone 1210 User Guide — CICM NN10300-902 01.01 23 July 2009 Copyright © 2006-2010 Nortel Networks. All Rights Reserved. - Page 56 Press Ok, or press the send key. The key type is changed and a check mark appears beside the selection. IP Phone 1210 IP Phone 1210 User Guide — CICM NN10300-902 01.01 23 July 2009 Copyright © 2006-2010 Nortel Networks. All Rights Reserved.
- Page 57 You can answer the call immediately without searching for the screen. Follow this procedure to enable or disable the autoscroll feature. IP Phone 1210 IP Phone 1210 User Guide — CICM NN10300-902 01.01 23 July 2009 Copyright © 2006-2010 Nortel Networks. All Rights Reserved.
- Page 58 A check mark appears beside the item to indicate your choice. You return to the Assign menu. --End-- IP Phone 1210 IP Phone 1210 User Guide — CICM NN10300-902 01.01 23 July 2009 Copyright © 2006-2010 Nortel Networks. All Rights Reserved.
-
Page 59: Labeling A Feature Key
Call Transfer and Three Way Call from being displayed on a IP Phone while the user’s line is idle. Instead, Auto Hide will display a feature IP Phone 1210 IP Phone 1210 User Guide — CICM NN10300-902 01.01 23 July 2009 Copyright © 2006-2010 Nortel Networks. All Rights Reserved. - Page 60 Follow this procedure to select a feature key to be your default line key. Step Action From the main menu, open the Feature menu. IP Phone 1210 IP Phone 1210 User Guide — CICM NN10300-902 01.01 23 July 2009 Copyright © 2006-2010 Nortel Networks. All Rights Reserved.
-
Page 61: Resetting The Feature Key To The Default Settings
Press Yes, or press the send key. The keys are reset to the default settings. You return to the Feature menu. --End-- IP Phone 1210 IP Phone 1210 User Guide — CICM NN10300-902 01.01 23 July 2009 Copyright © 2006-2010 Nortel Networks. All Rights Reserved. -
Page 62: Ip Phone
62 Using the Feature menu IP Phone 1210 IP Phone 1210 User Guide — CICM NN10300-902 01.01 23 July 2009 Copyright © 2006-2010 Nortel Networks. All Rights Reserved. -
Page 63: Selecting A Language
The terminal now displays text in the selected language. Press Cancel. You return to the main menu. --End-- IP Phone 1210 IP Phone 1210 User Guide — CICM NN10300-902 01.01 23 July 2009 Copyright © 2006-2010 Nortel Networks. All Rights Reserved. - Page 64 64 Selecting a language IP Phone 1210 IP Phone 1210 User Guide — CICM NN10300-902 01.01 23 July 2009 Copyright © 2006-2010 Nortel Networks. All Rights Reserved.
-
Page 65: Using The Time Menu
The time displayed changes to that of the selected zone. --End-- Enabling Daylight Saving Time Follow this procedure to set Daylight Saving Time. IP Phone 1210 IP Phone 1210 User Guide — CICM NN10300-902 01.01 23 July 2009 Copyright © 2006-2010 Nortel Networks. All Rights Reserved. -
Page 66: Disabling Daylight Saving Time
Follow this procedure to set the time format the terminal uses to display the current time. The time format choices are: • 12-hour clock • French • 24-hour clock IP Phone 1210 IP Phone 1210 User Guide — CICM NN10300-902 01.01 23 July 2009 Copyright © 2006-2010 Nortel Networks. All Rights Reserved. -
Page 67: Setting The Date Format
A check mark appears beside the format currently in use. To enable a format, select it and press Ok or press the send key. IP Phone 1210 IP Phone 1210 User Guide — CICM NN10300-902 01.01 23 July 2009 Copyright © 2006-2010 Nortel Networks. All Rights Reserved. -
Page 68: Resetting The Default Time
Confirm the action. The terminal reverts to the default time settings. You return to the previous screen. --End-- IP Phone 1210 IP Phone 1210 User Guide — CICM NN10300-902 01.01 23 July 2009 Copyright © 2006-2010 Nortel Networks. All Rights Reserved. -
Page 69: Using The User Menu
Unique—the ability to join a session with an m6350 SoftClient is not enabled. • Joint—the ability to operate in a joint session with an m6350 SoftClient is enabled. IP Phone 1210 IP Phone 1210 User Guide — CICM NN10300-902 01.01 23 July 2009 Copyright © 2006-2010 Nortel Networks. All Rights Reserved. -
Page 70: Viewing, Disabling, Or Enabling The Auto Login Feature
Perform one of these steps. • To enable Auto Login, select Enable. • To disable Auto Login, select Disable. IP Phone 1210 IP Phone 1210 User Guide — CICM NN10300-902 01.01 23 July 2009 Copyright © 2006-2010 Nortel Networks. All Rights Reserved. -
Page 71: Changing Your Password
The password is changed and you return to the previous menu. Use the new password the next time you log on. --End-- IP Phone 1210 IP Phone 1210 User Guide — CICM NN10300-902 01.01 23 July 2009 Copyright © 2006-2010 Nortel Networks. All Rights Reserved. - Page 72 72 Using the User menu IP Phone 1210 IP Phone 1210 User Guide — CICM NN10300-902 01.01 23 July 2009 Copyright © 2006-2010 Nortel Networks. All Rights Reserved.
-
Page 73: Testing The Local Mode
The terminal transitions to its secondary IP address and temporarily disconnects from the IP Client Manager. --End-- IP Phone 1210 IP Phone 1210 User Guide — CICM NN10300-902 01.01 23 July 2009 Copyright © 2006-2010 Nortel Networks. All Rights Reserved. - Page 74 74 Testing the local mode IP Phone 1210 IP Phone 1210 User Guide — CICM NN10300-902 01.01 23 July 2009 Copyright © 2006-2010 Nortel Networks. All Rights Reserved.
-
Page 75: Performing A Firmware Upgrade
A second confirmation screen appears. Press Yes, or press the send key. The firmware is downloaded. --End-- IP Phone 1210 IP Phone 1210 User Guide — CICM NN10300-902 01.01 23 July 2009 Copyright © 2006-2010 Nortel Networks. All Rights Reserved. - Page 76 76 Performing a firmware upgrade IP Phone 1210 IP Phone 1210 User Guide — CICM NN10300-902 01.01 23 July 2009 Copyright © 2006-2010 Nortel Networks. All Rights Reserved.
-
Page 77: Using The Dialpad To Enter Text
Scroll through the list and select the symbol. • Press Ok, or press the send key, to enter the symbol. --End-- IP Phone 1210 IP Phone 1210 User Guide — CICM NN10300-902 01.01 23 July 2009 Copyright © 2006-2010 Nortel Networks. All Rights Reserved. - Page 78 78 Using the dialpad to enter text Procedure job aid Figure 5 Special characters IP Phone 1210 IP Phone 1210 User Guide — CICM NN10300-902 01.01 23 July 2009 Copyright © 2006-2010 Nortel Networks. All Rights Reserved.
-
Page 79: Access Code Summary
Use this table to keep track of the feature Access Codes. Feature Access Code Feature Access Code IP Phone 1210 IP Phone 1210 User Guide — CICM NN10300-902 01.01 23 July 2009 Copyright © 2006-2010 Nortel Networks. All Rights Reserved. -
Page 80: Ip Phone
80 Access Code summary IP Phone 1210 IP Phone 1210 User Guide — CICM NN10300-902 01.01 23 July 2009 Copyright © 2006-2010 Nortel Networks. All Rights Reserved. -
Page 82: Ip Phone 1210 User Guide — Cicm
While the information in this document is believed to be accurate and reliable, except as otherwise expressly agreed to in writing NORTEL PROVIDES THIS DOCUMENT "AS IS" WITHOUT WARRANTY OR CONDITION OF ANY KIND, EITHER EXPRESS OR IMPLIED. The information and/or products described in this document are subject to change without notice.