
Related Manuals for Pioneer X-HM81-S


Summary of Contents for Pioneer X-HM81-S
- Page 1 X-HM81 -S/-K NETWORK CD RECEIVER SYSTEM X-HM71 -S/-K XC-HM81 -S/-K NETWORK CD RECEIVER http://www.pioneer.co.uk Discover the benefits of registering your product online at (or http://www.pioneer.eu). Operating Instructions...
- Page 2 To prevent a fire hazard, do not place any naked flame sources (such as a lighted candle) on the equipment. Pioneer is not responsible for any malfunction of the D3-4-2-1-7a_A1_En compatible Pioneer product due to communication...
- Page 3 When you find it for a long period of time (for example, when on extent of condensation). The water droplets will damaged, ask your nearest PIONEER authorized vacation). dissipate and playback will become possible.
-
Page 4: Table Of Contents
Contents Thank you for buying this Pioneer product. Please read through these operating instructions so you will know how to operate your model properly. About this product ....... 5 05 Music playback using Bluetooth®... -
Page 5: About This Product
Before you start Do not use or store batteries in direct sunlight or other About this product Checking what’s in the box excessively hot place, such as inside a car or near a heater. This can cause batteries to leak, overheat, explode Please check that you’ve received the following supplied X-HM81 or X-HM71 or catch fire. -
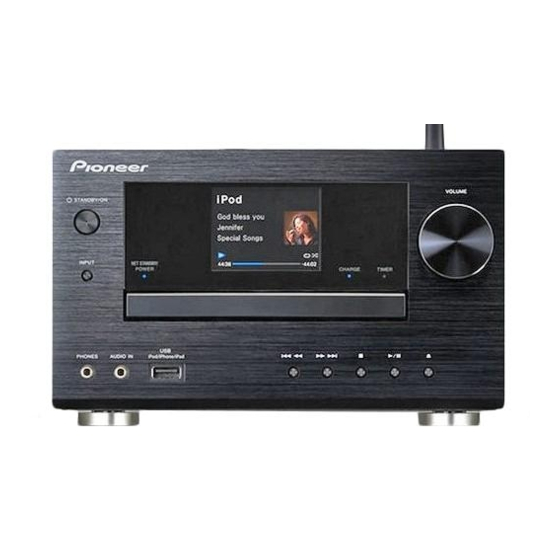
Page 6: Controls And Displays
Controls and displays STANDBY/ON button Input source Front panel Switches the receiver between standby and on (page 11). Mute Displayed during the mute operation (page 13). INPUT button Select the input source (page 12). Sleep timer When the sleep timer is set, the remaining time until power off Headphone socket Use to connect headphones. -
Page 7: Remote Control
Controls and displays SLEEP – Press to change the amount of time before the Sound control buttons Remote control receiver switches into standby (30 min. – 60 min. – 90 Adjust the sound quality (page 13). min. – Off). You can check the remaining sleep time at +Favorite any time by pressing SLEEP once (page 12). -
Page 8: Connecting Your Equipment
(OUTPUT 5V 0.1 A MAX) registered trademarks LAN (10/100) owned by Bluetooth SIG, To video input Inc. and any use of such socket marks by PIONEER Incorrect CORPORATION is under license. Other To AC outlet X-HM81 XC-HM81 FM wire antenna trademarks and trade ®... -
Page 9: Wlan Antenna Connection
Connecting your equipment Applying non skid pads (X-HM81 only) WLAN antenna connection Using other subwoofer The use of non skid pads is recommended depending on the installation location. Apply the pads to the four corners of the Connect the WLAN antenna to the WLAN ANTENNA You can connect a subwoofer with an amplifier to the side of the speaker which will be on the bottom. -
Page 10: Connecting Usb Storage Devices
Connecting your equipment • With Windows Media Player 11 or 12, you can even play To select Line function: back copyrighted audio files on this receiver. Connecting to auxiliary component • On main unit: Press INPUT button repeatedly until Line is displayed. -
Page 11: Getting Started
Getting started Timer playback: Setting the receiver Setting the clock The receiver turns on and plays the desired source (CD, AM, FM, USB, Internet Radio, AUDIO IN, LINE or iPod) at a When you use the receiver for the first time, the following iPod preset time. -
Page 12: Sleep Operation
Getting started Use / to adjust the volume. Sleep operation Listening to auxiliary component Press ENTER. Press SLEEP to change the amount of time before the Press AUDIO IN to select Audio In. The TIMER indicator lights, and the settings are Audio In is shown on the display. -
Page 13: Sound Controls
Getting started Auto volume Equaliser If you turned off this receiver with the volume set to 41 or When the SOUND button is pressed, the current mode setting higher, the volume starts at 40 when the receiver turns on next will be displayed. -
Page 14: Ipod/Iphone/Ipad Playback
Connect iPad to the USB/iPod/iPhone/iPad terminal. you can enjoy high-quality sound from your iPod/iPhone/iPad. website of Pioneer to your iPod/iPhone/iPad may result in Open the dock cover by pulling up. This receiver can also be connected to a television set, letting incompatibility with this receiver. -
Page 15: Playing Your Ipod/Iphone/Ipad
iPod/iPhone/iPad playback Is the iPod/iPhone/iPad connected correctly? Reconnect Watching iPod/iPhone images on your TV Playing your iPod/iPhone/iPad the iPod/iPhone/iPad to the receiver. To watch iPod/iPhone images on a television, connect it using Is the iPod/iPhone/iPad experiencing a hangup? Try a composite video cable. CAUTION resetting the iPod/iPhone/iPad, and reconnect it to the When an iPod/iPhone is connected to this receiver, the TV... -
Page 16: Music Playback Using Bluetooth® Wireless Technology
ADAPTER • Pairing is required when you first use Bluetooth wireless Wireless music play ® When the Bluetooth ADAPTER (Pioneer Model No. AS-BT100 technology device and Bluetooth wireless technology or AS-BT200) is connected to this receiver, a product ADAPTER. -
Page 17: Listening To Music Contents Of Bluetooth Wireless Technology Device
During pairing, the name of this receiver appears as AS- BT100 or AS-BT200. AIR JAM Air Jam - a Pioneer-exclusive application and available for Press BT Audio to select BT Audio as the input source. free. BT Audio is shown on the display. -
Page 18: Disc Playback
Disc playback This receiver can play back a standard CD, CD-R/RW in the Press to close the disc tray. CD format and CD-R/RW with MP3 or WMA files, but cannot Advanced CD or MP3/WMA disc playback record on them. Some audio CD-R and CD-RW discs may not Press /... - Page 19 Disc playback B. For example, to choose 130 To cancel repeat play: Programmed play (CD) Press REPEAT repeatedly until “Repeat Off” appears and Press the “+100” button. You can choose up to 32 selections for playback in the order “ ”...
-
Page 20: Mp3/Wma Folder Mode (Only For Mp3/Wma Files)
Disc playback Example: How to set folder number if MP3/WMA format files To cancel the programmed play mode: Procedure to playback MP3/WMA disc with folder are recorded as below figure. During programmed stop mode, press button. Press PLAY mode on MODE button to select the basic play mode, and all the ROOT folder is set as folder 1. - Page 21 Disc playback Press FOLDER +/- to select desired playback folder. (Folder mode on) Playback will start. 0:04 FOLDER F006 T007 Folder number First track number in the folder • In case of playback with the folder mode on, press FOLDER +/-, and the folder can be selected even though it is in playback/pause mode.
-
Page 22: Usb Playback
USB storage device. For details, see Connecting USB storage devices on page 10. Pioneer does not guarantee that any file recorded on a USB storage device will play or that power will be supplied to a USB storage device. -
Page 23: Internet Radio
The access code required for registration on the special Connecting to a LAN network You can also select the available stations from the Pioneer Internet radio site is displayed. Make a memo of Connect to the network using the LAN interface or WLAN internet radio menu. -
Page 24: Network Setting
Internet radio Class A: 10.0.0.1 to 10.255.255.254 / Class B: 172.16.0.1 to Wired setting Network setting 172.31.255.254 / Class C: 192.168.0.1 to 192.168.255.254 Make sure that the LAN cable connections has completed If a broadband router (with built-in DHCP server function) is Subnet Mask (page 10). -
Page 25: Wps Connection Setting
Internet radio Use / to select the available wireless network you Use / to select DHCP On, then press ENTER. Use / to select PBC (Push Button Configuration) or want to connect to. Select Use Proxy Server to setup Proxy Host Name and PIN Input, then press ENTER. -
Page 26: Connecting To A Router Without Wps-Pbc Function
Select Pioneer Setup (this receiver) in the available Apply. wireless network connection of your computer. If SSID is not displayed, return to step 9 and select SSID is displayed as Pioneer Setup:xxxxxx. "xxxxxx" is the 88192420 lower three bytes of the MAC address. Manual. -
Page 27: Connection Settings Using An Ios Device
Internet radio Note Changing the password Friendly Name • You can set the network as in the above by connecting this Press NETWORK SETUP. unit's IP address via the Safari Browser even if Web Control Press NETWORK SETUP. The Initial Setup screen is displayed on the display. -
Page 28: Music Server
• There are cases where the time elapsed may not be This receiver supports this DMR function. indicated on the Pioneer website. AirPlay may not be correctly displayed. When this receiver is selected as a DMR and DMS playback is compatible with iPod touch, iPhone, iPad or iTunes begun, the receiver’s input automatically switches to DMR. - Page 29 Music server Use / to select the file you want to play, then press ENTER. Playback starts. Music Server Song 1 Artist Album FLAC 44.1 kHz/24 bit 44:38 - 44:02 • When the file you want to play is in the folder, select the folder first.
-
Page 30: Using The Tuner
Using the tuner • Stations are stored in stereo. When the station is stored in Improving FM sound Listening to the radio broadcasts the FM MONO mode, it shows as when Tuned Stereo If the indicators don’t light when The following steps show you how to tune in to FM and AM recalled. -
Page 31: Using The Radio Data System (Rds)
Using the tuner • Program Service Name (PS) – The name of the radio Using the Radio Data System (RDS) iPod station. VOLUME MENU CONTROL STANDBY/ON • Program Type (PTY) – This indicates the kind of OPEN/CLOSE program currently being broadcast. An introduction to RDS NET STANDBY TIMER... -
Page 32: Additional Information
(page 11). trouble cannot be rectified even after exercising the checks track. listed below, ask your nearest Pioneer authorized service X-HM81/XC-HM81 only: The Bluetooth wireless technology Is the receiver located near excessive vibrations? center or your dealer to carry out repair work. - Page 33 Additional information Audio playback is undesirably stopped or disturbed. with Internet security software installed cannot be The folder stored on the component connected to the network You may be using a USB 1.0 compatible device. We accessed. has been deleted or damaged.
-
Page 34: Firmware Update
When downloading an update file from electromagnetic waves near the wireless LAN environment. the Pioneer website onto your computer, the file will be in ZIP Use the system in a place away from microwave ovens or format. -
Page 35: Resetting This Receiver
Additional information Press Bookmark icon. Click Bonjour list (a), and then Press Start. The firmware upload status screen is displayed. Press select this receiver's name (Friendly Name) (b) in The firmware update prepare screen is displayed. If the screen does not switch automatically, click Click here. “The upload process finished successfully.”... -
Page 36: Cautions On Use
Additional information • For tough dirt, apply some water to a soft cloth, wring out Cleaning the product Cautions on use thoroughly, wipe off the dirt, then wipe off the moisture with • Unplug the power cord from the power outlet when a dry cloth. - Page 37 • There are cases where you cannot listen to an Internet radio Pioneer is not responsible for any malfunction of the player protected content, you agree that Microsoft may include a station even if the station can be selected from a list of and/or the Music Server features due to communication revocation list with the licenses.
-
Page 38: Radio Wave Caution
Additional information CONTRACT, STRICT LIABILITY, OR TORT (INCLUDING aacPlus Scope of operation NEGLIGENCE OR OTHERWISE) ARISING IN ANY WAY OUT Use of this receiver is limited to home use. (Transmission OF THE USE OF THIS SOFTWARE, EVEN IF ADVISED OF THE distances may be reduced depending on communication POSSIBILITY OF SUCH DAMAGE. -
Page 39: Precautions Regarding Connections To Products Supported By This Receiver
Pro, Lossless, Voice. Categ Exten Stream Bitrate 5 kbps to 320 c Apple lossless encoding is not supported. sion kbps d Uncompressed FLAC files are not supported. Pioneer does .mp3 MPEG-1/2 Sampling 32 kHz, 44.1 not guarantee playback. VBR/CBR Supported/ Audio... -
Page 40: About Wi-Fi
Additional information “Made for iPod,” “Made for iPhone” and “Made for iPad” mean The Wi-Fi Protected Setup Mark is a mark of the Wi-Fi Width ........156 mm that an electronic accessory has been designed to connect Height . - Page 41 Português: Declaration of Conformity with regard to the R&TTE Directive 1999/5/EC Pioneer declara que este [*] está Pioneer izjavlja, da je ta [*] v skladu z Manufacturer: EU Representative’s: conforme com os requisitos essenciais bistvenimi zahtevami in ostalimi e outras disposições da Directiva...
- Page 42 253 Alexandra Road, #04-01, Singapore 159936 TEL: 65-6472-7555 PIONEER ELECTRONICS AUSTRALIA PTY. LTD. 5 Arco Lane, Heatherton, Victoria, 3202, Australia, TEL: (03) 9586-6300 PIONEER ELECTRONICS DE MEXICO S.A. DE C.V. Blvd.Manuel Avila Camacho 138 10 piso Col.Lomas de Chapultepec, Mexico, D.F. 11000 TEL: 55-9178-4270 K002_B3_En...