Table of Contents
Advertisement
Available languages
Available languages
X-HM51
CD Receiver System | Micro chaîne CD | CD-Receiversystem |
Sistema CD con amplificatore | CD Receiver System |
Sistema receptor de CD | Система ресивера CD
XC-HM51
CD Receiver | Micro chaîne CD | CD-Receiver |
Ricevitore CD | CD-Receiver | Receptor de CD | CD-Ресивер
Operating Instructions
Mode d'emploi
Bedienungsanleitung
Istruzioni per l'uso
Handleiding
Manual de instrucciones
Инструкции по эксплуатации
-K/-S
-K/-S
Advertisement
Chapters
Table of Contents

Related Manuals for Pioneer X-HM51


Summary of Contents for Pioneer X-HM51
- Page 1 X-HM51 -K/-S CD Receiver System | Micro chaîne CD | CD-Receiversystem | Sistema CD con amplificatore | CD Receiver System | Sistema receptor de CD | Система ресивера CD XC-HM51 -K/-S CD Receiver | Micro chaîne CD | CD-Receiver | Ricevitore CD | CD-Receiver | Receptor de CD | CD-Ресивер...
-
Page 2: Operating Environment
When you find it Do not install this unit in a poorly ventilated area, or in damaged, ask your nearest PIONEER authorized service locations exposed to high humidity or direct sunlight center or your dealer for a replacement. - Page 3 (including products supported by this unit). • Pioneer is not responsible for any malfunction of the compatible Pioneer product due to communication error/malfunctions associated with your network connection and/or your connected equipment.
-
Page 4: Table Of Contents
08 Using the tuner (X-HM51 only) ....... . . 7 Listening to the radio broadcasts . -
Page 5: Before You Start
If a battery should leak and the fluid • AAA batteries (R03) x 2 should get on your skin, flush it off with large quantities • Speaker cord x 2 (X-HM51 only) of water. • iPad stand • When disposing of used batteries, please comply with •... -
Page 6: Part Names And Functions
Part names and functions Chapter 2: Part names and functions STANDBY/ON Remote control Switches the receiver between standby and on (page 13). Input function buttons Use to select the input source to this receiver (pages 17, 18, STANDBY/ON OPEN/CLOSE 22, 24, 27 and 28). ... -
Page 7: Detatching And Replacing The Front Grille
Part names and functions 11 Tuner control buttons Detatching and replacing the front ST/MONO grille (X-HM51 only) Use to switch the sound mode between stereo and monaural. (page 24) The front grille of this speaker system is removable. Proceed RDS ASPM... -
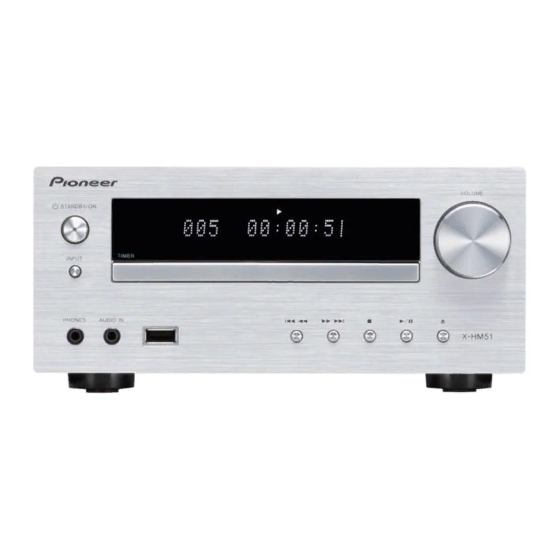
Page 8: Front Panel
Part names and functions Front panel VOLUME STANDBY/ON TIMER INPUT PHONES AUDIO IN STANDBY/ON button AUDIO IN socket Switches the receiver between standby and on (page 13). Use to connect an auxiliary component using a stereo minijack cable (page 27). -
Page 9: Display
Part names and functions Display Lights when the sound is muted. Timer function is set. Note Character display Displays various system information. • The mute icon will be displayed in red. Start playback. Pause playback. -
Page 10: Connections
Supplied Note speaker wire • There is no difference between L and R speakers. Cleaning the glossy finish of the speaker (X-HM51 CAUTION only) • These speaker terminals carry HAZARDOUS LIVE • If you use a dusty or hard cloth or if you rub the screen voltage. -
Page 11: Using Other Subwoofer
10 mm X-HM51 only • Do not install your speakers overhead on the ceiling or wall. The grill is designed to be detachable, and as such it may fall and cause damage or personal injury if installed ANTENNA overhead. -
Page 12: Using External Antennas
Connections Using external antennas Plugging in To improve FM reception Use a PAL connector (not supplied) to connect an external FM CAUTION antenna. • Do not use any power cord other than the one supplied with this unit. • Do not use the supplied power cord for any purpose other than that described below. -
Page 13: Getting Started
Getting started Chapter 4: Getting started To turn the power on General control Press the STANDBY/ON to turn the power on. Input function After use: When the INPUT on main unit is pressed, the current function Press the STANDBY/ON to enter the power stand-by mode. will change to different mode. -
Page 14: Sound Controls
Getting started Sound controls Setting the wake-up timer Used to change the existing timer setting, or to set a new Equalizer timer. When the EQUALIZER is pressed, the current mode setting Press STANDBY/ON to turn the power on. will be displayed. To change to a different mode, press the EQUALIZER repeatedly until the desired sound mode Press and hold CLOCK/TIMER. -
Page 15: Calling The Wake-Up Timer
Getting started Calling the wake-up timer Using Headphones An existing timer setting can be reused. Connect the headphones plug to the PHONES terminal. Follow steps 1 to 3 in “Setting the wake-up When the headphones are connected, there is no sound timer”. -
Page 16: Ipod/Iphone/Ipad Playback
(3/4G) Set the iPod/iPhone/iPad on the stand. iPad/iPad 2 Note • Pioneer does not guarantee that this unit plays iPod/ iPhone/iPad models other than the ones specified. • Some functions may be restricted depending on the model or software version. -
Page 17: Playing Ipod/Iphone/Ipad
iPod/iPhone/iPad playback Playing iPod/iPhone/iPad Connect your iPod/iPhone/iPad. • If an iPod/iPhone/iPad is connected while the unit is turned on, playback of the iPod/iPhone/iPad will not begin. Press USB as the input source. “USB/iPod” is shown on the main display. When the recognition is completed, will begin playing automatically. -
Page 18: Disc Playback
Disc playback Chapter 6: Disc playback This system can play back a standard CD, CD-R/RW in the CD CAUTION format and CD-R/RW with MP3 or WMA files, but cannot • Do not place two discs in one disc tray. record on them. Some audio CD-R and CD-RW discs may not •... -
Page 19: Advanced Cd Or Mp3/Wma Disc Playback
Disc playback Repeat play Advanced CD or MP3/WMA disc Repeat play can play one track, all tracks or a programmed sequence continuously. playback To repeat one track: Press REPEAT repeatedly until “REPEAT ONE” appears. Press STANDBY/ON OPEN/CLOSE DISPLAY TUNE+ FOLDER ENTER. -
Page 20: Programmed Play (Cd Or Mp3/Wma)
Disc playback Programmed play (CD or MP3/WMA) About downloading MP3/WMA You can choose up to 32 selections for playback in the order There are many music sites on the internet that you can you like. download MP3/WMA music files. Follow the instructions from the website on how to download the music files. -
Page 21: Specify The Folder To Play
Disc playback Specify the folder to play Switch the display contents To specify the folder to play, perform the following steps. Press DISPLAY. If the title, artist and album name has been written to the file, STANDBY/ON OPEN/CLOSE that information will be displayed. (The unit can only display DISPLAY FOLDER TUNE+... -
Page 22: Usb Playback
To repeat one track: • Pioneer does not guarantee that any file recorded on a Press REPEAT repeatedly until “REPEAT ONE” appears. Press USB storage device will play or that power will be ENTER. -
Page 23: Specify The Folder To Play
USB playback Specify the folder to play Playing in the desired order To specify the folder to play, perform the following steps. (Programmed Play) Press USB, and connect the USB storage device. The unit can play folders stored on a USB storage device in the desired order. -
Page 24: Using The Tuner
Using the tuner Chapter 8: Using the tuner To receive an FM stereo transmission: Listening to the radio broadcasts • Press ST/MONO to select stereo mode and “AUTO” will be displayed. The following steps show you how to tune in to FM and AM Improving poor FM reception: radio broadcasts using the automatic (search) and manual (step) tuning functions. -
Page 25: To Recall A Memorised Station
Using the tuner To recall a memorised station You can search the following program types: News – News Finance – Stock market Press PRESET +/– to select the desired reports, commerce, trading, Current Affairs – Current etc. Affairs station. Children’s Progs – Programs Information –... -
Page 26: Information Provided By Rds
Using the tuner To stop the ASPM operation before it is • If you want to listen to the same program type of another station, press the RDS PTY whilst the channel number or complete: station name is flashing. The unit will look for the next Press whilst it is scanning for stations. -
Page 27: Other Connections
Other connections Chapter 9: Other connections Connect the rear panel LINE IN audio jacks to your auxiliary CAUTION playback component. • Before making or changing the connections, switch off the power and disconnect the power cord from the AC This unit’s rear panel outlet. -
Page 28: Bluetooth® Audio Playback
Bluetooth SIG, Inc. and any use of such marks by PIONEER CORPORATION is under license. Other Note trademarks and trade names are those of their respective • This unit will be displayed as “X-HM51” on all Bluetooth owners. capable devices that you have. Pairing will start. -
Page 29: Listen To Music On The Unit From A Bluetooth Capable
Bluetooth® Audio playback Listen to music on the unit from a Radio wave caution Bluetooth capable device This unit uses a 2.4 GHz radio wave frequency, which is a band used by other wireless systems (see list below). To prevent noise or interrupted communication, do not use this Press the BT AUDIO. -
Page 30: Radio Wave Reflections
Bluetooth® Audio playback • If you live in a heavily populated residential area (apartment, townhouse, etc.) and if your neighbor’s microwave is placed near your system, you may experience radio wave interference. If this occurs, move your unit to a different place. When the microwave is not in use, there will be no radio wave interference. -
Page 31: Additional Information
If the trouble cannot be rectified even after exercising the checks listed below, ask your nearest Pioneer authorized service center or your dealer to carry out repair work. • If the unit does not operate normally due to external effects such as static electricity disconnect the power plug from the outlet and insert again to return to normal operating conditions. - Page 32 Additional information Problem Check Remedy Unable to connect to a Are there any devices nearby that If so, either move these devices away from the unit, or stop using Bluetooth capable device, no emit electromagnetic waves in the other devices that emit electromagnetic waves. sound comes out at all or 2.4 GHz band (microwaves, wireless sound cuts out when...
- Page 33 Additional information Problem Check Remedy Power is not supplied to the Is AUTH ERROR displayed on the Turn the power off then back on. USB storage device. front panel display? No power is Turn the power off, then disconnect and reconnect the USB storage supplied if the power consumption is device.
-
Page 34: Playable Discs And Formats
Additional information Playable discs and formats • Commercially available audio CDs Audio CD • CD-R/ -RW/ -ROM discs containing music recorded in the CD-DA format WMA files recorded on CD-R/ -RW/ -ROM discs or USB storage devices MP3 files recorded on CD-R/ -RW/ -ROM discs or USB storage devices •... -
Page 35: Do Not Place Objects On This Unit
• This unit’s lens should not become dirty in normal use, but if for some reason it should malfunction due to dust or dirt, consult your nearest Pioneer authorized service center. Although lens cleaners for players are commercially available, we advise against using them... -
Page 36: About Ipod/Iphone/Ipad
Additional information About iPod/iPhone/iPad “Made for iPod,” “Made for iPhone,” and “Made for iPad” mean that an electronic accessory has been designed to connect specifically to iPod, iPhone, or iPad, respectively, and has been certified by the developer to meet Apple performance standards. -
Page 37: Specifications
AAA batteries (R03) ....... . . 2 Speaker cord (X-HM51 only) ......2 iPad stand . - Page 38 Contacter le service après-vente N’installez pas l’appareil dans un endroit mal ventilé ou PIONEER le plus proche ou le revendeur pour un un lieu soumis à une forte humidité ou en plein soleil remplacement. (ou à une forte lumière artificielle).
- Page 39 Dans ce cas, augmentez la distance entre la prise d’entrée d’antenne et cet appareil (y compris les produits pris en charge par cet appareil). • Pioneer n’est pas responsable d’un mauvais fonctionnement du produit Pioneer compatible due à une erreur/défaillance de la connexion réseau et/ou de l’appareil raccordé.
- Page 40 Rappel d’une station mémorisée ....25 (X-HM51 uniquement) ......10 Pour balayer les stations préréglées .
-
Page 41: Préparatifs
Si l’électrolyte • Piles « AAA (R03) » x 2 d’une pile devait couler et se répandre sur votre peau, • Câbles d’enceinte x 2 (X-HM51 uniquement) nettoyez le liquide avec une grande quantité d’eau. • Support pour iPad •... -
Page 42: Les Organes Et Leurs Fonctions
Les organes et leurs fonctions Chapitre 2 : Les organes et leurs fonctions STANDBY/ON Télécommande Cette touche permet d’allumer le récepteur et de le mettre en veille (page 13). Touches de fonction d’entrée STANDBY/ON OPEN/CLOSE Pour sélectionner la source d’entrée de ce récepteur ... -
Page 43: Démontage Et Remontage De La Grille Avant
Démontage et remontage de la lecture Ces touches permettent de contrôler chacune des fonctions grille avant (X-HM51 uniquement) après avoir sélectionné la fonction désirée à l’aide des La grille de protection avant de chaque enceinte est amovible. touches de fonctions d’entrée (page 18). -
Page 44: Panneau Avant
Les organes et leurs fonctions Panneau avant VOLUME STANDBY/ON TIMER INPUT PHONES AUDIO IN Touche STANDBY/ON Prise AUDIO IN Cette touche permet d’allumer le récepteur et de le mettre en Pour raccorder un équipement auxiliaire à l’aide d’un câble veille (page 13). -
Page 45: Afficheur
Les organes et leurs fonctions Afficheur S’allume lorsque le son est coupé. La fonction réveille-matin est activée. Remarque Afficheur alphanumérique Affiche diverses informations sur le système. • L’icône de silence est affichée en rouge. Permet de lancer la lecture. Pour mettre la lecture en pause. -
Page 46: Connexions
Raccordement des enceintes • Ne laissez pas l’âme des câbles d’enceintes venir en (X-HM51 uniquement) contact avec le boîtier du récepteur. • Le fil d’enceinte fourni portant le repère en tube rouge doit être raccordé à la borne plus (+). Raccordez le fil portant le repère en tube rouge à... -
Page 47: Utilisation D'un Autre Woofer Auxiliaire
Vous pouvez raccorder un woofer auxiliaire avec un amplificateur à la prise SUBWOOFER PREOUT. Nettoyage de l’enceinte avec finition brillante (X-HM51 uniquement) Panneau arrière de cet appareil • Si vous utilisez un chiffon poussiéreux ou rugueux ou si vous frottez énergiquement l’affichage, la finition brillante des enceintes ou de l’appareil pourrait être... -
Page 48: Raccordement Des Antennes
Connexions Utilisation des antennes externes Raccordement des antennes Pour améliorer la réception FM Raccordez l’antenne cadre AM et l’antenne filaire FM comme Utilisez un connecteur de type PAL (non fourni) pour indiqué ci-dessous. Pour améliorer la réception et la qualité raccorder une antenne FM externe. -
Page 49: Pour Commencer
Pour commencer Chapitre 4 : Pour commencer Remarque Pour allumer l’appareil • Remettre l’horloge à l’heure lorsque l’alimentation est Appuyez sur la touche STANDBY/ON pour mettre rétablie après que l’appareil ait été rebranché ou après l’appareil sous tension. une panne d’électricité. Après utilisation : Appuyez sur STANDBY/ON pour passer en mode veille. -
Page 50: Commandes De Son
Pour commencer Commandes de son Réglage de l’alarme de réveil Vous pouvez modifier les réglages de l’alarme de réveille- Equalizer matin en cours ou définir une nouvelle alarme. Lorsque vous appuyez sur la touche EQUALIZER, le mode en Appuyez sur STANDBY/ON pour la mise cours est affiché. -
Page 51: Rappel De L'alarme De Réveil
Pour commencer Rappel de l’alarme de réveil Utilisation avec un casque Un réglage de réveille-matin peut être réutilisé. Branchez le connecteur du casque à la prise PHONES. Suivez les étapes 1 à 3 décrite dans la section Lorsque le casque est branché, les enceintes ne fournissent «... -
Page 52: Lecture D'une Source Ipod/Iphone/Ipad
(3/4G) iPad/iPad 2 Remarque • Pioneer ne garantit pas que cet appareil convienne à des iPod/iPhone/iPad, autres que ceux qui sont spécifiés. • Certaines fonctions peuvent ne pas être accessibles en Placez l’iPod/iPhone/iPad sur le support. fonction du modèle et de la version du logiciel. -
Page 53: Lecture À Partir D'un Ipod/Iphone/Ipad
Lecture d’une source iPod/iPhone/iPad Lecture à partir d’un iPod/iPhone/ iPad Connectez votre iPod/iPhone/iPad. • Si un iPod/iPhone/iPad est connecté alors que l’appareil est déjà en marche, la lecture à partir de l’iPod/iPhone/ iPad ne commence pas. Sélectionnez USB comme source d’entrée. «... -
Page 54: Lecture De Disque
Lecture de disque Chapitre 6 : Lecture de disque Ce système peut lire un disque CD standard, un disque CD-R/ Placez le disque sur le tiroir disque, côté RW en format CD et un CD-R/RW avec un fichier MP3 ou étiquette vers le haut. -
Page 55: Lecture Avancée De Disques Mp3/Wma Ou Cd
Lecture de disque Diverses fonctions de disque Arrêt de la lecture : Appuyez sur la touche Fonction Appareil Télé- Opération principal commande Lecture répétée Presser en mode d’arrêt. Lecture Avec répétition lecture, l’appareil peut relire continuellement une piste toutes les pistes ou une séquence programmée. Utilisable en cours de lecture. -
Page 56: Lecture Des Morceaux Programmés
Lecture de disque À propos du téléchargement de • Lors de la lecture au hasard, l’appareil reproduit des morceaux dans un ordre aléatoire. (Vous ne pouvez pas fichiers MP3/WMA choisir l’ordre de lecture des pistes.) Il y a de nombreux sites de musique sur l’Internet d’où on peut •... -
Page 57: Spécifiez Le Dossier De Lecture Souhaité
Lecture de disque Spécifiez le dossier de lecture souhaité Sélection des informations affichées Pour spécifier le dossier à lire, effectuer la procédure Appuyez sur la touche DISPLAY. suivante. Si le titre, le nom de l’artiste et le nom de l’album ont été enregistrés dans le fichier, ces informations apparaissent sur STANDBY/ON OPEN/CLOSE... -
Page 58: Lecture Usb
USB située à l’avant de ce récepteur. le courant à une clé mémoire USB. Pour plus de détails, • Pioneer ne garantit pas que tout fichier enregistré sur un voir la section Lorsqu’un périphérique de stockage USB périphérique de stockage USB puisse être lu par est connecté... -
Page 59: Lecture Aléatoire
Lecture USB Lecture aléatoire Lecture dans l’ordre souhaité Un fichier sur un périphérique de stockage USB peut être lu automatiquement en ordre aléatoire. (Lecture programmée) Pour lire tous les morceaux dans un ordre L’appareil peut lire les dossiers enregistrés sur un aléatoire : périphérique de stockage USB dans l’ordre souhaité. -
Page 60: Utilisation Du Tuner
Utilisation du tuner Chapitre 8 : Utilisation du tuner • La recherche automatique complète des stations peut être effectuée pour les stations RDS en utilisant le mode Écoute d’émissions de radio ASPM de mémorisation automatique des stations de Les étapes suivantes décrivent la façon de régler les bandes radio (voir page 26). -
Page 61: Rappel D'une Station Mémorisée
Utilisation du tuner Appuyez sur la touche MEMORY/ Utilisation du système RDS (Radio PROGRAM pour enregistrer la station dans la mémoire. Data System) Si l’affichage du numéro de préréglage passe du mode clignotant au mode fixe avant que la station ne soit mise en Présentation du système RDS mémoire, reprenez la procédure à... -
Page 62: Informations Données Par Rds
Utilisation du tuner Utilisation de la fonction de Appuyez sur pour sélectionner le type mémorisation automatique des de programme à écouter. stations de radio (ASPM) Le type de programme affiché change à chaque pression sur la touche. Si vous maintenez la touche enfoncée, l’affichage En mode ASPM, le tuner recherche automatiquement de des types de programme défile en continu. -
Page 63: Autres Raccordements
Autres raccordements Chapitre 9 : Autres raccordements Connectez l’équipement de lecture auxiliaire aux prises LINE ATTENTION IN situées sur le panneau arrière de l’appareil. • Avant d’effectuer ou de modifier les raccordements, mettez l’appareil hors tension et débranchez le cordon Panneau arrière de cet appareil d’alimentation au niveau de la prise secteur. -
Page 64: Lecture Audio Bluetooth
à leurs propriétaires respectifs. périphérique. Remarque • Cet appareil apparaîtra sous le nom « X-HM51 » sur tous les périphériques sans fil Bluetooth que vous possédez. La procédure d’association commence. • Placez le périphérique sans fil Bluetooth près de l’appareil. -
Page 65: Écouter De La Musique Sur L'appareil À Partir D'un Périphérique Sans Fil Bluetooth
Lecture audio Bluetooth® Vérifiez que l’association a bien été Précaution concernant les ondes effectuée sur le périphérique sans fil Bluetooth. Si l’association avec le périphérique sans fil Bluetooth a été radio réalisée correctement, le nom du périphérique s’affiche sur le Cet appareil utilise une fréquence d'ondes radio de 2,4 GHz, panneau avant de l’appareil. -
Page 66: Réflexions Des Ondes Radio
Lecture audio Bluetooth® • Dans un emplacement exposé au champ magnétique, à de l’électricité statique ou des parasites provenant d’équipements de communication radio, utilisant la même bande de fréquence (2,4 GHz) que cet appareil, tel qu’un périphérique LAN sans fil de 2,4 GHz (IEEE802.11b/g) ou un four à... -
Page 67: Informations Supplémentaires
Examinez les autres composants et les appareils électriques utilisés. Si le problème ne peut pas être résolu en dépit des vérifications ci-dessous, consultez le service après-vente Pioneer le plus proche pour faire réparer l’appareil. • Si l’appareil ne fonctionne pas normalement en raison d’effets extérieurs comme l’électricité statique, débranchez la fiche d’alimentation de la prise de courant et rebranchez-la pour revenir aux conditions normales de fonctionnement. - Page 68 Informations supplémentaires Problème éventuel Vérification Solution Connexion à un périphérique Des équipements produisant des Dans ce cas, éloignez de tels équipements de l’appareil, ou arrêtez sans fil Bluetooth impossible, ondes électromagnétiques dans la d’utiliser les autres équipements qui émettent des ondes aucun son ne sort ou le son bande de fréquences 2,4 GHz (fours à...
- Page 69 Informations supplémentaires Problème éventuel Vérification Solution Les noms de dossiers ou de Le nom de dossier ou les noms de Le nombre maximum de caractères affichables pour les noms de fichiers ne sont pas affichés, fichier contiennent-ils plus que dossier et de fichier est de 30. ou bien ils sont mal affichés.
-
Page 70: Types De Disque Et Formats De Fichier Lisibles
Informations supplémentaires Types de disque et formats de fichier lisibles • CD Audio en vente dans le commerce CD audio • Disques CD-R/-RW/-ROM contenant de la musique enregistrée en format CD-DA Fichiers WMA enregistrés sur des disques CD-R/ -RW/ -ROM ou sur des périphériques de stockage USB Fichiers MP3 enregistrés sur des disques CD-R/ -RW/ -ROM ou sur des périphériques de stockage USB •... -
Page 71: À Propos De La Condensation
Pioneer. Bien que divers produits de nettoyage pour lentille de lecteur soient en vente dans le commerce, nous déconseillons leur utilisation, car certains d’entre... -
Page 72: À Propos Des Disques De Forme Particulière
Informations supplémentaires À propos des disques de forme Rétablissement de tous les particulière réglages à leur valeur par défaut Les disques à formes spéciales (en cœur, hexagonaux, etc.) ne peuvent pas être lus sur cet appareil. N’essayez pas de lire Suivez les étapes ci-dessous pour restaurer tous les de tels disques car ils pourraient endommager cet appareil. - Page 73 Piles AAA (R03) ........2 Câbles d’enceinte (X-HM51 uniquement) ....2 Support pour iPad .
- Page 74 Prüfen Sie das Netzkabel von Zeit zu Zeit. Sollte es vermeiden, und das Gerät darf weder direkter beschädigt sein, wenden Sie sich an Ihre nächste Sonneneinstrahlung noch starken Kunstlichtquellen autorisierte PIONEER-Kundendienststelle oder Ihren ausgesetzt werden. Händler, um es zu ersetzen. D3-4-2-1-7c*_A1_De...
- Page 75 In diesem Fall vergrößern Sie den Abstand zwischen dem Antenneneingangsanschluss und dieser Einheit (einschließlich von dieser Einheit unterstützte Produkte). • Pioneer übernimmt keine Verantwortung für jegliche Fehlfunktionen am kompatiblen Pioneer-Produkt aufgrund von Fehlern/Fehlfunktionen, die mit der Netzwerkverbindung und/oder Ihren anderen angeschlossenen Geräten zusammenhängen.
- Page 76 (Programmwiedergabe) ......23 (nur X-HM51) ........7 08 Verwendung des Tuners Vorderes Bedienfeld .
-
Page 77: Vor Der Inbetriebnahme
Monat) nicht verwendet werden soll. Falls • Mikrozelle (R03, Größe „AAA“) x 2 Batterieelektrolyt ausgelaufen ist, reinigen Sie das • Lautsprecherkabel x 2 (nur X-HM51) Innere des Batteriefachs gründlich, und legen Sie dann • iPad-Ständer neue Batterien ein. Falls ausgelaufener Batterieelektrolyt mit der Haut in Kontakt gekommen ist, •... -
Page 78: Bezeichnungen Und Funktionen Der Teile
Bezeichnungen und Funktionen der Teile Kapitel 2: Bezeichnungen und Funktionen der Teile STANDBY/ON Fernbedienung Schaltet den Receiver zwischen Eingeschaltet und Bereitschaftsmodus um (Seite 13). Eingangsfunktion-Tasten STANDBY/ON OPEN/CLOSE Wird zur Wahl der Eingangsquelle für diesen Receiver verwendet (Seiten 17, 18, 22, 24, 27 und 28). TUNER AUDIO IN Bedientasten des CD-Receivers CLOCK/TIMER... -
Page 79: Loslösen Und Austauschen Des Frontgrills
Bezeichnungen und Funktionen der Teile 10 Wiedergabe-Steuertasten Loslösen und Austauschen des Verwendung zur Steuerung jeder Funktion, nachdem Sie sie unter Verwendung der Eingabefunktionstasten gewählt Frontgrills (nur X-HM51) haben (Seite 18). Der Frontgrill dieses Lautsprechersystems lässt sich 11 Tuner-Einstelltasten entfernen. Die Vorgehensweise ist wie folgt. - Page 80 Bezeichnungen und Funktionen der Teile Vorderes Bedienfeld VOLUME STANDBY/ON TIMER INPUT PHONES AUDIO IN STANDBY/ON-Taste Steckbuchse AUDIO IN Schaltet den Receiver zwischen Eingeschaltet und Verwendung zum Anschluss eines Nebengeräts mit einem Bereitschaftsmodus um (Seite 13). Stereo-Minibuchsen-Kabel (Seite 27).
-
Page 81: Display
Bezeichnungen und Funktionen der Teile Display Leuchtet bei stummgeschaltetem Ton. Die Timer-Funktion ist eingestellt. Hinweis Zeichenanzeige Zeigt verschiedene Systeminformationen an. • Das Stummschaltungs-Icon wird in Rot angezeigt. Hiermit starten Sie die Wiedergabe. Anhalten der Wiedergabe. -
Page 82: Anschlüsse
SPEAKERS betreffenden Kabel nicht leicht herausgezogen werden können. SUBWOOFER PREOUT Nur X-HM51 • Schließen Sie keine anderen Lautsprecherboxen als die im Lieferumfang enthaltenen Lautsprecher an diese Anlage an. • Schließen Sie die mitgelieferten Lautsprecher an keinen anderen Verstärker als den Verstärker im Lieferumfang Rückwand dieses Gerätes... -
Page 83: Anschluß Des Systems (Fortsetzung)
Lautsprecher (links und rechts). ANTENNA Reinigen der glänzenden Oberfläche des SUBWOOFER LINE PREOUT Lautsprechers (nur X-HM51) LOOP • Wenn Sie ein schmutziges oder hartes Tuch verwenden oder wenn Sie den Bildschirm kräftig reiben, wird die UNBAL Oberfläche des Produkts zerkratzt. -
Page 84: Anschluss Der Antennen
Anschlüsse Verwendung externer Antennen Anschluss der Antennen Zur Verbesserung des UKW-Empfangs Schließen Sie die MW-Rahmenantenne und die UKW- Benutzen Sie eine PAL-Verbindung (nicht im Lieferumfang), Drahtantenne wie unten dargestellt an. Um den Empfang und um eine externe UKW-Antenne anzuschließen. die Klangqualität zu verbessern, schließen Sie bitte externe Antennen an (siehe Verwendung externer Antennen unten). -
Page 85: Die Ersten Schritte
Die ersten Schritte Kapitel 4: Die ersten Schritte Hinweis Einschalten der Stromversorgung • Wenn die Stromzufuhr nach dem erneuten Anschließen Drücken Sie STANDBY/ON, um den Strom einzuschalten. des Gerätes oder nach einem Stromausfall wieder hergestellt ist, stellen Sie die Uhrzeit erneut ein. Nach Gebrauch: Drücken Sie STANDBY/ON, um den Strom-Standby-... -
Page 86: Lautstärkeregler
Die ersten Schritte Lautstärkeregler Einstellen des Weck-Timers Zur Änderung der momentanen Timer-Einstellung oder für Equalizer eine neue Timer-Einstellung verwendet. Wenn der EQUALIZER gedrückt wird, wird die momentane Drücken Sie STANDBY/ON, um das Gerät Modus-Einstellung angezeigt. Drücken Sie zur Änderung auf einzuschalten. -
Page 87: Anwählen Des Weck-Timers
Die ersten Schritte Anwählen des Weck-Timers Verwenden von Kopfhörern Eine vorhandene Timer-Einstellung kann wiederverwendet werden. Die Kopfhörer an den Anschluss PHONES anschließen. Wenn die Kopfhörer angeschlossen sind, kommt aus den Folgen Sie den Schritten 1 bis 3 in „Setting Lautsprechern kein Ton. the wake-up timer“. -
Page 88: Ipod/Iphone/Ipad-Wiedergabe
Die von diesem Gerät unterstützten iPod/iPhone/iPad- homeav/support/ios/eu/). Modelle sind in der nachstehenden Tabelle aufgelistet. • Das Installieren von anderen Software- Versionen als den auf der Website von Pioneer angezeigten auf Ihrem iPod/iPhone/iPad USB-Anschluss (nur Audio) iPod/iPhone/iPad kann dazu führen, dass diese inkompatibel mit diesem System werden. -
Page 89: Abspielen Des Ipods/Iphones/Ipads
iPod/iPhone/iPad-Wiedergabe Stellen Sie das iPod/iPhone/iPad auf den Hinweis Ständer. • Detaillierte Anweisungen zur Bedienung Ihres iPods/ iPhones/iPads finden Sie in dessen Bedienungsanleitung. • Nach jedem Anschließen eines iPods/iPhones/iPads an dieses Gerät wird dieses aufgeladen. (Diese Funktion wird auch im Standby-Modus unterstützt.) •... -
Page 90: Disc-Wiedergabe
Disc-Wiedergabe Kapitel 6: Disc-Wiedergabe Diese Anlage kann Standard-CDs und -CD-R/RWs im CD- Legen Sie die Disc mit dem Etikett nach oben Format sowie CD-R/RWs mit MP3- oder WMA-Dateien in das Disc-Schubfach ein. wiedergeben, sie kann diese aber nicht bespielen. Einige Audio-CD-Rs/CD-RWs können nicht abspielbar sein, abhängend vom Zustand der zur Aufnahme verwendeten Disc oder Vorrichtung. -
Page 91: Weitere Wiedergabe Von Cds Oder Mp3/Wma
Disc-Wiedergabe Verschiedene Disc-Funktionen Wiederholte Wiedergabe Bei der wiederholten Wiedergabe können ein Titel, alle Titel Funktion Hauptgerät Fernbedienung Betrieb oder eine programmierte Reihenfolge fortlaufend abgespielt In der Stopp-Betriebsart Wiedergabe werden. drücken. Wiederholen eines Titels: Drücken Sie im Stopp ... -
Page 92: Programmierte Wiedergabe (Cd Oder Mp3/Wma)
Disc-Wiedergabe Programmierte Wiedergabe (CD oder Herunterladen von MP3/WMA MP3/WMA) Im Internet gibt es zahlreiche Musik-Seiten, von denen man Musik-Dateien MP3/WMA herunterladen kann. Befolgen Sie Zur Wiedergabe können Sie bis zu 32 Titel in der die Anweisungen auf der Website für das Herunterladen gewünschten Reihenfolge wählen. -
Page 93: Geben Sie Das Verzeichnis An, Das Wiedergegeben Werden Soll
Disc-Wiedergabe Umschalten des Display-Inhalts • Von einer Disc mit MP3/WMA-Dateien können bis zu 255 Verzeichnisse und 999 Dateien (einschließlich der nicht abspielbaren Dateien) gelesen werden. Drücken Sie DISPLAY. Wenn der Titel, der Name des Interpreten und der Name des DATEI 3 STAMM VERZEICHNIS A VERZEICHNIS C... -
Page 94: Usb-Wiedergabe
Gerät ein USB-Speichergerät nicht erkennt, dieses Receivers ermöglicht es, Zweikanal-Audio zu hören. Dateien nicht abspielt oder das USB-Speichergerät • Pioneer garantiert nicht, dass jede Datei, die auf einem nicht mit Strom versorgt. Einzelheiten finden Sie im USB-Speicher gespeichert ist, wiedergegeben wird oder Abschnitt Wenn ein USB-Speichergerät angeschlossen ist... -
Page 95: Zufallswiedergabe
USB-Wiedergabe Zufallswiedergabe Wiedergabe in einer gewünschten Die Dateien des USB-Speichers können in zufälliger Reihenfolge oder automatisch wiedergegeben werden. Reihenfolge Zufallswiedergabe aller Titel: (Programmwiedergabe) Drücken Sie wiederholt RANDOM, bis „RANDOM ON“ Die Einheit kann die auf einem USB-Speicher gespeicherte erscheint. Drücken Sie ENTER. Verzeichnisse in der gewünschten Reihenfolge wiedergeben. -
Page 96: Verwendung Des Tuners
Verwendung des Tuners Kapitel 8: Verwendung des Tuners • Mit dem Modus Auto Station Program Memory (ASPM) kann eine vollautomatische Einstellung von RDS- Anhören von Radiosendungen Sendern realisiert werden (siehe Seite 26). Die folgenden Schritte beschreiben die Einstellung von UKW- Empfangen einer UKW-Stereosendung: und MW-Radiosendungen mittels der automatischen •... -
Page 97: Abrufen Eines Gespeicherten Senders
Verwendung des Tuners Sie können nach folgenden Programmtypen suchen: Hinweis News – Nachrichten Finance – Börsenberichte, • Die Backup-Funktion schützt die gespeicherten Sender Kommerz, Handel usw. Current Affairs – Aktuelle für den Fall eines Stromausfalls oder einer Entfernung Themen Children’s Progs – des Stromkabels einige Stunden. -
Page 98: Rds-Informationen
Verwendung des Tuners Abbrechen des ASPM Betriebes, ehe er • Wenn Sie sich den gleichen Programmtyp auf einem anderen Sender anhören wollen, dann drücken Sie RDS abgeschlossen ist: PTY, während die Kanalnummer oder der Name des Drücken Sie während des Scannens nach Sendern . -
Page 99: Andere Anschlüsse
Andere Anschlüsse Kapitel 9: Andere Anschlüsse Verbinden Sie die Audiobuchsen LINE IN auf dem hinteren ACHTUNG Bedienfeld mit Ihrem Wiedergabe-Nebengerät. • Schalten Sie, ehe Sie die Anschlüsse vornehmen oder ändern, den Strom aus und ziehen Sie das Netzkabel Rückwand dieses Gerätes aus der Netzsteckdose. -
Page 100: Bluetooth® Audio-Wiedergabe
Pairing-Vorgang am Gerät vornehmen. sind das Eigentum ihrer jeweiligen Inhaber. Hinweis • Diese Einheit wird auf allen Bluetooth-fähigen Geräten, die Sie haben, als „X-HM51“ angezeigt. Das Pairing beginnt. • Das Bluetooth-fähige Gerät nahe an der Einheit platzieren. • Bitte ziehen Sie zu Einzelheiten die Bedienungsanleitung für Ihr Bluetooth-fähiges Gerät zu... -
Page 101: Musik Auf Der Einheit Von Einem Bluetooth-Fähigen Gerät
Bluetooth® Audio-Wiedergabe Auf dem Bluetooth-fähigen Gerät Warnhinweis Funkwellen bestätigen, dass das Pairing abgeschlossen ist. Wenn das Pairing mit dem Bluetooth-fähigen Gerät korrekt Dieses Gerät arbeitet mit einer Funkwellenfrequenz von abgeschlossen worden ist, wird auf dem vorderen Bedienfeld 2,4 GHz, einem Frequenzband, das auch von anderen der Einheit die Bezeichnung des Bluetooth-fähigen Geräts drahtlosen Systemen genutzt wird (siehe Liste weiter unten). -
Page 102: Funkwellenreflektionen
Bluetooth® Audio-Wiedergabe • Neben großen Möbelstücken aus Metall. • In einer Menschenmenge oder in der Nähe eines Gebäudes oder Hindernisses. • An einem Standort, der einem Magnetfeld, statischer Elektrizität oder HF-Einstreuungen von Funkanlagen ausgesetzt ist, die das gleiche Frequenzband (2,4 GHz) wie diese Anlage nutzen, z. -
Page 103: Zusätzliche Informationen
Punkte. Manchmal liegt das Problem bei einer anderen Komponente. Überprüfen Sie die anderen verwendeten Komponenten und die elektrischen Anschlüsse. Falls das Problem selbst nach dem Durchgehen der unten aufgeführten Checkliste nicht behoben werden kann, wenden Sie sich bitte an Ihr von Pioneer autorisiertes Service-Center oder Ihren Händler und lassen Sie eine Reparatur durchführen. - Page 104 Zusätzliche Informationen Problem Prüfpunkt Maßnahme zur Behebung Der Anschluss an ein Befinden sich irgendwelche Geräte Ist dies der Fall, dann platzieren Sie entweder diese Geräte entfernt Bluetooth-fähiges Gerät ist in der Nähe, die elektromagnetische von der Einheit oder stoppen Sie die Verwendung anderer Geräte, nicht möglich, es wird Wellen im 2,4 GHz-Band aussenden die elektromagnetische Wellen aussenden.
- Page 105 Zusätzliche Informationen Problem Prüfpunkt Maßnahme zur Behebung Ordner- oder Dateinamen Enthalten die Namen der Die maximale Anzahl von anzeigbaren Zeichen für die Verzeichnis- werden überhaupt nicht oder Verzeichnisse oder Dateien mehr als und die Dateinamen beträgt 30. nicht richtig angezeigt. 30 Zeichen? Verzeichnis- oder Dabei handelt es sich nicht um eine...
-
Page 106: Abspielbare Discs Und Formate
Zusätzliche Informationen Abspielbare Discs und Formate • Handelsübliche Audio-CDs Audio-CD • CD-R/-RW/-ROM-Discs, die im CD-DA-Format aufgezeichnete Musikdaten enthalten WMA-Dateien, die auf CD-R/CD-RW/CD-ROM-Discs oder USB-Speicher (USB-Gerät) aufgenommen wurden. MP3- Dateien, die auf CD-R/CD-RW/CD-ROM-Discs oder USB-Speicher (USB-Gerät) aufgenommen wurden. • Mit diesem Gerät können ausschließlich finalisierte Vorsichtsmaßregeln bei der Discs abgespielt werden. -
Page 107: Hinweise Zu Kondensatbildung
Zusätzliche Informationen Setzen Sie den Receiver nicht der Hitze aus. bitte zwecks Reinigung der Linse an eine Pioneer- Kundendienststelle. Vom Gebrauch von Stellen Sie das Gerät nicht auf einen Verstärker oder eine handelsüblichen Linsenreinigern wird abgeraten, da andere Komponente, die Wärme erzeugt. Wenn Sie den derartige Reiniger die Abtasterlinse beschädigen... -
Page 108: Speziell Geformte Discs
Zusätzliche Informationen ihnen angebracht sind, und dass der Klebstoff der Etiketten herausgequollen ist. Überzeugen Sie sich vor Wiederherstellen aller der Verwendung der geliehenen Discs, dass sich rund Standardeinstellungen um die Kanten solcher Etiketten kein Klebstoff befindet. Führen Sie die unten angegebenen Schritte aus, um alle Einstellungen auf ihre Standard-Einstellungen zurückzusetzen. -
Page 109: Technische Daten
Mikrozelle (R03, Größe „AAA“) ......2 Lautsprecherkabel (nur X-HM51) ..... . 2 iPad-Ständer . - Page 110 (o a sorgenti di luce artificiale molto forti). della PIONEER oppure al vostro rivenditore per la D3-4-2-1-7c*_A1_It sostituzione del filo di alimentazione.
- Page 111 In tal caso, aumentare la distanza fra il connettore di ingresso dell’antenna e questa unità (compresi i prodotti da essa supportati). • Pioneer non è responsabile di malfunzionamenti del prodotto Pioneer compatibile dovuti ad errori / malfunzionamenti associati alla propria connessione di rete e / o alle attrezzature cui si è...
- Page 112 ....... . 23 (solo X-HM51) ....... . . 7 08 Come usare il sintonizzatore Pannello anteriore .
-
Page 113: Prima Di Cominciare
Se una batteria dovesse perdere il fluido che • Batterie AAA (R03) x 2 contiene ed entrare in contatto con la pelle, lavarlo via • Cavo Altoparlante x 2 (solo X-HM51) bene con acqua abbondante. • Supporto iPad • Se dovete smaltire vecchie pile, attenetevi alle leggi •... -
Page 114: Nome Delle Parti E Loro Funzione
Nome delle parti e loro funzione Capitolo 2: Nome delle parti e loro funzione STANDBY/ON Telecomando Commuta il ricevitore tra standby e on (pagina 13). Selettori di entrata Usarlo per selezionare la sorgente di entrata a questo STANDBY/ON OPEN/CLOSE ricevitore (pagine 17, 18, 22, 24, 27 e 28). ... -
Page 115: Rimuovere E Ricollocare La Griglia Frontale
Nome delle parti e loro funzione 11 Tasti di comando Tuner Rimuovere e ricollocare la griglia ST/MONO frontale (solo X-HM51) Usare per commutare la modalità di suono tra stereo e mono. (pagina 24) La griglia frontale di questo sistema altoparlanti è rimovibile. -
Page 116: Pannello Anteriore
Nome delle parti e loro funzione Pannello anteriore VOLUME STANDBY/ON TIMER INPUT PHONES AUDIO IN Tasto STANDBY/ON Presa AUDIO IN Commuta il ricevitore tra standby e on (pagina 13). Usare per connettere una componente ausiliaria tramite un cavo stereo minijack (pagina 27). -
Page 117: Display
Nome delle parti e loro funzione Display Si illumina quando il suono viene silenziato. La funzione orologio è stata impostata. Nota Display dei caratteri Visualizza varie informazioni sul sistema. • L’icona mute verrà visualizzata in rosso. Avviare la riproduzione. Pausa playback. -
Page 118: Collegamenti
Collegamento dei diffusori (solo X-HM51) • Il cavo dell’altoparlante in dotazione con il tubo rosso è per il terminale più (+). Collegare il cavo rosso al terminale più (+) e l’altro cavo al terminale meno (–). -
Page 119: Utilizzo Di Un Altro Subwoofer
Alla presa di ingresso audio 10 mm Cavo audio (disponibile in commercio) Solo X-HM51 Subwoofer disponibili sul mercato • Non installare gli altoparlanti appesi al soffitto o alla (amplificatore incorporato) parete. La griglia è stata progettata per essere rimossa, pertanto potrebbe cadere e causare danni o incidenti alla persona se installata in alto. -
Page 120: Collegamento Delle Antenne
Collegamenti Uso delle antenne esterne Collegamento delle antenne Per migliorare la ricezione FM Collegare l’antenna AM a telaio e l’antenna FM a filo come Utilizzare un connettore PAL (non fornito) per collegare segue. Per migliorare la ricezione e la qualità sonora, un’antenna FM esterna. -
Page 121: Come Iniziare
Come iniziare Capitolo 4: Come iniziare Per accendere l’apparecchio Comando generale Premere STANDBY/ON per attivare l’alimentazione. Entrata Dopo l’uso: Se si preme INPUT sull’unità principale, la funzione attuale si Premere STANDBY/ON per inserire la modalità di corrente commuterà in una modalità diversa. Premere INPUT stand-by. -
Page 122: Comandi Audio
Come iniziare Comandi audio Impostazione della sveglia Usato per cambiare le impostazioni esistenti dell’orologio o Equalizer per impostarne di nuove. Se si preme EQUALIZER, si visualizzeranno le impostazioni Premere STANDBY/ON per attivare della modalità corrente. Per selezionare una modalità diversa, l’alimentazione. -
Page 123: Regolare La Sveglia
Come iniziare Regolare la sveglia Usare le cuffie Un’impostazione esistente dell’orologio può essere riutilizzata. Connettere lo spinotto delle cuffie al terminale PHONES. Se le cuffie sono collegate, non viene emesso alcun suono Seguire i passaggi da 1 a 3 in “Impostare dagli altoparlanti. -
Page 124: Il Playback Di Ipod/Iphone/Ipad
(3/4G) iPad/iPad 2 Posizionare iPod/iPhone/iPad sul supporto. Nota • Pioneer non garantisce che modelli di iPod/iPhone/iPad diversi da quelli specificati possano venire usati. • Alcune funzioni possono non essere disponibili con certi modelli o certe versioni del software. • Gli iPod/iPhone/iPad devono venire usati per la riproduzione di materiale non protetto da diritti d’autore... -
Page 125: Riprodurre Da Ipod/Iphone/Ipad
Il playback di iPod/iPhone/iPad Riprodurre da iPod/iPhone/iPad Connettere l’iPod/iPhone/iPad. • Se si connette l’iPod/iPhone/iPad mentre l’unità è accesa, non si avvierà il playback dell’iPod/iPhone/iPad. Premere USB come sorgente in entrata. Sul display principale appare “USB/iPod”. Quando il riconoscimento è stato completato, la riproduzione si avvierà... -
Page 126: Riproduzione Di Dischi
Riproduzione di dischi Capitolo 6: Riproduzione di dischi Questo sistema può eseguire riproduzioni di CD standard, Mettere il disco sul vassoio con l’etichetta CD-R/RW nel formato CD e CD-R/RW con file MP3 o WMA, verso l’alto. ma non può registrare su di essi. La riproduzione di alcuni dischi-CD-R e CD-RW potrebbe non essere possibile a causa delle condizioni del disco o dell’apparecchiatura usata per la registrazione. -
Page 127: Ricerca Diretta Di Un Brano
Riproduzione di dischi Varie funzioni del disco Ripetizione di lettura La funzione di ripetizione della riproduzione permette di Funzione Apparecchio Tele- Funzionamento principale comando eseguire la lettura continua di un brano, di tutti i brani o di una sequenza programmata. Premere mentre Riproduzione ... -
Page 128: Riproduzione Programmabile (Cd O Mp3/Wma)
Riproduzione di dischi Riproduzione programmabile (CD o Scaricare MP3/WMA MP3/WMA) Su Internet vi sono vari siti dedicati alla musica da cui scaricare file musicali MP3/WMA. Seguire le istruzioni del Si possono scegliere fino a 32 selezioni da riprodurre sito web per scaricare i file musicali. In seguito, è possibile nell’ordine preferito. -
Page 129: Specificare La Cartella Da Riprodurre
Riproduzione di dischi Specificare la cartella da riprodurre Commutare i contenuti della schermata Per specificare la cartella da riprodurre, eseguire i seguenti passaggi. Premere DISPLAY. Se i nomi di titolo, artista e album sono stati scritti sul file, STANDBY/ON OPEN/CLOSE DISPLAY FOLDER TUNE+... -
Page 130: Riproduzione Usb
30 minuti, USB presente sul lato frontale del ricevitore. l’unità si spegne automaticamente. • Pioneer non garantisce che tutti i file registrati su qualsiasi dispositivo di memoria USB vengano letti o che Ripetizione di lettura la corrente venga fornita al dispositivo di memoria USB. -
Page 131: Specificare La Cartella Da Riprodurre
Riproduzione USB Nota Riproduzione in un ordine • Se si preme il tasto durante la riproduzione casuale, ci si può spostare sulla prossima pista selezionata desiderato (Riproduzione attraverso il funzionamento causale. D’altro canto, programmata) non permette di spostarsi sulla pista precedente. Sarà localizzato solo l’inizio del brano che si sta ascoltando. -
Page 132: Come Usare Il Sintonizzatore
Come usare il sintonizzatore Capitolo 8: Come usare il sintonizzatore • Quando si sintonizza su una stazione RDS (Radio Data System), innanzitutto si visualizzerà la frequenza. Infine, Ascoltare trasmissioni radio il nome della stazione apparirà. I seguenti punti mostrano come sintonizzare le trasmissioni •... -
Page 133: Per Richiamare Una Stazione Memorizzata
Come usare il sintonizzatore • Ripetere il procedimento dei punti 1 a 4 per impostare altre stazioni, oppure per cambiare una stazione Funzionamento di RDS (Radio Data preselezionata. Quando viene memorizzata una nuova System) stazione, la stazione memorizzata precedentemente per quel numero di canale preselezionato sarà... -
Page 134: Informazioni Fornite Da Rds
Come usare il sintonizzatore Se delle stazioni sono già state immesse nella memoria, il Mentre il programma selezionato viene numero delle nuove stazioni che si possono immettere nella visualizzato (entro 6 secondi), premere di nuovo memoria sarà inferiore. RDS PTY. Dopo che il tipo di programma selezionato è... -
Page 135: Altri Collegamenti
Altri collegamenti Capitolo 9: Altri collegamenti Connettere le prese jack LINE IN del pannello posteriore a un ATTENZIONE componente di playback ausiliario. • Prima di eseguire o cambiare i collegamenti, spegnete l’apparecchio e scollegate la spina dalla presa AC. Il pannello posteriore di questa unità Connessione di componenti ausiliari Connettere la mini-presa jack AUDIO IN del pannello frontale... -
Page 136: Riproduzione Bluetooth® Audio
Nota • Questa unità sarà visualizzata come “X-HM51” su tutti i dispositivi Bluetooth abilitati in vostro possesso. L’accoppiamento si avvierà. • Posizionare l’apparecchio abilitato a tecnologia Bluetooth vicino all’unità. -
Page 137: Ascoltare La Musica Sull'unità Con L'apparecchio Abilitato A Tecnologia Bluetooth
Riproduzione Bluetooth® Audio Controllare che l’accoppiamento Avvertenza sulle onde radio sull’apparecchio abilitato a tecnologia Bluetooth sia stato completato. Questa unità utilizza una frequenza di onde radio da 2,4 GHz, Se l’accoppiamento sull’apparecchio abilitato a tecnologia che corrisponde alla banda usata da altri sistemi wireless Bluetooth è... -
Page 138: Onde Radio Riflesse
Riproduzione Bluetooth® Audio • In un luogo esposto a campi magnetici, elettricità statica o interferenze radio provenienti da apparecchiature radio che utilizzano la stessa banda di frequenze (2,4 GHz) di questa unità, ad esempio un dispositivo wireless LAN da 2,4 GHz (IEEE802.11b/g) o un forno a microonde. -
Page 139: Informazioni Aggiuntive
Esaminare gli altri componenti e le apparecchiature elettriche in uso. Se il problema non può essere risolto anche dopo aver effettuato i controlli sopra descritti, chiedere al centro di servizio Pioneer più vicino o al concessionario di svolgere i lavori di riparazione. - Page 140 Informazioni aggiuntive Problema Controllare Soluzione Impossibile connettersi a un Vi sono apparecchi nelle vicinanze In tal caso, allontanare gli apparecchi dall’unità o smettere di usare apparecchio abilitato a che emettono onde altri dispositivi che emettono onde elettromagnetiche. tecnologia Bluetooth, non elettromagnetiche sulla banda viene emesso alcun suono o 2,4 GHz (forni microonde, apparecchi...
- Page 141 Informazioni aggiuntive Problema Controllare Soluzione I nomi della cartella o del file Questo non è un un problema con L’ordine in cui si visualizzano i nomi delle cartelle e dei file dipende non sono visualizzati in questa unità. da quello in cui le cartelle o i file sono stati registrati sul dispositivo ordine alfabetico.
-
Page 142: Dischi E Formati Riproducibili
Informazioni aggiuntive Dischi e formati riproducibili • CD audio disponibili in commercio CD-Audio • CD-R/-RW/-ROM contenenti musica e registrati in formato CD-DA File WMA registrati su dischi CD-R/ -RW/ -ROM o su dispositivi di memoria USB File MP3 registrati su dischi CD-R/ -RW/ -ROM o su dispositivi di memoria USB •... -
Page 143: La Condensa
Pioneer. Nonostante siano disponibili in commercio detergenti per lenti di lettori, se ne sconsiglia l’uso perché possono danneggiare la lente. -
Page 144: Su Ipod / Iphone / Ipad
Informazioni aggiuntive Su iPod / iPhone / iPad Ritorno di tutte le impostazioni ai valori predefiniti Usare i passaggi qui sotto per ripristinare tutte le impostazioni al default. Premere STANDBY/ON per attivare l’alimentazione. “Fatto per l’iPod”, “Fatto per l’iPhone” e “Fatto per l’iPad” significano che un accessorio elettronico è... -
Page 145: Specifiche
Batterie AAA (R03) ........2 Cavo Altoparlante (solo X-HM51) ..... . 2 Supporto iPad . - Page 146 PIONEER onderhoudscentrum vochtigheid of direct zonlicht (of sterke kunstmatige of uw dealer een nieuw snoer te kopen.
- Page 147 Vergroot in een dergelijk geval de afstand tussen de ingangsaansluiting voor de antenne en dit toestel (inclusief door dit toestel ondersteunde apparatuur). • Pioneer kan niet aansprakelijk worden gesteld voor storingen of foutieve werking van het geschikte Pioneer product door communicatiefouten/storingen die samenhangen met uw netwerkverbinding en/of de aangesloten apparatuur.
- Page 148 08 Gebruik van de tuner (alleen X-HM51) ....... . 7 Luisteren naar de radiouitzendingen .
-
Page 149: Voordat U Begint
(een maand of langer) niet meer gebruikt, om • AAA-batterijen (R03) x 2 schade door eventuele batterijlekkage te voorkomen. Als • Luidsprekersnoer x 2 (alleen X-HM51) er batterijvloeistof is gelekt, veegt u de binnenkant van • iPad-houder het batterijvak dan zorgvuldig schoon, voordat u nieuwe •... -
Page 150: Overzicht Van De Bedieningstoetsen
Overzicht van de bedieningstoetsen Hoofdstuk 2: Overzicht van de bedieningstoetsen STANDBY/ON Afstandsbediening Schakelen tussen ruststand en aan (bladzijde 13). Ingangsfunctieknoppen Gebruik deze toets om de ingangsbron van deze receiver te STANDBY/ON OPEN/CLOSE selecteren (bladzijden 17, 18, 22, 24, 27 en 28). ... -
Page 151: Afnemen En Vervangen Van De Grille Aan De Voorzijde (Alleen X-Hm51)
Overzicht van de bedieningstoetsen 11 Tuner-bedieningsfuncties Afnemen en vervangen van de ST/MONO grille aan de voorzijde (alleen X- Gebruik deze functie om het geluid tussen stereo en mono te wijzigen. (bladzijde 24) HM51) RDS ASPM De grille aan de voorzijde van dit speakersysteem kan worden RDS Auto station gebruiken om te zoeken naar stations verwijderd. -
Page 152: Voorpaneel
Overzicht van de bedieningstoetsen Voorpaneel VOLUME STANDBY/ON TIMER INPUT PHONES AUDIO IN STANDBY/ON-toets AUDIO IN-contactpunt Schakelen tussen ruststand en aan (bladzijde 13). Gebruiken voor aansluiting van een extra component via een stereo-ministekerkabel (bladzijde 27). Afstandsbedieningssensor USB-aansluitpunt. -
Page 153: Display
Overzicht van de bedieningstoetsen Display Brandt wanneer het geluid is gedempt. De Timerfunctie is ingesteld. Opmerking Lettertekendisplay Toont uiteenlopende systeeminformatie. • Het Mute-icoon verschijnt in rood. Start de weergave. De weergave onderbreken. -
Page 154: Aansluitingen
• Sluit het netsnoer aan nadat alle aansluitingen tussen de diverse apparaten zijn voltooid. Aansluiten van de luidsprekers (alleen X-HM51) • De meegeleverde luidsprekerdraad met de rode huls is bestemd voor de pluspool (+). Sluit de draad met de - Als de kabelkern van de speaker in contact komt met... -
Page 155: Het Gebruik Van Een Andere Subwoofer
Buitenantennes gebruiken op bladzijde 12). 10 mm afb. a afb. b Alleen X-HM51 • Plaats de luidsprekers niet boven het hoofd aan het plafond of aan de wand. Het rooster is afneembaar en kan daarom van de speaker afvallen en schade of letsel veroorzaken ingeval van installatie boven het hoofd. -
Page 156: Buitenantennes Gebruiken
Aansluitingen Buitenantennes gebruiken Insteken Om de FM-ontvangst te verbeteren Gebruik een PAL-connector (niet meegeleverd) om een WAARSCHUWING externe FM-antenne aan te sluiten. • Gebruik uitsluitend het netsnoer dat bij dit apparaat is meegeleverd. • Gebruik het netsnoer uitsluitend voor het doel dat hieronder staat beschreven. -
Page 157: Aan De Slag
Aan de slag Hoofdstuk 4: Aan de slag Opmerking Het apparaat inschakelen • Wanneer stroomvoorziening is weergegeven nadat het Druk op de toets STANDBY/ON om het apparaat in te apparaat weer is ingestoken of door vermogensuitval, schakelen. stel de klok in opnieuw. Na gebruik: Druk op de toets STANDBY/ON om het apparaat op stand-... -
Page 158: Geluidsbediening
Aan de slag Geluidsbediening De wekkerfunctie instellen Gebruiken om de bestaande timerinstelling te wijzigen of om Equalizer een nieuwe timer in te stellen. Als de EQUALIZER wordt ingedrukt, wordt de huidige Druk op STANDBY/ON om het apparaat modusinstelling getoond. Om de modus te wijzigen, drukt u in te schakelen. -
Page 159: Activeren Van De Wekkerfunctie
Aan de slag Activeren van de wekkerfunctie Gebruik van hoofdtelefoons Een bestaande timerinstelling kan opnieuw worden gebruikt. Sluit de aansluitplug van de hoofdtelefoon aan op het Volg stap 1 en 3 in “Setting the wake-up aansluitpunt PHONES. timer”. Wanneer een hoofdtelefoon is aangesloten, wordt er geen geluid weergegeven via de luidsprekers. -
Page 160: Weergave Van Ipod/Iphone/Ipad
(3/4G) iPad/iPad 2 Opmerking • Pioneer kan niet garanderen dat dit apparaat werkt met andere iPod/iPhone/iPad modellen dan die hieronder zijn aangegeven. • Het is echter mogelijk dat bij sommige modellen of Plaats de iPod/iPhone/iPad op de houder. -
Page 161: De Ipod/Iphone/Ipad Afspelen
Weergave van iPod/iPhone/iPad De iPod/iPhone/iPad afspelen Aansluiting van uw iPod/iPhone/iPad. • Wanneer een iPod/iPhone/iPad is aangesloten terwijl het apparaat is ingeschakeld, gaat de weergave van de iPod/iPhone/iPad niet van start. Druk op USB als de ingangsbron. “USB/iPod” wordt op het hoofddisplay aangegeven. Zodra het apparaat de iPod/iPhone/iPad heeft herkend, wordt deze automatisch afgespeeld. -
Page 162: Disc-Weergave
Disc-weergave Hoofdstuk 6: Disc-weergave Dit systeem kan een standaard CD, CD-R/RW in CD-formaat Druk op OPEN/CLOSE om de schijflade te en CD-R/RW met MP3- of WMA-bestanden afspelen, maar openen. kan deze niet opnemen. Bepaalde audio CD-R en CD-RW discs kunnen vanwege de status van de disc of opname- Druk op / om de weergave te starten. -
Page 163: Geavanceerde Weergave Van Een Cd Of Mp3/Wma-Disc
Disc-weergave Diverse discfuncties Herhaalde weergave In de herhalingsfunctie kan één fragment, alle fragmenten of Functie Hoofd- Afstandsbediening Bediening toestel een geprogrammeerde reeks herhaald worden afgespeeld. Indrukken tijdens de Afspelen Herhalen van één fragment: stopfunctie. Druk herhaaldelijk op REPEAT totdat “REPEAT ONE” Indrukken voor de verschijnt. -
Page 164: Geprogrammeerde Weergave (Cd Of Mp3/Wma)
Disc-weergave Geprogrammeerde weergave (CD of Informatie over het downloaden van MP3/WMA) MP3/WMA U kunt maximaal 32 fragmenten voor weergave in de Op het Internet bevinden zich veel muziek-websites, waar u gewenste volgorde kiezen. MP3/WMA kunt downloaden. Volg de instructies van de website, hoe u de muziekbestanden kunt downloaden. -
Page 165: De Map Kiezen Die Moet Worden Afgespeeld
Disc-weergave De map kiezen die moet worden Wijzig de displayinhoud afgespeeld Druk op DISPLAY. Voer de volgende stappen uit om de map te kiezen die moet Als de titel, artiest en albumnaam naar het bestand zijn worden afgespeeld. geschreven, dan wordt die informatie getoond. (Het systeem toont uitsluitend alfanumerieke tekens. -
Page 166: Usb-Weergave
• Als er geen USB-opslagapparaat wordt afgespeeld en er receiver. heeft meer dan 30 minuten lang geen bediening • Pioneer garandeert niet dat bestanden die op een USB- plaatsgevonden, dan schakelt het apparaat automatisch opslagapparaat zijn opgenomen kunnen worden uit. -
Page 167: De Map Kiezen Die Moet Worden Afgespeeld
USB-weergave Opmerking Afspelen in de gewenste volgorde • Als u op drukt tijdens Random Play, gaat u naar de volgende track die door Random Play wordt (Programma-weergave) geselecteerd. U kunt echter niet naar de vorige track Het apparaat kan de in het USB-opslagapparaat opgeslagen gaan door op te drukken. -
Page 168: Gebruik Van De Tuner
Gebruik van de tuner Hoofdstuk 8: Gebruik van de tuner • Als op een RDS-station (Radio Data System) wordt afgestemd, wordt eerst de frequentie getoond. Tenslotte Luisteren naar de zal de naam van het station getoond worden. radiouitzendingen • RDS-stations kunnen geheel automatisch worden afgestemd via de functie Auto Station Program Memory Hieronder wordt beschreven hoe u afstemt op FM- en AM- (ASPM), zie bladzijde 26. -
Page 169: Instellen Van Een Voorkeurzender
Gebruik van de tuner • Herhaal de stappen 1 tot 4 om andere zenders in te Met RDS kunt u zoeken naar typen programma’s. U kunt stellen of om een voorkeurzender te wijzigen. Wanneer bijvoorbeeld een station zoeken dat het programmatype JAZZ een nieuwe zender in het geheugen opgeslagen wordt, uitzendt op dit moment. -
Page 170: Via Rds Verzorgde Informatie
Gebruik van de tuner Na het scannen zal het aantal zenders dat in het geheugen is Opmerking opgeslagen 4 seconden worden getoond, waarna 4 seconden • Begin, zodra de display stopt met knipperen, weer bij lang de aanduiding “END” getoond zal worden. stap 2. -
Page 171: Overige Aansluitingen
Overige aansluitingen Hoofdstuk 9: Overige aansluitingen Sluit de LINE IN-audiostekers aan het achterpaneel aan op de WAARSCHUWING extra weergavecomponent. • Schakel het apparaat uit en verwijder het netsnoer van het wandcontact voordat u apparatuur aansluit of Het achterpaneel van dit apparaat aansluitingen wijzigt. -
Page 172: Bluetooth® Audioweergave
® Het merk Bluetooth en de logo’s daarvan zijn gedeponeerde Schakel het met Bluetooth uitgeruste handelsmerken van Bluetooth SIG, Inc. PIONEER apparaat waarmee gepaard moet worden in en CORPORATION gebruikt deze onder licentie Andere voer de paringsprocedure uit. handelsmerken en handelsnamen zijn eigendom van de respectieve eigenaren. -
Page 173: Luister Naar Muziek Op Het Systeem Vanaf Een Met Bluetooth Uitgerust Apparaat
Bluetooth® audioweergave Bevestig op het met Bluetooth uitgeruste Waarschuwing radiogolven apparaat dat de paring is voltooid. Als de paring met het met Bluetooth uitgeruste apparaat op Dit apparaat maakt gebruik van een radiogolffrequentie van de juiste wijze is voltooid, wordt de naam van het met 2,4 GHz, wat een band is die wordt gebruikt door andere Bluetooth uitgeruste apparaat op het voorpaneel van het draadloze systemen (zie lijst hieronder). -
Page 174: Weerkaatsingen Van Radiogolven
Bluetooth® audioweergave • In een menigte mensen of in de buurt van een gebouw of een obstakel. • Op een locatie die is blootgesteld aan het magnetische veld, statische elektriciteit of radiogolfinterferentie van radiocommunicatieapparatuur die gebruik maakt van dezelfde frequentieband (2,4 GHz) als dit apparaat, zoals een 2,4 GHz draadloos LAN-apparaat (IEEE802.11b/g) of een magnetron. -
Page 175: Aanvullende Informatie
Als u het probleem aan de hand van de gegeven maatregelen niet kunt verhelpen, dient u contact op te nemen met uw dichtstbijzijnde officiële Pioneer servicecentrum of met uw dealer om het apparaat te laten repareren. - Page 176 Aanvullende informatie Probleem Controle Oplossing Kan geen met Bluetooth Bevindt er zich apparatuur in de Als dat het geval is moet deze apparatuur van het systeem uitgerust apparaat buurt die elektromagnetische golven verwijderd worden of moet andere apparatuur die aansluiten, er komt geen in de 2,4 GHz band (microgolven, elektromagnetische golven uitzendt niet meer worden gebruikt.
- Page 177 Aanvullende informatie Probleem Controle Oplossing Mappen of bestandsnamen Bevatten de map- of bestandsnamen Het maximum aantal tekens dat voor de map en bestandsnamen worden niet juist of helemaal meer dan 30 tekens? kan worden weergegeven is 30. niet aangegeven. Map- of bestandsnamen Dit duidt niet op een storing in de De volgorde waarin de map- en bestandsnamen worden worden niet in alfabetische...
-
Page 178: Afspeelbare Schijven En Indelingen
Aanvullende informatie Afspeelbare schijven en indelingen • In de audiohandel verkrijgbare audio-CD’s Audio CD • CD-R/-RW/-ROM discs met muziek die is opgenomen in het CD-DA formaat WMA-bestanden die op CD-R/-RW/-ROM-schijven zijn opgenomen of USB-opslagapparatuur MP3-bestanden die op CD-R/-RW/-ROM-schijven of USB-opslagapparaten zijn opgenomen •... -
Page 179: Over Condensvocht
• Bij normaal gebruik hoort het lensje van dit apparaat niet voordat gehuurde schijven worden gebruikt. vuil te worden, maar als er mogelijk stof of vuil op is gekomen, raadpleegt u dan uw dichtstbijzijnde Pioneer servicecentrum. Lensreinigers voor spelers zijn in de handel verkrijgbaar, maar sommige kunnen schade aan... -
Page 180: Informatie Over Schijven Met Speciale Vormen
Aanvullende informatie Informatie over schijven met speciale Alle instellingen op de beginstand vormen terugzetten Gebruik in dit apparaat geen discs met afwijkende vormen (zeshoekig, hartvormig e.d.). Probeer niet om dergelijke discs Volg onderstaande stappen om alle instellingen terug te af te spelen, want dat kan dit apparaat beschadigen. stellen op de standaardinstellingen. - Page 181 AAA-batterijen (R03) ....... . 2 Luidsprekersnoer (alleen X-HM51) ..... 2 iPad-houder .
- Page 182 (o de otra luz artificial potente). descargas eléctricas. Revise el cable de alimentación D3-4-2-1-7c*_A1_Es está dañado, solicite el reemplazo del mismo al centro de servicio autorizado PIONEER más cercano, o a su distribuidor. S002*_A1_Es sólo X-HM51 No instale los altavoces en el techo o en los muros por encima de la altura de la cabeza.
- Page 183 En este caso, aumente la distancia entre el conector de entrada de antena y esta unidad (incluyendo los productos compatibles con esta unidad). • Pioneer no se hace responsable de ningún fallo del producto Pioneer compatible debido a un error de comunicación/fallos de funcionamiento asociados con su conexión a la red y/o su equipo conectado.
- Page 184 Reproducción en el orden deseado (reproducción (sólo X-HM51) ....... . . 7 programada) .
-
Page 185: Antes De Comenzar
• Pilas AAA (R03) x 2 tiempo (1 mes o más). Si advirtiera la presencia de fugas • Cable de altavoz x 2 (sólo X-HM51) en las pilas, limpie cuidadosamente el interior del • Soporte de iPad compartimiento e introduzca pilas nuevas. -
Page 186: Nombres Y Funciones De Los Controles
Nombres y funciones de los controles Capítulo 2: Nombres y funciones de los controles STANDBY/ON Mando a distancia Alterna el receptor entre encendido y modo de espera (página 13). Botones de función de entrada STANDBY/ON OPEN/CLOSE Utilícelos para seleccionar la fuente de entrada para este ... -
Page 187: Cómo Extraer Y Sustituir La Rejilla Delantera
Nombres y funciones de los controles 11 Botones de control Tuner Cómo extraer y sustituir la rejilla ST/MONO delantera (sólo X-HM51) Permiten alternar el modo de sonido entre estéreo y monoaural. (página 24) La rejilla frontal del sistema de altavoces es extraíble. -
Page 188: Panel Frontal
Nombres y funciones de los controles Panel frontal VOLUME STANDBY/ON TIMER INPUT PHONES AUDIO IN Botón STANDBY/ON Toma de AUDIO IN Alterna el receptor entre encendido y modo de espera Permite conectar un componente auxiliar mediante un cable (página 13). -
Page 189: Indicadores
Nombres y funciones de los controles Indicadores Se ilumina cuando se silencia el sonido. La función del temporizador está activada. Nota Pantalla de visualización de caracteres Muestra diversos datos del sistema. • El icono de silencio se mostrará en rojo. Para iniciar la reproducción. -
Page 190: Conexiones
Inserte los cables del altavoz de manera segura en los terminales y compruebe que el cable no se sale con facilidad. Sólo X-HM51 • No conecte ningún altavoz que no haya sido suministrado con este sistema. • No conecte los altavoces suministrados a ningún amplificador que no sea el que se suministra con este sistema. -
Page 191: Utilizar Otro Bafle
PREOUT LOOP UNBAL 75 Ω 10 mm Sólo X-HM51 A la toma de entrada • No instale los altavoces en el techo o en los muros por de audio encima de la altura de la cabeza. La rejilla ha sido diseñada para que se pueda desmontar;... -
Page 192: Conexión De Antenas
Conexiones Uso de antenas exteriores Conexión de antenas Para mejorar la recepción en FM Conecte la antena de cuadro de AM y la antena de hilo de FM Utilice un conector PAL (no suministrado) para conectar una como se indica a continuación. Para mejorar la recepción y la antena de FM externa. -
Page 193: Primeros Pasos
Primeros pasos Capítulo 4: Primeros pasos Nota Para encender la unidad • Cuando se restablece la alimentación eléctrica después Pulse STANDBY/ON para conectar la alimentación. de volver a conectar la unidad o después de un fallo eléctrico, configure el reloj. Después del uso: Para colocar la unidad en el modo de espera, pulse STANDBY/ON. -
Page 194: Controles De Sonido
Primeros pasos Controles de sonido Configuración del despertador Para cambiar la configuración actual del despertador o Equalizer realizar una nueva configuración: Al pulsar EQUALIZER, se mostrará el ajuste del modo en Pulse STANDBY/ON para conectar la curso. Para cambiar a otro modo, pulse EQUALIZER varias alimentación. -
Page 195: Cómo Restablecer El Despertador
Primeros pasos Cómo restablecer el despertador Nota Se puede reutilizar un ajuste de temporizador existente. • El temporizador de desconexión automática puede ajustarse presionando SLEEP mientras se visualiza el Siga los pasos 1 a 3 en “Setting the wake-up tiempo restante. timer”. -
Page 196: Reproducción De Un Ipod/Iphone/Ipad
Conectando simplemente su iPod/iPhone/iPad a este • Si instala versiones de software distintas de las indicadas en la página web de Pioneer en su iPod/ aparato, podrá escuchar el sonido de alta calidad del iPod/ iPhone/iPad, puede derivar en la incompatibilidad con iPhone/iPad. - Page 197 Reproducción de un iPod/iPhone/iPad Reproducción de un iPod/iPhone/ iPad Conecte el iPod/iPhone/iPad. • Si conecta un iPod/iPhone/iPad cuando la unidad está encendida, la reproducción del iPod/iPhone/iPad no dará comienzo. Pulse USB como fuente de entrada. Se mostrará “USB/iPod” en el display principal. Cuando el reconocimiento haya terminado, comenzará...
-
Page 198: Reproducción De Discos
Reproducción de discos Capítulo 6: Reproducción de discos Este sistema puede reproducir un CD estándar, CD-R/RW en Coloque el disco en la bandeja del disco, con el formato CD y CD-R/RW con archivos MP3 o WMA, pero no la etiqueta mirando hacia arriba. puede grabar en ellos. -
Page 199: Reproducción Avanzada De Cd O Disco De Mp3/Wma
Reproducción de discos Distintas funciones de los discos Repetición de la reproducción La repetición de lectura de una pista se puede realizar de Función Unidad Mando a Funcionamiento principal distancia forma que afecte a todas las pistas o a una secuencia programada de forma continua. -
Page 200: Reproducción Programada (Cd O Mp3/Wma)
Reproducción de discos Reproducción programada (CD o MP3/ Sobre la descarga de archivos MP3/ WMA) Podrá seleccionar hasta 32 selecciones para la reproducción Existen muchas páginas web que permiten descargar en el orden que usted prefiera. ficheros de música MP3/WMA. Siga las instrucciones de la página web acerca de cómo descargar los archivos de En el modo de parada, pulse MEMORY/ música. -
Page 201: Especifique La Carpeta Que Desea Reproducir
Reproducción de discos Especifique la carpeta que desea Cómo cambiar el contenido reproducir visualizado Para especificar la carpeta que desea reproducir, lleve a cabo Pulse DISPLAY. los siguientes pasos. Si el archivo contiene el título, el nombre del artista y el nombre del álbum, esta información se mostrará. -
Page 202: Reproducción Usb
USB, que no reproduzca archivos o interfaz USB de la parte delantera de este receptor. que no suministre alimentación al dispositivo de • Pioneer no garantiza que todos los ficheros grabados en almacenamiento USB. Para obtener más detalles, un dispositivo de almacenamiento USB puedan consulte Cuando se ha conectado un dispositivo de reproducirse, ni que se suministrará... -
Page 203: Reproducción Aleatoria
Reproducción USB Reproducción aleatoria Reproducción en el orden deseado El archivo del dispositivo de almacenamiento USB se puede reproducir en orden aleatorio automáticamente. (reproducción programada) Para reproducir aleatoriamente todas las La unidad puede reproducir en el orden deseado carpetas pistas: guardadas en un dispositivo de almacenamiento USB. -
Page 204: Uso Del Sintonizador
Uso del sintonizador Capítulo 8: Uso del sintonizador • Las emisoras RDS se pueden sintonizar de forma totalmente automática utilizando la Memoria Cómo escuchar emisoras de radio Automática de Estaciones Programadas (ASPM). El siguiente procedimiento describe cómo sintonizar Consulte página 26. emisoras de radio de FM o AM utilizando las funciones de Para recibir una transmisión de FM en estéreo: sintonización automática (búsqueda) y sintonización manual... -
Page 205: Para Recuperar Una Emisora Memorizada
Uso del sintonizador Nota Empleo del sistema de datos • La función de backup protegerá las emisoras radiofónicos (RDS) memorizadas durante algunas horas en el caso de que se produzca una interrupción en el suministro eléctrico o se desenchufe el cable de alimentación de CA. Introducción al RDS Para recuperar una emisora El Radio Data System (Sistema de datos de radio), o RDS... -
Page 206: Información Proporcionada Por Rds
Uso del sintonizador Si usted ya ha almacenado algunas emisoras en la memoria, Mientras se esté mostrando el tipo de el número de emisoras nuevas que podrán almacenarse será programa seleccionado, pulse de nuevo RDS PTY inferior. (antes de que hayan transcurrido 6 segundos). Pulse TUNER en el mando a distancia. -
Page 207: Otras Conexiones
Otras conexiones Capítulo 9: Otras conexiones Conecte las tomas de audio LINE IN del panel posterior al PRECAUCIÓN componente de reproducción auxiliar. • Antes de realizar o cambiar las conexiones, apague el sistema y desenchufe el cable de alimentación de la Panel posterior de este receptor toma de CA. -
Page 208: Reproducción De Audio Con Bluetooth
PIONEER CORPORATION se hace bajo Nota licencia. Otras marcas y nombres comerciales son propiedad • Esta unidad se mostrará como “X-HM51” en todos los de sus respectivos propietarios. dispositivos habilitados para Bluetooth de que usted disponga. -
Page 209: Cómo Escuchar Música En La Unidad Desde Un Dispositivo Habilitado Para Bluetooth
Reproducción de audio con Bluetooth® Confirme en el dispositivo habilitado para Precaución con las ondas Bluetooth que la sincronización se ha llevado a cabo. radioeléctricas Si la sincronización con el dispositivo habilitado para Esta unidad emplea una frecuencia de onda de radio de Bluetooth se ha completado correctamente, el nombre del 2,4 GHz, que es una banda utilizada por otros sistemas dispositivo habilitado para Bluetooth se mostrará... -
Page 210: Reflejos De Ondas Radioeléctricas
Reproducción de audio con Bluetooth® • En un lugar expuesto a un campo magnético, electricidad estática o interferencias de ondas de radio por parte de equipos de radiocomunicaciones que usen la misma banda de frecuencia (2,4 GHz) que esta unidad, tales como dispositivos LAN inalámbricos de 2,4 GHz (IEEE802.11b/g) u hornos de microondas. -
Page 211: Información Adicional
Si el problema no se puede solucionar después de comprobar los puntos indicados abajo, solicite al centro de servicio técnico autorizado de Pioneer o a su distribuidor que le haga los trabajos de reparación necesarios. - Page 212 Información adicional Problema Verificación Solución No se puede conectar a un ¿Hay algún dispositivo cercano que En tal caso, aleje esos dispositivos de la unidad, o deje de usar dispositivo habilitado con emita ondas electromagnéticas en la otros dispositivos que emitan ondas electromagnéticas. Bluetooth, no se escucha banda de 2,4 GHz (microondas, ningún sonido en absoluto o...
- Page 213 Información adicional Problema Verificación Solución Los nombres de carpetas o Los nombres de las carpetas o de los El número máximo de caracteres que se pueden visualizar para los de archivos no se visualizan o archivos, ¿contienen más de 30 nombres de carpetas y de archivos es de 30.
-
Page 214: Discos Y Formatos Que Pueden Reproducirse
Información adicional Discos y formatos que pueden reproducirse • CD de audio de venta en establecimientos comerciales Audio CD • Discos CD-R/-RW/-ROM con música grabada en el formato CD-DA Archivos WMA grabados en discos CD-R /-RW /-ROM o en dispositivos de almacenamiento USB Archivos MP3 grabados en discos CD-R /-RW /-ROM o en dispositivos de almacenamiento USB •... -
Page 215: Acerca De La Condensación
Pioneer más cercano. Aunque se encuentran a la venta limpiadores de lentes para reproductores, no recomendamos utilizarlos porque podrían dañarlas. -
Page 216: Sobre Los Discos Con Formas Especiales
Información adicional Sobre los discos con formas especiales Restauración de todos los ajustes a Los discos con formas especiales (en forma de corazón, los ajustes predeterminados hexagonales, etc.) no se pueden reproducir en esta unidad. No intente reproducir tales discos porque podrían dañar la Para restaurar todos los ajustes a sus valores por defecto, unidad. - Page 217 Pilas AAA (R03) ........2 Cable de altavoz (sólo X-HM51)......2 Soporte de iPad .
- Page 218 проветриваемом помещении или в месте с высокой обнаружения повреждения обратитесь за заменой в влажностью, открытом для прямого солнечного ближайший официальный сервисный центр фирмы света (или сильного искусственного света). PIONEER или к Вашему дилеру. D3-4-2-1-7c*_A1_Ru S002*_A1_Ru только X-HM51 Не устанавливайте громкоговорители на уровне...
- Page 219 В таком случае увеличьте расстояние между входным гнездом антенны и данным аппаратом (включая изделия, поддерживаемые данным аппаратом). • Pioneer не несет ответственности за любые сбои на совместимых изделиях Pioneer по причине ошибок/сбоев связи, связанных с подключением к сети и/или подключенным оборудованием.
- Page 220 ) ...23 X-HM51) ....... 7 .
- Page 221 • • • • • • • AAA (R03) x 2 • x 2 ( X-HM51) • iPad • • • • 30°. 30° 30° • • • • • • • •...
- Page 222 STANDBY/ON . 13). STANDBY/ON OPEN/CLOSE . 17, 18, 22, 24, 27 28). TUNER AUDIO IN CLOCK/TIMER CLOCK/TIMER BT AUDIO SLEEP . 13). EQUALIZER SLEEP . 15. P.BASS . 19). BASS/TREBLE CLEAR RANDOM CLEAR REPEAT . 20). DISPLAY FOLDER TUNE+ DISPLAY USB (...
-
Page 223: X-Hm51)
Tuner ST/MONO X-HM51) . 24) RDS ASPM RDS ( . 25). RDS PTY RDS ( . 25). RDS DISPLAY . 25). 12 OPEN/CLOSE . 18). . 14). 14 RANDOM CD, iPod USB ( . 19). 15 REPEAT CD, iPod USB ( . - Page 224 VOLUME STANDBY/ON TIMER INPUT PHONES AUDIO IN STANDBY/ON AUDIO IN ( . 13). . 27). TIMER Apple iPod/iPhone/iPad ( . 17 22). . 18). . 9. . 13). INPUT . 18). . 15).
- Page 225 •...
-
Page 226: ( X-Hm51)
• • • • X-HM51) • (+). (+), (–). X-HM51 • • SPEAKERS • SUBWOOFER • PREOUT XC-HM51 • X-HM51 16 . • X-HM51) • • • •... - Page 227 • ): 350 / 10 . 12). X-HM51 • ANTENNA • LOOP • UNBAL 75 Ω SUBWOOFER PREOUT. . ), ANTENNA . ). SUBWOOFER LINE PREOUT LOOP UNBAL 75 Ω •...
- Page 228 PAL- • • ANTENNA UNBAL 75 Ω SPEAKER AC IN...
- Page 229 • STANDBY/ON STANDBY/ON, • iPod/iPhone/iPad, INPUT INPUT USB/iPod DISPLAY FOLDER TUNE+ STANDBY/ON OPEN/CLOSE BT AUDIO LINE AUDIO IN TUNER AUDIO IN ENTER BT AUDIO CLOCK/TIMER SLEEP MEMORY MENU /PROGRAM DIMMER EQUALIZER PRESET VOLUME TUNE– STANDBY/ON, CLOCK/TIMER «CLOCK». ENTER. VOLUME VOLUME +/–...
- Page 230 EQUALIZER STANDBY/ON, EQUALIZER, CLOCK/ FLAT TIMER. ACTIVE «ONCE» «DAILY», DIALOGUE ENTER. ONCE – NIGHT DAILY – «TIMER SET», ENTER. P.BASS) P.BASS, P.BASS P.BASS ENTER. • CD, FM, AM, USB/iPod, BT AUDIO, AUDIO IN LINE. ENTER. BASS/TREBLE, ENTER. EQUALIZER P.BASS • ENTER.
- Page 231 PHONES. «Setting the wake-up timer». VOLUME «TIMER ON» STANDBY/ON ENTER. TIMER INPUT PHONES AUDIO IN «Setting the wake-up timer». «TIMER OFF» ENTER. • STANDBY/ON, • • • iPod/iPhone/iPad iPod/iPhone/iPad • iPod/iPhone/iPad «HP MUTE». • •...
-
Page 232: Ipod/Iphone/Ipad
• iPod/iPhone/iPad, Pioneer (http://pioneer.jp/homeav/ iPod/iPhone/iPad. support/ios/eu/). iPod/iPhone/iPad • iPod/iPhone/iPad iPod/iPhone/iPad. Pioneer, • iPod/ iPod/iPhone/iPad iPhone/iPad. iPod/iPhone/iPad, iPod/iPhone/iPad iPod/iPhone/iPad USB ( iPod nano (3/4/5/6/7G) iPod/iPhone/iPad iPod touch (1/2/3/4/5G) iPad iPhone 5 iPod/iPhone/iPad iPhone 4S iPhone 4 iPhone 3GS... -
Page 233: Ipod/Iphone/Ipad
iPod/iPhone/iPad iPod/iPhone/iPad iPod/iPhone/iPad. • iPod/iPhone/iPad iPod/iPhone/iPad «USB/iPod». • iPod/iPhone/iPad - • iPod/iPhone/iPad • iPod/iPhone/iPad iPod/iPhone/iPad, iPod/iPhone/iPad • iPod/iPhone/iPad iPod/iPhone/iPad. • iPod/iPhone/iPad iPod/iPhone/iPad • USB/iPod iPod/iPhone/iPad iPod/iPhone/ iPad, • iPod/ iPhone/iPad • iPod/iPhone/iPad iPod/iPhone/iPad, • iPod/iPhone/iPad iPod/iPhone/iPad, • iPod/iPhone/iPad? iPod/iPhone/iPad • iPod/iPhone/iPad? iPod/iPhone/iPad iPod/iPhone/iPad... - Page 234 CD, CD-R/RW CD CD-R/RW WMA, CD-R CD-RW MP3: MPEG Audio Layer 3. MP3 • MPEG-1/2 Audio Layer OPEN/CLOSE, • WMA: WMA (Windows Media Audio) Advanced System Format, Windows Media Audio. Microsoft Windows Media • Player. • • WMA ( . .). : 32 /44,1 / ).
- Page 235 REPEAT, ENTER. «REPEAT ONE». REPEAT, ENTER. «REPEAT ALL». « MP3/WMA)» REPEAT, «REPEAT ALL». ENTER. REPEAT, ENTER. «REPEAT OFF». • • MP3/WMA STANDBY/ON OPEN/CLOSE DISPLAY TUNE+...
-
Page 236: Mp3/Wma
MP3/WMA • MP3/WMA. • CD-R/RW. • MP3/WMA) MP3/WMA MEMORY/PROGRAM FOLDER MP3/WMA. ENTER • MEMORY/PROGRAM. • CLEAR. • «PRG CLEAR», • MP3/WMA MEMORY/PROGRAM. ФАЙЛ 3 КОРНЕВАЯ ПАПКА A ПАПКА C ФАЙЛ 4 (ПАПКА 1) (ПАПКА 2) (ПАПКА 4) ФАЙЛ 5 ПАПКА D ФАЙЛ... - Page 237 DISPLAY. STANDBY/ON OPEN/CLOSE DISPLAY TUNE+ FOLDER TUNER AUDIO IN «*».) BT AUDIO CLOCK/TIMER SLEEP ENTER MEMORY EQUALIZER MENU /PROGRAM P.BASS PRESET VOLUME TUNE– BASS/TREBLE MUTE – – CLEAR REPEAT RANDOM DIMMER DISPLAY FOLDER TUNE+ ST/MONO...
- Page 238 • USB 2.0. • USB, USB - USB. . 32. • Pioneer • USB, USB. Pioneer «USB/iPod». REPEAT, ENTER. «REPEAT ONE». USB. REPEAT, USB, ENTER. «REPEAT ALL». • « • iPod/iPhone/iPad MP3/WMA)» REPEAT, «REPEAT ALL». ENTER. PHONES AUDIO IN REPEAT, ENTER.
- Page 239 RANDOM, ENTER. «RANDOM ON». MP3/WMA) . 20. RANDOM, ENTER. «RANDOM OFF». • • • USB. FOLDER ENTER. • USB. . 21.
-
Page 240: Rds
• RDS, ) (ASPM), . 26. FM AM ST/MONO, • «AUTO». ST/MONO STANDBY/ON OPEN/CLOSE MONO. DISPLAY TUNE+ FOLDER TUNER AUDIO IN BT AUDIO CLOCK/TIMER SLEEP ENTER MEMORY EQUALIZER MENU /PROGRAM P.BASS PRESET VOLUME TUNE– BASS/TREBLE MUTE – – RANDOM CLEAR REPEAT... -
Page 241: (Rds)
• JAZZ ( News – Finance – Current Affairs – Children’s Progs – Information – PRESET +/–, Sport – Social Affairs – Education – o Religion – Drama – p Cultures – Phone In – Science – Varied Speech – PRESET +/–. - Page 242 «SEARCH», TUNER • ASPM «ASPM» (87,5 • RDS PTY «END». ASPM • «NOT FOUND». RDS DISPLAY, • STANDBY/ON OPEN/CLOSE • DISPLAY FOLDER TUNE+ TUNER AUDIO IN • CLOCK/TIMER BT AUDIO SLEEP ENTER ASPM, EQUALIZER MEMORY • MENU /PROGRAM «END».
- Page 243 LINE IN • AUDIO IN SUBWOOFER LINE PREOUT • iPod/iPhone/iPad, USB. VOLUME STANDBY/ON TIMER INPUT PHONES AUDIO IN AUDIO IN PHONES AUDIO IN LINE, «LINE». INPUT AUDIO IN INPUT, «AUDIO IN». AUDIO IN •...
- Page 244 STANDBY/ON Bluetooth ( BT AUDIO. . .) BT AUDIO, Bluetooth ( PAIRING. Bluetooth. Bluetooth Bluetooth, ® Bluetooth Bluetooth SIG, Inc.; PIONEER CORPORATION • «X- HM51» Bluetooth, • Bluetooth • Bluetooth. • PIN- «0000». ( PIN- «0000».)
- Page 245 Bluetooth® Audio Bluetooth, Bluetooth Bluetooth «*».) • • • • (IEEE802.11b/g) • Bluetooth • • BT AUDIO. • BT AUDIO. • Bluetooth • (HAM) Bluetooth. • • Bluetooth. • Bluetooth. • Bluetooth. Bluetooth, Bluetooth, • Bluetooth, • • •...
- Page 246 Bluetooth® Audio • (2,4 (IEEE802.11b/g) • Bluetooth, Bluetooth. Bluetooth. • • • •...
- Page 247 Pioneer • — CD, MP3, WMA, iPod/iPhone/iPad, AUDIO IN LINE. . 5). . .? . 5). . 35). . . ( . 35). . (WMA, MP3).
- Page 248 Bluetooth, Bluetooth . .)? Bluetooth Bluetooth c Bluetooth. Bluetooth Bluetooth? Bluetooth? Bluetooth, A2DP. USB. USB? USB? FAT16 FAT32. (exFAT, NTFS, HFS USB 2.0. DRM)?
- Page 249 USB. USB? USB. AUTH ERROR? USB. USB. INPUT USB/iPod. iPod/iPhone/iPad iPod/iPhone/iPad iPod/iPhone/iPad iPod/iPhone/iPad . 16). iPod/iPhone/iPad. iPod/iPhone/iPad iPod/iPhone/iPad . 16). iPod/iPhone/iPad « », iPod/iPhone/iPad...
- Page 250 • (Audio CD) Audio CD • CD-R/ -RW/ -ROM CD-DA WMA, CD-R/ -RW/ -ROM MP3, CD-R/ -RW/ -ROM • • UDF), • iPod/iPhone. • STANDBY/ON, ISO9660 Level 1, Level 2 Joliet. «STAND BY», • DRM (Digital Rights Management), AUDIO IN. •...
- Page 251 • • • • • . ., • • • • • • • • • . ., • Pioneer.
- Page 252 . .) STANDBY/ON, INPUT iPod/iPhone/iPad OPEN/CLOSE, STANDBY/ON, “Made for iPod,” “Made for iPhone” “Made for iPad” «DEFAULT». iPod, iPhone iPad Apple. Apple iPod, iPhone iPad iPad, iPhone, iPod, iPod nano iPod touch Apple Inc.,...
- Page 253 AAA (R03) ....... . .2 X-HM51) ....2 iPad .
- Page 254 212-0031, Japan http://www.pioneer.eu [*] X-HM51-K, X-HM51-S, XC-HM51-K, XC-HM51-S English: Dansk: Hereby, Pioneer, declares that this [*] is Undertegnede Pioneer erklærer in compliance with the essential herved, at følgende udstyr [*] requirements and other relevant overholder de væsentlige krav og provisions of Directive 1999/5/EC.
- Page 255 Português: Slovenščina: Pioneer declara que este [*] está Pioneer izjavlja, da je ta [*] v skladu z conforme com os requisitos essenciais bistvenimi zahtevami in ostalimi e outras disposições da Directiva relevantnimi določili direktive 1999/5/CE. 1999/5/ES. Română: Čeština: Pioneer tímto prohlašuje, že tento [*] je Prin prezenta, Pioneer declara ca acest ve shodě...
- Page 256 Примечание: В соответствии со статьей 5 Закона Российской Федерации “О защите прав потребителя” и Указанием Правительства Российской Федерации № 720 от 16 июня 1997 года корпорация Pioneer Europe NV устанавливает условие на следующую продолжительность срока службы официально поставляемых на Российский рынок товаров.