
Related Manuals for Britax Strider Compact


Summary of Contents for Britax Strider Compact
- Page 1 INSTRUCTION MANUAL Steelcraft IMPORTANT: KEEP THIS BOOKLET IN A SAFE PLACE FOR FUTURE REFERENCE. Note: Second Seat, Bassinet, Infant Carrier & Footmuff are all sold separately.
-
Page 2: Table Of Contents
INDEX Stroller Features ..................4 Quick Reference Guide to Compact Single Mode Configurations .... 6 Quick Reference Guide to Compact Double Mode Configurations ... 7 Folding with the Second Seat Warning ............. 8 1 Stroller ....................9 1.1 Stroller General Warnings ............... 10 1.2 Stroller Parts .................... - Page 3 INDEX 1.25 To use the foot muff ................31 1.26 Fitting the mesh cover ................32 1.27 Fitting the rain cover ................34 1.28 To fold/close the Stroller ................. 36 Optional Accessories (Bassinet, Infant Carrier & Second Seat) ..39 Bassinet Warnings ................
-
Page 4: Stroller Features
STROLLER FEATURES S11. Side access zip pocket S1. Adjustable & removable canopy (on both sides) S2. Peek a boo window S12. UV Sun Visor S3. Pivotal handle S13. Adjustable head pillow S4. Tether Strap S14. Reversible seat pad S5. Frame fold mouldings (on both sides) S15. - Page 5 STROLLER FEATURES cont... S23. Canopy window S24. Backrest recline lever S25. Back pocket S26. Accessory bag S27. Brake S28. Rear wheel release S29. Mouldings (for attachment to Second seat connecting pins) S30. Second lock (for Second seat) S31. Lower mouldings (for attachment to second seat frame) *Accessory bag and Stroller seat...
-
Page 6: Quick Reference Guide To Compact Single Mode Configurations
QUICK REFERENCE GUIDE - SINGLE MODE Stroller - Forward Facing Page: 19 Stroller - Rear Facing Page: 22 Bassinet Page: 41 Infant Carrier - Rearward Facing Page: 45 Shown with optional accessories (sold separately) -
Page 7: Quick Reference Guide To Compact Double Mode Configurations
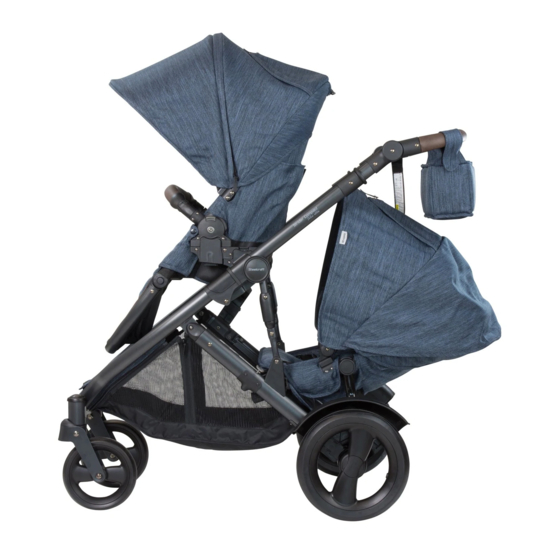
QUICK REFERENCE GUIDE - DOUBLE MODE Stroller Forward Facing + Second Seat Pages: 19 + 49 With Adaptors: 58 + 59 Stroller Forward Facing + Infant Carrier Pages: 19 + 60 With Adaptors: 58 + 59 Infant Carrier + Second Seat Pages: 45 + 49 With Adaptors: 58 + 59 Recommended to use the adaptors in this mode... -
Page 8: Folding With The Second Seat Warning
FOLDING WITH THE SECOND SEAT WARNING WARNING: INCORRECT FOLDING MAY CAUSE DAMAGE THE STROLLER & FRAME. PLEASE FOLLOW THE FOLDING INSTRUCTIONS CAREFULLY. NOTE: If folding the Stroller with the Second Seat attached, you must adjust the stroller pivot handle to the regular or highest position, to prevent the handle from coming in contact with the second seat and causing damage to the stroller. -
Page 10: Stroller
1.1 STROLLER GENERAL WARNINGS WARNINGS: TO AVOID INJURY OR DEATH: ALWAYS APPLY THE BRAKES WHENEVER THE STROLLER IS STATIONARY. • RETAIN FOR FUTURE REFERENCE. • READ ALL INSTRUCTIONS CAREFULLY BEFORE ASSEMBLY AND USE OF THIS STROLLER. • ALWAYS FOLLOW THE INSTRUCTIONS. •... - Page 11 • It is unsafe to use accessories other than those tested and approved by Britax. • For maximum safety only use accessories designed for this stroller. • Do not place more than 4kg in the basket, or 1kg in the seat backrest pocket, 1kg in the Bassinet pocket, or 1kg in the accessory bag.
-
Page 12: Stroller Parts
1.2 STROLLER PARTS Stroller frame Stroller seat (with head pillow) Canopy Arm bar Boot cover Reversible Shoulder pads Accessory bag Seat pad Mesh cover Rain cover Wheel guards Rear wheels Front wheels (4 wheel model) -
Page 13: Stroller Frame Opening
1.3 STROLLER FRAME OPENING Lay the frame on a flat surface. Release the frame lock and lift up the handle to partially open frame. Push down on the handle to Continue to lift the handle up to confirm the frame is locked open. open the frame until the left and right side frame mouldings engage NOTE: To fold/close the frame... -
Page 14: To Fit And Remove The Wheel Guards
1.4 FIT & REMOVE THE WHEEL GUARDS A Position the left and B Fit each guard onto C Pull on each guard right guards beside the moulding at the in the direction shown, the frame as shown. base of the leg tubes. to make sure they are Push down until they locked on correctly. -
Page 15: Front Wheel Fitting And Removal
1.6 FRONT WHEEL FITTING & REMOVAL NOTE: Tip the frame backwards for A Take each front wheel assembly and push the axle into the wheel more convenient assembly. housing, until it locks in. B Pull on both front wheel sets to C To remove the wheel assembly, make sure they are locked on. -
Page 16: Swivel/Fixed Front Wheel Operation
1.7 SWIVEL/FIXED FRONT WHEEL OPERATION NOTE: Always lock the front swivel wheels when on uneven surfaces. For swivel wheel B To lock the front wheels The front wheels will mode, slide both red into the fixed position, automatically lock into the latches up until they slide both red latches fixed position when you... -
Page 17: To Adjust The Pivotal Handle - 7 Positions
1.9 TO ADJUST THE PIVOTAL HANDLE A There is an adjusting B Press both C When the desired button on the inside of buttons in together height position has each handle moulding. and hold. Now rotate been achieved, release the handle up or both buttons. - Page 18 1.10 TO FIT THE ACCESSORY BAG Cont... Now thread each Attach each strap to The accessory bag is hook and loop tab through the hook and loop tab now ready for use. the frame moulding sewn onto the bag to brackets as shown.
-
Page 19: Fitting The Stroller Seat To The Frame
1.11 FITTING THE STROLLER SEAT TO THE FRAME WARNING Always remove your child from the Stroller seat before installing, removing or changing seat direction. NOTE: The seat is reversible so it can face in either forward or rearward position. Hold the Stroller seat over Align the Stroller seat mouldings the frame. -
Page 20: To Fit The Armbar
1.12 TO FIT THE ARMBAR CAUTION: When Child is in the Stroller, keep the arm bar attached to the frame at all times. A One side at a time, B Press in and hold the C Release the button, align the arm bar pin engaging / release then pull on the arm bar with the frame... -
Page 21: Adjusting The Backrest
1.13 ADJUSTING THE BACKREST CAUTION: Ensure that your child’s limbs are inside the seating area before adjusting the backrest. be prepared to support your child’s weight rest. when adjusting the back A To adjust up or down, B Continue to hold the C There are 3 indicated fully lift the adjusting lever up and adjust the... -
Page 22: To Face The Seat In Opposite Direction
1.15 TO FACE SEAT IN OPPOSITE DIRECTION WARNING Always remove your child from the Stroller seat before changing seat direction. A Refer to section 1.14 B Turn the Stroller seat for removing the seat around to face handle. from the frame. Refer to section 1.11 for fitting the seat to the frame. -
Page 23: To Adjust The Head Pillow & Shoulder Harness Height
1.16 TO ADJUST THE HEAD PILLOW HEIGHT NOTE: The head pillow has a small height adjusting range for additional comfort. A The head pillow height is adjustable via the pile strip on the seat back. Adjust the head pillow height to suit the chosen shoulder strap slots. -
Page 24: Harness Adjustment
1.17 TO FIT, USE & REMOVE THE CANOPY cont... For extra protection, To expose the mesh The zip should be fully pull visor out from under section of the canopy, unzipped to expose the the front of canopy. unzip the center section. centre mesh section. - Page 25 1.18 HARNESS ADJUSTMENT cont... A Position the shoulder Shoulder strap strap tongue (A) on the top of the waist buckle tongue (B) one side at a time. Buckle housing Waist Waist strap strap Crotch strap B Push the buckle Shoulder Shoulder tongues combinations strap...
- Page 26 1.18 HARNESS ADJUSTMENT cont... D Tighten or loosen the waist straps, hold and lift the 4 bar slider and then 4 bar pull the harness strap, to slider adjust to the desired fit. E The waist strap needs to fit firmly around the child. Always adjust the harness strap when changing the seating position of the child.
- Page 27 1.18 HARNESS ADJUSTMENT cont... G The Stroller Seat has 3 sets of harness slots at different heights to accommodate the child. To change the shoulder harness height, push the shoulder harness tongue out of the current harness slot and through the back of the seat fabric.
-
Page 28: Tether Strap
1.19 TETHER STRAP WARNING - USE THE TETHER STRAP TO PREVENT THE STROLLER FROM ROLLING AWAY. NOTE: A tether strap is fitted to this Stroller, always place the loop over desired wrist when using the Stroller. A Slide your hand through the tether strap whenever you use the Stroller. -
Page 29: To Use The Reversible Shoulder Pads
1.21 TO USE THE REVERSIBLE SHOULDER PADS NOTE: The shoulder pads are reversible. A Fit the reversible B Repeat for the other C The reverse side of the shoulder pads by fitting reversible shoulder pad. shoulder pad has a different around the harness fabric pattern. -
Page 30: Fitting The Boot Cover
1.23 TO FIT THE BOOTCOVER A Raise the leg support B Pull the top of C Connect the press to the horizontal position. bootcover under the arm studs to keep in place. Hook the boot cover bar and then back over The Boot cover is now ‘pocket’... -
Page 31: To Use The Foot Muff
1.25 TO USE THE FOOT MUFF* *PURCHASED SEPARATELY NOTE: Always secure the harness through the strap holes before use. NOTE: Remove all accessories before installing the foot muff. To fit the foot muff, Undo both sides Unzip the top section ensure the head pillow of the buckle prongs of the Foot muff and set... -
Page 32: Fitting The Mesh Cover
1.25 TO USE THE FOOT MUFF cont... G Place the child in the Stroller and connect Engage the other side of the arm bar the harness buckle. Ensure the harness buckle (see section 1.12). is correctly engaged (see section 1.18). Zip together the top &... - Page 33 1.26 TO FIT THE MESH COVER cont... D Lift the top fabric Wrap the elastic loops To fit the mesh cover cover as required or and clips around the hook over the bassinet, place lower for most and pile strips and attach the elastic section of the protection.
-
Page 34: Fitting The Rain Cover
1.27 TO FIT THE RAIN COVER A To fit the rain cover to the Stroller - Place over the B Join the hook and pile Stroller canopy as shown. Loop the elastic section around the handle tube. over the Stroller seat leg support, then pull the rear rain cover section down between the handle. - Page 35 1.27 TO FIT THE RAIN COVER cont... H Rain cover fitted over G To fit the rain cover to F Join the hook and pile the two Infant Carriers the Infant Carrier and around the handle tube. shown above. Second Seat or second Infant Carrier - Follow Step E, but ensure to pull the rear rain cover...
-
Page 36: To Fold/Close The Stroller
1.28 TO FOLD/CLOSE THE STROLLER • Remove the Bassinet or Infant Carrier if connected to the frame prior to folding. • The Second Seat can either be removed or folded up prior to folding. • The rain cover must also be removed if fitted. NOTE: Stroller Seat and wheels can be removed to reduce the total folded size. - Page 37 1.28 TO FOLD/CLOSE THE STROLLER cont... WARNING: INCORRECT FOLDING MAY CAUSE DAMAGE TO THE STROLLER & FRAME. PLEASE FOLLOW THE FOLDING INSTRUCTIONS CAREFULLY. • Release the front wheels into swivel mode to fold. • Ensure the front wheels are in swivel mode, so the front wheels will automatically position under the stroller during folding.
- Page 38 1.28 TO FOLD/CLOSE THE STROLLER cont... H The two separate I Separation of the G Frame lock components shown Stroller seat and frame engaged. after folding. promotes easier handling and storage. NOTE: Make sure the frame lock is engaged before lifting up and always bend the knees when lifting.
-
Page 39: Optional Accessories (Bassinet, Infant Carrier & Second Seat)
Section Two: Bassinet Section Three: Infant Carrier Section Four: Second Seat... -
Page 40: Bassinet Warnings
2.1 BASSINET WARNINGS WARNINGS: PLEASE FOLLOW THESE WARNINGS IF YOU ARE USING THESE ACCESSORIES. • THE COMPACT & STRIDER BASSINETS ARE THE ONLY BASSINETS DESIGNED TO FIT THE COMPACT STROLLER. • REMOVE STROLLER SEAT OR INFANT CARRIER FROM THE FRAME BEFORE FITTING BASSINET. •... -
Page 41: Bassinet Assembly, Fitting & Removal
2.3 BASSINET ASSEMBLY, FITTING & REMOVAL A To assemble B Frame support rods C Push down lightly on bassinet, locate straps are locked under all the top edges of the in the centre of the four clips. bassinet to check that frame support rods the frame supports are and pull straps slowly... - Page 42 2.3 BASSINET ASSEMBLY, FITTING & REMOVAL cont... I Attach hook and loop H Fold canopy down G Fasten hook and tabs on canopy to the loop tabs around the (see section 2.3 (D)). liner on both side and in handle mouldings and Insert the pad into the 2 places near the main stretch the liner over...
- Page 43 2.3 BASSINET ASSEMBLY, FITTING & REMOVAL cont... NOTE: The bassinet can only be installed rearward (facing mother position) on the Stroller frame. The frame will not fold with bassinet installed so it must be removed before folding. M Lower the Bassinet N Ensure Bassinet is L Line up plastic all the way down until it...
-
Page 44: Infant Carrier Warnings
3.1 INFANT CARRIER WARNINGS (Optional Accessory) WARNINGS: PLEASE FOLLOW THESE WARNINGS IF YOU ARE USING THESE ACCESSORIES. • THE STEELCRAFT & STRIDER INFANT CARRIERS ARE THE ONLY COMPATIBLE INFANT CARRIERS DESIGNED TO FIT COMPACT STROLLER AND COMPACT SECOND SEAT FRAME. •... - Page 45 3.2 INFANT CARRIER FITTING & REMOVAL A Remove Stroller seat or Bassinet from frame, B Push down on the Infant (see sections 1.14 (B) & 2.3 (O)). The Infant Carrier Carrier and make sure it is must face the Stroller handle. With the Infant Carrier located in the frame handle in the upright position, locate the Infant Carrier mouldings.
- Page 46 3.2 INFANT CARRIER FITTING & REMOVAL cont... F IMPORTANT: G Secure your baby H To remove the into the Infant Carrier Pull up on both sides of Infant Carrier, squeeze by the harness the Infant Carrier and both handle latches in provided.
-
Page 47: Second Seat Warnings
4.1 SECOND SEAT WARNINGS (Optional Accessory) WARNINGS: PLEASE FOLLOW THESE WARNINGS IF YOU ARE USING THESE ACCESSORIES. • DO NOT USE THIS SEAT WITH ANY OTHER MODELS OF STROLLER. • THE SECOND SEAT TO BE USED ONLY IN FORWARD FACING POSITION. THAT IS CONNECTED TO THE REAR OF THE STROLLER. -
Page 48: Second Seat Parts
4.2 SECOND SEAT PARTS SS1. Second Seat assembly SS2. Second Seat engaging pins (2) SS3. One hand, 4 position reclining backrest SS4. Adjustable /removable canopy SS5. Canopy Release Buttons SS6. Adaptors (2) SS7. Head Pillow SS8. Shoulder pads (2) SS9. Second Seat leg tube... -
Page 49: Fitting Second Seat To The Stroller
4.3 FITTING SECOND SEAT TO THE STROLLER NOTE: For easier installation, rotate the Pivotal Handle in the most upright position. A Remove the B The Second Seat C While holding the Accessory Bag if fitted. connecting pins (SS2) Second Seat, hook the Apply the Stroller brake, need to lock into the connecting pins (SS2) -
Page 50: To Adjust Into Seating Positions
4.4 TO ADJUST INTO SEATING POSITIONS Adjust to desired The seat will slide up seating position by using and down the frame. Lock the one hand backrest into any one of 4 seating adjusting lever. Lift the positions by releasing the lever all the way up and backrest adjusting lever at the same time, lift up... -
Page 51: Harness Adjustment
4.5 TO FIT, USE & REMOVE THE CANOPY cont... To expose the mesh The zip should be fully section of the canopy, unzipped to expose the center unzip the center section. mesh section. Use the fabric to expose or enclose the mesh section. - Page 52 4.6 HARNESS ADJUSTMENT cont... Position the shoulder Shoulder strap strap tongue (A) on the top of the waist buckle tongue (B) on both sides one side at a time. Buckle housing Waist Waist strap strap Crotch strap Push the buckle Shoulder Shoulder tongues combinations (A+B)
- Page 53 4.6 HARNESS ADJUSTMENT cont... Tighten or loosen the waist straps, hold and lift the 4 bar slider and then 4 bar pull the harness strap, to slider adjust to the desired fit. The waist strap needs to fit firmly around the child. Always adjust the harness strap when changing the seating position of the child.
-
Page 54: Adjusting The Head Pillow Height Position
4.6 HARNESS ADJUSTMENT cont... G The second seat has 2 sets of harness H To reposition slots at different heights to accommodate the harness, pull the child. To change the shoulder harness height, shoulder buckle tongue push the shoulder harness tongue out of the through the desired slot. -
Page 55: Using Reversible Shoulder Pads
4.8 TO USE THE REVERSIBLE SHOULDER PADS A Fit the reversible B Repeat for the other C The reverse side of shoulder pads by fitting reversible shoulder pad. the shoulder pad has a around the harness different fabric pattern. shoulder strap and attach To reverse, undo the the hook and pile. -
Page 56: Folding The Second Seat With The Frame
4.10 FOLDING THE SECOND SEAT WITH THE FRAME CAUTION: Remove the child from the Second Seat before folding. NOTE: Fold the Second Seat before folding the Stroller. A Fold the canopy back, then fully lift up the backrest adjusting lever and lower the Second Seat to the lowest position. -
Page 57: Removing The Second Seat From The Frame
4.11 REMOVING THE SECOND SEAT FROM THE FRAME CAUTION: Remove the child from the Second Seat before folding. A First, fold the B With the Second C Wrap your hands Second Seat up under Seat in the folded around the Second Seat the frame - see section position, locate the Frame and fully depress... -
Page 58: To Use The Adaptors
4.12 TO USE THE ADAPTORS NOTE: Adaptors are supplied to create more space if required, when using the Second Seat or Infant Carrier on Second Seat frame. A Align the adaptor B Press down on the with the Stroller frame adaptors to lock into the mouldings as the Stroller frame mouldings... -
Page 59: Install The Stroller Seat Using The Adaptors
4.13 TO INSTALL THE STROLLER SEAT USING THE ADAPTORS A Lock the Stroller B Adjust the Stroller seat into the adaptors backrest angle as in the forward facing required. position. CAUTION: Stroller seat must be correctly attached, see fitting and removal sections 1.11 & 1.14 4.14 TO INSTALL THE INFANT CARRIER USING THE ADAPTORS CAUTION:... -
Page 60: Fitting And Removing Soft Goods From The Second Seat Frame
4.15 FITTING & REMOVING SOFT GOODS FROM SECOND SEAT FRAME B Lay the Second Seat A To fit the infant carrier C To remove the frame on a flat surface to the second seat frame, canopy, press in and hold facing upwards. - Page 61 4.15 FITTING & REMOVING SOFT GOODS FROM SECOND SEAT FRAME cont... G Release hook and H Release hook and I Pull the fabric pocket loop tab on both sides. loop tab. off from both bottom frame posts. J Pull the fabric clear of L Hold the Second K The Second Seat the mouldings and pull...
-
Page 62: Fitting And Removing Infant Carrier From The Second Frame
4.16 FITTING & REMOVING INFANT CARRIER FROM SECOND FRAME A Lower the Second C For easier installation, B Raise the backrest Seat frame and push remove Stroller seat or Infant adjusting lever and lift the down to lock the Carrier from frame, (see head end of the Second legtubes (SS9) into the sections 1.14 (b) &... - Page 63 4.16 FITTING & REMOVING INFANT CARRIER FROM SECOND FRAME cont... G The handle indicator H IMPORTANT: I Secure your baby should now be GREEN Pull up on both sides of into the Infant Carrier and the Infant Carrier the Infant Carrier and by the harness should be locked into the confirm it is locked into...
-
Page 64: Refit And Remove The Softgoods To The Second Seat
4.17 REFIT THE SOFTGOODS TO THE SECOND SEAT FRAME A Lay the Second Seat B Pull the fabric over C Ensure the latch at frame on a flat surface as the frame. the top of the frame is shown above. pulled through the cutout in the fabric cover. - Page 65 4.17 REFIT THE SOFTGOODS TO THE SECOND SEAT FRAME cont... G Attach hook and loop H Attach hook and loop I Attach the D ring and tab (3) on both sides. tab (2) on both sides webbing around the bar making sure the canopy by sliding the webbing moulding on the top side...
-
Page 66: Stroller Folding Configurations
STROLLER FOLDING CONFIGURATIONS The following are recommended configurations for storage and transportation in a vehicle. Shown with second seat (optional accessory, sold separately). Note: The easiest method is to remove the top seat and optional accessories from the stroller frame and place the accessories and stroller frame into the vehicle separately. -
Page 67: Care & Maintenance
CARE AND MAINTENANCE • To prolong the life of your stroller and accessories keep it clean and do not leave it in the direct sunlight or in the car boot for extended periods of time. • Removable fabric covers and trims may be cleaned using warm water with a household soap or mild detergent. - Page 68 1300 303 330 BRITAX CHILDCARE PTY. LTD. A Britax International Company ABN 55 006 773 6000 99 Derby Road, Sunshine, Victoria, 3020, Australia Britax Childcare Pty Ltd (Customer Service 1300 303 330) Britax Childcare (NZ) Ltd (Customer Service 0508 688 822) For our entire Steelcraft product range, visit www.britax.com.au...