
Related Manuals for Horizon Fitness Endurance 4


Summary of Contents for Horizon Fitness Endurance 4
- Page 1 ENDURANCE 4 ENDURANCE 5 ELLIPTICAL OWNER’S MANUAL Read the ELLIPTICAL gUIdE before using this OWNER’S MANUAL.
- Page 3 ASSEMBLY WARNING There are several areas during the assembly process that special attention must be paid. It is very important to follow the assembly instructions correctly and to make sure all parts are firmly tightened. If the assembly instructions are not followed correctly, the elliptical could have frame parts that are not tightened and will seem loose and may cause irritating noises.
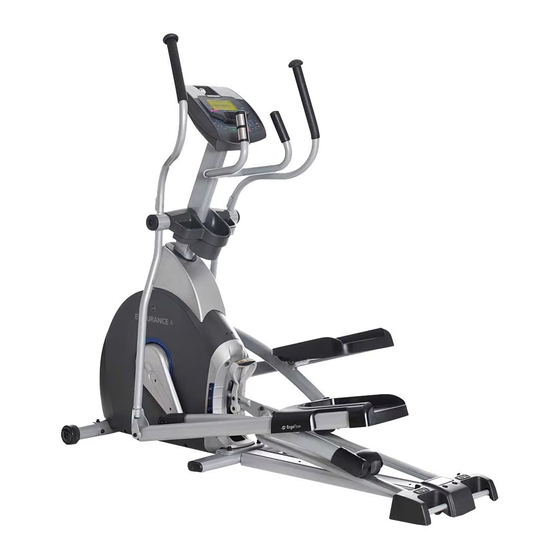
- Page 4 SPEAKERS CONSOLE FAN TOUCH PAD PANEL ENDURANCE 4 UPPER HANDLEBAR AND DISPLAY WINDOWS SHOWN PULSE GRIPS LOWER HANDLEBAR WATER BOTTLE HOLDER MANUAL INCLINE LIFT LEVER TOP CAP PIVOTING FOOT PADS POWER CORD SOCKET CRANK STABILIZER TUBE MAIN FRAME GUIDE RAIL SET...
- Page 5 SPEAKERS CONSOLE FAN ENDURANCE 5 UPPER HANDLEBAR TOUCH PAD PANEL SHOWN AND DISPLAY WINDOWS PULSE GRIPS WATER BOTTLE HOLDER LOWER HANDLEBAR TOP CAP CRANK POWER CORD SOCKET STABILIZER TUBE PIVOTING FOOT PADS MAIN FRAME PEDAL ARM GUIDE RAIL SET REAR COVER LOWER LINK ARM...
- Page 6 ONE bolt. F 2 Pedal Arms NOTE: A light application of grease may aid in the installation of hardware. Any F 1 Manual Incline Set (Endurance 4 only) grease, such as lithium bike grease is recommended. F 2 Lower Handlebars...
- Page 7 ASSEMBLY STEP 1 ENDURANCE 4 SHoWN HARDWARE foR STEP 1: BOLT (A) SPRING WASHER (B) ARC WASHER (C) MODELS 30 mm 15 mm 17 mm STABILIZER TUBE Qty: 4 Qty: 4 Qty: 4 Open hardware for step 1. Attach the stabilizer tube to the main frame using 2 bolts (a), 2 spring washers (b) and 2 arc washers (c) on ARC WASHERS (C) SPRING WASHERS (B)
- Page 8 Qty: 4 Qty: 4 Qty: 4 GUIDE RAIL SET * This step is for ENdURANCE 4 only. BOLTS (D) Open hardware for step 2. Attach manual incline lift lever to guide rail set using 4 bolts (d), 4 flat washers (e), 4 spring washers (f) and 4 nuts (g).
- Page 9 ENDURANCE 5 ASSEMBLY STEP 2 HARDWARE foR STEP 2: ENdURANCE 5 * This step is for models only. FLAT WASHER (D) SPRING WASHER (E) BOLT (F) BOLT (G) Open hardware for step 2. ENDURANCE 5 16 mm 15 mm 20 mm 35 mm Qty: 4 Qty: 4 Qty: 4 Qty: 4...
- Page 10 ASSEMBLY STEP 3 HARDWARE foR STEP 3: ENDURANCE 5 SHoWN MODELS FLAT WASHER (K) WAVY WASHER (L) BOLT (M) 20 mm 22.5 mm 20 mm Qty: 2 Qty: 2 Qty: 2 SPRING WASHER (N) 15 mm Qty: 2 CONSOLE MAST CONSOLE CABLES Open hardware for step 3. PRE-INSTALLED BOLTS AND WASHERS MAIN FRAME...
- Page 11 ASSEMBLY STEP 4 HARDWARE foR STEP 4: Open hardware for step 4. Slide the lower linK arm into BOLT (O) SPRING WASHER (P) FLAT WASHER (Q) MODELS 20 mm 15.4 mm 20 mm the pedal arm bracKet. Qty: 2 Qty: 2 Qty: 2 Attach the lower linK arm to the pedal arm bracKet using 1 flat washer (s), 1 spring washer (r) and 1 bolt (Q).
- Page 12 ASSEMBLY STEP 5 HARDWARE BAG 5 CONTENTS : ENDURANCE 5 SHoWN RUBBER FLAT FLAT MODELS WASHER (R) WASHER (S) WASHER (T) 26 mm 25 mm 26 mm Qty: 2 Qty: 4 Qty: 4 SPRING BOLT (V) WASHER (U) 20 mm 15 mm Qty: 2 Qty: 2 CONSOLE MAST RUBBER WASHER (T) FLAT WASHERS (S)
- Page 13 ASSEMBLY STEP 6 HARDWARE BAG 6 CONTENTS : ENDURANCE 5 SHoWN TEFLON FLAT WASHER (X) SPRING WASHER (Y) MODELS WASHER (W) 17 mm 15 mm 28.4 mm Qty: 2 Qty: 2 Qty: 4 BOLT (Z) NUT (AA) 70 mm Qty: 2 Qty: 2 Open hardware bag 6. Align end of lower linK arm with bracket on NUT (AA) bottom of lower handlebar.
- Page 14 ASSEMBLY STEP 7 HARDWARE BAG 7 CONTENTS : ENDURANCE 5 SHoWN SCREW (BB) SCREW (CC) 12 mm 15 mm MODELS Qty: 3 Qty: 2 SCREWS (BB) CONSOLE MAST TOP CAP Open hardware bag 7. WATER REAR COVER BOTTLE HOLDER Slide top cap and top cap rear cover CONSOLE MAST BOOT over console mast and snap into place.
- Page 15 ASSEMBLY STEP 8 NOTE: There is no hardware bag for this step. ENDURANCE 5 SHoWN HANDLEBAR CAP Attach the console cables to the console. MODELS Carefully tuck the Console cables into the CONSOLE CABLES console mast before attaching the console. CONSOLE Attach console to console mast using 4 UPPER HANDLEBAR pre-installed bolts.
- Page 16 ENDURANCE 4 ASSEMBLY COMPLETE! SHOWN endurance 4 Max. User Weight: 136 kg / 300 lbs Product Weight: 84 kg / 185 lbs Overall dimension: 190 x 62 x 168 cm / 75” x 24” x 66”...
- Page 17 ENDURANCE 5 SHOWN endurance 5 Max. User Weight: 148 kg / 325 lbs Product Weight: 87 kg / 192 lbs Overall dimension: 190 x 62 x 168 cm / 75” x 24” x 66”...
- Page 19 ELLIPTICAL OPERATION This section explains how to use your elliptical’s console and programming. The BASIC OPERATION section in the ELLIPTICAL gUIdE has instructions for the following: • LoCATIoN of THE ELLIPTICAL • PoWER/GRoUNDING INSTRUCTIoNS • fooT PoSITIoNING • MoVING THE ELLIPTICAL • LEVELING THE ELLIPTICAL • P oWER/MANUAL INCLINE oPERATIoN •...
- Page 20 ENDURANCE 4 SHOWN ENDURANCE 4 EnergySaver ENERGIESPARMODUS CONSTANT INTERVAL WORKOUTS WEIGHT LOSS WORKOUTS PERFORMANCE WORKOUTS WATTS HERZFREQUENZ- INTERVALLPROGRAMME GEWICHTSREDUZIERUNGSPROGRAMME LEISTUNGSPROGRAMME GESTEUERT WATTGESTEUERT SPEED STRENGTH PEAK CARDIO MUSCLE PEAK NATURE MOUNTAIN INTERVALS INTERVALS INTERVALS BURN TONER BUILDER DESCENT TRAIL CLIMB GESCHWINDIGKEITS-...
- Page 21 MANUAL INCLINE oPERATIoN The Endurance 4 has an adjustable incline feature to add variety to your workouts. To adjust the incline up or down, stand on the side of the elliptical and place your hand firmly on the top of the shroud. With your other hand, grab the MANUAL INCLINE LIfT LEVER...
- Page 22 ENDURANCE 5 SHOWN ENDURANCE 5 EnergySaver ENERGIESPARMODUS CONSTANT INTERVAL WORKOUTS WEIGHT LOSS WORKOUTS PERFORMANCE WORKOUTS CUSTOM WATTS HERZFREQUENZ- INTERVALLPROGRAMME GEWICHTSREDUZIERUNGSPROGRAMME LEISTUNGSPROGRAMME BENUTZER GESTEUERT WATTGESTEUERT SPEED PEAK CARDIO MUSCLE STRENGTH PEAK NATURE MOUNTAIN INTERVALS INTERVALS INTERVALS BURN TONER BUILDER DESCENT TRAIL CLIMB GESCHWINDIGKEITS- HR INTERVALL...
- Page 23 ENDURANCE 5 CoNSoLE oPERATIoN Note: There is a thin protective sheet of clear plastic on the overlay of the console that should be removed before use. A) LCD DISPLAy WINDoW: time, distance, calories, watts, RPM, incline, speed, resistance level, heart rate, and fan. B) PRoGRAMS: press to select which workout. C) CUSToM 1 & 2 KEyS: press to select custom 1 or custom 2 program.
- Page 24 DISPLAy WINDoWS • HEART RATE (HR): Shown as BPM (beats per • TIME: Shown as minutes : seconds. View minute). Used to monitor your heart rate (displayed the time remaining or the time elapsed in your when contact is made with both pulse grips). workout.
- Page 25 GETTING STARTED CHANGING yoUR PRoGRAM MID-WoRKoUT 1) Check to make sure no objects are nearby that will hinder the movement of the elliptical. Anytime during your workout (Except HR 2) Plug in the power cord and turn the elliptical ON. INTERVALS & HRC), press program button (Switch is located at the bottom-front of the elliptical.) to select a new program.
- Page 26 PRoGRAM INfoRMATIoN MANUAL: Adjust your resistance level manually during your workout. INTERVAL WoRKoUTS SPEED INTERVALS Segment Warm Up Program Segments - Repeat Cool down Seconds 60 60 60 60 30 90 90 30 30 90 30 90 90 30 30 90 60 60 60 60 Level 10 11 12 13 14 15 16 17 18 19 20 SPEED INTERVALS: Improves your strength,...
- Page 27 NoTES: • The large LCd dot matrix window displays your heart rate during exercise. The middle row represents your target heart rate (THR) and the other rows equal +/-5 heart beats. If you are working out beneath your THR, the LCds below the middle row will illuminate. If you are over, the LCds above the middle row will illuminate.
- Page 28 PRoGRAM CARDIo BURN Segment Warm Up 60 Second Program Segments - Repeat Cool down INfoRMATIoN Level 10 11 12 13 14 15 16 17 18 19 20 WEIGHT LoSS WoRKoUTS 10 10 10 10 10 10 11 11 11 11 10 10 10 10 11 11 12 12 12 12 11 11 10 10 10 11 11 12 12 13 13 13 13 12 12 11 11 10 CARDIo BURN: Promotes weight loss by 11 12 12 13 13 14 14 14 14 13 13 12 12 11...
- Page 29 20 30 30 70 80 80 80 80 90 90 90 90 90 90 80 80 70 30 30 20 ELEVATION Level 9 to choose from. For Endurance 4, 10 11 11 12 12 13 13 13 13 12 12 11 11 10 RESISTANCE...
- Page 30 PRoGRAM INfoRMATIoN CoNSTANT WATTS: This workout automatically adjusts the resistance to keep you within a set Watts range and maintains your desired level of exercise intensity. 1) Press CONSTANT WATTS program key and press ENTER to confirm . 2) Set time using and press ENTER .
- Page 31 USING CUSToM PRoGRAMS (ENDURANCE 5 oNLy) 1) Press the CUSTOM 1 or 2 key to select a custom program. Press ENTER to confirm. 2) Set the workout time using and press ENTER. 3) Use to set the resistance level for each segment. Press ENTER to confirm the resistance setting for each segment of the workout.
- Page 32 GoAL CENTER ™ Research shows that those who create and track their fitness goals, on average, achieve greater success than those who do not. Because your new elliptical is equipped with Horizon’s exclusive gOAL CENTER Performance Tracker, you’ve taken an important step towards achieving your fitness goals.
- Page 33 ENERGy SAVER (STANDBy MoDE) This elliptical has an energy saver mode. The display will automatically enter standby mode (energy saver mode) after 15 minutes of inactivity. Almost all power for the elliptical will be off except for some circuits that are needed to detect a key press or RPM detection, indicating the console should “wake up”.
- Page 34 ENDURANCE 4 EXPLoDED VIEW N24x4 Q15x6 Q17x12 L04 L03 Q16x6 J03x2 Q20x3 L02 L06X2 L06X2 B16x4 B23x4 M42x4 B12x2 Q16x4 Z01x4 Z02x4 Q16x6 Z03x4 P07X3 Z02X4 Z11 X4 D13x2 Z 10X4 J03x2 Z22x2 Z09X4 Q14x2...
- Page 35 ENDURANCE 4 PARTS LIST dESCRIPTION dESCRIPTION FRAME SET;REAR;EP565B-SBOM; SCREW;SH;M10X1.5PX15L;HS;BZN;BP CONSOLE MAST SET;SA;S-EP566B; WASHER;FLT;Φ12.0XΦ23.0X2.5T; gUIdE RAIL SET;SA;R;S-EP566B; STOPPER BLOCK;CAM;gM30 gUIdE RAIL SET;SA;L;S-EP566B; SCREW;BH;M8X1.25PX20L;HS;BP CONNECTINg SET;SA;EP565B-SBOM; FOAM;SINgLE;45X20X4T PEdAL ARM SET;SA;L;S-EP566B; BOTTLE HOLdER;ABS;dg;75140;EP565B-2KM; PEdAL ARM SET;SA;R;S-EP566B; SCREW;BH;M8X1.25PX20L;HS;BP ARM REST SET;SA;LU;S-EP566B; WASHER;FLT;Φ8.2XΦ20.0X1.5T;BZN; ARM REST SET;SA;RU;S-EP566B; CABLE TIE;NYLON;BLACK;160L ARM REST SET;SA;Ld;S-EP566B;...
- Page 36 dESCRIPTION dESCRIPTION SCREW;BH;Φ4X10L;TC;PH;BAN;POT SCREW;BH;M8X1.25PX30L;HS; WIRE;CONSOLE;dOWN1200MM(CKM254301-8P+SM- WASHER;SPL;Φ8.2XΦ15.4X2.0T; SENSOR WIRE WASHER;ARC;Φ8.4XΦ17.0X1.0T; POWER WIRE;dC;600MM(dC+CKM 25430101-2P) WASHER;FLT;Φ10.2XΦ20.0X1.5T;BZN; SCREW;BH;Φ3X10L;TC;PH;BOX;POT SCREW;SH;M10X1.5PX20L;HS;BZN; TIE STRAP AdHESIVE; NYLON66;HC-101;W WASHER;SPL;Φ10.2XΦ18.4X2.5T;BAN; CABLE TIE;NYLON;BLACK;160L SCREW;BH;M8X1.25PX35L-20L;HS;P-T AdAPTOR;USA;100-240V 12V/2A ;HZ WASHER;FLT;Φ8.2XΦ16.0X2.0T;BZN; PLASTIC COVER;U;ABS;BS;877C;EP565B-2KM; NUT;NLK;M8X1.25P;BZN; PLASTIC COVER;ABS;BS;877C;EP565B-2KM; WASHER;WW;Φ17.2XΦ22.5X0.5T;65MN BOOT;CONSOLE;PVC;EP520-1US WASHER;FLT;Φ8.2XΦ20.0X1.5T;BZN; CRANK COVER;ABS;877C;SILVERP565B-2KM; WASHER;FLT;Φ16.0XΦ25.0X1.5T; SCREW;BH;Φ4X15L;TC;PH;g8.8;NKL;POT SCREW;BH;M8X1.25PX20L;HS;BP BRACKET SIdE COVER SCREW;BH;M8X1.25PX70L-12L;HS;BP;P-T SCREW;BH;Φ4X15L;TC;PH;BAN;POT...
- Page 37 dESCRIPTION dESCRIPTION NUT;LCK;AN05 M25X1.5P;SS41;BOX; PEdAL ARM;L;PAINTINg;QF332SEP565B-2KM KEY;ROUNd;SIgNAL-ENd;6X6X20L; WASHER;FLT;Φ8.5XΦ20.0X1.0T; SCREW;BH;M6X1.0PX15L;MT;HS;g8.8;BAN;BP; SCREW;BH;M8X1.25PX15L;HS;BP WASHER;FLT;Φ6.2XΦ30.0X1.5T; SCREW;BH;Φ4X10L;TC;PH;BAN;POT COVER;STABILIZER;B;PP;BLACK;EP537-1US SCREW;SH;M10X1.5PX45L-16L;MT;g10.9;CRMO; LABEL;dROP MOULdINg;STABILIZER;REAR;COVE WASHER;FLT;Φ10.2XΦ20.0X1.0T; HP gRIP SET;S-EP554; NUT;NLK;M10X1.5P;g10.0;BAN; CONSOLE MAST SET;PAINTINg;QF332S;EP568-2 BEARINg;BALL;6004ZZ;Φ20XΦ42X12T;SL; CABLE TIE;NYLON BEARINg;BALL;6302ZZ;Φ15XΦ42X13T;SL; WARNINg LABEL;CONSOLE MAST;EP562; WASHER;WAVE;Φ17.2XΦ22.5X0.5T;65MN;BAN WAVE TUBE;KSS R-07P*200L SHIM;CRANK SLEEVE;SPHC;EP558; gUIdE RAIL SET;L;PAINTINg;QF332S;EP565B COVER;PEdAL ARM;ABS;EP525-1US gUIdE RAIL ORNAMENT;NICKEL;EP520-1US COVER;PULLEY;L;EP525-1US...
- Page 38 dESCRIPTION dESCRIPTION BEARINg;BALL;6004ZZ;Φ20XΦ42X12T;SL; PIN SLEEVE;HANgARM;EP525-1US BEARINg;BALL;6302ZZ;Φ15XΦ42X13T;SL; STICKER;INSTRUCTION;L; WASHER;WAVE;Φ17.2XΦ22.5X0.5T;65MN;BAN ARM REST SET;Rd;PAINTINg;QF332S;EP565B SHIM;CRANK SLEEVE;SPHC;EP558; HANd ARM SET;PAINTINg;QF332S;EP565B- COVER;PEdAL ARM;ABS;EP525-1US BUSHINg;Φ28.5XΦ22.30X12.5H;CU60%;40% COVER;PULLEY;R;EP525-1US SCREW;BH;M8X1.25PX15L;HS;BP LINK ARM CAPS;EP525-1US WASHER;FLT;X8.2XX27.0X2.0T; WARNINg STICKER(1);CAUTION; WASHER;FLT;Φ18.2XΦ30.0X1.0T;TFN; STICKER;INSTRUCTON;R; PIN SLEEVE;HANgARM;EP525-1US ARM REST SET;LU;PAINTINg;QF332S;EP565B STICKER;INSTRUCTON;R; FOAM;HANdLE BAR;Φ31.8X3.0TX300L; STABILIZER SET;F;PAINTINg;QF332S;SILVE CAP;TUBE;PVC;BLACK;EP03 RVN;ALS7-8125-3.8(0.5-3.8);YZN;...
- Page 39 dESCRIPTION dESCRIPTION WASHER;WW;Φ17.2XΦ22.5X0.3T; dECORATEd LABEL;SIdE COVER;ROUNd;EP566 ENd-CAP;gUIdE RAIL;PP;BL;EP136-B26B LOgO STICKET;EP136-1US RVN;ALS7-616-150;YZN; CAP;PVC;BL;TM67 CLAMP;EXTERNAL C-SHAPEd;S-16; PULSE SENSOR SET AdjUSTABLE FOOT PAd NUT CRANK PIN SLEEVE;ALUMINUM CASTINg;EP558 PEdAL ARM SET;L;PAINTINg;QF332S;EP5 BEARINg;BALL;6003ZZ;Φ17XΦ35X10T;SL; SCREW;ANTI-SLIPPERY;TRHW;M5X0.8PX12L BEARINg;BALL;6003ZZ;Φ17XΦ35X10T;SL; BUSHINg;Φ28.5XΦ22.30X12.5H;CU60%;40% ROLLER;PU;BLACK;EP525 LINK ARM SWIVEL AXLE;EP525 CABLE TIE;NYLON;200L;BL;KSS;CV-200MB FOOTPAd;LEFT;BLACK;SLIK-PRINT ERgOFLOW;E LINK ARM CAPS;BLACK;EP525-1US STICKER;INSTRUCTION;L;...
- Page 40 ENDURANCE 5 EXPLoDED VIEW P04x2 N20x4 P29x2 Q15x6 Q17x12 Q21x6 J03x2 Q20x3 B16x4 R14 R09 B23x4 S03x4 B17x2 Q21x4 P20x2 Z01x4 Z02x4 Q21x6 Z03x4 Z22x2 D13x2 K03x2 Z09x4 Q20x2 P15x3 J03x2 P14x5 Z07x4 Z08x4 Z06x4 Z10x4 Z02x4 Z11x4...
- Page 41 ENDURANCE 5 PARTS LIST dESCRIPTION dESCRIPTION FRAME SET;SA;B;S-EP566B; SCREW;HH;3/8-16UNC-42L-14L;HE;P-T CONSOLE MAST SET;SA;S-EP566B; WASHER;FLT;Φ10.2XΦ19.0X2.0T;CHM; gUIdE RAIL SET;SA;L;S-EP566B; NUT;NLK;3/8'-16UNC;BAN; gUIdE RAIL SET;SA;R;S-EP566B; WASHER;FLT;Φ12.0XΦ23.0X2.5T; PEdAL ARM SET;SA;L;S-EP566B; BOTTLE HOLdER;ABS;dg;75140;EP565B-2KM; PEdAL ARM SET;SA;R;S-EP566B; SCREW;BH;M8X1.25PX20L;HS;BP ARM REST SET;SA;LU;S-EP566B; WASHER;FLT;Φ8.2XΦ20.0X1.5T;BZN; ARM REST SET;SA;RU;S-EP566B; WASHER;SPL;Φ8.2XΦ15.4X2.0T; ARM REST SET;SA;Ld;S-EP566B; CABLE TIE;NYLON;BLACK;160L ARM REST SET;SA;Rd;S-EP566B;...
- Page 42 dESCRIPTION dESCRIPTION MOTOR;AC ELEVATION;220V;175MM;104;10PIN EXTERNAL PWd WIRE(jPN);1.25MM 2M; LCB;dIgITAL INCLINE EP;100-240V;MLH1105; EXTERNAL PWR CORd;BRIZIL;1.5MM2;2M SCREW;BH;M4X0.7PX12L;CT;PH;BZN; PWR CORd(CHINA);1.5MM;LONg2M NPUT FILTER;220V/3A PWR CORd;USA;16AWg;LONg2M WIRE;CONSOLE;dOWN1200MM(CKM254301-8P+SM- PWR CORd gROUP;ISRAEL;1.5MM;LONg2M SENSOR WIRE WIRE;EXTERNAL PWR;SET;CHILE USEd;jIS2 U SCREW;BH;Φ3X12L;SM;PH;BZN;POT PWR CORd(INdIA);1.5MM;LONg2M WIRE;POWER SOCKET SET;250LOCK100m100 PWR CORd;EXTERNAL(NZL);1.5MM;LONg2M POWER SWITCH;dOUBLE POLE;W/O LIgHT;125V/ EXTERNAL PWR(ARgENTINA)1.5MM 2M;...
- Page 43 dESCRIPTION dESCRIPTION NUT;NLK;1/4'-20UNC;BZN; RINg;RUBBER;Φ26.2XΦ16.20X11.50 FIX PLATE;EYE BOLT;SPC;1.3T;AB01 SCREW;BH;Φ4X15L;TC;PH;g8.8;NKL;POT WASHER;FLAT;Φ12.5XΦ20.0X2.0T; SCREW;BH;M4X0.7PX12L;CT;PH;BAN; ECB SET;8Kg;EUP; AXLE,TRANSIMISSION;42CRMO; STEEL ROPE;ECB; 160L;L1+L2=65 EENSOR MAgENT;Φ15X7T;1900gAUSS SCREW;BH;Φ4X12L;TC;PH;BAN;POT PULLEY;POLY-V;NYLON;Φ360 j10; LOgO LABEL;STABILIZER COVER;REAR;EP566 BEARINg;BALL;6005ZZ;Φ25XΦ47X12T;SL; SAFETY LABEL;CE EN957;EP566B-2KM; KEY;ROUNd;dUAL-ENd;6X6X14L; LOgO STICKET;EP136-1US SNAP RINg;EXTERNAL;CST;BAN;S-25; SCREW;BH;M8X1.25PX30L;HS; NUT;LCK;AN05 M25X1.5P;SS41;BOX; WASHER;SPL;Φ8.2XΦ15.4X2.0T; KEY;ROUNd;SIgNAL-ENd;6X6X20L; WASHER;ARC;Φ8.4XΦ17.0X1.0T; SCREW;BH;M6X1.0PX15L;MT;HS;g8.8;BAN;BP; WASHER;FLT;Φ10.2XΦ20.0X1.5T;BZN;...
- Page 44 dESCRIPTION dESCRIPTION gUIdE RAIL SET;L;PAINTINg;QF332S;EP565B COVER;PEdAL ARM;ABS;EP525-1US gUIdE RAIL ORNAMENT;NICKEL;EP520-1US COVER;PULLEY;L;EP525-1US SCREW;BH;M6X1.0PX15L;HS;ZN; LINK ARM CAPS;EP525-1US FOAM;SINgLESIdE;30X1.5TX650L;55±5°,75M; WARNINg LABEL;ENgLISH ANd gERMAN;CAUT BUSHINg;Φ28.5XΦ22.30X12.5H;CU60%;40% STICKER;INSTRUCTION;L; PIN SLEEVE;HANgARM;EP525-1US CRANK SLEEVE SET;SA;S-EP566; gUIdE RAIL SET;R;PAINTINg;QF332S;EP565B- MOVINg WHEEL SET;SA;S-EP566; gUIdE RAIL ORNAMENT;NICKEL;EP520-1US PEdAL ARM;R;PAINTINg;QF332S;EP565B-2KM SCREW;BH;M6X1.0PX15L;HS;ZN; WASHER;FLT;Φ8.5XΦ20.0X1.0T; FOAM;SINgLESIdE;30X1.5TX650L;55±5°,75M;...
- Page 45 dESCRIPTION dESCRIPTION CAP;TUBE;PVC;BLACK;EP03 SCREW;ANTI-SLIPPERY;TRHW;M5X0.8PX12L SCREW;SET;M10X1.5PX12L;BZN;BP BUSHINg;Φ28.5XΦ22.30X12.5H;CU60%;40% STICKER;INSTRUCTION;L; FOOTPAd;LEFT;ABS+20%PC;SLIKPRINT ERgOFLO ARM REST SET;RU;PAINTINg;QF332S;EP565B LINK ARM SWIVEL AXLE;EP525 FOAM;HANdLE BAR;Φ31.8X3.0TX300L; CABLE TIE;NYLON;200L;BL;KSS;CV-200MB CAP;TUBE;PVC;BLACK;EP03 LINK ARM CAPS;BLACK;EP525-1US SCREW;SET;M10X1.5PX12L;BZN;BP STICKER;INSTRUCTION;L; STICKER;INSTRUCTON;R; PEdAL ARM SET;R;PAINTINg;QF332S;EP566B ARM REST SET;Ld;PAINTINg;QF332S;EP565B SCREW;ANTI-SLIPPERY;TRHW;M5X0.8PX12L HANd ARM SET;PAINTINg;QF332S;EP565B- BUSHINg;Φ28.5XΦ22.30X12.5H;CU60%;40% BUSHINg;Φ28.5XΦ22.30X12.5H;CU60%;40% FOOTPAd;RIgHT;ABS+20%PC;SLIKPRINT ERgOFL SCREW;BH;M8X1.25PX15L;HS;BP LINK ARM SWIVEL AXLE;EP525 WASHER;FLT;X8.2XX27.0X2.0T;...
- Page 46 dESCRIPTION BEARINg;BALL;6003ZZ;Φ17XΦ35X10T;SL; Roller;PU;Black;EP525...
- Page 47 Ende der Nutzungsdauer einer sachgerechten Entsorgung zu (örtliche Sammelstelle). GB: Waste Disposal Vision Fitness / Horizon Fitness / TEMPO Fitness / TREO Fitness products are recyclable. At the end if its useful life please dispose of this article correctly and safely (local refuse sites).
- Page 48 ELLIPTICAL OWNER’S MANUAL Endurance 4 & Endurance 5 Owner’s Manual 0518’12 Rev. 1.5 © 2012 Horizon Fitness...