Table of Contents
Advertisement
Quick Links
Advertisement
Table of Contents

Related Manuals for VTech DS6472-6


Summary of Contents for VTech DS6472-6
- Page 1 ® User’s manual w w w .v t e c h p h o n e s . c o m Model: DS6472-6...
- Page 2 The Bluetooth word mark and logos are registered trademarks owned by Bluetooth SIG, Inc. and any use of such marks by VTech Holdings Limited is under license. VTech Holdings Limited is a member of Bluetooth SIG, Inc. Other trademarks and trade names are those of their respective owners.
-
Page 3: Table Of Contents
Table of contents Getting started ......1 View the directory download information ......35 Parts checklist ......1 Change PIN ........36 Installation ........2 Telephone base and Telephone settings ....37 charger installation ....3 Handset settings .......37 Handset battery installation ..4 Ringers ........37 Handset battery charging ...5 Ringer volume (handset) ....37 Headset charger installation ..6 Ringer volume (headset) ....37... - Page 4 Table of contents Silence the ringer .......55 Remove a downloaded directory ........73 Mute ...........55 Speed dial ........74 Temporary tone dialing ....56 Assign a speed dial slot .....74 Hold ..........56 Reassign a speed dial slot ..74 Handset/headset locator ....56 Dial a speed dial entry ....74 Equalizer ........57 Delete a speed dial entry ...75 Transfer a call ......57...
- Page 5 Table of contents Call screening ......90 Call intercept ......90 Temporarily turning off the message alert tone ....91 Message playback .....91 Delete all old messages .....93 Record and play memos ....93 Message window displays ..94 Remote access ......95 Appendix ........96 Display screen messages ..96 Handset and telephone base indicators ........101 Headset indicators .....103...
-
Page 6: Getting Started
Getting started Parts checklist Your telephone contains the following items. Save your sales receipt and original packaging in the event warranty service is necessary. Bluetooth Quick start guide User’s manual quick start guide Quick start guide Bluetooth User’s manual Wall mount bracket quick start guide Cordless headset Additional... -
Page 7: Installation
Getting started Installation Install the telephone base close to a telephone jack and a power outlet not connected to a wall switch. For optimum range and better reception, place the telephone base in a central and open location. When using a Bluetooth wireless technology enabled cell phone with this telephone, make sure the cell phone is within 15 feet of the telephone base to maintain a reliable connection between the cell phone and telephone base. -
Page 8: Telephone Base And Charger Installation
Getting started Telephone base and charger installation Install the telephone base and chargers as shown below. Make sure that the electrical outlet is not controlled by a wall switch. If you subscribe to digital subscriber line (DSL) high-speed Internet service through your telephone line, you must install a DSL filter between the telephone line cord and the telephone wall jack. -
Page 9: Handset Battery Installation
Getting started Handset battery installation Install the battery as shown below. Plug the battery connector securely into the socket inside the handset battery compartment, matching the color-coded label. Place the battery with the label THIS SIDE UP facing up and the wires inside the battery compartment. -
Page 10: Handset Battery Charging
Getting started Handset battery charging Once you have installed the battery, the handset LCD display indicates the battery status (see the table below). NOTES • For best performance, keep the handset in the telephone base or charger when not in use. •... -
Page 11: Headset Charger Installation
Getting started Headset charger installation Install the headset charger as shown below. Plug the large end of the headset charger power adapter into an electrical Plug the small end of outlet not controlled by a the headset charger wall switch. power adapter into the power jack of the headset charger. -
Page 12: Headset Battery
Getting started Headset battery It takes up to three hours for the battery to be fully charged. When it is fully charged, you can expect the following performance: Operation Operating time While in use (talking*) Nine hours While not in use (standby**) Ninety hours *Operating times vary depending on your actual use and the age of the battery. -
Page 13: Earbud Installation
Getting started Earbud installation There are four earbuds provided and one of them has already been attached to the headset. To remove the earbud from the headset earpiece: Hold both sides of the earbud and then pull the earbud until it separates from the earpiece. -
Page 14: Ear Hook Installation
Getting started Ear hook installation There are three ear hooks provided. The smallest ear hook is a flexible ear hook. If you choose to use it, adjust to suit your ear comfortably before use. To attach the ear hook to the headset: Remove any headset attachment (earbud excluded) connected to the headset. - Page 15 Getting started Ear hook installation (continued) To wear the headset on your left ear: Hold the headset with one hand. Twist the ear hook 180 degrees Lift the ear hook upward. clockwise. Push the ear hook downward. Hook the headset on your left ear.
- Page 16 Getting started Ear hook installation (continued) To remove the ear hook from the headset: Hold the headset with one hand and the ear hook with your other hand. Pull the end of the ear hook up until it separates from the rotating clip on the headset.
-
Page 17: Head Band Installation
Getting started Head band installation To attach the head band to the headset: Remove any headset attachment connected to the headset. Attach the ear pad to the headset earpiece. To wear the headset on your right ear, insert the end [A] of the head band into the rotating clip [B] on the headset until it clicks into place. - Page 18 Getting started Head band installation (continued) Adjust the head band to fit your head. Adjust and rotate the angle of the headset until the microphone is pointing towards your mouth. Firmly grip the earpiece with one hand whenever adjusting the headset microphone up or down.
-
Page 19: Installation Options
Getting started Installation options Your telephone base is ready for tabletop use. If you want to mount your telephone on a wall, use the provided wall mount bracket to connect with a standard dual-stud telephone wall mounting plate. If you do not have this mounting plate, you can purchase one from many hardware or consumer electronics retailers. -
Page 20: Wall Mount To Tabletop Installation
Getting started Wall mount to tabletop installation If the telephone line cord and power adapter cord are bundled, untie them first. Slide the black wall mount bracket up and remove it from the wall plate. Unplug the telephone line cord (or DSL filter) from the wall. Unplug the power adapter from the power outlet. -
Page 21: Telephone Base Layout
Getting started Telephone base layout DELETE/X Press to delete the message REPEAT/ currently playing (page 90). Press to repeat a message When the phone is not in or press twice to play the use, press twice to delete all previous message previously reviewed messages (page 90). -
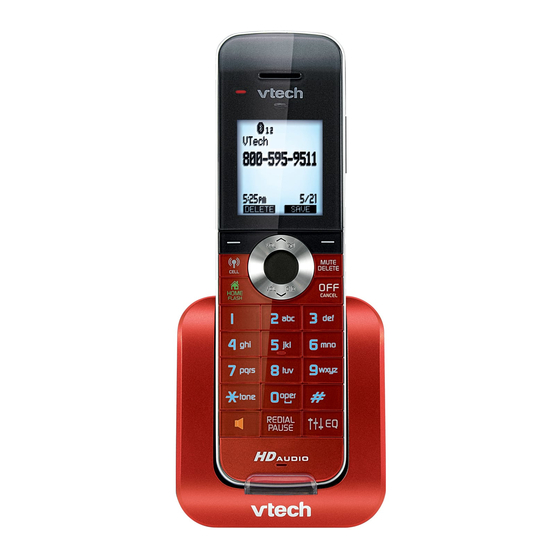
Page 22: Handset Layout
Getting started Handset layout CHARGE light On when the handset is charging in the telephone base or charger. Softkeys (2) Press to select a menu item displayed above the key. While in a menu, press to select an item, or save an entry or setting. - Page 23 Getting started Handset layout (continued) VOL/ While in a menu, press to scroll up. During a call or message playback, press to increase the listening volume (page 55 or page 92). When the handset is not in use, press to enter the directory (page 71).
- Page 24 Getting started Handset layout (continued) PUSH TO TALK (PTT) Press to begin a one-to-one or one-to-group broadcast (page 65 and page 66). Press and hold to begin a broadcast to a group of handsets when the handset is not in use (page 66).
-
Page 25: Headset Layout
Getting started Headset layout (on/off) Press and hold two seconds to power on or off. Press to answer, end or join a call (pages 50, 52 and 61). On in red when charging in the headset charger. On in blue when fully charged in the headset charger. Flashes once every 10 seconds in blue when in idle mode. -
Page 26: Handset Main Menu
Getting started Handset main menu To enter the main menu: MENU Press when the handset is not in use. SELECT Press to highlight a handset feature menu, then press enter that menu. /CANCEL. To return to the previous menu, press /CANCEL. - Page 27 Cal ler ID log Intercom Intercom Bluetooth Bluetooth Ringers Ringers Set date/time BACK SELECT BACK SELECT Settings - change your telephone Website - displays the VTech website settings. address. Intercom Bluetooth Bluetooth Ringers Ringers Set date/time Set date/time Settings Settings Website...
-
Page 28: Bluetooth
The Bluetooth ® word mark and logos are owned by Bluetooth SIG, Inc. and any use of such marks by VTech Holdings Limited is under license. VTech Holdings Limited is a member of Bluetooth SIG, Inc. Other trademarks... -
Page 29: Glossary Of Terms
Bluetooth Glossary of terms Below are some terms used in this user’s manual to help you become familiar with using your Bluetooth enabled devices and your new DS6472 telephone system. Active device slots - the Device list has two active slots for two cell phones, or one cell phone and one headset. -
Page 30: Bluetooth Setup
Bluetooth Bluetooth setup To use a Bluetooth enabled cell phone or headset with your DS6472, you must first pair and connect your Bluetooth device(s) with the telephone base. All DS6472 handsets can be used to make or answer on the cell phone line. Bluetooth wireless technology operates within a short range (30 feet). - Page 31 Set cel l to discoverable mode. The handset displays Set cell search base: to search base: VTech DS6472 discoverable PIN: VTech DS6472 0000. Promptly turn on the Bluetooth feature of your discoverable cell phone and search for or add new devices.
-
Page 32: Add A Headset
Bluetooth Add a headset Before you begin, make sure that your Bluetooth enabled Answering sys headset is not connected to any other Bluetooth device. Directory Refer to your headset user's manual to learn how to Cal ler ID log search for or add new Bluetooth devices. Intercom Bluetooth To pair and connect a headset:... -
Page 33: Auto Connection
Bluetooth Add a headset (continued) When a device is successfully connected, the handset displays Headset A is added and connected to Adding base and the corresponding status icon ( 1 or Headset A You hear a confirmation tone. The corresponding light to device on the telephone base (D1 or D2) turns on. -
Page 34: Connecting Devices
Bluetooth Connecting devices Up to four devices can be paired to the telephone base. All paired devices are shown on the device list. To use a paired device, it must be in an active slot (D1 or D2) on the device list and connected. Only one Bluetooth cell phone or a headset can be on a call at a time. -
Page 35: Remove A Device
Bluetooth Remove a device When you already have the maximum of four paired devices on the device list and you want to add another device, you must first delete a device from the device list. MENU Press on the handset when it is not in use. BLUETOOTH to highlight Bluetooth, then Press... -
Page 36: Rename A Device
Bluetooth Rename a device You can change the name of a device on the device list. BLUETOOTH MENU Press on the handset when it is not in use. Add device to highlight Bluetooth, then Press Device list press SELECT. Download dir Change PIN to highlight Device list, then Press... -
Page 37: Replace An Active Device
Bluetooth Replace an active device If you already have two active devices on the device list BLUETOOTH and you want to activate a different device, you must Add device deactivate one of the two active devices. Device list Download dir To replace an active device: Change PIN MENU... -
Page 38: Download Directory
Bluetooth Download directory You can download up to four cell phone directories (phonebooks) to your DS6472 telephone system via Bluetooth wireless technology. Each downloaded directory can store up to 1,500 entries with up to 30 digits for each phone number and 15 characters for each name. Before downloading the directory, make sure the cell phone is paired, active and connected to the DS6472. - Page 39 Bluetooth Download directory (continued) • If the selected device’s directory has already been downloaded to the DS6472 before, the handset displays the last update date of your cell phone. The Cel l Phone A directory stored on the DS6472 for that cell phone will be erased and replaced with the current cell Downloading phone directory.
-
Page 40: Interruption To Directory Download
Bluetooth Interruption to directory download When you are downloading a directory from a cell phone and the phone receives a call, the download process stops and all handsets display Download fail after the call ends. When you try to view the downloaded directory, the handset displays Last download failed: MM/DD/YY. -
Page 41: Change Pin
Bluetooth Change PIN You are required to enter a PIN when establishing a BLUETOOTH Bluetooth connection. The default PIN of your telephone Add device base is 0000. Device list Download dir To change the PIN: Change PIN MENU Press on the handset when it is not in use. BACK SELECT to highlight Bluetooth, then... -
Page 42: Telephone Settings
Telephone settings Handset settings Ringers In the ringers menu, you can select the ringer tones and adjust the ringer volume for incoming calls to the home and cell lines. Ringer volume (handset) RINGERS You can adjust the ringer volume for the incoming home Ringer volume and cell calls. -
Page 43: Ringer Tone
Telephone settings Ringer tone You can select the ringer tones for the incoming home and cell calls. To select a ringer tone: Press MENU on the handset when it is not in use. RINGERS Ringer volume to highlight Ringers, then Press Ringer tone press SELECT. -
Page 44: Set Date And Time
Telephone settings Set date and time The answering system announces the day and time of each message prior to playing it. If you subscribe to caller ID service, the day, month and time are set automatically with each incoming call. If you do not want to set the date and time automatically with caller ID information, turn this feature off (see CID time synchronization on page 44). -
Page 45: Settings
Telephone settings Settings In the settings menu, you can modify the settings for LCD language, voice language, display alerts, CID time synchronization, handset name, key tone, dial mode and caller ID announce. LCD language You can select a language (English, French or Spanish) to SETTINGS be used in all screen displays. -
Page 46: Display Alerts
If you do not want to review the missed calls one by one, MENU you can reset the missed call indicator. All the entries are then considered old and kept in the caller ID log. VTech To reset the missed call indicator: 800-595-9511 MENU Press on the handset when it is not in use. -
Page 47: Voicemail Indicators
Telephone settings Display alerts (continued) Voicemail indicators If you subscribe to voicemail service offered by your telephone service provider, New voicemail and appear on the handsets when you have new voicemail messages. Contact your telephone service provider for more information and assistance about using your voicemail service. After you have listened to all new voicemail messages, the indicators on the handsets turn off automatically. -
Page 48: Download Fail
Telephone settings Display alerts (continued) No line If there is no telephone line connected to the telephone base, the handsets show No home line. If you do not want to display the message on the handsets (for example, if you use the cell line only), you can turn off the no line alert. To turn the no line alert on or off: MENU Press... -
Page 49: Cid Time Synchronization
Telephone settings CID time synchronization If you subscribe to caller ID service, the date and time will be set automatically by the caller ID information. You SETTINGS can turn off this feature if you want to set the date and Voice language time manually. -
Page 50: Key Tone
Telephone settings Key tone You can change the volume of the key tone or turn it off. SETTINGS Display alerts To change the setting: CID time sync MENU Press on the handset when it is not in use. Rename handset Key tone Press to highlight Settings, then... -
Page 51: Caller Id Announce
Telephone settings Caller ID announce You can set your handset and/or telephone base to announce the caller ID information for incoming calls. SETTINGS The caller ID announce setting is independent for each Rename handset handset and the telephone base. Key tone Dial tone To change the setting: Annc Cal ler ID... -
Page 52: Website
Telephone settings Website You can use this feature to view the VTech website Bluetooth address. Ringers Set date/time MENU Press on the handset when it is not in use. Settings to highlight Website, then press Press Website SELECT. The handset displays the VTech website. -
Page 53: Cell Area Code
Telephone settings Cell area code Most cell phone entries are stored in a 10-digit format. If all of your cell phone entries are stored this way, you do 800-595-9511 not need to program your cell area code. 1-800-595-9511 595-9511 If your cell phone stores entries in a 7-digit format, we 1-595-9511 recommend that you program your cell area code so that your 7-digit directory entries can be dialed correctly using... -
Page 54: Telephone Base Settings
Telephone settings Telephone base settings Telephone base ringer volume /VOL or /VOL on the side of telephone base to adjust the ringer Press volume when the telephone is not in use. When you set the ringer volume to zero, the base ringer is off and the system announces, “Base ringer is off.” /VOL during an incoming call to mute the ringer temporarily. -
Page 55: Telephone Operation
Telephone operation Make, answer or end a home call Using a handset: To make a home call: Press /HOME/ , then enter the FLASH telephone number. Press on the headset to join the call. Hang up the handset at any time to leave the call and the headset continues the call. -
Page 56: Call Waiting On The Home Line
Telephone operation Make, answer or end a home call (continued) To transfer a call from a handset to a Bluetooth headset: If you make or answer a home call on a handset, you can transfer the call to your Bluetooth headset. The handset remains active, but the handset earpiece and microphone are muted. -
Page 57: Make, Answer Or End A Cell Call
Telephone operation Make, answer or end a cell call You can connect a maximum of two Bluetooth enabled cell phones to the telephone base, but only one cell phone can be used on a cell call at a time. All handsets can be used to make or answer calls on the cell phone line. -
Page 58: Answer A Cell Call While On A Home Call
Telephone operation Answer a cell call while on a home call When you are on a home call and you receive an incoming cell call, you 1 or 2 displays on the handset you are using. The hear a beep, and telephone base and all other handsets ring. -
Page 59: Conference Home And Cell Calls
Telephone operation Conference home and cell calls When you have calls established on the home and cell lines, you can create a 3-way conference. To conference both home and cell calls: Press OPTION. to highlight Conference. Press Press SELECT. The handset displays Lines now in conference. To select an option while on a conference call: Press OPTION. -
Page 60: Handset Speakerphone
Telephone operation Handset speakerphone During a call, press to switch between speakerphone and normal handset use. Volume control During a call, press VOL/ / or VOL/ / on the handset, or +/-/VOLUME on the side of the headset to adjust the listening volume. You hear an in-ear beep while adjusting. -
Page 61: Temporary Tone Dialing
Telephone operation Temporary tone dialing If you have pulse (rotary) service only, you can switch from pulse to touch- tone dialing temporarily during a call. This is useful if you need to send touch- tone signals to access your telephone banking or long distance services. During a call: Press Use the dialing keys to enter the relevant number. -
Page 62: Equalizer
Telephone operation Equalizer The equalizer feature on the handset enables you to change the quality of the handset audio to best suit your hearing. While on a call, an intercom, a PTT session, or listening to a message or announcement, press to select the equalizer setting Treble 1, Treble 2, Bass or Natural (the default setting) for the handset. -
Page 63: Chain Dialing
Telephone operation Chain dialing Use this feature to initiate a dialing sequence from numbers stored in the directory, caller ID log or redial while you are on a call. Chain dialing can be useful if you wish to access other numbers (such as bank account numbers or access codes) from the directory, caller ID log or redial list. -
Page 64: Redial List
Telephone operation Redial list The redial list stores up to 10 of the most recently dialed numbers on each handset. When there are already 10 entries, the oldest entry is deleted to make room for the new entry. Entries are shown in reverse chronological order. Review the redial list Press REDIAL/ when the handset is not... -
Page 65: Save A Redial Entry To The Directory
Telephone operation Save a redial entry to the directory Press REDIAL/ when the handset is not in use. PAUSE or REDIAL/ Press to select the desired number. PAUSE Press SAVE. The handset displays EDIT NUMBER. Use the dialing keys to edit the number, if necessary. -
Page 66: Multiple Handset Use
Multiple handset use Share an outside call You can use up to four system handsets on an outside call at a time. While on a call: /HOME/ • Press on another handset, or on the headset to FLASH join the call. - OR - OPTION •... -
Page 67: Answer An Incoming Call During An Intercom Call
Multiple handset use Intercom (continued) To answer an intercom call at the destination handset: /HOME/ Both handsets show Intercom. • Press FLASH on the headset. The originating handset displays Intercom. • Press To silence an intercom call: Press OFF/ , MUTE/ SILENCE •... -
Page 68: Transfer A Call Using Intercom
Multiple handset use Transfer a call using intercom You can use the intercom feature to transfer an outside call to other system handsets or headset. Directory When on an outside call, press OPTION. Cal ler ID log Press to highlight Intercom, then press Intercom SELECT. -
Page 69: Push-To-Talk (Ptt)
Multiple handset use Push-to-talk (PTT) You can directly broadcast messages from one handset to the speakerphone of one or a group of handsets. Press and hold PUSH TO TALK to begin two-way communication . If only one handset is available or registered, the handset screen shows PTT requires two handsets when you press PUSH TO TALK. -
Page 70: Ptt To A Single Handset
Multiple handset use PTT to a single handset You have two ways to begin a PTT call: If you have two handsets, press and hold PUSH TO TALK when • handset is not in use. • If you have three or more handsets, press PUSH TO TALK when the handset is not in use. -
Page 71: Ptt To Multiple Handsets
Multiple handset use PTT to multiple handsets When there are multiple handsets registered to the telephone system, PTT supports one-to-group calls. PTT supports a maximum of one-to-four calls when one to five handsets are registered, and a maximum of one-to-three calls when six or more handsets are registered. -
Page 72: Answer A Ptt Call
Multiple handset use Answer a PTT call You can respond to a PTT call whenever the speakerphone light is off, as described below. When your handset receives a PTT call, the handset beeps and displays Press and hold [PTT] to talk. When the other party is speaking, your speakerphone light is on, and your handset displays PTT From HANDSET X To handset: Y (X represents the originating handset and Y represents the destination handset;... -
Page 73: End A Ptt Call
Multiple handset use End a PTT call • For a one-to-one PTT call, both the originating and destination handsets can end the PTT call. • For a PTT call to multiple handsets, the originating handset can end the PTT call. If any one of the destination handsets leaves the PTT call, the call continues until all participants or the initiator hangs up. -
Page 74: About The Directory
Directory About the directory Your phone directory consists of a home directory and up to four directories downloaded from cell phones. The home directory stores up to 200 entries with up to 30 digits for each phone number and 15 characters for each name. Each downloaded directory stores up to 1,500 entries with up to 30 digits for each phone number and 15 characters for each name. -
Page 75: Create A New Entry In The Home Directory
Directory Create a new entry in the home directory MENU Press on the handset when it is not in use. to highlight Directory, then press SELECT. Press Press OPTION to select Home. Press to highlight Add contact, then press SELECT. The handset displays ENTER NUMBER. -
Page 76: Review The Directory
Directory Review the directory Entries are sorted alphabetically. To review the directory: Press when the handset is not in use. to choose a directory, then press REVIEW. Press Press to browse. - OR - MENU Press on the handset when it is not in use. to highlight Directory, then press SELECT. -
Page 77: Dial A Directory Entry
Directory Dial a directory entry You can dial a directory entry on either a home or cell line. To dial a directory entry: Search for the desired entry in the directory (see Review the directory or 3-character alphabetical search on page 71). When the desired entry appears, press # (pound key) 800-595-9511 repeatedly to show different dialing options. -
Page 78: Edit The Type Of A Directory Entry
Directory Edit the type of a directory entry If you only want to edit the type of a directory entry: Search for the desired entry in the directory (see Review the directory or 3-character alphabetical search on page 71). When the desired entry appears, press LABEL. Enter the corresponding shortcut keys shown in the below table. -
Page 79: Speed Dial
Directory Speed dial You can copy 10 of your directory entries to the speed dial slots (0-9). The speed dial entries are shared by all handsets. Assign a speed dial slot Press MENU on handset when it is not in use. to highlight Directory, then press SELECT. -
Page 80: Delete A Speed Dial Entry
Directory Delete a speed dial entry Press MENU on handset when it is not in use. to highlight Directory, then press SELECT. Press to highlight Speed dial, then press REVIEW. Press Press to highlight an assigned slot, then press /DELETE. MUTE The handset displays Delete Entry A Speed dial assignment? Press... -
Page 81: Caller Id
Caller ID About caller ID This product supports caller ID services provided by most telephone service providers. Depending on your service subscription, you may see the caller’s number, or the caller’s name and number from the telephone service provider after the first or second ring. Caller ID from the home line allows you to see the name, number, date and time of the incoming calls. -
Page 82: Caller Id History
Caller ID Caller ID history If you subscribe to caller ID service provided by your telephone service provider and/or cell phone service provider, information about each caller appears after the first or second ring. If you answer a call before the caller information appears on the screen, it will not be saved in the caller ID log. -
Page 83: Review The Caller Id Log
Caller ID Review the caller ID log CID when the handset is not in use. Press VOL/ / Press to highlight the desired line (home or cell), then press REVIEW. Press to browse. - OR - Press MENU on the handset when it is not in use, or press OPTION while on a call. -
Page 84: View Dialing Options
Caller ID View dialing options Although the caller ID log entries received have 10 digits (the area code plus the seven-digit number), in some areas, you may need to dial only the seven digits, or 1 plus the seven digits, or 1 plus the area code plus the seven digits. -
Page 85: Save A Caller Id Log Entry To The Directory
Caller ID Save a caller ID log entry to the directory Caller ID log entries can only be saved to the Home directory. Select a desired entry in the caller ID log (see Review the caller ID log on page 78). When the desired entry appears, press # (pound key) repeatedly to show different dialing options. -
Page 86: Delete From The Caller Id Log
Caller ID Delete from the caller ID log To delete a single entry: Select a desired entry in the caller ID log (see Review the caller ID log on page 78). When the desired entry appears, press /DELETE. The handset MUTE shows the previous caller ID log entry. -
Page 87: Answering System Settings
Answering system settings Answer on/off If you turn the answering system on, it answers calls and records messages only on the home line. If your paired cell phone has voicemail, callers can leave messages with that voicemail service. If your answering system is turned off and you change any of its settings, the answering system automatically turns on again and the handset displays Calls will be answered. -
Page 88: Announcement
Answering system settings Announcement The telephone is preset with a greeting that answers calls with “Hello, please leave a message after the tone.” You can use this preset announcement, or replace it with your own. Play your announcement ANSWERING SYS Announcement MENU Press... -
Page 89: Delete Your Announcement
Answering system settings Delete your announcement MENU Press on the handset when it is not in use. to choose Answering sys, then Press Announcement press SELECT. playback SELECT to choose Announcement. Press The handset displays ANNOUNCEMENT, press PLAY to play the announcement. DELETE STOP DELETE... -
Page 90: Answering System Setup
Answering system settings Answering system setup In the answering system setup menu, you can change the settings for call screening, number of rings, remote access code, message alert tone and recording time. Call screening Use this feature to choose whether incoming messages ANSWERING SYS Delete al l old are broadcast from the telephone base speaker when... -
Page 91: Number Of Rings
Answering system settings Number of rings When the answering system is turned on, it answers all ANS SYS SETUP incoming home calls after the number of rings set. You Cal l screening can choose from two, three, four, five or six rings; or toll # of rings saver. -
Page 92: Remote Access Code
Answering system settings Remote access code A two-digit security code is required to access the answering system remotely from any touch tone telephone. The preset code is 19. You can change the ANS SYS SETUP code to any number from 00 to 99. Cal l screening # of rings To change the setting:... -
Page 93: Message Alert Tone
Answering system settings Message alert tone When the answering system is turned on, the telephone beeps every 10 seconds to alert you of new messages. ANS SYS SETUP The tone stops when all new messages have been Cal l screening reviewed. -
Page 94: Answering System Operation
Answering system operation Answering system and voicemail indicators Your telephone has separate indicators for two different types of voice messages: those left on its built-in answering system and those left at your service provider’s HANDSET 1 New message voicemail (fees may apply). Your telephone’s built-in answering system messages and voicemail messages are separate. -
Page 95: Message Capacity
Answering system operation Message capacity The answering system can record and store up to 99 messages. Each message can be up to three minutes depending on the message length set (see Recording time on page 88). The total storage capacity for the announcement, messages and memos is approximately 11 minutes. -
Page 96: Temporarily Turning Off The Message Alert Tone
Answering system operation Temporarily turning off the message alert tone If the message alert tone is turned on, the telephone base beeps every 10 seconds when there are new or missed messages. Pressing any telephone base key (except /FIND HANDSET) temporarily silences the message alert tone. - Page 97 Answering system operation Message playback (continued) To play messages with a handset: MENU Press to show the menu when the handset is not in use. SELECT to choose Play messages. If you have either new or old Press messages, the messages play automatically. If you have both new and old messages: SELECT to select Play new msgs.
-
Page 98: Delete All Old Messages
Answering system operation Delete all old messages Using the telephone base: Press DELETE/X when the phone is not in use. The telephone announces, “To delete all old messages, press DELETE again.” Press DELETE/X again. All previously heard messages are erased and the telephone announces, “All old messages deleted.”... -
Page 99: Message Window Displays
Answering system operation Message window displays Window display Description No messages. The time and date need to be set. 0 (flashing) Total number of old messages and memos recorded. 1-99 The message number currently playing. When time and date are not set, it flashes 0, the total 0-99 (flashing) number of new messages recorded, or total number of old messages recorded. -
Page 100: Remote Access
Answering system operation Remote access A two-digit security code is required to access the answering system remotely from any touch-tone telephone. The preset code is 19. See Remote access code on page 87 to change it. Dial your telephone number from any touch-tone telephone. When the system plays the announcement, enter the two-digit security code. -
Page 101: Appendix
Appendix Display screen messages The Bluetooth device failed to pair to the Add device failed telephone base. The telephone number entered is already Already saved stored in the directory. The home area code you saved will not be Area code wil l not show shown in caller ID log. - Page 102 Appendix Display screen messages (continued) Connection is establishing between the Connecting... telephone base and the Bluetooth device. Unsuccessful connection between a Bluetooth Connection failed device and the telephone base. You are trying to start a PTT session to all Connecting to al l other handsets.
- Page 103 Appendix Display screen messages (continued) Another system handset or another telephone Home line in use on the same home line is in use. One handset is receiving an outside call Home Transfer from transferred from another handset. HANDSET X (for models with more than two handsets) Home Transfer from other handset...
-
Page 104: No Home Line
Appendix Display screen messages (continued) There are no entries found when you No entries found. Try downloading from SIM only download a cell phone directory from the cell memory. There are no entries found when you No entries found. Try download a cell phone directory from your downloading from Phone only... - Page 105 Appendix Display screen messages (continued) One handset has started a PTT session to PTT From HANDSET X To another handset. HANDSET Y You have started the PTT process. PTT To HANDSET X The PTT session is ended. Push to talk Ended Your handset is not registered to the Put handset on BASE to telephone base.
-
Page 106: Handset And Telephone Base Indicators
Appendix Handset and telephone base indicators Handset lights On when the handset speakerphone is in use. Flashes quickly when there is an incoming cell call. /CELL Flashes slowly when the cell line is on hold. Flashes quickly when there is an incoming home call. /HOME/FLASH Flashes slowly when the home line is on hold. -
Page 107: Handset Icons
Appendix Handset icons HOME line - on steadily when the home line is in use or there is an incoming home call. CELL line - on steadily when the cell line is in use or there is an incoming cell call. Bluetooth connected devices - indicates that there are Bluetooth connected devices on the device list. -
Page 108: Headset Indicators
Appendix Headset indicators Headset alert tones One beep Headset key tone. One beep every 30 seconds Muted headset microphone alert tone. Two quick beeps Error alert tone. The volume reaches its minimum or maximum setting. Two rapid beeps every 20 seconds Low battery warning. -
Page 109: Expand Your Telephone System
Appendix Expand your telephone system The handsets provided with your telephone system are already registered. Additional handsets registered to the telephone system are assigned in sequential order. For instance, if you already have HANDSET 1 and HANDSET 2, the new registered handset is assigned HANDSET 3. This telephone system accommodates up to 12 handsets. -
Page 110: Add And Register A Headset
Appendix Add and register a headset This telephone system accommodates up to two cordless headsets. You can buy an additional cordless headset (IS6100, purchased separately) for the telephone base. You can register a maximum of two headsets to the telephone base. The telephone base recognizes and counts a headset the same as a handset. -
Page 111: Deregister Handsets/Headsets
Appendix Deregister handsets/headsets If you want to replace a handset or headset, or reassign the designated handset number of a registered handset, you must deregister all handsets and headsets that are registered to the telephone base. Then register each handset and/or headset you wish to use individually. To make deregistration easier, read all of the instructions on this page before you begin. -
Page 112: Troubleshooting
Bluetooth feature. See the user’s manual of your cell phone for more information. • Manually connect your cell phone to VTech DS6472. Refer to the user’s manual of your cell phone for more information. I cannot connect my Bluetooth headset with the telephone base. - Page 113 25. • Make sure that you manually set your cell phone to search for devices. Remove VTech DS6472 from your cell phone’s handsfree device history list (see • the user’s manual of your cell phone). •...
- Page 114 Appendix Troubleshooting The PIN on the telephone base does not work. • The default PIN is 0000. • If you have changed the PIN, it will appear on the handset in the pairing process. I cannot hear any audio on my telephone system when on a cell call. •...
- Page 115 Appendix Troubleshooting My telephone does not work at all. • Make sure the battery is installed and charged correctly (page 4). For optimum daily performance, return the handset to the telephone base or charger after use. • Make sure the power adapter is securely plugged into an outlet not controlled by a wall switch.
- Page 116 Appendix Troubleshooting The display shows No line. I cannot hear the dial tone. • Disconnect the telephone line cord from your telephone and connect it to another telephone. If there is no dial tone on that other telephone either, then the telephone line cord may be defective.
- Page 117 Appendix Troubleshooting My handset beeps and is not performing normally. • Make sure the power cord is securely plugged into the telephone base. Plug the telephone base into a different working electrical outlet not controlled by a wall switch. • Move the handset closer to the telephone base.
- Page 118 Appendix Troubleshooting I hear noise on the cordless handset and the keys do not work. • Make sure the telephone line cord is plugged in securely. Registration failed appears on the handset. • Only one handset can be registered at a time. If you have multiple handsets to register, please follow the instructions on page 104 for the first handset.
- Page 119 Appendix Troubleshooting The headset does not charge in the headset charger. • Make sure the headset charger adapter is securely plugged into an electrical outlet (page 3). For optimum daily performance, return the headset to the headset charger after use. •...
-
Page 120: Incoming Call
Appendix Troubleshooting I cannot hear any ring tone from the cordless headset when there is an incoming call. • The headset does not have an external ringer. The ring tone can only be heard through the headset earpiece. • Make sure the headset ringer volume is not set to the lowest level (page 37). •... - Page 121 Appendix Troubleshooting My caller ID features are not working properly. • Caller ID is a subscription service. You must subscribe to this service from your telephone service provider for this feature to work on your telephone. • The caller may not be calling from an area which supports caller ID. •...
- Page 122 Appendix Troubleshooting and New voicemail appear on the handsets and I don’t know why. • Your telephone has voicemail indication that is separate from the built-in and New voicemail appear on the handsets, your answering system. If telephone has received a signal from your telephone service provider that you have a voicemail message waiting for you to retrieve from your telephone service provider.
- Page 123 Appendix Troubleshooting The answering system does not record messages. • Make sure the answering system is on. • When the answering machine memory is full, it does not record new messages until some old messages are deleted. • If you subscribe to voicemail service, change the number of rings so that your answering system answers before your voicemail answers (page 86).
- Page 124 Appendix Troubleshooting Common cure for electronic equipment. • If the telephone is not responding normally, put the cordless handset in the telephone base. If it does not fix the problem, try the following (in the order listed): Disconnect the power to the telephone base. Disconnect the battery on the cordless handset.
-
Page 125: Important Safety Instructions
Appendix Important safety instructions When using your telephone equipment, basic safety precautions should always be followed to reduce the risk of fire, electric shock and injury, including the following: Read and understand all instructions. Follow all warnings and instructions marked on the product. Unplug this product from the wall outlet before cleaning. -
Page 126: Battery
Appendix Battery • CAUTION: Use Only Supplied Battery. • Do not dispose of the battery in a fire. Check with local waste management codes for special disposal instructions. • Do not open or mutilate the battery. Released electrolyte is corrosive and may cause burns or injury to the eyes or skin. -
Page 127: About Cordless Telephones
VTech product service centers. Please call 1 (800) 8 BATTERY information on Li-ion battery recycling and disposal bans/restrictions in your area. VTech’s involvement in this program is part of its commitment to protecting our environment and conserving natural resources. ®... -
Page 128: Fcc, Acta And Ic Regulations
Appendix FCC, ACTA and IC regulations FCC Part 15 This equipment has been tested and found to comply with the requirements for a Class B digital device under Part 15 of the Federal Communications Commission (FCC) rules. These requirements are intended to provide reasonable protection against harmful interference in a residential installation. -
Page 129: Industry Canada
Appendix FCC, ACTA and IC regulations (continued) If this equipment is malfunctioning, it must be unplugged from the modular jack until the problem has been corrected. Repairs to this telephone equipment can only be made by the manufacturer or its authorized agents. -
Page 130: California Energy Commission Battery Charging Testing Instructions
Appendix California Energy Commission battery charging testing instructions This telephone is set up to comply with the energy-conserving standards right out of the box. These instructions are intended for California Energy Commission (CEC) compliance testing only. When the CEC battery charging testing mode is activated, all headset functions, except battery charging, will be disabled. -
Page 131: For C-Ul Compliance Only
Ne surchargez pas les prises de courant et les rallonges. Débranchez cet appareil de la prise de courant et communiquez avec le département de service à la clientèle de VTech dans les cas suivants: • Lorsque le cordon d’alimentation est endommagé ou écorché. - Page 132 Appendix For C-UL compliance only 14. N’utilisez pas le téléphone pour rapporter une fuite de gaz à proximité de la fuite. En certaines circonstances, une flammèche pourrait être provoquée lorsque l’adaptateur est branché à une prise de courant, ou lorsque le combiné est déposé sur le socle. Ceci est un événement commun associé...
- Page 133 Appendix For C-UL compliance only À propos des téléphones sans fil • Alimentation électrique: Les mêmes caractéristiques qui constituent des avantages pour les téléphones sans fil affichent également des restrictions. Les appels téléphoniques sont transmis entre le combiné sans fil et le socle par le biais d’ondes radio ; il y a donc la possibilité que vos conversations téléphoniques sans fil soient interceptées par des équipements de réception radio se trouvant dans la portée du combiné...
-
Page 134: Limited Warranty
Limited warranty What does this limited warranty cover? The manufacturer of this VTech Product warrants to the holder of a valid proof of purchase (“Consumer” or “you”) that the Product and all accessories provided in the sales package (“Product”) are free from defects in material and workmanship, pursuant to the following terms and conditions, when installed and used normally and in accordance with the Product operating instructions. - Page 135 Some states/provinces do not allow limitations on how long an implied warranty lasts, so the above limitation may not apply to you. In no event shall VTech be liable for any indirect, special, incidental, consequential, or similar damages (including, but not limited to lost profits or revenue, inability to use the Product or other associated equipment, the cost of substitute equipment, and claims by third parties) resulting from the use of this Product.
-
Page 136: Technical Specifications
Appendix Technical specifications Frequency control Crystal controlled PLL synthesizer Transmit frequency Handset: 1921.536-1928.448 MHz Telephone base: 1921.536-1928.448 MHz Headset: 1921.536-1928.448 MHz Channels Nominal effective Maximum power allowed by FCC and IC. Actual operating range range may vary according to environmental conditions at the time of use. -
Page 137: Index
Index Index Conference home and cell calls 54 Connect an active device 29 Add a cell phone 25 Create a new directory entry 70 Add a handset 104 Add a headset 27 Alphabetical search 71 Announcement 83 Date 39 Answer a cell call 52 Delete a directory entry 73 Answer a cell call while on a home call Delete a redial entry 60... - Page 138 Index Index Memos 93 Message alert tone 88 Glossary 24 Message capacity 90 Message playback 91 Message window displays 94 Handset icons 102 Missed calls 41 Handset layout 17 Mute 55 Handset lights 101 Handset locator 56 Handset main menu 21 No home line 43 Handset ringer volume 37 Handset speakerphone 55...
- Page 139 Index Repeat messages 91 View directory download information 35 Replace a handset 106 Voice announce caller ID 46 Replace a headset 106 Voice language 40 Replace an active device 32 Voicemail 42 Reset download fail indication 43 Voicemail indicators 42 Reset the missed call indicator 41 Volume 37 Reset the voicemail indicators 42...
- Page 140 The Bluetooth word mark and logos are owned by Bluetooth SIG, Inc. and any use of such marks by VTech Holdings Limited is under license. VTech Holdings Limited is a member of Bluetooth SIG, Inc. Other trademarks and trade names are those of their respective owners.