Oki C711WT User Manual
Oki printer
Hide thumbs
Also See for C711WT:
- Gui do usuario manual (86 pages) ,
- Guía del usuario (85 pages) ,
- Manual de l'utilisateur (84 pages)
Table of Contents
Advertisement
Quick Links
Advertisement
Table of Contents

Related Manuals for Oki C711WT


Summary of Contents for Oki C711WT
- Page 1 C711WT/ES7411WT User’s Guide...
-
Page 2: Preface
45095102EE Rev1; Copyright © 2012. All rights reserved. OKI is a registered trademark of Oki Electric Industry Co., Ltd. Oki Printing Solutions is a registered trademark of Oki Data Corporation. Microsoft, MS-DOS and Windows are registered trademarks of Microsoft Corporation. -
Page 3: Emergency First Aid
Oki Data Corporation, 4-11-22 Shibaura, Minato-ku, Tokyo 108-8551, Japan MPORTER TO THE AUTHORISED REPRESENTATIVE Oki Europe Limited (trading as OKI Printing Solutions) Blays House Wick Road Egham Surrey, TW20 0HJ United Kingdom For all sales, support and general enquiries contact your local distributor. -
Page 4: Table Of Contents
ONTENTS Preface ...........2 Emergency first aid . - Page 5 Oki contact details........
-
Page 6: Notes, Cautions And Warnings
OTES CAUTIONS AND WARNINGS NOTE A note provides additional information to supplement the main text. CAUTION! A caution provides additional information which, if ignored, may result in equipment malfunction or damage. WARNING! A warning provides additional information which, if ignored, may result in a risk of personal injury. -
Page 7: About This Guide
BOUT THIS GUIDE NOTE Images used in this manual may include optional features that your product does not have installed. OCUMENTATION SUITE This guide is part of a suite of online and printed documentation provided to help you become familiar with your product and to make the best use of its many powerful features. The documentation is summarised below for reference and is found on the software CD unless indicated otherwise: >... -
Page 8: On-Line Usage
LINE USAGE This guide is intended to be read on screen using Adobe Reader. Use the navigation and viewing tools provided in Adobe Reader. There are many cross-references within this book, each highlighted as blue text. When you click on a cross-reference the display will instantly jump to the part of the manual containing the referenced material. -
Page 9: Introduction
NTRODUCTION Congratulations on choosing this colour printer. Your printer includes these features: > ProQ/High Quality, multi-level technology produces subtler tones and smoother gradations of colour to lend photographic quality to your documents. > 600 x 600, 1200 x 600 dpi (dots per inch) and ProQ2400 print resolution for high quality image production showing the finest detail. -
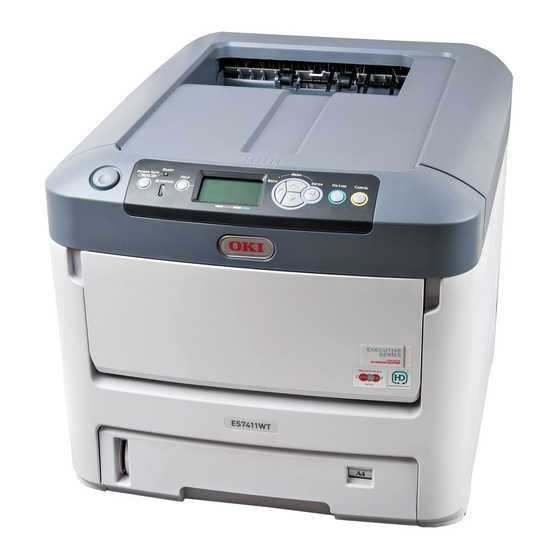
Page 10: Printer Overview
RINTER OVERVIEW RONT VIEW 1. Output stacker, face down. 5. Paper level indicator. Standard printed copy delivery point. Holds 6. Front cover release lever. up to 350 sheets at 80g/m². 7. Multi-purpose tray release recess. 2. Operator panel. 8. Top cover release button. Menu driven operator controls and LCD 9. -
Page 11: Rear View
EAR VIEW This view shows the connection panel, the rear output stacker. 1. ON/OFF switch. 5. ACC interface (host USB). 2. AC power socket. 6. Network interface. 3. Rear, face up stacker. 7. Parallel interface. 4. USB interface. a. The Network Interface may have a protective “plug” which must be removed before connection can be made. -
Page 12: Changing The Display Language
When the rear paper stacker is folded down paper exits the printer through the rear of the printer and is stacked here face up. This is mainly used for heavy print media and transparency/transfer media. When used in conjunction with the multi purpose feed tray, the paper path through the printer is essentially straight. -
Page 13: Paper Recommendations
APER RECOMMENDATIONS Your printer will handle a variety of print media, including a range of paper weights and sizes, transparency and transfer media. This section provides general advice on choice of media, and explains how to use each type. The best performance will be obtained when using standard 75~90g/m² paper designed for use in copiers and laser printers. -
Page 14: Face Up Stacker
ACE UP STACKER The face up stacker at the rear of the printer should be opened and the tray extension pulled out when required for use. In this condition paper will exit via this path, regardless of driver settings. The face up stacker can hold up to 100 sheets of 80g/m² standard paper, and can handle stocks up to 250 /m². -
Page 15: Loading Paper
OADING PAPER ASSETTE TRAYS Remove the paper tray from the printer. Fan the paper to be loaded at the edges (1) and in the middle (2) to ensure that all sheets are properly separated, then tap the edges of the stack on a flat surface to make it flush again (3). - Page 16 Load paper (letter headed paper face down and top edge towards the front of the printer), as shown. > Adjust the rear stopper (a) and paper guides (b) to the size of paper being used. CAUTION! IMPORTANT: Set paper size dial (c) to the size of paper being used (A4 in the above example).
- Page 17 > Do not pull the paper tray out during printing (except as described below for the 2nd tray). NOTE > If you have two trays and you are printing from the 1st (upper) tray, you can pull out the 2nd (lower) tray during printing to reload it. However, if you are printing from the 2nd (lower) tray, do not pull out the 1st (upper) tray.
-
Page 18: Multi Purpose Tray
ULTI PURPOSE TRAY Open the multi purpose tray (a). Fold out the paper supports (b). Press gently down on the paper platform (c) to ensure it is latched down. Load the paper and adjust the paper guides (d) to the size of paper being used. >... -
Page 19: How To Access The Driver Screens
OW TO ACCESS THE DRIVER SCREENS Most of the features described are accessed via the printer driver screens. How you access them depends on your computer and its operating system. The driver windows are dialogue boxes offering a wide range of choices about how you want to print your documents. -
Page 20: Printing Preferences In Windows Applications
RINTING PREFERENCES IN INDOWS APPLICATIONS When you choose to print your document from a Windows application program a print dialogue box appears. This dialogue usually specifies the name of the printer on which you will print your document. Next to the printer name is a Properties button. -
Page 21: Changing The Driver Defaults
HANGING THE DRIVER DEFAULTS Windows XP/2000 Click Start > Settings > Printers and Faxes to open the Printers and Faxes window. In the Printers and Faxes window, right-click on the appropriate printer driver icon, and choose Printing Preferences from the context menu. Windows Vista Click Start >... -
Page 22: Setting The Driver Device Options
ETTING THE DRIVER DEVICE OPTIONS This section explains how to ensure that your printer driver can utilize all of the hardware features installed in your printer. Accessories such as additional paper trays will only be usable if the printer driver on your computer knows they are there. -
Page 23: Color Setting
OLOR SETTING OLOR You can select Color Print or Gray Scale (White) Print for the color mode. OLOR RINT Select this when printing in color. Windows On the print dialog box, click the Color tab. Under Color Mode, select Color Print. This screen is normally not used. - Page 24 Mac OS X On the print dialog box, select the Printer Features panel. From the Feature Sets menu, select Color Option. From Color Mode, select Color Print. This screen is normally not used. Color Print Details 1,2 panel This screen is normally not used. Your printer performs color matching by using an ICC profile.
-
Page 25: Gray Scale (White) Print
CALE HITE RINT Select this when printing documents using only white toner without using CMY toner. NOTE To use this setting, you need to create data as gray scale data in an application. Save data with the gray scale or monochrome mode. The color data cannot be converted to Gray Scale (White) Print automatically. -
Page 26: Print Mode
RINT You can specify whether to use white toner for printing when Color Print is selected. HITE Selecting this prints documents using white toner. The object whose color is explicitly set to white is printed with white toner. White On is used when the background color of print media is not white. - Page 27 Mac OS X On the print dialog box, select the Printer Features panel. From the Feature Sets menu, select Color Option. From Print Mode, select your preferred setting. Color setting > 27...
-
Page 28: Finishing Options
INISHING OPTIONS Your printer offers a wide selection of document finishing options that help you to control the final form of your printed document. For detailed information on finishing options see: > “Collating” on page 29 > “Separating queued print jobs” on page 31 >... -
Page 29: Collating
OLLATING This feature allows multiple copies of a multipage document to be printed with the pages of each copy in sequence. Uncollated pages print like this Collated pages print like this Application collate—Some application programs have a collate feature in their print options. -
Page 30: Windows
INDOWS In the Job Options tab, choose how many copies you want to print from the scrolling list. Click the Collate checkbox. OS X Select Printer Features (1). From the Feature Sets menu (2), select Job Options. Select the Collate checkbox (3) to enable printer collate. NOTE The Collate option in the Copies &... -
Page 31: Separating Queued Print Jobs
EPARATING QUEUED PRINT JOBS When you share a printer with other users it can be useful to print a special page between print jobs to help locate each user’s job in a paper stack at the printer. In Windows this page is called a “separator page”. -
Page 32: Cover Print
OVER PRINT Cover print is when the first page (cover) of a print job is fed from one paper tray, and the remaining pages of the print job are fed from another paper tray. This feature is not available in the Windows PostScript Drivers. Do not confuse Cover Print with “Cover Page”. -
Page 33: Custom
USTOM PAGE SIZE This feature enables printing on non-standard sized print media. The multipurpose tray is used for feeding non-standard media sizes. Print media width can be from approximately 64mm to 216mm, and its length can be from 127mm to 355.6mm. Actual limits vary slightly depending on which printer driver you use and your computer’s operating system. -
Page 34: Mac Os X
You can also position the page image on the paper to avoid printing too close to the edge by choosing an Offset. Offset relative to perpendicular direction adds to your left margin. Offset relative to parallel direction adds to your top margin (normal feed) or bottom margin (flipped feed). -
Page 35: Printing Multiple Pages On One Sheet (N-Up)
RINTING MULTIPLE PAGES ON ONE SHEET This feature scales the page size of your document for printing and reproduces several pages per sheet. This is useful when you simply want to proof your page layout, or distribute your document in a more compact format. It saves paper, bulk, weight and cost. INDOWS CRIPT In the driver’s Layout tab, choose the number of pages (N-up) you want to print on each... -
Page 36: Mac Os X
OS X Select Layout (1). From the Pages per Sheet menu (2), select the number of pages you want to fit onto a single sheet of paper. If required, change the direction (3) the document pages are laid out on each sheet of paper. -
Page 37: Scale To Page
CALE TO PAGE Scale to Page allows you to print data formatted for one size page onto a different size page, without modifying the print data. This feature is not available with the Windows PS driver. OS X Select Paper Handling (1). Check the Scale to Fit Paper Size checkbox (2). -
Page 38: Transfer/Transparency Film Printing
RANSFER TRANSPARENCY FILM PRINTING This feature enables printing on transfer or tranparency film. The multipurpose tray is used for feeding film media. INDOWS In the driver’s Paper/Quality tab, click Advanced, and select the required film size from the Paper Size drop-down list. In the same window, select the Films from the Printer Features - Media Type drop-down list. -
Page 39: Mac Os X
OS X In the driver's window, select the Multi-Purpose Tray from the All Pages From drop-down list. Move to the Printer Features window, select the Films from the Media Type drop-down list in the Feature Sets: Paper Input Options. Finishing options > 39... -
Page 40: How To Print With Application Setting
OW TO PRINT WITH APPLICATION SETTING To print image data without the white background, you need to configure the application setting. If printing image data without configuring the application setting, white is printed on the whole background of the image. The following pages explain how to configure the setting in the Adobe applications. -
Page 41: Adobe Illustrator
DOBE LLUSTRATOR This section describes how to print the image data without white background by Adobe Illustrator CS. Load the image data. Create a path around the area of the placed picture image that you want to mask. Select the created path and the picture image, and create a clipping mask. Save the image data. -
Page 42: Menu Functions
ENU FUNCTIONS This section lists the menus accessed via the controls on the printer’s operator panel and displayed in the LCD window. PERATOR PANEL 1. Ready LED ON: Ready to receive data. 2. Display Displays the printer status and any error messages. BLINKING: Processing data. -
Page 43: How To Change The Settings - User
OW TO CHANGE THE SETTINGS USER It should be noted that many of these settings can be, and often are, overridden by settings in the printer drivers. However, several of the driver settings can be left at “Printer Setting”, which will then default to the settings entered in these printer menus. Where applicable, factory default settings are shown in bold type in the following tables. -
Page 44: Configuration Menu
Using the up or down MENU button, identify the parameter as required. Press the Enter button. An asterisk (*) will appear next to the setting, indicating that this setting is currently in effect. Press the On Line button to switch to online. The machine will automatically re- boot. -
Page 45: Print Information Menu
RINT INFORMATION MENU This menu provides a quick method of listing various items stored within the printer. ITEM ACTION EXPLANATION Configuration Execute Select execute to print out a configuration report. Network Execute Scroll down to this parameter and select execute to print out Network information. -
Page 46: Menus
ENUS ITEM ACTION EXPLANATION Tray Configuration Paper Feed Select tray. Select by scroll and Enter button. Default: Tray 1 Auto Tray Switch Switches Auto ON/OFF. Select by scroll and Enter button. Default: On Tray Sequence Selects Tray sequence Down/Up/Paper feed Tray. - Page 47 ITEM ACTION EXPLANATION Tray Configuration MPTray Config Configure Paper Size/Media Type/Media (cont.) Weight/Tray Usage. Select by scroll and Enter button. Paper Size: A4/A5/A6/B5/ Legal14/Legal 13.5/Legal13/ Letter/ Executive/ Custom/Com-9 Envelope/Com- 10 Envelope/ Monarch Envelope/DL Envelope/C5/ Index Card Media Type: Plain/ USERTYPE 1 to 5 are displayed only if registered Letterhead/ in the host PC.
- Page 48 ITEM ACTION EXPLANATION System Adjust Power Save Time Select from 1/2/3/4/5/10/15/30/60/120 Minutes. Default: Select by scroll and Enter button. Sleep Time Select from 1/2/3/4/5/10/15/30/60/120 Minutes. Default: Select by scroll and Enter button. Clearable Warning Select from: ONLINE/Job. Select by scroll and Enter button.
-
Page 49: Admin Setup
DMIN SETUP ITEM SETTINGS EXPLANATION Enter xxxxxxxxxxxx Enter a password to gain entry to the Admin Setup menu. Password Password should be from 6 to 12 digits of alpha/numeric characters (or mix) The default value is “aaaaaa” Network TCP/IP Enable Sets TCP/IP Protocol. - Page 50 ITEM SETTINGS EXPLANATION Network Gateway xxx.xxx.xxx.xxx Sets the Gateway (default router) address. Setup Address 0.0.0.0 means that there is no router. (cont.) Display Conditions: > TCP/IP should be enabled. > IP Version is not IPv6. Enable Sets Enable/Disable of Web. Disable Enable: Web/IPP is available.
- Page 51 ITEM SETTINGS EXPLANATION Print Setup Resolution 600dpi Sets default resolution. (cont.) 600x1200dpi 600dpi multi- level X Dimension 64 mm Specifies paper width of Custom paper as a default value. Sets a paper size at right angles to the paper run direction.
- Page 52 ITEM SETTINGS EXPLANATION Flash Initialize Execute Initializes Resident FLASH. Memory When the Enter button is pressed, the following Setup confirmation message appears. Are You Sure? Yes/No If No is selected, the previous menu display resumes. If Yes is selected, the following confirmation message displays.
- Page 53 ITEM SETTINGS EXPLANATION Settings Reset Execute Resets EEPROM of CU. Resets User menu to the factory Settings default. If Execute is selected, exits from the menu. Save Execute Saves menus currently set. With this function, the menus Settings with which operation was last performed are saved, and overwrites with the menus that were previously saved.
-
Page 54: Calibration
ALIBRATION ITEM SETTINGS EXPLANATION Auto Density On/Off Selects whether density adjustment and TRC Mode compensation is automatically performed. On: Density adjustment is automatically run under the engine-specified conditions, and reflected in TRC compensation. Off: The printer does not voluntarily run density adjustment. -
Page 55: Boot Menu
OOT MENU This menu should only be changed by the System Administrators. In order to gain access to this menu, follow the instructions in “How to change the settings - administrator” on page This menu is in ENGLISH only (default settings in bold type). Parallel Setup This menu controls the operation of the printer’s Parallel data interface. - Page 56 Power setup ITEM SETTINGS EXPLANATION Peak Power Control Normal Sets Peak Power Control level. Power Save Enable Sets Enable/Disable of Power Save Mode. Disable If Power Save is disabled, pressing the Power Save / Wake Up button on the control panel will manually override this setting.
-
Page 57: Maintenance
AINTENANCE EPLACING CONSUMABLE ITEMS Only use genuine original consumables to ensure the best quality and performance from your hardware. Non original products may adversely affect your printer's performance and invalidate your warranty. ONER CARTRIDGE REPLACEMENT NOTE When the LCD display indicates TONER LOW, or if print appears faded, first open the top cover and try tapping the cartridge a few times to evenly distribute the toner powder. - Page 58 Note the positions of the four cartridges. 1. White cartridge 2. Magenta cartridge 3. Yellow cartridge 4. Cyan cartridge Pull the coloured toner release lever on the cartridge to be replaced fully towards the front of the printer. Lift the right-hand end of the cartridge and then draw the cartridge to the right to release the left-hand end as shown, and withdraw the toner cartridge out of the printer.
- Page 59 Gently shake the new cartridge from end to end several times to loosen and distribute the toner evenly inside the cartridge. Remove the wrapping material and peel off the adhesive tape from the underside of the cartridge. Holding the cartridge by its top centre with the coloured lever to the right, lower it into the printer over the image drum unit from which the old cartridge was removed.
-
Page 60: Image Drum Replacement
Gently wipe the LED head surface with a clean, lint free cloth. Finally, close the top cover and press down firmly at both sides so that the cover latches closed. MAGE DRUM REPLACEMENT CAUTION! Static sensitive devices, handle with care. The printer contains four image drums: white, magenta, yellow and cyan. - Page 61 Note the positions of the four toner cartridges (a) and image drums (b). It is essential that they go back in the same order. Holding it by its top centre, lift the image drum, complete with its toner cartridge, up and out of the printer.
- Page 62 Lift the right-hand end of the toner cartridge (1) and then draw the cartridge to the right to release the left-hand end as shown (2), and withdraw the toner cartridge out of the image drum cartridge. Place the cartridge on a piece of paper to avoid marking your furniture.
-
Page 63: Replacing The Transfer Belt Unit
Holding the complete assembly by its top centre, lower it into place in the printer, locating the pegs at each end into their slots in the sides of the printer cavity. Finally, close the top cover and press down firmly at both sides so that the cover latches closed. - Page 64 Lift each of the image drum units out of the printer and place them in a safe place away from direct sources of heat and light. CAUTION! The green image drum surface at the base of each cartridge is very delicate and light sensitive.
-
Page 65: Fuser Replacement
Lower the new belt unit into place, with the lifting bar at the front and the drive gear towards the rear of the printer. Locate the drive gear into the gear inside the printer by the rear left corner of the unit, and lower the belt unit flat inside the printer. Turn the two fasteners (a) 90°... - Page 66 Pull the two fuser retaining levers (b) towards the front of the printer so that they are fully upright. Holding the fuser by its handle (a), lift the fuser straight up and out of the printer. If the fuser is still warm, place it on a flat surface which will not be damaged by heat. Remove the new fuser from its packaging and remove the transit material.
-
Page 67: Cleaning
LEANING CAUTION! Use a clean, moist, lint-free cloth for cleaning. Do not use benzine, thinners or alcohol as a cleaning agent. THE UNIT CASING Switch the printer off. Wipe the unit surface with a soft cloth moistened sparingly with water or neutral detergent. -
Page 68: The Paper Feed Rollers
THE PAPER FEED ROLLERS Clean the paper feed rollers if paper jams frequently occur. CAUTION! Use a clean, moist, lint-free cloth for cleaning. Do not use benzine, thinners or alcohol as a cleaning agent. Remove items like a wrist watch or bracelet. Switch the printer off. -
Page 69: Installing Upgrades
NSTALLING UPGRADES This section explains how to install optional equipment into your printer. This includes: > additional RAM memory > additional paper tray(s) > cabinet EMORY UPGRADE The basic printer model comes equipped with 256MB of main memory. This can be upgraded with an additional memory board of 256MB or 512MB, giving a maximum total memory capacity of 768MB. - Page 70 Lift the edge of the side cover slightly and pull the cover away from the printer at the top. Lift the cover slightly to detach it from the printer. Place it safely to one side. Carefully remove the new memory board from its wrapping. Try to handle the board only by its short edges, avoiding contact with any metal parts as far as possible.
- Page 71 Close the top of the side cover up to the printer and refit the securing screw loosened in step 4. Close the front cover, and close the top cover, pressing down firmly at each side to latch it closed. Reconnect the AC power cable and switch the printer on. When the printer is ready, print a menu map as follows: Press the Enter button.
-
Page 72: Additional Paper Tray(S)
DDITIONAL PAPER TRAY Switch the printer off and disconnect the AC power cable. Place additional paper tray(s) on desired location. Observing safety rules for lifting and, using locating guides, place printer on top of the additional paper tray(s). Re-connect the AC power cable and switch the printer ON. All that remains is to adjust the printer driver to make full use of the new features. -
Page 73: Setting The Driver Device Options
ETTING THE DRIVER DEVICE OPTIONS Once your new upgrade has been installed, you may need to update the printer driver so that the additional features are available to your applications. Accessories such as additional paper trays will only be usable if the printer driver on your computer knows they are there. -
Page 74: Troubleshooting
ROUBLESHOOTING Provided that you follow the recommendations in this guide on the use of print media, and you keep the media in good condition prior to use, your printer should give years of reliable service. However, paper jams occasionally do occur, and this section explains how to clear them quickly and simply. -
Page 75: Paper Sensor Error Codes
APER SENSOR ERROR CODES 380, 400 CODE # LOCATION CODE # LOCATION Paper feed Paper Tray Paper path Paper tray Paper exit Paper size MP Tray a. If fitted. Troubleshooting > 75... -
Page 76: Clearing Paper Jams
LEARING PAPER JAMS If a sheet is well advanced out of the top of the printer, simply grip it and pull gently to draw it fully out. If it does not remove easily, do not use excessive force. It can be removed from the rear later. - Page 77 he assembly down gently onto a piece of paper to prevent toner from marking Put t your furniture and to avoid damaging the green drum surface, and cover. CAUTION! The green image drum surface at the base of the Image Drum is very delicate and light sensitive.
- Page 78 Look into the printer to check whether any sheets of paper are visible on any part of the belt unit. CAUTION! Do not use any sharp or abrasive objects to separate sheets from the belt. This may damage the belt surface. To remove a sheet with its leading edge at the front of the belt (a), carefully lift the sheet from the belt and pull it forwards into the internal drum cavity and withdraw the sheet.
- Page 79 through the drum cavity area. Then allow the pressure release lever to rise again. NOTE If the sheet is well advanced into the fuser (only a short length is still visible), do not attempt to pull it back. To remove a sheet in the fuser, push the two retaining levers (e) towards the rear of the printer to release the fuser.
- Page 80 Starting with the white image drum unit nearest the fuser, replace the four image drums into the drum cavity, making sure to locate them in the correct order. Holding the complete assembly by its top centre, lower it into place in the printer, locating the pegs at each end into their slots in the sides of the printer cavity.
- Page 81 If you are not using the rear exit tray, close it once any paper has been removed from this area. Pull down the MP Tray using the depressions. Lift the front cover release lever and lower the front cover. Check inside the cover for sheets in this area and remove any that you find, then close the cover.
-
Page 82: Specifications
PECIFICATIONS N31194B ITEM SPECIFICATION Dimensions 435 x 547 x 389mm (W x D x H) Weight 27.6Kg approx. Power supply 220 to 240VAC @ 50/60 Hz ± 2% Power consumption Operating: 1200 max.; 600 W av. (25°C) Standby: 90 W av. (25°C) Power saving: 15 W max. -
Page 83: Index
NDEX Application collate Operator Panel ....29 ...... 42 Belt Page size how to replace custom ....63 ......33 Paper jam clearing ..... 74 Cleaning jam, error codes ....75 the LED head loading cassette trays ....67 ..15 the paper feed rollers loading letterhead .. -
Page 84: Oki Contact Details
OKI Systems (Italia) S.p.A. Northern Ireland Website: www.oki.ua via Milano, 11, 19 Ferndale Avenue 20084 Lacchiarella (MI) OKI Sistem ve Yazıcı Çözümleri Tic. Glengormley Ltd. Şti. BT36 5AL Tel:+39 (0) 2 900261 Harman sok Duran Is Merkezi, Northern Ireland... - Page 85 Oki Systems (Sweden) AB Borgafjordsgatan 7 Box 1191 164 26 Kista Tel. +46 (0) 8 634 37 00 e-mail: info@oki.se för allmänna frågor om Oki produkter support@oki.se för teknisk support gällandes Oki produkter Vardagar: 08.30 - 12.00, 13.00 - 16.00 Website: www.oki.se...
- Page 86 Oki Europe Limited Blays House Wick Road Egham Surrey, TW20 0HJ United Kingdom Tel: +44 (0) 208 219 2190 Fax: +44 (0) 208 219 2199 www.okiprintingsolutions.com...