Table of Contents
Advertisement
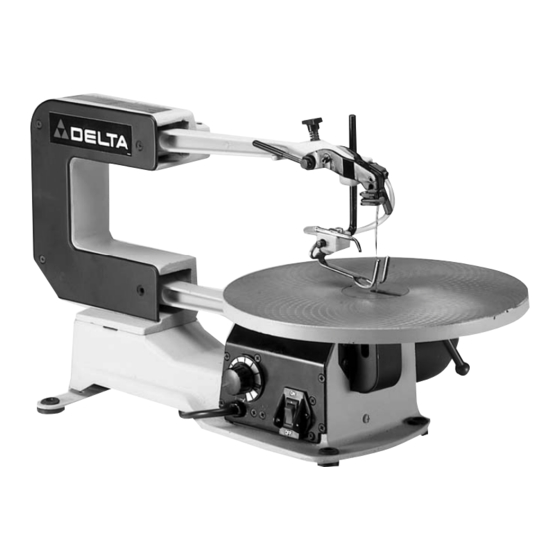
16" Variable Speed Scroll Saw
with Quickset II Blade
®
Changing Feature
(Model 40-540)
PART NO. 900087-0010
Copyright © 2000 Delta Machinery
To learn more about DELTA MACHINERY
ESPAÑOL: PÁGINA 17
visit our website at: www.deltamachinery.com.
For Parts, Service, Warranty or other Assistance,
1-888-848-5175 (
1-800-463-3582).
please call
In Canada call
Advertisement
Table of Contents

Related Manuals for Delta 40-540


Summary of Contents for Delta 40-540
- Page 1 Quickset II Blade ® Changing Feature (Model 40-540) PART NO. 900087-0010 Copyright © 2000 Delta Machinery To learn more about DELTA MACHINERY ESPAÑOL: PÁGINA 17 visit our website at: www.deltamachinery.com. For Parts, Service, Warranty or other Assistance, 1-888-848-5175 ( 1-800-463-3582).
-
Page 2: Safety Rules
If you have any questions rela- tive to a particular application, DO NOT use the machine until you have first contacted Delta to determine if it can or should'be performed on the product. -
Page 3: Additional Safety Rules For Scroll Saws
18. THE USE of attachments and accessories not rec- Safety Requirements for Woodworking Machinery and ommended by Delta may result in the risk of injuries. the U.S. Department of Labor OSHA 1910.213 19. ALWAYS hold the work firmly against the table. -
Page 4: Assembly Instructions
ASSEMBLY INSTRUCTIONS The table and table locking handle are furnished dis- assembled from the scroll saw to prevent damage dur- ing shipment. 1. To assemble the table (A) Fig. 2, to the machine, find the two special screws (B) and two locknuts (C). Fig. - Page 5 4. Screw threaded end of stud (H) Fig. 6, with flat washer (J) through slot in angle of tilt scale (D) and into tapped hole (K). Fig. 6 5. Reassemble handle (G) Fig. 7, and screw and spring (F) which were removed in STEP 3, onto stud (H). Move table (A) to the horizontal position and lock table (A), by turning handle (G) clockwise.
- Page 6 8. Rotate bracket (M) Fig. 10, back to its original posi- tion as shown, and tighten the two screws that fasten bracket (M) to rod (N). These screws were loosened in STEP 6. Then tighten lockhandle (R) to hold rod (S) in position.
-
Page 7: Connecting Scroll Saw To Power Source
CONNECTING SCROLL SAW TO POWER SOURCE POWER CONNECTIONS A separate electrical circuit should be used for your tools. This circuit should not be less than #12 wire and should be protected with a 20 Amp fuse. Have a certified electrician replace or repair a worn cord immediately. Before connect- ing the motor to a power line, make sure the switch is in the "OFF"... -
Page 8: Fastening Scroll Saw To Supporting Surface
GROUNDED OUTLET BOX This tool is intended for use on a circuit that has an out- let and a plug that looks like the one shown in Fig. 15. A CURRENT CARRYING temporary adapter, which looks like the adapter illustrat- PRONGS ed in Fig. -
Page 9: On-Off And Variable Speed Switches
ON-OFF AND VARIABLE SPEED SWITCHES The on-off switch (A) Fig. 18, and variable speed switch (B) is located on the left side of the scroll saw base, as shown. To turn the saw "ON," push the top portion of switch (A) and to turn the saw "OFF", push the bottom portion of the switch (A). -
Page 10: Changing Blades
A table insert blank (B) Fig. 22, is supplied as standard equipment with your scroll saw and can be used when cutting very small workpieces to give added support to the bottom of the workpiece. Simply cut a slot into the blank and replace the standard insert (A) with the blank (B). -
Page 11: Adjusting Blade Ten- Sion
5. Fig. 26 illustrates the quickset blade changing wrench (K) engaged with the lower blade holder assem- bly. Turn wrench counterclockwise to loosen screw (J) Figs. 26 and 27, and remove blade from lower chuck, as shown in Fig. 27. Fig. -
Page 12: Adjusting Upper Blade Holder
ADJUSTING CLAMPING ACTION OF UPPER BLADE HOLDER Different widths of scroll saw blades will make it neces- sary to adjust the clamping action of the upper blade holder. It should be noted, however, that very little adjustment is necessary and very little clamping force is required to hold the blade satisfactorily. -
Page 13: Leveling Table
LEVELING THE TABLE 1. Loosen table lock handle way to the right. and move the table all the to the right. 2. Using a square (A) Fig. 33, check to see if the table is 90 degrees to the saw blade, as shown. Fig. -
Page 14: Following A Line
Make "relief" cuts before cutting long curves and never attempt to cut a curve that is too tight for the blade being used. INSIDE CUTTING Inside cutting is where the blade must be threaded through a hole in the workpiece. The Delta 16" Scroll Saw has the capability of performing this operation quickly and easily as follows: Let's assume you are performing an inside cutting oper- ation on a project, similar to the one shown in Fig. -
Page 15: Lubrication
LUBRICATION To keep the scroll saw operating at peak efficiency, we recommend that a simple maintenance procedure be performed after approximately each 20 hours of use. Proceed as follows: 1. MAKE CERTAIN THE MACHINE IS DISCON- NECTED FROM THE POWER SOURCE. 2. - Page 16 All Delta Machines and accessories are manufactured to high quality standards and are serviced by a network of Porter- Cable•Delta Factory Service Centers and Delta Authorized Service Stations. To obtain additional information regarding your Delta quality product or to obtain parts, service, warranty assistance, or the location of the nearest service outlet, please call 1-888-848-5175, (In Canada call 1-800-463-3582).