Table of Contents
Advertisement
Advertisement
Table of Contents

Related Manuals for Navman iCN 510


Summary of Contents for Navman iCN 510
-
Page 1: User Manual
Europe / Australia Edition iCN 510 Smart Version 3.0 with User Manual... - Page 2 510 | User Manual...
-
Page 3: Table Of Contents
510 | User Manual Contents Introduction ..............4 iCN Features ............5 Memory Card ............8 Turning your iCN On and Off ........Turning your iCN On and Off ........Turning your iCN On and Off Position in a Vehicle ..........10 Main Menu Screen ..........11 Screen Keyboard ...........11... -
Page 4: Introduction
• Do not use or handle the iCN when it is hot, leave it to cool out of direct sunlight Navman disclaim all liability for use of this product in a way that may cause accidents, damage or may violate law. -
Page 5: Icn Features
510 | User Manual 2. iCN Features It is recommended that you familiarize yourself with the basic operations of your iCN such as using the stylus, 4-way toggle and volume control. Front Components Component Description Amber indicates that battery is charging;... -
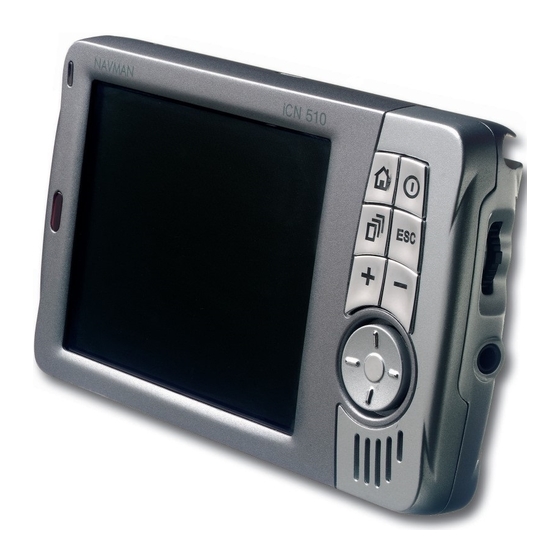
Page 6: Back Components
510 | User Manual Back Components Component Description Must be set to ON for normal use. Switching to OFF will turn the battery off, Battery Switch saving battery power. GPS Receiver Receives signals from GPS satellites when lifted out to the horizontal position. -
Page 7: Internal Battery
510 | User Manual End Components Component Description Reset Resets iCN. Press using stylus. USB Socket Connection socket for USB cable to your computer. Power Socket Connection socket for power cable. Stylus The stylus is your input device. Pull the stylus out of the slot and extend it for ease of use. Store it in the slot when not in use. -
Page 8: Memory Card
510 | User Manual 3. Memory Card Your iCN comes with a memory card containing a preactivated map of the region in which it was purchased. To navigate to your destination you will fi rst need to insert the memory card into your iCN. -
Page 9: Turning Your Icn On And Off
510 | User Manual 4. Turning your iCN On and Off The fi rst time you use the iCN you will need to switch the Battery Switch on the back of the iCN to ON. Switch the Battery Switch to OFF if you are not going to be using the iCN for a period of time, as this will save battery power. -
Page 10: Position In A Vehicle
510 | User Manual 5. Position in a Vehicle Before you begin, check if your vehicle is fi tted with a heat refl ecting or heated windshield. If so, you will need to purchase an external antenna for your iCN to receive GPS signals. -
Page 11: Main Menu Screen
510 | User Manual 6. Main Menu Screen The Main Menu screen gives you access to all of the iCN’s functions, including navigating to a destination: 1. Press the Power button. Power button. Power 2. The Language screen will display. Tap your language choice. Tap the Page icon. -
Page 12: Gps Status
510 | User Manual 8. GPS Status Signals are transmitted by Global Positioning System (GPS) satellites orbiting the Earth. This screen provides a visual representation of the information being received. Latitude and longitude are displayed, along with a North-pointing compass, the heading in degrees and ground speed. -
Page 13: Setting Your Destination
510 | User Manual 9. Setting your Destination Before you travel, you must specify a destination. To a Street Address 1. From the Main Menu, tap the Destination option. 2. From the Destination screen, tap Address. The Destination-Address screen will display.` 3. - Page 14 510 | User Manual 4. To select a Region or State tap the textbox. Use the keyboard to select a region. Tap the Page icon. 5. To select a Postcode or ZIP Code, tap the textbox. Use the keyboard to select a postcode or ZIP code. Tap the Page icon.
- Page 15 510 | User Manual To a Point-Of-Interest (POI) A POI is a named site, feature, landmark or public venue. POIs are stored in Categories, such as parks and museums. POIs can be displayed as icons on a map. 1. From the Main Menu, select the Destination option.The Destination screen will display.
- Page 16 510 | User Manual Multiple Destination Points with the Trip Planner You can use the Trip Planner to set multiple destination points for your trip. Your route will be calculated to go via each of these points in the specifi ed order. Destination points can be added via the Trip Planner screen or by...
- Page 17 510 | User Manual 2. Tap the screen to display the cross-hair on the Map screen. • To remove the cross-hair press ESC. 3. Drag the intersection of the cross-hair to a destination. The street will highlight and the name will display.
-
Page 18: Avoiding An Area
510 | User Manual 10. Avoiding an Area You can calculate a route that avoids a specifi ed area on the map. Up to ten Avoid Areas can be added. Avoid Areas are displayed as shaded areas. If no alternative route exists, you will be routed through an Avoid Area. -
Page 19: Viewing Your Route
510 | User Manual 11. Viewing Your Route Once a route has been calculated, there are a number of ways to view it. Cycle through the screens by pressing the Page button. To cancel a route or stop the Route Demonstrator, return to the Main Menu, select the Route Information option, then the Cancel Route option. -
Page 20: Next Turn Screen
510 | User Manual Next Turn Screen Displays the turn direction, street name and the distance to the next turn. A route must have been calculated for this screen to display. Access to this screen is set on the Settings - Display screen. -
Page 21: Route Information
510 | User Manual Route Information The Route Information screen provides information about your current route, and let's you skip a trip destination point or cancel a route. The screen is only available from the Main Menu when you are navigating a route. -
Page 22: Map Screen Pop-Up Menu
510 | User Manual 12. Map Screen Pop-up Menu The Pop-up menu allows you to access navigational functions from the Map screen. 1. Move around the Map screen using the 4-way toggle; Zoom using the + and - buttons. -
Page 23: Route Demonstrator
510 | User Manual 13. Route Demonstrator The Route Demonstrator allows you to: • Preview a route, or • Plan and view a route without a GPS fi x, such as when you are inside a building. Step 1. Activate Route Demonstrator 1. -
Page 24: Favourites & Shortcuts
510 | User Manual 14. Favourites & Shortcuts You can save up to 200 destinations as Favourites, 10 of which can be Shortcuts. Saving Favourites and Shortcuts 1. From the Main Menu, select the Destination option. 2. From the Destination screen, select the Address option. The Destination-Address screen will display. -
Page 25: Using Shortcuts
510 | User Manual Editing Favourites and Shortcuts Edit the name of the Favourite or Shortcut, or save a Favourite as a Shortcut. 1. From the Main Menu screen, select the Favourites option. • If you have saved a Shortcut, the Shortcuts screen will display. To edit a Favourite, press the Page button to display the Favourite screen. -
Page 26: Settings
510 | User Manual 15. Settings You can modify the following settings to suit your preferences. Screen Brightness 1. Press and hold the + or - button to display the brightness indicator bar. 2. Press and hold the + or - button to adjust the brightness. -
Page 27: Language Settings
510 | User Manual 14. To enable GPS datalogging, select Track Recording. The Data Logging Enabled screen will display. Data Logging Enabled screen will display. Data Logging Enabled Note: A memory card is required for datalogging. • Tap the Name of log fi le box. The Enter Text screen will display. - Page 28 510 | User Manual 12. To display a North pointing compass on the Map and 3D Map screens, select the Display Compass on Map checkbox. 13. Tap ESC repeatedly until the Map screen displays. • If you have made changes to the settings, tap Yes to accept the Warning dialogue box.
- Page 29 510 | User Manual My Points of Interest (POIs) Settings Custom Points Of Interest (POIs) are installed from the Smart Desktop POI Editor, and listed on the Desktop POI Editor, and listed on the My POIs screen.
-
Page 30: Screen Settings
510 | User Manual Operation Settings 1. From the Main Menu, tap Settings. 2. From the Settings screen, tap Alerts. 3. From the Alerts screen, tap Operating. The Operating screen will display. 4. To enable a warning dialogue box to be displayed for the driver when a button is pressed while driving, select the Warn driver when operating check box. -
Page 31: Power Status
510 | User Manual 6. To adjust screen brightness, move the Brightness slider towards Low or High. 7. Tap ESC repeatedly until the Map screen displays. • If you have made changes to the settings, tap Yes to accept the Warning dialogue box. -
Page 32: Smart Desktop Desktop
Once Smart Desktop has been installed, you can access it from the Desktop has been installed, you can access it from the Start menu: Start > Programs > Navman > Smart Desktop Desktop Maps are coloured to indicate Selected maps. -
Page 33: Updating Your Icn
510 | User Manual 17. Updating your iCN It is recommended that you regularly check the Navman website for software updates to the version of Smart you are you are using: 1. Open Smart Desktop: Desktop: Start >... -
Page 34: Continuous Continental Navigation
Desktop 3. On the Map menu, click Basemaps. The Navman Basemap Utility window will open. Navman Basemap Utility window will open. Navman Basemap Utility 4. Click the appropriate Add button to install the Basemap to the iCN, memory card or memory card reader. - Page 35 Start > Programs > Navman > Smart Desktop Desktop 3. On the Map menu, click Basemaps. The Navman Basemap Utility window will open. Navman Basemap Utility window will open. Navman Basemap Utility 4. Select the Basemap to remove.
-
Page 36: Smart Desktop Advanced Features Desktop Advanced Features
510 | User Manual 20. Smart Desktop Advanced Features Desktop Advanced Features Find a City or Town To search for a City or Town to verify the map to be installed: 1. From the Map menu, click Find City. The Find City window will... - Page 37 510 | User Manual Points of Interest (POI) Editor You can add custom Points of Interest (POIs) using the POI Editor. A maximum of 25 Custom POIs can be saved on your iCN. The Custom POI fi les are listed on the My POI screen. Custom POIs can be set to announce when in close My POI screen.
-
Page 38: Accessories
510 | User Manual 21. Accessories The following accessories are available for your iCN: External Antenna Required for vehicles with heated windshields, and to boost GPS performance in weak signal areas. Memory Card Writer Connects to your computer and allows you to download maps to SD or MMC memory cards. -
Page 39: Limitation Of Liability
Hardware Product Navman warrants its products to be free from defects in materials or workmanship under normal use for one year from the date of purchase (the Warranty Period) to the original owner (You). To claim under this warranty, You must return the product to the place of purchase, or a service centre approved by Navman (Service Centre). - Page 40 Phone: (44) 1293-780-500 Phone: (02) 9879 9000 support@navman-europe.com pcnsupport.aus@navman.com www.navman-europe.com www.navman.com Copyright © 2004 Navman NZ Limited. Navman is a registered trademark of Navman NZ Limited. All rights reserved. Smart , Drive-Away , Drive-Away , Drive-Away and Back-On-Track and Back-On-Track and Back-On-Track are trademarks of Navman NZ Limited.