
Related Manuals for Motorola EX600 XLS


Summary of Contents for Motorola EX600 XLS
- Page 1 • • EX600 ™ Expert Series Two-Way Radio User Guide Guide de l'utilisateur de l'appareil radio émetteur-récepteur...
-
Page 3: Table Of Contents
Audio Indicators for Programmable CONTENTS Buttons ......21 Trunked Radio Systems ....22 Computer Software Copyrights . - Page 4 Sounding an Emergency Siren ..32 Prioritizing a Talkgroup or Channel in a Scan List ....45 Radio Calls .
-
Page 5: Computer Software Copyrights
Motorola. Furthermore, the purchase of Motorola products shall not be deemed to grant either directly or by implication, estoppel, or otherwise, any license under the copyrights, patents or patent... - Page 6 Notes English...
-
Page 7: Safety
The battery was designed usage contained in the Product specifically to be used with a Motorola charger. Safety and RF Exposure booklet Charging in non-Motorola equipment may lead C a u t i o n enclosed with your radio. - Page 8 Notes English...
-
Page 9: Warranty
One (1) Year warrant the installation, maintenance or service of the Product. Motorola, at its option, will at no charge either repair the Product (with new or MOTOROLA cannot be responsible in any reconditioned parts), replace it (with a new... - Page 10 COMMERCIAL LOSS, LOST PROFITS warranty. Because each system which may OR SAVINGS OR OTHER INCIDENTAL, use the Product is unique, MOTOROLA SPECIAL OR CONSEQUENTIAL disclaims liability for range, coverage, or DAMAGES ARISING OUT OF THE USE...
- Page 11 G) Rechargeable batteries if: service. You can also call Motorola at 1- any of the seals on the battery 800-927-2744 US/Canada. enclosure of cells are broken or show evidence of tampering.
- Page 12 MOTOROLA with such claim; respect to infringement of patents by the Product B) that MOTOROLA will have sole control of the or any parts thereof. defense of such suit and all negotiations for Laws in the United States and other countries its settlement or compromise;...
- Page 13 Motorola software. MOTOROLA software may be used in only the Product in which the software was originally embodied and such software in such Product may not be replaced, copied, distributed, modified in any way, or used to produce any derivative thereof.
- Page 14 Notes English...
-
Page 15: Radio Overview
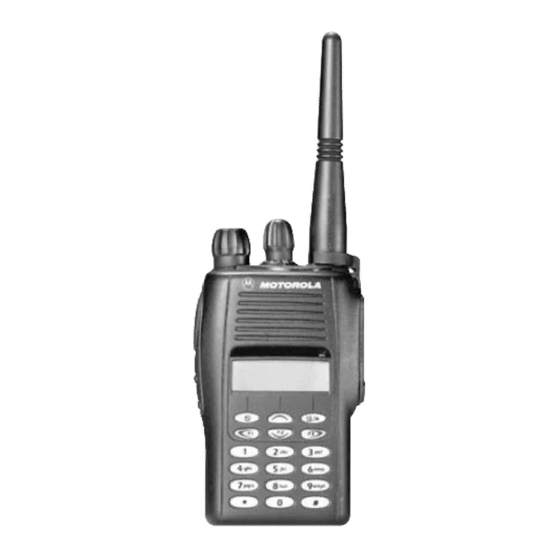
RADIO OVERVIEW PARTS OF THE RADIO EX600•XLS Model Zone, Talkgroup, or Side Channel Selector Knob Connector (Programmable) Cover Top Button (C) (programmable) On/Off/Volume Knob LED Indicator Microphone LCD Screen Push-to-Talk (PTT) Button Menu Keys Side Button 1 (A) (P1, P2, P3) (programmable) (programmable) Keypad... -
Page 16: On/Off/Volume Knob
On/Off/Volume Knob LED Color Indicates Turns the radio on or off, and adjusts the Double Selective call received radio’s volume. flashing yellow Channel or Zone Selector Knob Momentary Radio has powered-up green successfully Switches the radio to different trunked or Single System or All Group Scan conventional zones. -
Page 17: Keypad Keys
Menu/Select Key ) Left Key < Used to enter menu mode. When in menu mode, Used as a backspace key when editing radio this key is also used to make menu selections. call, scan, and phone lists. This key can also be programmed with a radio feature (see Exit Key ( page 19). - Page 18 Entering Characters Using the Keypad Number of Times Key is Pressed < > & Á Ç à á ç È É Ê è é ê Í ì í Ñ Ó Ô ò ó ô ö Ú ù ú Ý ý Blank ’...
-
Page 19: Lcd Screen
LCD Screen Symbol Indication An Emergency Siren is being sounded. Emergency Call Received A Selective Call or Call Alert has been received (trunked Call Received operation only). When the green LED is The top two screen rows display menu and blinking, indicates that the radio status information: System or All Group Scan... - Page 20 Symbol Indication Symbol Indication • When the green LED is on, The number of bars (0–4) indicates activity on a shown indicates the charge Battery Level Priority 2 talkgroup or remaining in your battery. channel during System Not Currently Assigned Scan.
-
Page 21: Programmable Buttons
Programmable Buttons The table on page 20 summarizes the programmable features available and shows Several of your radio’s buttons can be the page number where the feature is programmed by your dealer as shortcuts to explained. many of the radio’s features. In the “Button”... - Page 22 Programmable Features Feature Indicator Short Press Long Press Hold Down Page Button — — Check the battery’s Battery Gauge Color charge status. Sound a tone for — Volume Set — — adjusting your radio’s volume level. Toggle between using a conventional —...
-
Page 23: Audio Indicators For Programmable Buttons
Programmable Features (Continued) Feature Indicator Short Press Long Press Hold Down Page Button Toggle transmit power level between — Power Level † high and low. Home Channel — Access your favorite trunked talkgroup — — † Revert or conventional channel. —... -
Page 24: Trunked Radio Systems
of airtime available to any one radio and Button High-Low Tone Low-High Tone minimizes channel congestion. Scan Stop scan Start scan Some of the benefits of trunked two-way radio systems are: High power Low power Power Level selected selected • No channel monitoring required prior to Squelch (no transmission... -
Page 25: Battery Information
GETTING STARTED LED Color Battery/Charger Status BATTERY INFORMATION Steady Red Battery in rapid-charge mode. Charging the Battery Flashing Yellow Battery in charger, not in rapid- If a battery is new or its charge level is very charge mode but waiting to be low, you need to charge it before you can use charged. -
Page 26: Battery Charge Status
Battery Charge Status Battery charges will only charge the Motorola authorized batteries listed below; other You can check your battery’s charge status in batteries may not charge. two ways: The charge status is shown by the P Part No. Description •... -
Page 27: Attaching The Battery
Attaching the Battery Removing the Battery Battery Latches 1 Fit the extensions at the bottom of the battery 1 Turn off the radio (see page 27). into the bottom slots on the radio. 2 Slide both battery latches, on both sides of the 2 Press the top part of the battery toward the battery, downwards. -
Page 28: Accessory Information
ACCESSORY INFORMATION Removing the Antenna Attaching the Antenna 1 Align the threaded end of the antenna with the 1 Turn the antenna counterclockwise to remove radio’s antenna connector. 2 Turn the antenna clockwise to attach it. English... -
Page 29: Attaching The Side Connector Cover
Attaching the Side Connector Cover TURNING THE RADIO ON OR OFF Antenna Loop Slot Thumbscrew Turn the On/Off/ Turn the On/Off/ Volume knob coun- Volume knob clock- 1 Place the loop (attached to the side connector terclockwise until you wise. cover) over the antenna;... -
Page 30: Adjusting The Volume
ADJUSTING THE VOLUME Up to 15 LTR trunked zones (containing 16 talkgroups each) can be programmed into your radio. Turn the On-Off/Volume Control knob To select a trunked zone and talkgroup: clockwise to increase the volume or counterclockwise to decrease the volume. Note: The selection of zones can be prorgrammed by your dealer either on the –or–... -
Page 31: Sending A Trunked Call
SENDING A TRUNKED CALL 4 Press and hold the PTT button. To send a trunked call: –or– Press and release the PTT button and wait 3 1 Turn your radio on. seconds. • If access to the trunked system was 2 Select the desired zone and talkgroup (see successful, the LED indicator lights steady page 28 “Selecting a Trunked Zone and... -
Page 32: Selecting A Conventional Zone And Channel
SELECTING A CONVENTIONAL ZONE 6 + or ? until you see the desired AND CHANNEL conventional channel on the display. Up to 160 conventional channels, in one or more conventional zones, can be programmed into SENDING A CONVENTIONAL CALL your radio. Note: In the United States, FCC regulations require To select a conventional zone and channel you to monitor the conventional channels... -
Page 33: Receiving A Trunked Or Conventional
Note: The J symbol appears on the LCD RECEIVING A TRUNKED OR screen when talkaround mode is CONVENTIONAL CALL selected. To select either repeater mode or 1 Turn your radio on. talkaround mode: 2 Adjust your radio’s volume (see page 28). Press the preprogrammed Repeater/ Talkaround button (see page 20) to toggle 3 Select the desired trunked or conventional... -
Page 34: Home Channel Revert
Note: The E symbol appears on the LCD HOME CHANNEL REVERT screen when the Emergency Siren has The Home Channel Revert feature allows you been activated. to instantly access your favorite trunked To start the Emergency Siren: talkgroup or conventional channel at the touch Press the preprogrammed Emergency Siren of a button. -
Page 35: Radio Calls
RADIO CALLS 6 + or ? to locate the desired ID in the Radio Call List. MAKING A SELECTIVE CALL –or– Enter the ID number of the radio you want to You can make a selective call to a particular call. -
Page 36: Receiving A Selective Call F
RECEIVING A SELECTIVE CALL F 3 ) to select Radio Call When you receive a selective call: The LCD screen displays F and the prepro- • 4 + or ? until Call Alert grammed name or ID of the calling radio. •... -
Page 37: Receiving A Call Alert Page
To answer the page, press the PTT button; to 8 If the Call Alert page is received by the target cancel the page, press any other key. radio, you see: Note: Your radio displays only the last Call Alert Acknowledge page received. - Page 38 To perform a Radio Check: 8 If the Radio Check is received by the target radio, you see: 1 ) to enter menu mode. Acknowledge 2 + or ? until Radio Call If not received, you see: Radio Call 3 ) to select No Acknowledge 4 + or ? until Radio Check...
-
Page 39: Editing A Radio Call List K
EDITING A RADIO CALL LIST K 5 ) to select RadioCall List Your radio has a Radio Call list that contains the names and radio IDs of several talkgroups or individuals. 6 + or ? until Edit Entry? The ID numbers in the Radio Call List are programmed by your dealer, and cannot be changed from your radio. -
Page 40: Name And Call Alert Tone Tagging
NAME AND CALL ALERT TONE 6 + or ? until you see the name you want TAGGING to tag. You can program your radio to sound a 7 ) to confirm the selection. particular alert tone when a specific user is calling (name tone tagging), or when receiving 8 + or ? until you see and hear the tone a particular type of radio call (call tone... - Page 41 4 + or ? until Call Tone Tag 5 ) to select Call Tone Tag 6 + or ? until you see the call type you want to tag. 7 ) to confirm the selection. 8 + or ? until you see and hear the tone you want to use for this type of call.
- Page 42 Notes English...
-
Page 43: Scan
program the amount of time you can respond SCAN (or “TALKBACK”) to the caller before your radio resumes scanning. Your radio is equipped with the Scan feature, You must press the PTT button to participate in which allows you to search for, lock onto, and the call;... -
Page 44: All Group Scan G (Ltr Trunked Operation Only)
To start Auto Group Scan: Note: If you enter menu mode while the radio is scanning, scanning stops. It resumes when Select a talkgroup that has been programmed you exit menu mode. for Auto Group Scan by your dealer. To Start or Stop All Group Scan Operation Note: You do not need to press a through a preprogrammed button (see page 21):... -
Page 45: System Scang
SYSTEM SCAN Do the following: System Scan scans trunked talkgroups and 1 ) to enter menu mode. conventional channels between LTR and conventional zones, as programmed by your 2 + or ? until System Scan dealer. Up to 16 different talkgroups or conventional channels can be programmed System Scan 3 ) to select... -
Page 46: Restoring A Channel/Talkgroup Back To The Scan List
To temporarily delete the channel/talkgroup: When you edit a Scan list, you can either add, delete, or prioritize talkgroups or channels. 1 While the radio’s receiving activity is on the Your radio cannot receive any calls while you nuisance channel, press and hold the prepro- are editing a Scan list. -
Page 47: Prioritizing A Talkgroup Or Channel In A Scan List
5 ) to select Scan List ) to confirm the deletion. You see: Entry Deleted 6 + or ? until Add Entry? 11 ( to return to Add Entry? Delete Entry? –or until or to return to Delete Entry? –or– 7 ) to confirm your selection. -
Page 48: Setting Priority Talkgroups Or Channels
5 ) to select Priority Channel Scanning Sequence Scan List Channel 2 Ch2 Ch1 Ch8 Ch3 6 + or ? until (Priority 1) and Ch2 Ch4 Ch8 …Ch1 Edit Priority? Channel 8 (Priority 2) 7 ) to select Edit Priority? Note: In Conventional operation only, even if there is activity on a non-priority channel,... - Page 49 12 ( to return to Edit Priority? –or– Hold down ( to exit menu mode. Note: You cannot reprioritize a Priority 1 chan- nel or talkgroup to Priority 2 channel or talkgroup. If you want to reprioritize all channels or talkgroups, you must delete each priority channel from the scan list and add it back.
- Page 50 English...
-
Page 51: Phone
To initiate a phone call: PHONE Do the following: Your radio allows you to place and receive 1 Select a trunked zone and talkgroup that have telephone calls through trunked and been programmed for telephone. conventional systems (depending on phone line availability). -
Page 52: Making A Phone Call Dthrough A Conventional System
To disconnect the phone call: appears on the LCD when you are in Press and hold ( to exit Phone. Phone mode. D no longer appears on the LCD. 5 Press and Release the PTT button. MAKING A PHONE CALL D •... - Page 53 D appears on the LCD screen when you are a Press and release the preprogrammed in Phone Mode. Speed Dial button (see step 6) to use the Speed Dial feature. (For conventional operation with auto access b Press the key (1 to 9) corresponding to the only).
-
Page 54: Receiving A Phone Call Dthrough An Ltr Trunked Or Conventional System
RECEIVING A PHONE CALL D 10 To disconnect a phone call, do one of the THROUGH AN LTR TRUNKED OR following: CONVENTIONAL SYSTEM Enter the deaccess code using the keypad. –or– To receive a phone call: If your radio has the deaccess code programmed, go to step 9. -
Page 55: Modifying The Phone Listk
MODIFYING THE PHONE LIST ) to select Phone List Your radio contains a Phone list that holds up to 25 phone numbers. The Phone list is shared + or ? until Add Entry? between trunked and conventional Phone operation. You can modify the Phone list in three ways through your radio’s menu: ) to select Add Entry? - Page 56 12 + or ? until you see the location in the ) to select Phone List list where you want to store the phone number. 13 ) to store the phone number. + or ? until Delete Entry? Entry Saved You see: ) to select Delete Entry?
- Page 57 To Edit an Entry: + or ? until Edit Name? (to edit the name), ) to enter menu mode. + or ? until –or– until Program Lists Edit Number? (to edit the phone number), ) to select Program Lists Edit Location? –or–...
- Page 58 Notes: English...
-
Page 59: Audio/Tone Settings
AUDIO/TONE SETTINGS 4 + or ? until you see the feature you want to change (see the table on the next page). You can customize the audio and tone feature settings on your radio by 5 ) to select the feature. You see the fea- ture’s current setting. - Page 60 Audio/Tone Settings Feature What it Does Settings Name Tone Tag ‡ Standard Assigns a specific ring tone when receiving a call from a Alert #1 – #7 specific user (see page 38 for details). Call Tone Tag ‡ Standard Assigns a specific tone when receiving a specific type of Alert #1 –...
-
Page 61: Utilities
UTILITIES 4 + or ? until you see the feature you want to change (see the Utilities Features table). You can customize some of your radio’s feature 5 ) to select the feature. You see the fea- ture’s current setting. 1 ) to enter menu mode. - Page 62 Utilities Features (Continued) Feature What it Does Settings Clock Clock On Sets the time, or turns the clock on or off (see page 63). Clock Off Set Time Reminder Alarm Alarm On Sets the alarm, or turns it on or off (see page 63). Alarm Off Set Time Language...
-
Page 63: Setting Tight Or Normal Squelch (Conventional Operation Only)
SETTING TIGHT OR NORMAL SQUELCH ) to select Squelch (CONVENTIONAL OPERATION ONLY) Sqlch Tight? + or ? until Use this feature to filter out nuisance (unwanted) calls and/or background noise. –or– However, tightening squelch could cause calls Sqlch Normal? until from remote locations to be filtered out as well. -
Page 64: Setting The Power Level B
SETTING THE POWER LEVEL To set the power level: Press the preprogrammed Power Level button Each channel in your radio has a predefined (see page 20) to toggle between low and high, transmit power level that can be changed. –or– •... -
Page 65: Setting The Clock/Alarm
+ or ? until –or– Set Time? Power Low? until ) to select –or– Set Time? Power Auto? until When a setting is blinking, you can change it 8 ) to confirm the selection. with + or ?. Hour 3:05 PM SETTING THE CLOCK/ALARM (AM or PM) To set the clock/alarm:... - Page 66 Notes English...
-
Page 67: Accessories
Slim Li-Ion, 1000 mAh, 7.5 V Battery Many of the available accessories are listed below. JMNN4024_R High Capacity Li-Ion, 1320 mAh, 7.5 V For a complete list, see your Motorola dealer. Battery CARRY CASE JMNN4025_R NiMH, 700 mAh, 7.5 V FM Approved... - Page 68 Notes: English...
- Page 69 Selecting a Trunked Zone and Talkgroup 1. Turn Zone Selector knob to appropriate trunked zone. 2. + or ? until you see desired preprogrammed talkgroug on the display. ™ EX600•XLS Radio Quick Reference Card Sending a Trunked Call 1. Press PTT. If trunked system access was successful — LED = steady red; Record the functions for your radio’s programmable buttons in the table provided if unsuccessful —...
- Page 70 Menu Navigation Chart — Available in LTR trunked zones only (Refer to Menu Navigation guidelines — † — Available in conventional zones only lower, left-hand corner of this page) Rptr/ System All Group Audio/Tones (LTR) Program Phone Utilities Radio Call Talkarnd†...
- Page 72 MOTOROLA and the Stylized M Logo are registered in the US Patent & Trademark Office. All other product or service names are the property of their respective owners. © Motorola, Inc. 2002. Inc. All rights reserved. Printed in U.S.A. MOTOROLA, Le logo stylisé M,et intelligence universelle sont des marques de Motorola, Inc.