Mackie DL1608 Reference Manual
Audio mixer
Hide thumbs
Also See for DL1608:
- Quick start quide (32 pages) ,
- User manual (7 pages) ,
- Reference manual (192 pages)
Table of Contents
Advertisement
Quick Links
Advertisement
Table of Contents

Related Manuals for Mackie DL1608


Summary of Contents for Mackie DL1608
- Page 1 Mackie DL1608 Reference Guide V1.2...
-
Page 2: Important Safety Instructions
Mackie DL1608 Reference Guide V1.2 Important Safety Instructions 16. Do not overload wall outlets and extension cords as this can result in a risk of fire or 1. Read these instructions. electric shock. 2. Keep these instructions. 17. The MAINS plug or an appliance coupler is used as the disconnect device, so the discon- 3. -
Page 3: Table Of Contents
Architecture Overview ..........................11 Hardware ..............................11 Software ..............................11 Chapter 2: DL1608 Hardware : Front Panel ..............12 Introduction ............................... 12 iPad Tray Insert Removal [for the original iPad] ..................12 iPad Tray Insert Reinstall [for the all iPads, except the original] ............13 iPad Dock Connector .......................... - Page 4 Mackie DL1608 Reference Guide V1.2 Chapter 4: DL1608 Hardware : Wireless Setup .............. 22 Introduction ............................... 22 Wi-Fi Router..............................22 Network Connectivity ..........................22 Connect ..............................23 Router Settings ............................25 Chapter 5: Mackie Master Fader Software ..............26 Introduction ............................... 26 Downloading and Installing the Master Fader App ................
- Page 5 High Shelving – Band 4 ......................54 Shelf / Bell..............................55 HPF On / Off and Frequency........................56 DL1608 EQ at a Glance ..........................57 Chapter 10: Channel View : Gate and Compression ............58 Introduction ............................... 58 The Swipe Zone ............................58 Gate On / Off...............................
- Page 6 Graphic EQ On / Off ............................ 69 31-Band EQ..............................69 Draw ..............................70 DL1608 Graphic EQ at a Glance ........................ 71 Chapter 13: Channel View : Output Compressor / Limiter..........72 Introduction ............................... 72 The Swipe Zone ............................72 Compressor On / Off ..........................73 Compressor Display and Settings ......................
- Page 7 Mackie DL1608 Reference Guide V1.2 Chapter 14: Mixer View : Navigation Bar ............... 74 Introduction ............................... 74 Mixer ..............................74 Current Parameter Display ........................74 Tools ..............................74 Devices ............................75 Settings ............................80 Help ............................82 File System ..............................83 Snapshots ..........................
-
Page 8: Chapter 1: Welcome
***We strongly encourage checking out the Quick Start Guide before diving into this Reference Guide*** It is a great way to familiarize yourself with the basic ideas of the DL1608, how to switch between views, add color to a mix, gates & compressors, FX, graphic EQ and much more. Once you do that, this will be a breeze! This guide is designed to be accessible, with subsections as complete as practical to minimize having to leaf back and forth looking for the whole story. -
Page 9: Features
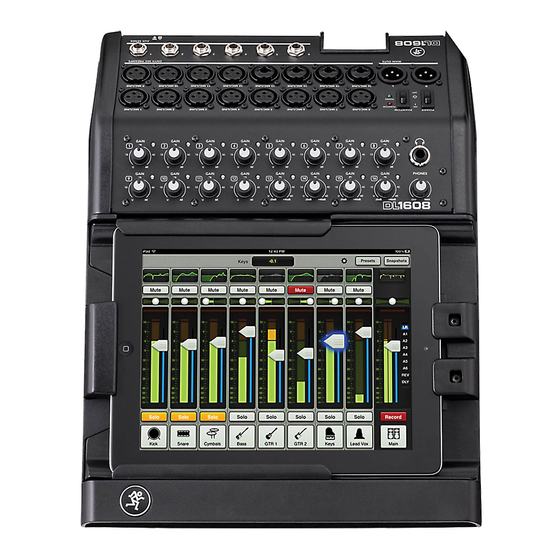
Mackie DL1608 Reference Guide V1.2 Features • Proven hardware that sounds great • 16 Onyx mic preamps • High-end Cirrus Logic® converters • Ultra low-noise, high-headroom design • Six aux sends for monitor mixes • Master L/R output for mains • Tons of built-in processing • Powerful, touch-sensitive plug-ins • 4-band EQ, gate and compression on inputs • 31-band GEQ and comp/limiter on outputs • Global reverb and delay • Wireless mixing • Seamless wired to wireless mixing • Tune the room from anywhere • Get on stage to ring out monitors • Personal monitor mixing • Use up to 10 iPad devices simultaneously • Total control from your iPad • Intuitive Master Fader app • “Grow & Glow” visual feedback • Preset and snapshot recall • Record the mix to the iPad for instant sharing • Integrate music from any app into the mix • Install friendly features • PadLock™ feature locks down iPad for permanent installs • Industry standard Kensington lock secures mixer • Compact footprint save precious workspace • 15.5" x 11.5" x 3.9" (394 mm x 292 mm x 99 mm) -
Page 10: Introduction
Mackie DL1608 Reference Guide V1.2 Introduction Nearly 25 years ago, Mackie revolutionized the pro audio world by unleashing the CR1604 16-channel mixer. Today, Mackie redefines live mixing by combining the power of a digital mixer with the ease and portability of an iPad. Think of it as today’s CR1604...but digital and unplugged. Control the Mix from anywhere: With the Mackie DL1608’s seamless wired to wireless mixing capabilities, you can mix in real time from anywhere in the venue on your iPad . The bar, the bathroom, the back closet. Instantly adjust mix functions from tuning front of house trouble spots to ringing out stage monitors. -
Page 11: Architecture Overview
Master Fader App Hardware DL1608 Mixer — Every mixer in the universe has input and output jacks. The DL1608 is no different. In addition to input and output jacks, this mixer contains 16 gain knobs and accompanying SIG/OL LEDs. On the rear panel are the power connector and network connector. Power and 48V phantom power switches and LEDs round out the mixer. Unlike most other mixers, though, the DL1608 doesn’t have... -
Page 12: Chapter 2: Dl1608 Hardware : Front Panel
What we’re saying is: the iPad tray insert only needs to be removed if you are mixing with one of the original iPads. Here’s how to remove the iPad tray: (1) remove the four screws holding the DL1608 tray insert to the DL1608, numbered 1 to 4 in the illustration below. (2) slide the tray insert out from the mixer and SAVE IT SOMEWHERE SAFE! Should you ever upgrade to an iPad 2 or iPad (3rd generation), the tray will be necessary. -
Page 13: Ipad Tray Insert Reinstall [For The All Ipads, Except The Original]
(1) remove the four screws from the DL1608 mixer, numbered 1 to 4 in the illustration below. (2) slide the tray insert into the mixer as displayed below. (3) put the screws back into the DL1608 from where you just removed them to hold the tray insert into place. Tray Insert Tray The iPad tray insert doesn’t need to be locked down If switching regularly between iPads. -
Page 14: Ipad Dock Connector
Dock Connector On the far left of the DL1608 (outlined by the vertical green rectangle below) is the iPad dock connector. Slide the iPad right to left, face up, home button on the left until it mates with the iPad dock connector. This connection serves multiple purposes. For one, as long as the DL1608 is plugged in and turned on, the iPad will charge. More importantly, recording and playback are possible when an iPad is connected to the mixer. [Recording and playback are detailed in upcoming chapters]. And it just looks cool when... -
Page 15: Padlock
Mackie DL1608 Reference Guide V1.2 PadLock™ Also included with the mixer is a DL1608 PadLock. This is used to lock the iPad into place on the mixer. One might use this for fixed installs where a dedicated iPad is used and (Pad)locked to the mixer. Or leave the PadLock off so the iPad may be conveniently transferred in and out of the DL1608. After docking the iPad (not shown), the PadLock needs to be attached by moving it right to left [horizontal green arrows], NOT downward. This ensures that the foam compresses against the iPad and holds it solidly in place. Then hand-tighten each of the two security screws down [vertical green dotted line] using the supplied wrench. While the PadLock provides some level of security, it is NOT foolproof or guaranteed protection. LOUD Technologies Inc. is not responsible for the loss, theft, damage or destruction of your DL1608 mixer or iPad whether a PadLock has been used or not. -
Page 16: Gain Knobs
Mackie DL1608 Reference Guide V1.2 Gain Knobs The gain knobs adjust the input sensitivity of the mic and mic/line inputs. This allows signals from the outside world to be adjusted to run through each channel at optimal internal operating levels. All 16 channels may accept a balanced mic or line-level signal using an XLR connector, while channels 13 – 16 also accept 1/4” line-level signals. The gain knobs are analog controls, and are... -
Page 17: Chapter 3: Dl1608 Hardware : Rear Panel
Press the top of this rocker switch in to turn the DL1608 on and press the bottom of this switch to turn the DL1608 off. As a general guide, the DL1608 should be turned on first, before any external power amplifiers or powered speakers. As such, it should also be turned off last. This will reduce the possibility of any turn-on or turn-off... -
Page 18: Power Led
Mackie DL1608 Reference Guide V1.2 Power LED This LED will illuminate green when the DL1608 is turned on. If it does not turn on, confirm that The Power Block and line cord are connected correctly (to each other, the mixer and the AC outlet), the local AC mains supply is active and that the power switch is on. Phantom Power Switch Press the top of this rocker switch in if any microphone requires phantom power. (Always check the position of this switch before connecting microphones.) This is a global switch that affects all mic channels’ XLR jacks at once. Press the bottom of this switch in to turn the phantom power off. Most modern professional condenser mics require 48V phantom power which lets the mixer send low-current DC voltage to the mic’s electronics through the same wires that carry audio. (Semi-pro... -
Page 19: L/R Main Outs
(pages 49-50) the first time you set levels on this mixer. Thanks in advance! L/R Main Outs The male XLR connectors provide a balanced line-level signal that represent the end of the DL1608, where the fully mixed stereo signal enters the real world. Connect these to the left and right line-level inputs of powered speakers or to the left and right line-level inputs of an amplifier (with speakers already attached). -
Page 20: Aux Sends 1-6
To connect unbalanced lines to these inputs, use a 1/4” mono (TS) phone plug, wired as follows: 1/4” TS Unbalanced Mono Wiring: SLEEVE SLEEVE Sleeve = Shield Tip = Hot (+) SLEEVE Kensington Lock An optional Kensington Lock provides an extra level of security should the DL1608 be left alone, unwatched. There are a wide variety of cable apparatuses to choose from to secure your DL1608 via the Kensington Lock security slot. Feel free to decide on what type works best for you by perusing the Kensington website: http://www.kensington.com/ While the Kensington cable and lock provide some level of security, it is NOT foolproof or guaranteed protection. LOUD Technologies Inc. is not responsible for the loss, theft, damage or destruction of your DL1608 mixer whether a Kensington Lock has been used or not. -
Page 21: Network Connector
The DL1608 and Master Fader app do a great job at letting you know when either (or both) the software and firmware need updating, but this button here forces a complete firmware update if the need ever arrives. -
Page 22: Chapter 4: Dl1608 Hardware : Wireless Setup
(2) DHCP — The router needs to be able to assign an IP address to a device [the DL1608, for example] connected to the Ethernet port. In most cases, the router will handle this task. However, there are some routers that can’t complete this simple assignment and should not be used. Routers with a single Ethernet port often will not work well with the DL1608 for this reason. (3) 802.11n / 5GHz — Believe it or not, those numbers are not just a bunch of mumbo jumbo. Those numbers reflect a Wi-Fi mode [802.11n] and band [5GHz] that we prefer and strongly suggest. -
Page 23: Connect
Mackie DL1608 Reference Guide V1.2 Connect At this point in time, we’re ready to dial in the settings of the iPad. Start by turning the iPad on (if it’s not already). You should have to follow these instructions only once for each iPad connected to the router. After that they should connect automatically. Now tap “Settings” on the iPad. Settings lands you here. Select Wi-Fi by touching it. Notice that Wi-Fi is “Off ” at this point, but we’re going to fi x that. Drag the Wi-Fi on/off slider right to the on position. - Page 24 Mackie DL1608 Reference Guide V1.2 Check out the view below. The iPad is searching for (and setting up the connection to) the router. It should be noted here that (by default) many routers will NOT be password protected. In the occurrence that yours has a pre confi gured password from the factory, you should be able to locate it on the bottom of the wireless router and type it in the space provided on the iPad.
-
Page 25: Router Settings
(2) Security — You will need to select a security mode and password. We suggest using WPA [Wi-Fi Protected Access] for security purposes and a password that is easy for you to recall, but diffi cult for others to hack. This prevents strangers from joining your network and controlling the DL1608, so pick a good password! (3) Band — No, we’re not here to talk about your favorite rock band. Rather, we are here to choose the Wi-Fi band. -
Page 26: Chapter 5: Mackie Master Fader Software
Mackie DL1608 Reference Guide V1.2 Chapter 5: Mackie Master Fader Software Introduction As mentioned earlier, the DL1608 is the digital mixer, and one or more iPads control it. All DSP processing and routing take place in the mixer itself, meaning it’s not just a “dock”. The Master Fader app is where to “control” the mix. Downloading and Installing the Master Fader App There are a couple of ways to download and install the Master Fader app. Via iTunes on Mac or PC, for example. However, the easiest and fastest way to download and install it is directly from the iPad. You’ve downloaded apps on an iPad before and it’s the same method to download this one, as well. Here’s how: With a good internet connection via Wi-Fi, 3G or LTE, turn on the iPad and open up the App Store. Type “master fader” in the search... -
Page 27: Updating The Master Fader App
Mackie DL1608 Reference Guide V1.2 This then turns into a green INSTALL APP button. To install the Master Fader app to an iPad, tap the green INSTALL APP button and enter your Apple ID password when prompted. The blue line underneath the Master Fader app icon shows the progress of the download. Once the blue progress line disappears, the download is complete and the Master Fader app is ready for use. -
Page 28: Updating The Dl1608 Firmware
(2) checking email, (3) updating apps, calendar, notes, (4) checking the score of the game, (5) updating the status of your favorite social networking site, etc. Instead, wait until after the update has completed to tweet “Just updated my @MackieGear #DL1608 fi rmware, #my life is complete!” I learned the hard way so you don’t have to. Eat a sandwich, quaff a beer, or whatever else you need to do to occupy your time during the fi rmware upgrade. -
Page 29: Lingo
Mackie DL1608 Reference Guide V1.2 Lingo Before diving into the features and functions of the Master Fader app, let’s take a few minutes to get acquainted with the wording that will be used throughout this Reference Guide. Doing so will minimize confusion and increase productivity, a great combination! Tapping, Dragging, Flicking, Swiping, and Pinching You already have an iPad...you wouldn’t be using this mixer otherwise! Getting around the Master Fader app is similar to getting around the iPad and many of the other apps you currently utilize. Let’s go over the functions you will be using: Gesture... -
Page 30: Two Main Views
Soon enough we will go through each of these in detail in the upcoming sections. Let’s take a quick peek at what each one looks like and what each represents. This is important so focus! Mixer View The mixer view is exactly what it sounds like; it’s a view of the mixer! The key mixing controls of every input and output for the DL1608 exist here. All 16 channel strips (plus the reverb, delay and iPad channel strips) are present along with a thumbnail view of each channel’s EQ curve, mute, pan slider, gain reduction meter, fader level, input meters, selected output indicator, solo and channel name and image. Mixer View Visible and ready for action in the mixer view are: (1) the channel strips which occupy the majority of the screen. -
Page 31: Channel View
Mackie DL1608 Reference Guide V1.2 Channel View The channel view handles all DSP-related activities. It is in the channel view where all plug-in processing is adjusted on individual channel inputs and outputs. This includes channel EQ, channel gate and compression, FX, graphic EQ and output compression and limiting. Channel View Visible and ready for action in all input channel views are: (1) the channel fader which resides vertically on the far left of the screen. -
Page 32: Grow & Glow, Current Parameter Display And The Swipe Zone
Mackie DL1608 Reference Guide V1.2 Grow & Glow, Current Parameter Display and The Swipe Zone The following are key paradigms built into the Master Fader app to help simplify your mixing world. These exist on all screens and are important concepts to understand. - Page 33 Mackie DL1608 Reference Guide V1.2 The Swipe Zone — Swiping, dragging and flicking are the keys to navigating the Master Fader app and the swipe zone exists in nearly every single view. While in the mixer view, the swipe zone exists anywhere on the black background of a channel. Swipe left or right to display any of the 16 input channels, the two FX channels and iPad channel. A maximum of nine channels (including the...
-
Page 34: Chapter 6: Mixer View : Channel Strips
Mackie DL1608 Reference Guide V1.2 Chapter 6: Mixer View : Channel Strips Introduction The mixer view contains 16 channel faders, two FX channel faders [one reverb, one delay] and one iPad channel fader. Each channel strip looks and functions exactly like the others except for the FX and iPad channels. These faders may be seen in both the mixer view and channel view. In the mixer view, all faders are readily available, while in the channel view it is the current channel’s fader strip that is displayed... -
Page 35: Eq Curve
Mackie DL1608 Reference Guide V1.2 EQ Curve At the top of each channel fader is a thumbnail view of the current EQ processing that’s applied to each channel (whether the EQ is currently engaged or not). Tapping a channel’s EQ curve will change the outlook from the mixer view to that channel’s channel view. The EQ curve will illuminate green when engaged and is gray when disengaged. As seen below, there are four possible scenarios regarding the EQ curve depending on whether the EQ and/or HPF are enabled. Each one may look unique, but it is the same exact EQ in each... -
Page 36: Channel Faders And Input Meters
Mackie DL1608 Reference Guide V1.2 Channel Faders and Input Meters The touch sensitive faders adjust the level of each channel going to the selected output. Adjustments are made by touching and dragging channel faders up and down. Touched channel faders will “grow & glow” to indicate that they are being adjusted. The fader level ranges from –∞ to +10 dB as indicated by the scale on the left. -
Page 37: Solo
Mackie DL1608 Reference Guide V1.2 Solo Solo off ers the opportunity to audition channel(s) before they are added to the mix. Whenever a channel’s solo button is engaged, only the soloed channel(s) may be heard in the headphones. Solo buttons illuminate orange when engaged and are gray when disengaged. Input channel solo buttons are PFL which stands for pre-fader listen. Therefore, the level of the channel fader does not aff ect the level heard in the headphones. - Page 38 Mackie DL1608 Reference Guide V1.2 An open gray box with only the channel’s name works, but let’s spice it up with an image. There are several options in this department. From the channel popover, tap “Image” to reveal a new popover as seen below [Image Source]. You will be presented with four choices: Use Camera Image Source...
-
Page 39: Fx [Reverb / Delay]
Mackie DL1608 Reference Guide V1.2 FX [Reverb / Delay] Now let’s take a look at the reverb and delay channel strips since they operate slightly diff erent than channel strips 1-16. To get here, fl ick or drag left anywhere in the mixer view swipe zone until the FX channels appear. The diff erences between the input channel strips and FX channel strips are noted below. Channel 16 was left in the image on purpose to easily see the side-by-side diff erence between an input channel strip and an FX channel strip. -
Page 40: Ipad / Playback
Mackie DL1608 Reference Guide V1.2 iPad / Playback Now let’s take a look at the iPad channel strip since it operates slightly diff erent than channel strips 1-16. To get here, fl ick or drag left anywhere in the mixer view swipe zone until the iPad channel appears. The diff erences between the input channel strips and iPad channel strip are noted below. Channel 16 was left in the image on purpose to easily see the side-by-side diff erence between an input channel strip and the iPad channel strip. The only diff erence between the iPad channel and the FX channels is that the iPad channel has a gain reduction meter. Otherwise, they are totally the same. Take a look below: Balance Slider — The pan slider becomes a balance slider on the iPad channel, now acting as a stereo balance. - Page 41 Mackie DL1608 Reference Guide V1.2 (4) — Tap the play button to begin playback (if it’s not already playing). Notice that the volume slider IS available. This is because the iPad is NOT yet attached to the DL1608. Once attached, the volume slider disappears. The volume is now changed with the Master Fader app. (5) — Press the home button on the iPad to exit the app. (6) — Tap the Master Fader app to relaunch the program and control the source in the mix.
-
Page 42: Chapter 7: Mixer View : Master Fader
Mackie DL1608 Reference Guide V1.2 Chapter 7: Mixer View : Master Fader Introduction The master fader is arguably the most important tool of the mixer. So much so, in fact, that the master fader is always displayed no matter what view is shown. -
Page 43: Graphic Eq
Mackie DL1608 Reference Guide V1.2 Once a diff erent output has been selected, the channel faders will change to show the level going to the newly selected output. Similarly, the master fader will change to show the controls of the newly selected output. -
Page 44: Balance And Pre / Post
Mackie DL1608 Reference Guide V1.2 Balance and Pre / Post When LR is the selected output, the balance slider controls how much of the output signal is sent to the left versus the right outputs. Touch and drag the slider left or right to make adjustments. -
Page 45: Record And Solo
Mackie DL1608 Reference Guide V1.2 Record and Solo If the selected output is LR (and the iPad is attached to the mixer), a record button resides below the master fader. This allows you to easily record the LR output on the iPad. Record is unavailable in Wi-Fi mode. Pressing record will begin recording immediately. The record button illuminates red when engaged and is gray when disengaged. - Page 46 Mackie DL1608 Reference Guide V1.2 (3) — Go to the apps tab. (4) — Drag and drop the recordings from the list to your hard drive. If the selected output is any aux, the record button will be replaced with a solo button.
-
Page 47: Master Id Button
Mackie DL1608 Reference Guide V1.2 Master ID Button The master fader’s name and image is similar to that of a channel strip’s name and image. Like the channel faders, the master fader’s name and image is also user-editable. Simply tap the button at the bottom of the master fader and a popover allows editing a name or selecting an image. Let’s start with the name. Tap in the name box to bring up the blinking cursor and keyboard (as seen in the image below). - Page 48 Mackie DL1608 Reference Guide V1.2 An open gray box with only the master fader’s name works, but let’s spice it up with an image. There are several options in this department. From the popover, tap “Image” to reveal a new popover as seen below [Image Source]. You will be presented with four choices: Use Camera Image Source Select Photo Select Icon Use Camera —...
-
Page 49: Chapter 8: Level Setting Procedure
Mackie DL1608 Reference Guide V1.2 Chapter 8: Level Setting Procedure Introduction If you’re reading this front to back, now seems like a great time to discuss how to set the levels, as we just completed chapters 3 and 4 (which dealt with the hardware) and chapters 7 and 8 (which detailed the channels strips and master fader). However, if you didn’t read those chapters, already have a grip on the mixer and Master Fader app and just want to learn how to set the levels, this is the place...either way, let’s go! Level Setting Procedure (1) Phantom Power — If any connected mics require an extra 48V of power, engage the phantom power switch on the rear panel of the mixer. -
Page 50: Headphones
Mackie DL1608 Reference Guide V1.2 (6) Less Than Zero — The gain knob should be completely counter-clockwise and channel fader all the way down for each channel not in use. (7) The Raising of the Fader, Part II — Slowly raise the master fader to the desired amount. -
Page 51: Chapter 9: Channel View : Eq
Mackie DL1608 Reference Guide V1.2 Chapter 9: Channel View : EQ Introduction The equalizer area accesses all EQ-related parameters such as EQ for the selected channel (including gain, frequency and Q), a shelf / bell option, high-pass fi lter (HPF) and polarity invert. The 16 input channels, reverb, delay and iPad channels all have 4-band EQ with high shelving, high-mid peaking, low-mid peaking and low shelving. Shelving means that the circuitry boosts or cuts all frequencies past the specifi ed frequency. -
Page 52: Eq On / Off
Mackie DL1608 Reference Guide V1.2 EQ On / Off The enable button – near the upper-left corner of the screen – allows for true bypass of the EQ circuitry to ensure that there is no coloration of the signal if the EQ is not needed. When this button is disengaged, the EQ controls have no eff ect on the signal. You may use this button to make an A/B comparison between the EQ’d signal and the signal without EQ. Press the enable button to turn EQ on or off . It will illuminate green when engaged (as seen on the previous page) and is gray when disengaged (as seen below). Additionally, the EQ curve at the top of the channel fader switches between green [engaged] and gray [disengaged]. -
Page 53: Gain, Frequency And Q [Bandwidth]
Mackie DL1608 Reference Guide V1.2 Gain, Frequency and Q [Bandwidth] The gain and frequency may be changed by moving any of the four numbered balls (representing each band) until the desired sound has been achieved. Moving a ball horizontally changes the gain by up to ±15 dB. Moving a ball vertically changes the frequency, ranging from 20 Hz to 20 kHz. There is a Shelf / Bell... -
Page 54: High-Mid Peaking - Band 3
Mackie DL1608 Reference Guide V1.2 High-Mid Peaking – Band 3 The high-mid EQ provides up to 15 dB of boost or cut from 20 Hz to 20 kHz. Midrange EQ is often thought of as the most dynamic because the frequencies that defi ne any particular sound are almost always found within this range. For example, the female vocal range as well as the fundamentals and harmonics of many higher-timbred instruments. -
Page 55: Shelf / Bell
Mackie DL1608 Reference Guide V1.2 Shelf / Bell A Shelf / Bell option is available on bands 1 and 4. Simply tap which setting you prefer. The chosen setting will illuminate green when engaged, while the other option will be grayed out. When engaged, the EQ becomes a shelving fi lter rather than a parametric fi lter. Shelf boosts frequencies from the cut-off point upwards. -
Page 56: Hpf On / Off And Frequency
Mackie DL1608 Reference Guide V1.2 HPF On / Off and Frequency High-pass fi lters are utilized to cut out low frequencies. The high-pass fi lter control adjusts the cut-off frequency for the fi lter. Frequencies below the cut-off frequency are attenuated at a rate of 12 dB/octave. The slope for the HPF is adjustable by sliding the HPF ball or HPF slider left and right. Simply tap the HPF button – near the lower-left corner of the screen – to engage the high-pass fi lter. It will illuminate green when engaged and is gray when disengaged. -
Page 57: Dl1608 Eq At A Glance
Mackie DL1608 Reference Guide V1.2 DL1608 EQ at a Glance Parameter Low Value Limit High Value Limit Default Polarity Invert HPF Enable HPF Frequency 20 Hz 700 Hz 100 Hz HPF Slope – – 18 dB/octave EQ Enable High Band Type Parametric Shelf Shelf Low Band Type Parametric Shelf... -
Page 58: Chapter 10: Channel View : Gate And Compression
Mackie DL1608 Reference Guide V1.2 Chapter 10: Channel View : Gate and Compression Introduction Gates are typically used to reduce leakage from open microphones. Signals below the threshold level are muted, while signals above the threshold get to pass through. The range control changes the rule slightly. -
Page 59: Gate On / Off
Mackie DL1608 Reference Guide V1.2 Gate On / Off Press the Gate button to turn the gate on or off . It will illuminate green when engaged and is gray when disengaged. GATE ON GATE OFF Gate Display and Settings The gate for each channel may be adjusted by moving the threshold and range balls or moving any of the fi ve sliders left and right. -
Page 60: Compressor On / Off
Mackie DL1608 Reference Guide V1.2 Compressor On / Off Press the Comp button to turn the compressor on or off . It will illuminate green when engaged and is gray when disengaged. COMPRESSOR ON COMPRESSOR OFF Compressor Display and Settings The compressor for each channel may be adjusted by moving the gain, threshold and ratio balls or moving any of the fi ve sliders left and right. Additionally, exact settings may be entered into the current parameter value. -
Page 61: Gate / Compressor Meters
Mackie DL1608 Reference Guide V1.2 Gate / Compressor Meters These three meters show the input level, amount of gain reduction and output level. The input and output meters range from –90 dBFS to 0 dBFS. The reduction meter of the gate ranges from 0 to 60 dB, while the reduction meter of the compressor ranges from 0 to 20 dB. DL1608 Gate at a Glance Parameter Low Value High Value Default... -
Page 62: Chapter 11: Channel View : Fx
Chapter 11: Channel View : FX Introduction The DL1608 has one reverb and one delay and these may be fed from any combination of channels. There are a wide variety of reverb and delay types at your disposal on the Master Fader app. As seen in the image below, the Master Fader app follows standard FX send and return confi guration so the learning curve is kept to a minimum. -
Page 63: Fx View
These selections are global and aff ect all channels sent to the eff ects as there is only one reverb and one delay on the DL1608. Eff ect types are described in more detail in a few pages. - Page 64 Mackie DL1608 Reference Guide V1.2 FX Returns — There are two vertical return channel faders and meters, one for each eff ect. These control the return level from the eff ect to the selected output. You have seen these before, as they are the same faders displayed in the mixer view.
-
Page 65: Reverb Type
Mackie DL1608 Reference Guide V1.2 Reverb Type Reverb simulates the eff ect of room variations. The Master Fader app comes with nine reverb types to choose from: plate, ambience, small room, medium room, large room, hall, cathedral, gated reverb and spring. A button displaying the current reverb type may be tapped to reveal the other reverb types. -
Page 66: Reverb Sliders
Mackie DL1608 Reference Guide V1.2 Reverb Sliders The following is a list of sliders available for each selected reverb. Slide left to decrease the reverb time and slide right to increase the reverb time. Pre Delay (All) When listening to a live performance, direct sounds are reached first, followed by reverberation caused by room reflections. The pre delay is the amount of time between when the direct sounds... -
Page 67: Delay Type
Mackie DL1608 Reference Guide V1.2 Delay Type Delay allows adjustment of the eff ect delay. The Master Fader app comes with fi ve delays to chose from: mono, tape echo, stereo, ping-pong and multi-tap. A button displaying the current delay type may be tapped to reveal the other delay types. -
Page 68: Delay Sliders
Mackie DL1608 Reference Guide V1.2 Delay Sliders The following is a list of sliders available for each selected delay. Slide left to decrease the delay time and slide right to increase the delay time. Some delays have a ‘tap’ function in which case you tap the ‘tap’ button at the rate you would like the delay. Delay (Mono, Tape Echo) This slider sets the current delay time in milliseconds, from 10 ms to 1600 ms. -
Page 69: Chapter 12: Channel View : Graphic Eq
Mackie DL1608 Reference Guide V1.2 Chapter 12: Channel View : Graphic EQ Introduction Graphic EQ is a great tool for really dialing in the sound you’re looking for or to squelch feedback from monitors. Arrival is easy. Simply tap the graphic EQ curve at the top of the master fader channel from the mixer view or from any input channel view. The graphic EQ looks and works similarly to that of a typical 31-band graphic EQ. -
Page 70: Draw
Mackie DL1608 Reference Guide V1.2 Draw The draw button is located near the upper-right corner of the screen. This allows you to draw an EQ curve over the display (regardless of where the slider balls currently reside) and the sliders will snap to the corresponding position. -
Page 71: Dl1608 Graphic Eq At A Glance
Mackie DL1608 Reference Guide V1.2 DL1608 Graphic EQ at a Glance Parameter Low Value High Value Default GEQ ENABLE 20 Hz Gain –12 dB 12 dB 0 dB 25 Hz Gain –12 dB 12 dB 0 dB 31.5 Hz Gain –12 dB 12 dB 0 dB 40 Hz Gain –12 dB... -
Page 72: Chapter 13: Channel View : Output Compressor / Limiter
Mackie DL1608 Reference Guide V1.2 Chapter 13: Channel View : Output Compressor / Limiter Introduction The output compressor / limiter looks and functions similar to that of the channel compressor, except (1) the output compressor / limiter aff ects and alters the sound of everything passing through the selected output and (2) the output compressor / limiter output is in stereo. -
Page 73: Compressor On / Off
Mackie DL1608 Reference Guide V1.2 Compressor On / Off Press the Comp button to turn the compressor on or off . It will illuminate green when engaged (as seen on the previous page) and is gray when disengaged (as seen below). Compressor Display and Settings The output compressor for each selected output may be adjusted by moving the gain, threshold and ratio balls or moving any of the fi ve sliders left and right. -
Page 74: Chapter 14: Mixer View : Navigation Bar
Offl ine — The Master Fader app is NOT communicating with a DL1608 because it has been confi gured as such. Offl ine could even be displayed when an iPad is physically connected to a DL1608. Connected — The Master Fader app is connected to the DL1608 mixer, either wired or wirelessly. Disconnected — The Master Fader app is trying to connect wirelessly to the DL1608 mixer, but is unable to connect. -
Page 75: Devices
Offline, of course! Offline is also where you test drive the Master Fader app [for free!] before purchasing a DL1608. Wired — A wired iPad is using the wired connection to control the mixer. Only one iPad may be wired per DL1608. Therefore, only one item will ever be shown in the wired list. If the iPad is not docked with a DL1608, the words “No Connected Device” will be displayed. Wireless — The wireless list will display all DL1608 consoles available for wireless control from the Master Fader app. Choose one DL1608 console to connect to and then control it from the iPad. A wireless iPad is connected to the mixer (via Wi-Fi), but not physically docked with the mixer. If it is, the device will change automatically to wired. Up to 10 iPads may select the device to connect to wirelessly. - Page 76 The wired mixer is grayed out indicating that it is not available for selection. This is because there is no wired device, nor any wireless options at this point. This mode is perfect for confi guring a complete show offl ine or to test drive the Master Fader app before buying the accompanying DL1608. Wired I — Slide the iPad into the mixer. You will see that the wired device changes to display the name of the DL1608 console and it is automatically selected.
- Page 77 This may take a few moments to appear. Again, though, since the iPad is wired, you will be unable to change over to wireless control. Try to select the wireless DL1608 by tapping it. Notice that it just bounces back to the wired device. This is indicated by a grayed out DL1608 icon in the wireless selection. However, the offl ine icon is not grayed out, indicating that it is available for selection. You might decide to work offl ine so your changes don’t aff ect the mix of the gig currently taking place.
- Page 78 If you would prefer to stay permanently disconnected (even when the DL1608 returns to the wireless network) simply select “Work Offl ine/Demo” from the devices list. If you do this, you will eventually see the DL1608 disappear from the wireless list. This is because it is not currently available AND you are no longer trying to connect to it.
- Page 79 Mackie DL1608 Reference Guide V1.2 You should now know how to set up your iPad in devices. Go ahead and experiment with it, switching between the three selections. The more you do it, the more familiar it becomes. Plus, it’s software: you can’t break it! Also, notice in all of the examples that the text underneath the tools icon displays exactly what the state of the iPad is in...and will be no matter what view you are in. Tools > Devices is just the place...
-
Page 80: Settings
“DL1608”? Well, you might have two DL1608s and want to identify between them on the wireless network. The mixer may be named from either a wired or wireless iPad. As a hardware setting, the name is stored in the DL1608, is global to the mixer and therefore aff ects all connected iPads. It is not changed by show or snapshot changes. DL1608 is the default name. Renaming from a wired iPad: (1) Type in the name you want to call the mixer followed by tapping the “return” button. - Page 81 Mackie DL1608 Reference Guide V1.2 Renaming from a wireless iPad: (1) Type in the name you want to call the mixer followed by tapping the “return” button. (1) Type in the name you want to call the mixer followed by tapping the “return” button.
-
Page 82: Help
Mackie DL1608 Reference Guide V1.2 Help We’re with you every step of the way and here’s where to go if you need further assistance or simply want to seek additional information about the DL1608. There is plenty enough to go around for everyone and we share nice! The list below describes all of the goodies as shown in the image above: About — About displays the Master Fader App version that is currently installed on the iPad. -
Page 83: File System
, just like an analog console. The fi le system consists of the following: (1) Current State — When the DL1608 is turned on, it wakes in the state that it was in when it was powered off , including channel images and solo. -
Page 84: Snapshot List
Mackie DL1608 Reference Guide V1.2 Snapshot List The snapshot list shows a grid with an icon with a number and name for each snapshot. The number corresponds to the order of each snapshot in the currently loaded show. At the beginning of the snapshot list is a button labeled “0”. Tap this button to release a popover as seen in the image to the left. Recall will set the Master Fader app to its default (which – for all intents... -
Page 85: Recall Safe
Mackie DL1608 Reference Guide V1.2 Recall Safe On the right-hand side of the snapshots view are 26 small recall safe buttons. When engaged for a channel, it will be removed from snapshot recall, leaving it unchanged. These will illuminate green when engaged and are gray when disengaged. -
Page 86: Shows
Master Fader app. At all times, there is a single show loaded on the DL1608. This is called the current show. The snapshot list (described on page 82) displays all snapshots of the current show. - Page 87 Mackie DL1608 Reference Guide V1.2 Replace — Saves the current state of the console snapshots over the selected show. This is useful if you have made changes to the current show and need to update the copy on the iPad. A confi rmation dialog will appear. Name — When the name button is pressed, use the onscreen keyboard to rename the show.
-
Page 88: Presets
The DL1608 comes with a library of factory presets. Only 18 factory presets will be displayed at one time. Just scroll up to view the other factory presets, if available. There are also user presets. These may be created for each preset type. -
Page 89: Factory Presets Vs User Presets
Mackie DL1608 Reference Guide V1.2 Factory Presets vs User Presets There are factory presets and user presets on all channel and DSP settings that may be set ahead of time. Feel free to start with a factory preset, manipulate to your liking, then save as a user preset. We will start with what each one looks like and how they work. The next section will discuss the diff erences between channel presets and DSP presets. - Page 90 Mackie DL1608 Reference Guide V1.2 Name — When the name button is pressed, use the onscreen keyboard to name the currently selected item. Simply type a name in the box and tap the “return” key when fi nished. For familiarity, this is the same keyboard that is used for messaging or emailing from the iPad. An open gray box with only the preset’s name works, but let’s spice it up with an image.
- Page 91 Mackie DL1608 Reference Guide V1.2 Since we already named this preset geetar, we might as well use the geetar picture to boot, right? Select the photo from the camera roll in select photo. This preset is set: name, image and most importantly...settings. Delete — The delete button deletes the currently selected preset. This is a permanent deletion with no undo, so a confi rmation dialog helps prevent accidents.
-
Page 92: Channel Presets Vs Dsp Presets
Mackie DL1608 Reference Guide V1.2 Channel Presets vs DSP Presets There are channel presets and DSP presets. Also, there are factory presets for both or you may create your own user presets for each. So many options! Let’s take a look at each: Input and Output Channel Presets — Channel presets change virtually all controls on the channel. There are both input and output channel presets. Input channel presets do NOT change pan, mute, fader, solo or polarity. Output channel presets do NOT change balance, level or pre / post. - Page 93 Mackie DL1608 Reference Guide V1.2 From the EQ channel view you are able to choose between setting a preset for the entire input channel or just the channel’s EQ. Don’t forget to scroll up to access more factory presets, if going that route. EQ presets do NOT recall either the HPF on/off or the EQ on/off . PRESETS From the gate / compressor channel view there are three preset choices to choose from: the entire input channel, just the channel’s gate or just the channel’s compressor.
- Page 94 Mackie DL1608 Reference Guide V1.2 From the graphic EQ channel view you are able to choose between setting a preset for the entire output channel or just the graphic EQ. Tap which one you prefer. GRAPHIC EQ PRESETS And from the compressor / limiter channel view you are able to choose between setting a preset for the entire output channel or just the output compressor / limiter.
-
Page 95: Appendix A: Service Information
Appendix A : Service Information Troubleshooting If you think your Mackie product has a problem, please check out the following troubleshooting tips and do your best to confirm the problem. Visit the Support section of our website (www.mackie.com) to get some ideas or contact our technical support heroes. -
Page 96: Repair
Mackie DL1608 Reference Guide V1.2 Noise / Hum • Are all the connections good and sound? Make sure all of the connecting cables work and are securely connected at both ends. Try the same source signal in another channel, set up exactly like the suspect channel. • Turn the input gains down one-by-one. If the offending noise disappears, it’s either that input or whatever is plugged into it. If you unplug the whatever-is-plugged-into-it and turn the input gain back up and the noise is gone, it’s from your whatever. -
Page 97: Appendix B: Ipad Optimizations
Mackie DL1608 Reference Guide V1.2 Appendix B : iPad Optimizations Below is a list of ways to trick out your iPad to optimize its use with the DL1608. When you have some additional time, use your favorite search engine to Google “trick out your iPad” for other ways to optimize your iPad. All of the following tips and tricks may be found by going to Settings > General on the iPad. iPad Optimization #1 : Lock the iPad so it doesn’t turn off in the middle of a show. Simply change the Auto-Lock from its current selection to “Never” (or 15 minutes, at least). iPad Optimization #2 : Allows you to change the level on more than three faders simultaneously. Simply turn Multitasking Gestures off . - Page 98 Mackie DL1608 Reference Guide V1.2 iPad Optimization #3 : Allows you to press three faders simultaneously. Go to Settings > General >Accessibility. Simply turn Zoom off . iPad Optimization #4 : Disable 3G Data [TDMA] so the iPad is Wi-Fi only. Simply turn Cellular Data off .
- Page 99 Mackie DL1608 Reference Guide V1.2 iPad Optimization #5 : Mute keyboard clicks, sent and received email alerts, calendar event warnings, alarms and other extraneous iPad noises (except music apps; those will continue to play). There are two methods to optimize your iPad here. It’s just a matter of preference. Use Side Switch to: Mute Now fl ip the side switch on the iPad (next to the volume up/down switch) so that the orange dot is visible. It indicates that the iPad is indeed muted (except for the music apps). Use Side Switch to: Lock Rotation Double-tap the home button on the iPad to reveal the tool bar at the bottom of the iPad. Now swipe it right to reveal the iPad’s audio play bar. On the far left is a mute/un-mute button. Mute it.
-
Page 100: Appendix C: Technical Information
Mackie DL1608 Reference Guide V1.2 Appendix C : Technical Information DL1608 Specifications General Digital Sample Rate: .........................................48 kHz A/D/A Bit Depth: ......................................24-bit System Latency: ......................................1.5 ms Frequency Response All inputs to all outputs: ............................ ±0, –1 dB, 20 Hz to 20 kHz Distortion THD (mic input to main output, 1 kHz, –1 dBFS): ........................<0.005% Noise / Dynamic Range / Signal-to-Noise Ratio EIN (150 termination): .................................. - Page 101 Mackie DL1608 Reference Guide V1.2 DL1608 Specifications Continued... Analog Inputs 1–16 Connectors: ..................................1-12: XLR Balanced 13-16: Combo XLR / TRS Balanced XLR Mic Pre: ........................................Onyx Input Impedance: ....................................1-12: 3k 13-16: 3 k mic [XLR], 30 k line [1/4"] Max Input Level: .....................................XLR: +21 dBu 1/4": +30 dBu Gain: ......................................XLR: 0 to 60 dB 1/4": –20 to 40 dB 48V Phantom Power (XLR): ............48 VDC, 10 mA max per mic, with up to eight simultaneously.
- Page 102 Mackie DL1608 Reference Guide V1.2 DL1608 Specifications Continued... Analog Headphone Out Connector: ....................................1/4" TRS Stereo Max Output Level: ................................. +18.0 dBu into 600 +19.5 dBu max into 100 k Networking Connector: ....................................100 MB Ethernet Control: ........................................Complete Simultaneous Control: ................................10 iPad Devices iPad Support iOS Version Requirement: ................................5.0 or greater iPad Version Requirement: ....................Original iPad, iPad 2, iPad (3rd generation) Power External Supply: ........................................ Yes External Supply Power: ......................
- Page 103 Mackie DL1608 Reference Guide V1.2 DL1608 Specifications Continued... Dimensions Width: ......................................11.5 in / 291 mm Height (Front): ....................................1.6 in / 40 mm Height (Rear): ....................................3.7 in / 95 mm Depth: ......................................15.4 in / 391 mm Weight: ......................................6.9 lb / 3.1 kg Rack: ......................................
-
Page 104: Dl1608 Dimensions
Mackie DL1608 Reference Guide V1.2 DL1608 Dimensions Weight 15.4 in / 391 mm 7.9 lb 3.1 kg 11.5 in / 291 mm 3.7 in / 95 mm 1.6 in / 40 mm 1.5 in / 38 mm 2.1 in / 53 mm 59.1 in / 1500 mm... - Page 105 Mackie DL1608 Reference Guide V1.2 DL1608 Dimensions Continued... Nine rack spaces Nine rack spaces 19.0 in / 483 mm 19.0 in / 483 mm 0.354 in / 9 mm [iPad 1 bottom] 0.354 in / 9 mm [iPad 1 bottom] 0.520 in / 13.2 mm [iPad 2 bottom]...
-
Page 106: Dl1608 Block Diagram
Mackie DL1608 Reference Guide V1.2 DL1608 Block Diagram... -
Page 107: Appendix D: Hookup Diagrams
A keyboard is connected to channels 15-16 via 1/4" input jacks. The L/R main outs of the DL1608 connect directly to a pair of Mackie HD1501 powered subwoofers which are connected to a pair of Mackie HD1221 powered loudspeakers. Aux sends 1-4 are sent to four separate SRM450v2 powered loudspeakers set up as monitors for the band. - Page 108 Mackie DL1608 Reference Guide V1.2 Live Sound: Self-Engineered Wireless Router (Wi-Fi) Vocalist Guitarist Engineer’ s Headphones Keyboardist Bassist Drummist DJist Here’s a setup for all the musicians out there who whine for “more me” in the mix. Set up and connect each musician’s instrument, the PA and monitors just like they would be in any other live situation. The house engineer’s iPad is connected and locked to the DL1608 where he/she will set the LR main mix, as well as get the 2-track recording of the band’s live show. Up to 10 iPads may be connected to the DL1608 wirelessly. As such, each band member may control their own mix from their own “station”. As seen in the illustration above, the vocalist, guitarist, bassist, keyboardist, drummist and DJist each have an iPad. Six musicians, six iPads, six auxes. Coincidence? We think not. Whining...
- Page 109 Mackie DL1608 Reference Guide V1.2 Live Sound: Two Mixers, One iPad Mackie HD1521 Mackie HD1521 Loudspeaker Loudspeaker and HD1801 and HD1801 Subwoofer Subwoofer Mackie HD1221 (for monitors) Monitor Mixer Wireless Headphones Router (Wi-Fi) So you say you have a snake. We prefer dogs, cats or fi sh for pets, but snakes are cool, too.
- Page 110 All you need to do is leave eight inputs open on the second DL1608. Then make the connection from the outputs and auxes of DL1608 #1 to the inputs of DL1608 #2. The outputs of DL1608 #2 are then sent to the inputs of the PA.
- Page 111 Mackie DL1608 Reference Guide V1.2 DL1608 Rack Mounted Wireless Headphones Wireless Router Wireless Headphones This hookup diagram illustrates that the DL1608 doesn’t just have to eat up desk space...rack mount it instead! Before doing so, though, it would be a good idea to review the Rack Mount Kit Installation Instructions that were included with the Rack Mount Kit. The dog ate them, you say? Likely story, actually. You know why? The DL1608 has actually been ready to be unleashed to the world for eons, but my girlfriend’s dogs kept eating copies of the Reference Guide. Anyway, back to the Rack Mount Kit Installation Instructions. Click here to retrieve them.
-
Page 112: Appendix E: Glossary Of Terms
Mackie DL1608 Reference Guide V1.2 Appendix E: Glossary Of Terms The glossary contains brief definitions of many of the audio and electronic terms and acronyms used in discussions of sound mixing and recording. If you would like more information, we recommend the following: The Audio Dictionary —... - Page 113 They are typically powered by internal batteries or phantom power supplied by the DL1608. Console — Another term for mixer. DL1608 mixer = DL1608 console. D/A Converter — Digital-to-analog converter. A device that transforms incoming digital signals into analog form.
- Page 114 Mackie DL1608 Reference Guide V1.2 Glossary Of Terms Continued... EIN — Equivalent Input Noise. A specification that helps measure the “quietness” of a gain stage by deriving the equivalent input noise voltage necessary to obtain a given preamp’s output noise. Numerically, it’s the output noise at a given gain setting minus the gain. EIN is usually measured at a maximum gain and typically ranges from -125 to -130 dBu. EQ — Short for equalization. EQ Curve — A graph of the response of an equalizer, with frequency on the x (horizontal) axis and amplitude (level) on the y (vertical) axis. Equalizer types and effects are often named after the shape of the graphed response curve, such as peak, dip, bell and shelf.
- Page 115 Maintaining proper circuit impedance relationships is important to avoid distortion and minimize added noise. Mackie input and output impedances are set to work well with the vast majority of audio equipment. Knee — A knee is a sharp bend in a compressor gain curve, not unlike a sharp bend in your leg.
- Page 116 Mono — Short for monaural (and mononucleosis for that matter). Noise — Whatever you don’t want to hear. This could be hum, buzz or hiss; or it could be crosstalk, digital hash, or your neighbor’s stereo; or it could be white noise, pink noise or brown noise. It’s also how your parents describe your band. After all, it’s what they don’t want to hear. Noise Floor — The residual level of noise in any system. In a well-designed mixer (such as the Mackie DL1608), the noise floor will be a quiet hiss, which is the thermal noise generated by electrons bouncing around in resistors and semiconductor junctions. The lower the noise floor and the higher the headroom, the more usable dynamic range a system has.
- Page 117 Mackie DL1608 Reference Guide V1.2 Glossary Of Terms Continued... PA — Acronym for Public Address. Today, people who work with PA systems like to say they’re working in “sound reinforcement”. See SR. Pan — Pan sliders are used to position (or even dynamically move) a monaural sound source in a stereo mixing field by adjusting the source’s volume between the left and right channels. Our brains sense stereo position by hearing this difference in loudness when the sound strikes each ear, taking into account time delay, spectrum, ambient reverberation and other cues.
- Page 118 Send — A term used to describe the output of a secondary mix of the input signals, typically used for monitors, headphone amp or effects devices. These are the aux sends on the DL1608. Shelving — A term used to describe the shape of an equalizer’s frequency response. A shelving equalizer’s response begins to rise (or fall) at some frequency and continues to rise (or fall) until it reaches the shelf frequency, at which point the response curve flattens out and remains flat to the limits of audibility.
- Page 119 XLR Connector — Three-pin connectors now universally used for balanced microphone connections. Also known as Cannon, as Cannon was the original manufacturer of this type of connector. In sound work, a Cannon connector is taken to mean a Cannon XLR-3 connector or any compatible connector. You can tell who the audio geezers are when they refer to XLR connectors as Cannon connectors. Z — The electrical symbol for impedance. Zymurgy — The science of brewing, an important part of Mackie technology and history since we are located less than one mile from the Red Hook brewery. Besides, we need something other than just a plain ‘ol “Z” to end the glossary.
-
Page 120: Warranty Statement
GPL Statement This Mackie product includes software code developed by third parties, including software code subject to the GNU General Public License (“GPL”) Version 2. Where such specific license terms entitle you to the source code of such software, Loud Technologies Inc. - Page 121 Mackie DL1608 Reference Guide V1.2...