Table of Contents
Advertisement
GETTING STARTED:
STEP 1
Choose a location for your fridge
freezer, away from any heat
sources and allow adequate
ventilation - 100mm
(4 inch) gap above.
STEP 3
Level the fridge freezer by
adjusting the front feet.
This will stop rocking or vibration
and keep the door aligned.
NB. The spanner is for illustration only and is
not supplied with the fridge freezer.
STEP 5
Plug in and switch on. Allow the
fridge freezer compartments to
cool before placing food inside.
All food in the fridge freezer
should be covered.
What the display will show as both
Stage 1: Freezer
The display will show temperature
reading with the freezer High
Temperature symbol on.
The freezer High Temperature symbol will stay
on until the freezer compartment has cooled
to its factory setting (-18˚C).
Stage 2: Freezer
The display will show arrow
indicating the temperature is
cooling down, until -18˚C is
reached, the arrow then turns off.
Stage 3: Fridge
The display will show temperature
reading with arrow indicating the
fridge compartment is cooling to
its factory setting (4˚C). When 4˚C
is reached the arrow turns off.
NOTE:
See CONTROLS section to find out how to change the display or change compartment temperatures.
Read the rest of these instructions to get the best from your appliance and remember to fill in your guarantee registration.
FRIDGE FREEZER - MODELS FFA97 & FFM97
INSTRUCTIONS FOR INSTALLATION & USE
To ensure that your fridge freezer runs reliably and efficiently follow these steps.
compartments cool:
STEP 7
Keep this Book in a safe place for quick reference.
STEP 2
STEP 4
STEP 6
Place the fresh food inside.
Fast freeze will automatically cancel after 48
hours.
What the display will show as the Freezer
compartment cools if Fast Freeze is pressed:
Your fridge freezer is now
working.
If after 24 hours your fridge
freezer is not operating as you
want, refer to the Troubleshooting
section.
Move the fridge freezer into
position, using the sides of the
cabinet.
Take care to avoid damaging the
refrigerant circuit pipe work on
the rear.
Before plugging in and switching
on, leave the fridge freezer in its
final location for at least 15
minutes to allow it to settle.
If you are freezing fresh food, turn
on Fast Freeze by pressing the
switch 24 hours before placing
the food inside.
Stage 1:
When Fast Freeze is pressed.
Stage 2:
After 8 seconds the display will
show temperature reading with
the freezer High Temperature
symbol on.
Stage 3:
Freezer compartment is set to
Fast Freeze.
The freezer High Temperature
symbol has turned off.
Advertisement
Table of Contents

Related Manuals for Hotpoint FFA97


Summary of Contents for Hotpoint FFA97
- Page 1 FRIDGE FREEZER - MODELS FFA97 & FFM97 INSTRUCTIONS FOR INSTALLATION & USE GETTING STARTED: To ensure that your fridge freezer runs reliably and efficiently follow these steps. STEP 1 Choose a location for your fridge freezer, away from any heat...
-
Page 2: For Your Safety
Take care when installing or moving the fridge freezer to avoid damaging the pipes on the rear. If you suspect a leak, do not switch on the fridge freezer, but open the windows and doors to ventilate the room. Do not use any electrical devices inside the freezer, for instance for defrosting. - Page 3 Minimise operating sounds caused by vibration. Minimum space required to open door The fridge freezer needs a space of 600mm (24 inches) in front to allow the door to open. When positioning the fridge freezer next to a unit, a gap of 30mm (1 be left at the hinge side of the door to allow the easy removal of furniture.
- Page 4 Levelling: Level the fridge freezer when it is in its final location by adjusting the front feet, until firm contact is made with the floor. This will stop rocking or vibration and keep the door aligned which helps the fridge freezer run reliably and efficiently.
- Page 5 This appliance is fitted with a special mains lead. If you need to replace the mains lead due to damage, one can be bought from Hotpoint Service (see KEY CONTACTS, back page). It is strongly advised that this work is carried out by a qualified electrician.
- Page 6 Controlling the Temperature of the Fridge or the Freezer Compartment Use the Compartment Select button to choose either the fridge compartment or the freezer compartment. Press the Temp Change button to select a different temperature for the compartment. The temperature will decrease, getting 1˚C colder for each press of the button, until the required...
-
Page 7: Holiday Function
You can check the temperature of the fridge freezer compartments by using a Fridge Freezer Thermometer available from Hotpoint Genuine Part and Accessories Mail Order Hotline (see KEY CONTACTS back page). WARNING: Do not use a mercury filled thermometer, as breakage would cause a health hazard. - Page 8 The symbol may come on for a short period when opening the freezer door to load or unload food, in this case storage times will not be affected.
- Page 9 Keep foods tightly covered to retain moisture and prevent flavour/odour transference. Plastic bags, aluminium foil, plastic stretch wrap and containers with lids are ideal. Select chilled and frozen food last when shopping, transport in a ‘cool bag’ and place in freezer as soon as possible after arriving home.
- Page 10 Microban® technology has been proven safe, durable and effective over many years of use in personal care and household consumer products. In addition, Hotpoint operate a rigorous antibacterial testing programme through approved independent testing laboratories.
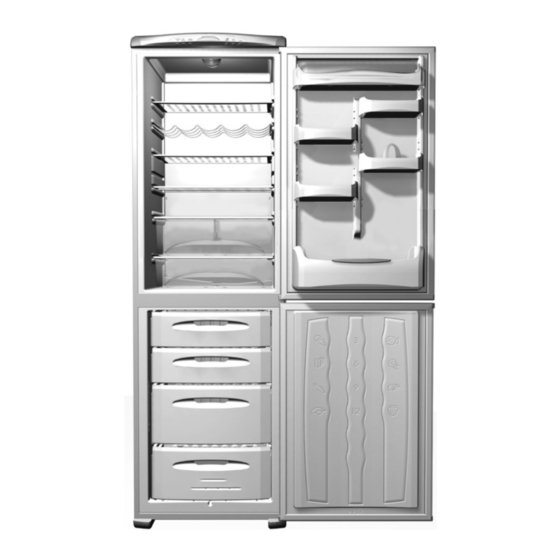
- Page 11 Commodity and Bottle Racks Commodity racks can be repositioned in the door to suit your storage requirements. The lidded commodity rack is recommended for the storage of dairy items, such as butter, margarine and cheese. To remove, lift rack vertically to release from fixing supports. To replace, align grooves on either side of the rack above fixing supports and push down until secure.
-
Page 12: Humidity Control
Salad Bins For the storage of fruit, vegetables and salad items. When storing vegetables, remove unusable leaves and soil. Leave lettuce, cabbage and cauliflower on the stem. It is advisable to clean the salad bin regularly, it can be removed by sliding it out from position. Note : Care must be taken to ensure that the salad bin is pushed in fully before shutting the fridge door. - Page 13 Liquid-filled bottles or sealed fizzy drinks must not be stored in freezer, as they may burst. Lollipops and water ices should not be given to children directly from the freezer the low temperature may cause ‘freezer burns’ . Store ice cream towards the top front of the freezer and remove from freezer 15-30 minutes before serving.
- Page 14 It is recommended to remove the required food, rather than the whole freezer drawer. Note : It is important not to touch or move any of the freezer drawers/parts with wet hands as it may cause freezer burn or discomfort.
- Page 15 Use a clean soft cloth wrung out in warm water and washing up liquid to wipe the exterior surface, dry thoroughly. Use a soft brush or vacuum cleaner to remove dust from underneath the fridge freezer and from the compressor and condenser situated at the back of the fridge freezer.
- Page 16 Changing the Light Bulb WARNING: Switch off electricity supply and pull out the mains plug Obtain a replacement SES 15 watt bulb from the Hotpoint Genuine Parts and Accessories Mail Order Hotline (see KEY CONTACTS back page) and fit as follows : Remove any shelves from directly below the interior light, to make access easier.
-
Page 17: Door Reversal
Remove all door furniture and all loose items/fittings from inside the fridge freezer. If you have previously set up and used the fridge freezer and since decided to reverse the doors, you must remove stored food, wrap or cover it and place into insulated containers to keep cool/frozen whilst carrying out this operation. - Page 18 Door Handle Reversal Remove the hole plugs from the right hand side of the door. Unscrew the handle fixing screws and carefully remove the handle from the door. Turn the handle vertically, top to bottom and place against the right hand side. Secure the handle in place with the original fixing screws.
-
Page 19: Troubleshooting
Press the cancel button at any time to silence the buzzer, the bell symbol will go out on the display. See CONTROLS section. If there is still a problem contact Hotpoint Service (See KEY CONTACTS, back page, for contact details). continued... - Page 20 Gases flowing through the pipes can produce gurgling, bubbling, roaring or humming noises. Expansion and contraction of parts inside the fridge freezer can produce a cracking noise as they rapidly change temperature. The circulating fan can make a whirring or buzzing sound as it blows cold air around the compartments.
- Page 21 Notes...
- Page 22 All Hotpoint appliances carry a fully inclusive 12 month parts and labour guarantee as well as free replacement parts for the first 5 years (except microwaves, selected integrated appliances and cooker hoods, which have a one year guarantee) provided that they are fitted by a Hotpoint engineer.
-
Page 23: After Sales Service
Hotpoint appliance than us - the manufacturer” As part of our commitment to you, all Hotpoint appliances have the added benefit of a fully inclusive parts and labour guarantee for the first 12 months. In addition to this you also have the advantage of free replacement parts for the first 5 years when fitted by a Hotpoint engineer. - Page 24 Key Contacts After Sales Service Repair Service and Information Desk Extended Warranties Genuine Parts and Accessories Indesit Company UK Limited, Morley Way, Peterborough, PE2 9JB PRINTED BY SIMLEX . FOUR ASHES, WOLVERHAMPTON. 03/2005 195051340.00...