
Related Manuals for LG LIP-6812


Summary of Contents for LG LIP-6812
- Page 1 IP Telephone Installer Guide LIP-6812 & 6830 SIP (Session Initiation Protocol) SIP4B Please read this manual carefully before installation. Retain it for future reference. LGN68126830-1224IG-01.05 June, ‘07...
-
Page 2: Revision History
Copyright Laws. LG-Nortel reserves the right to make changes in specifications at any time without notice. The information furnished by LG-Nortel in this material is believed to be accurate and reliable, but is not warranted to be true in all cases. -
Page 3: Read Me First
Applying VLAN changes at Boot-up During a power or disconnect boot-up, the LIP-6812 & LIP-6830 may implement an an automatic provisioning process, retrieving a configuration file from a server. If VLAN settings are changed by the retrieved configuration file, the LIP-Phone must again reboot for normal operation. -
Page 4: Table Of Contents
LIP-6812 & LIP-6830 Installer Guide Table of Contents Introducing the LIP-6812 & LIP-6830 ..............1 1.1 LIP-6812 and LIP-6830 Overview..................1 1.2 LIP Phone Features ......................1 1.3 LIP-6812/LIP-6830 General Description ................2 Basic Installation ....................6 2.1 Physical Connections ......................6 LCD Menu Configuration ..................9... - Page 5 LIP-6812 & LIP-6830 Installer Guide 3.5.2.5 Local UDP Port .....................34 3.5.2.6 RTP Start Port ......................35 3.5.2.7 Proxy Registration....................35 3.5.2.8 Register Expires ....................36 3.5.2.9 VMS Address ......................37 3.5.2.10 Domain ........................37 3.6 Phone Settings ........................ 39 3.6.1 LCD Contrast ......................39 3.6.2 Ring Type.........................39 3.6.3...
- Page 6 5.1 Information ........................100 5.2 Troubleshooting Guide....................100 Appendix A. Factory Default Configuration ............A-1 Appendix B. LIP-6812/LIP-6830 Specification ............B-1 Appendix C. Download LCD Messages ..............C-1 Appendix D. Using the Configuration File............... D-1 Appendix E. Dial Pad Mode ..................E-1 Appendix F.
-
Page 7: Introducing The Lip-6812 & Lip-6830
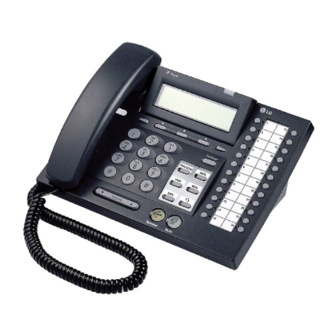
Features and functions available to the LIP-6812 & LIP-6830 through the SIP Call Server are similar to those of a conventional business telephone. For ease of use, the LIP-6812 and LIP- 6830 are equipped with Fixed feature buttons, Flexible (programmable) feature buttons, an LCD display, Softkeys, and a dial pad. -
Page 8: Lip-6812/Lip-6830 General Description
A Microphone, which can be switched On and Off (muted), is located in the right front for audio input to the LIP-6812 and LIP-6830 Speakerphone. The 3-line-24 character LCD is a visual output for status and interactive menus. The various buttons are the LIP-6812 and LIP- 6830 input devices used to access resources, activate features, and interact with menus. - Page 9 LIP Phone configuration. Volume control button. Use to adjust Ring, Headset, Handset, and Speaker volume. Speaker button. Toggle the LIP-6812 speakerphone On and Off. Mute button. Toggle audio from the microphone to the connected party On and Off.
- Page 10 LIP-6812 & LIP-6830 Installer Guide Figure 1.3-3 Front view of LIP-6830 Figure 1.3-4 LIP-6830 buttons June, ‘07...
- Page 11 LIP-6812 & LIP-6830 Installer Guide NUMBER BUTTON FUNCTION Left direction button. This button has two functions; when appears on the bottom-left corner of the LCD, the previous menu may be selected. Right direction button. When appears on the bottom-right corner of the LCD, the next group of Softkeys may be selected.
-
Page 12: Basic Installation
Installer Guide Basic Installation The LIP-6812 & LIP-6830 have been designed to be simple, yet flexible to install. The physical installation is a matter of connecting the ports of the LIP Phone to the LAN, the Desk-top PC and when Power over Ethernet (PoE) is not supported, to power (refer to section 2.1). - Page 13 LIP-6812 & LIP-6830 Installer Guide Figure 2.1-1 Bottom view of LIP-6812 Figure 2.1-2 Bottom view of LIP-6830 June, ‘07...
- Page 14 Connect Headset Coil cord to LIP Phone base. Connect Handset Coil cord to LIP Phone base and handset. Handset Table 2-1 Description of LIP-6812/LIP-6830 connector ports LAN Ethernet port pin assignment PC Ethernet port pin assignment Pin 1 = TX+...
-
Page 15: Lcd Menu Configuration
Installer Guide LCD Menu Configuration This chapter provides detailed information to configure the LIP-6812 and LIP-6830 IP Phone using the LCD for menu display and Softkeys and dial pad for inputs. To configure the IP phone manually, it should be connected to the LAN and, if required, power cables as described in Section 2.1. - Page 16 LIP-6812 & LIP-6830 Installer Guide Figure 3-2 Menu Tree June, ‘07...
-
Page 17: Lcd Menu Navigation
LIP-6812 & LIP-6830 Installer Guide LCD Menu Navigation The LCD Menu is accessed only from the idle state and may be password protected (Locked). If the LCD Menu is Locked, data may be viewed, however data entry is not possible (refer to Section Lock/Unlock Configuration). -
Page 18: Lock/Unlock Configuration
LIP-6812 & LIP-6830 Installer Guide Lock/Unlock Configuration The LIP Phone LCD Menu can be password protected for security. If a password is assigned and the LCD Menu Locked, the Menu must be unlocked using the password in order to change any parameter. - Page 19 LIP-6812 & LIP-6830 Installer Guide To unlock the LCD Menu: 6) Press the button. 7) Press button or move the cursor to 7.Lock/Unlock Config using the [Next]/[Prev] Softkeys and press [ OK ] Softkey. Enter Password: ] [Chng] [ OK ] 8) Dial the assigned password and press the [ OK ] Softkey, the LCD Menu, the Unlock message appears for approximately 2 seconds.
-
Page 20: Network Configuration
(DHCP) mode, IP addresses, DNS (Domain Name Service), etc. can be viewed and changed. In addition, the LIP-6812 & LIP-6830 MAC address can be viewed. When Static IP addressing is employed on the LAN, the IP Network settings must be configured manually; the settings... -
Page 21: Ip Address
2.IP Address using the [Next]/[Prev] Softkeys, and press the [ OK ] Softkey. 4) Input IP address for the LIP-6812/LIP-6830 using the dial pad, and press the [ OK ] Softkey to save your Configuration. -
Page 22: Default Gateway
4.Default Gateway using the [Next]/[Prev] Softkeys, and press the [ OK ] Softkey. 4) Input the Default Gateway IP address for the LIP-6812/LIP-6830 using the dial pad, and press the [ OK ] Softkey to save your Configuration. -
Page 23: Secondary Dns Address
5.Primary DNS Address using the [Next]/[Prev] Softkeys, and press the [ OK ] Softkey. 4) Input the Primary DNS IP Address for the LIP-6812/LIP-6830 using the dial pad, and press the [ OK ] Softkey to save your Configuration. -
Page 24: Mac Address
IEEE 802.1p/Q standards. Separate VLAN tags are assigned for the LIP-6812/LIP-6830 PC port and the LAN (voice) port. When the VLAN id is assigned, only frames with the assigned ID are accepted and all voice frames sent by the LIP-6812/LIP-6830 include the VLAN ID assigned to the LAN port. -
Page 25: Vlan Id (Lan)
7) Press the button to exit from the menu. Changing the VLAN Priority for the LAN port requires a reboot of the LIP-6812/LIP- 6830; when you leave the menu, you will receive a Reboot notice. A VLAN priority of 5 for the LAN port is recommended. -
Page 26: Vlan Priority (Pc)
LIP-6812 & LIP-6830 Installer Guide Changing the VLAN ID for the LAN port requires a reboot of the LIP-6812/LIP-6830; when you leave the menu, you will receive a Reboot notice. To disable VLANs, assign the VLAN ID as ‘0’. 3.4.8.3 VLAN Priority (PC) The VLAN Priority (PC) establishes the priority for Ethernet frames for the LIP-6812/LIP-6830 PC port. -
Page 27: Cdp
7) Press the button to exit from the menu. Changing the VLAN ID for the PC port requires a reboot of the LIP-6812/LIP-6830; when you leave the menu, you will receive a Reboot notice. To disable VLANs, assign the VLAN ID as ‘0’. - Page 28 LIP-6812 & LIP-6830 Installer Guide Changing the CDP status requires a reboot of the LIP-6812/LIP-6830; when you leave the menu, you will receive a Reboot notice. VLAN settings can not be changed if CDP is enabled June, ‘07...
-
Page 29: Sip Configuration
4) Press button, or move cursor to 1.Call Server Address using the [Next]/[Prev] Softkeys, and press the [ OK ] Softkey. 5) Input the Call Server IP or FQDN for the LIP-6812/LIP-6830 using the dial pad. Call Server 1 Address[1] 100.0.0.1 ] [Mode] [ OK ] 6) Press the [ OK ] Softkey to save your Configuration. -
Page 30: Proxy Port
6) Press the [ OK ] Softkey to save your Configuration. 7) Press the button to exit from the menu. Changing the Proxy Port requires a reboot of the LIP-6812/LIP-6830; when you leave the menu, you will receive a Reboot notice. 3.5.1.3 Display Name When assigned, the Display Name is used in SIP headers as the Caller ID name. -
Page 31: Name
4) Press button, or move cursor to 3.Display Name using the [Next]/[Prev] Softkeys, and press the [ OK ] Softkey. 5) Input the Display Name for the LIP-6812/LIP-6830 using the dial pad. Enter Display Name Richard ] [Mode] [ OK 6) Press the [ OK ] Softkey to save your Configuration. -
Page 32: Authentication User Name
4) Press button, or move cursor to 5.Auth. Username using the [Next]/[Prev] Softkeys, and press the [ OK ] Softkey. 5) Input the Authentication User Name for the LIP-6812/LIP-6830 using the dial pad. Enter Auth. UserName [1] 1234 ] [Mode] [ OK ] 6) Press the [ OK ] Softkey to save your Configuration. -
Page 33: Registration Status
5) Press the button to exit from the menu. 3.5.1.8 Line Type Line buttons represent the SIP call appearance for a User ID or account. The LIP-6812/LIP- 6830 support three Line types: Private Line Shared or Bridged Line Direct Station Selction (DSS)/ Busy Lamp Field (BLF) Call Coverage Line It is intended the first two Line buttons be configured as the User’s Line (Private or Shared);... -
Page 34: Extension For Dss Line
6) Press the [ OK ] Softkey to save your Configuration. 7) Press the button to exit from the menu. Changing a Line Type requires a reboot of the LIP-6812/LIP-6830; when you leave the menu, you will receive a Reboot notice. An asterisk is displayed in front of the current selection. -
Page 35: Acd Active
LIP-6812 & LIP-6830 Installer Guide 3) Enter the Line number or move cursor using [Next]/[Prev] Softkeys, and press [ OK ] Softkey to select a Line. 4) Press button, or move cursor to 9.Extension for DSS using [Next]/[Prev] Softkeys, and press [ OK ] Softkey. -
Page 36: Acd Agent
LIP-6812 & LIP-6830 Installer Guide 3.5.1.11 ACD Agent A Private Line or primary shared Line (Boss BLA) appearance on the User’s LIP Phone can be associated with an Automated Call Distribution (ACD) group defined in the Call Server as an Agent. - Page 37 LIP-6812 & LIP-6830 Installer Guide Note, if check-in fails, the The LCD shows one of the following results for approximately 2 seconds. ACD Check-In failed. Changing Agent status to Available Once checked in, an ACD Agent is made available to receive calls. To make an Agent available,...
-
Page 38: Sip Configuration, General Parameters
3) Press button, or move cursor to 3.Outbound Proxy Addr. Using the [Next]/[Prev] Softkeys, and press the [ OK ] Softkey. 4) Input the Outbound Proxy address for the LIP-6812/LIP-6830 using the dial pad. Outbound Proxy Addr 100.1.1.1 ] [Mode] [ OK ] 5) Press the [ OK ] Softkey to save your Configuration. -
Page 39: Backup Proxy Address
3) Press button, or move cursor to 4.Outbound Proxy Port using the [Next]/[Prev] Softkeys, and press the [ OK ] Softkey. 4) Input the Outbound Proxy Port for the LIP-6812/LIP-6830 using the dial pad. Outbound Proxy Port 5060 ] [CLR ] [ OK ] 5) Press the [ OK ] Softkey to save your Configuration. -
Page 40: Backup Proxy Port
3) Press button, or move cursor to 6.Backup Proxy Port using the [Next]/[Prev] Softkeys, and press the [ OK ] Softkey. 4) Input the Backup Proxy Port for the LIP-6812/LIP-6830 using the dial pad. Backup Proxy Port 5060 ] [CLR ] [ OK ] 5) Press the [ OK ] Softkey to save your Configuration. -
Page 41: Rtp Start Port
Reboot notice. 3.5.2.7 Proxy Registration If Proxy Registration is set to [Yes ], the LIP-6812/LIP-6830 will register with the appropriate Call or Proxy Server upon initial power-up, during a reboot and at periodic intervals based on the Registration timer (refer to Section 3.5.2.8). -
Page 42: Register Expires
Register Expires 3600 ] [CLR ] [ OK ] 4) Input the Registration Expiration time for the LIP-6812/LIP-6830 using the dial pad. 5) Press the [ OK ] Softkey to save your Configuration. 6) Press the button to exit from the menu. -
Page 43: Vms Address
VMS Address 100.1.1.1 ] [Mode] [ OK ] 4) Input the VMS Address for the LIP-6812/LIP-6830 using the dial pad. 5) Press the [ OK ] Softkey to save your Configuration. 6) Press the button to exit from the menu. - Page 44 LIP-6812 & LIP-6830 Installer Guide 4) Input the Domain for the LIP Phone using the dial pad. 5) Press the [ OK ] Softkey to save your Configuration. 6) Press the button to exit from the menu. To enter alpha-numeric characters select the [Mode] Softkey (refer to Appendix E. for the character mapping of dial pad digits.
-
Page 45: Phone Settings
3.6.2 Ring Type The LIP-6812/LIP-6830 can be set to provide one of seven distinctive Ring signals or tones. By assigning different Ring types to closely located phones, the user can quickly identify the ringing phone. -
Page 46: Ringer Off
3.6.4 Headset Auto Mode The LIP-6812 & LIP-6830 support the use of the Headset. When Headset Auto Mode is enabled, pressing a Line button will automatically connect audio to the headset. Also, redial and click-to- call will place calls with audio through the headset. -
Page 47: Dss Registration
] [Mode] [ OK ] 5) Press the button to exit from the menu. To remove a DSS console from LIP-6812/LIP-6830, delete each digit of the MAC address using the [ ] Softkey and then press the [ OK ] Softkey. -
Page 48: Flexible Button Setting
LIP-6812 & LIP-6830 Installer Guide Problem Explanation After DSS Console is connected to power, the DSS Console isn’t associated with an IP Phone 4 LEDs blink red sequentially. 3.6.6 Flexible Button Setting The programmble buttons not assigned as Line buttons can be configured for access to various functions. -
Page 49: Time Configuration
In the LIP-6812/LIP-6830, flexible buttons 1 and 2 are assigned as the User extension's primary and secondary line appearance and can't be assigned as another function. In the LIP-6812, flexible button 12 is assigned as the Headset On/Off button, and can't be assigned as another function. -
Page 50: Time Zone
To enter alpha-numeric characters select the [Mode] Softkey (refer to Appendix E. for the character mapping of dial pad digits). 3.6.7.2 Time Zone For proper operation of the clock in the LIP-6812/LIP-6830, the local Time Zone must be entered in phone memory. To assign the Time-Zone: 1) Press the button. -
Page 51: Dst Auto Adjustment
(select the nearest region as shown in Appendix D). 3.6.7.3 DST Auto Adjustment The LIP-6812 & LIP-6830 can automatically adjust for DST when enabled. To enable automatic Day Light Savings time: 1) Press the button. -
Page 52: Date Format
LIP-6812 & LIP-6830 Installer Guide 2) Press button, or move cursor to 3.Phone Settings using the [Next]/[Prev] Softkeys, and press the [ OK ] Softkey. 3) Press button, or move cursor to 7.Time Configuration using the [Next]/[Prev] Softkeys, and press the [ OK ] Softkey. -
Page 53: S/W Update
HTTPS Verification settings, Software Download flag, Configuration Download flag and DHCP Options can be viewed and changed. 3.6.8.1 Provisioning Type The LIP-6812/LIP-6830 supports two Provisioning protocols: Trivial File Transfer Protocol (TFTP) – a simple transfer mechanism using UDP but lacks security and TFTP ports are often blocked at firewalls. -
Page 54: Tftp Server Address
LIP-6812 & LIP-6830 Installer Guide Changing the Provisioning Type requires a reboot of the LIP-6812/LIP-6830; when you leave the menu, you will receive a Reboot notice. An asterisk is displayed in front of the current selection. 3.6.8.2 TFTP Server Address When TFTP provisioning is selected, the IP address of the TFTP server must be defined. - Page 55 7) Press the button to exit the menu. Changing the Provisioning URL requires a reboot of the LIP-6812/LIP-6830; when you leave the menu, you will receive a Reboot notice. To enter alpha-numeric characters select the [Mode] Softkey (refer to Appendix E. for the character mapping of dial pad digits).
- Page 56 HTTPS Port ] [CLR ] [ OK ] 14) Press the button to exit the menu. Changing the HTTPS Port requires a reboot of the LIP-6812/LIP-6830; when you leave the menu, you will receive a Reboot notice. 3.6.8.3.3 User Name In some cases the HTTP/HTTPS server may require a User Name (ID) and Password for authentication prior to allowing file access.
- Page 57 7) Press the button to exit the menu. Changing the Password requires a reboot of the LIP-6812/LIP-6830; when you leave the menu, you will receive a Reboot notice. To enter alpha-numeric characters select the [Mode] Softkey (refer to Appendix E. for the character mapping of dial pad digits).
-
Page 58: S/W Download Flag
Reboot notice. 3.6.8.4 S/W Download Flag When Power is applied or a Reboot is processed, the LIP-6812/LIP-6830 can be assigned to automatically check and download LIP Phone Software from the defined provisioning Server. -
Page 59: Config Download Flag
Reboot notice. 3.6.8.5 Config Download Flag When Power is applied or a Reboot is processed, the LIP-6812/LIP-6830 can automatically download a Global (system) and a Phone specific (MAC) Configuration file from the defined provisioning Server;... -
Page 60: Lock Outgoing Call
3.6.9 Lock Outgoing Call The LIP-6812/LIP-6830 can be configured to allow outgoing calls only if a Password is entered. When enabled, the LCD screen will display the password request as shown and the password must be entered prior to connecting an outgoing call. -
Page 61: Speed Number
3.6.10 Speed Number The LIP-6812/LIP-6830 includes a Phone Book which supports up to 100 entries. Numbers from the Phone Book entries can be dialed by accessing the Phone Book and selecting an entry, or by simply dialing the Speed Number (0-99) entry number when it is enabled. The Speed Number can be set in the Phone Book menu (refer to Section 3.8.1). -
Page 62: Call Preferences
LIP-6812 & LIP-6830 Installer Guide Call Preferences Call Preferences define various call handling features of the LIP Phone. 3.7.1 Do Not Disturb When in Do Not Disturb mode, the LIP Phone will reject all incoming calls; Do Not Disturb is activated by an assigned flexible button and must be enabled for operation. -
Page 63: Call Waiting Tone
LIP-6812 & LIP-6830 Installer Guide Call Waiting Current value is ‘Yes’. [Yes ] [ No ] 5) Press the button to exit the menu. 3.7.3 Call Waiting Tone While off-hook, the LIP Phone can provide a tone to indicate a Call Waiting over the existing conversation. -
Page 64: Message Waiting Tone
LIP-6812 & LIP-6830 Installer Guide Call Hold Ringback Current value is ‘Yes’. [Yes ] [ No ] 5) Press the button to exit the menu. 3.7.5 Message Waiting Tone When a Line receives an indication of a Message Waiting, the MSG LED will flash. In addition, a ‘Stutter’... -
Page 65: Caller Id Blocking
3.7.8 Anonymous Call Block The LIP-6812 & LIP-6830 can block incoming calls that are using Anonymous Caller ID. To set Anonymous Call Blocking: 1) Press the button. If the LCD Menu is locked, use the unlock procedure (refer to Section Lock/Unlock Configuration). -
Page 66: Intercom Notification
LIP-6812 & LIP-6830 Installer Guide Anonymous Call Block Current value is ‘Yes’. [Yes ] [ No ] 5) Press the button to exit the menu. 3.7.9 Intercom Notification If enabled in the SIP server, the LIP Phone automatically answers intercom calls, and connecting the caller to the called party’s Speakerphone;... -
Page 67: Phone Book
Installer Guide Phone Book The LIP-6812 & LIP-6830 includes a Phone Book of names and numbers for up to 100 contacts. The Phone Book can be managed and used to place calls using the LCD Menu or using a Phone Book button assigned to the LIP Phone. Contacts can be added, edited or deleted and the Phone Book may be searched. - Page 68 Phone Book : Speed Num. ] [CLR ] [ OK ] 9) The contact is modified and the LIP-6812/LIP-6830 returns to the Phone Book list. To enter alpha-numeric characters select the [Mode] Softkey (refer to Appendix E. for the character mapping of dial pad digits).
-
Page 69: Deleting A Phone Book Record
5) Press the [ Yes ] Softkey to delete the selected contact. Data will be lost. Are you sure? [Yes ] [ No ] 6) The contact is deleted and the LIP-6812/LIP-6830 returns to the Phone Book list. 3.8.4 Deleting All Records To delete all Phone Book records: 1) Press the button. -
Page 70: Searching The Phone Book
Data will be lost. Are you sure? [Yes ] [ No ] 6) All contacts of your LIP-6812/LIP-6830 are deleted and the LIP-6812/LIP-6830 returns to the Phone Book list. 3.8.5 Searching the Phone Book To search for the Phone Book using either Name or Number: 1) Press the button. - Page 71 [ OK ] Softkey. 4) Select a contact to dial using the [Prev]/[Next] Softkeys. Phone Book (Page 1) >[15]Tommy,9876 [Prev] [Next] [Dial] 5) Press the [Dial] Softkey; the LIP-6812/LIP-6830 calls the contact. Calling to █ 9876 [EndC] To dial a Registered Contact using a Flexible button (refer to Section 3.6.6): 1) Press the Flexible key for the Phone Book function while in an idle or dial state.
-
Page 72: Default
9.Reboot using the [Next]/[Prev] Softkeys, and press the [ OK ] Softkey. 3) Press the [ Yes ] Softkey to reboot the LIP-6812/LIP-6830, or press the [ No ] Softkey to cancel this menu. June, ‘07... - Page 73 LIP-6812 & LIP-6830 Installer Guide System will be rebooted. Are you sure? [Yes ] [ No ] 4) If you press [ No ] in Step 3), press the button to exit the menu. June, ‘07...
-
Page 74: Web Manager Configuration
Browser host. The IP address of the LIP-6812/LIP-6830 is available through Information Display (Section 5.2). Login & Site Map Pointing your browser at the LIP-6812/LIP-6830 IP Address and Port 8000 will return the LIP- 6812/LIP-6830 Login page, Figure 4.1-1 (ex., http://150.150.57.44:8000). - Page 75 LIP-6812 & LIP-6830 Installer Guide Figure 4.1-3 Site Map NOTE: On the left is the Web Manager page link window and in the main screen is a more detailed site map. 3) Select the desired parameters from either the Site Map or Page Link window.
-
Page 76: Voip Configuration
LIP-6812 & LIP-6830 Installer Guide VoIP Configuration Figure 4.2-1 VoIP Configuration Within VoIP Configuration, the adjustable parameters are: - Line based parameters June, ‘07... - Page 77 LIP-6812 & LIP-6830 Installer Guide o Proxy Server Address – IP address or FQDN of the IP Phone telephony host server. o Proxy Port – Where the server listens for incoming requests and sends outgoing responses o Display Name – Specifies a name to be used as part of the phone caller ID. The Display Name assigned for Line1 will be displayed on the LCD display.
- Page 78 .. button. Changing the proxy server address, proxy port by line and outbound proxy, backup proxy, VMS address or local UDP port requires a reboot of the LIP-6812/LIP-6830; when you leave the menu, you will receive a Reboot notice. June, ‘07...
-
Page 79: Lan Configuration
Figure 4.3-1 LAN Configuration In the LAN Configuration screen the adjustable parameters are: - LAN Configuration o Network Selection – IP Address mode for the LIP-6812/LIP-6830, radio button selects Static or DHCP address o IP address – LIP Phone IP address o Subnet Mask –... - Page 80 LIP-6812 & LIP-6830 Installer Guide To modify any of the addressing information 1) Select the parameter to be changed and enter the new value (Static mode only). 2) When complete, select the button to load new values to the LIP Phone memory.
-
Page 81: Call Preferences
Installer Guide Call Preferences Figure 4.4-1 Call Preferences LIP-6812/LIP-6830 supports various User Call preferences from outgoing Caller ID blocking to Anonymous Call Block to prevent unwanted incoming calls. On the Call Preferences screen the adjustable parameters are: - Call Preferences o Caller ID Blocking –... - Page 82 LIP-6812 & LIP-6830 Installer Guide o Call Hold Ringback – When a user has a call on hold and returns to idle, the Phone can notify the user of the holding call with a ring tone (if enabled). o Message Waiting Tone – The user can receive an audible signal, “stutter” dial tone, as notification of a message waiting;...
-
Page 83: Dial Plan
LIP-6812 & LIP-6830 Installer Guide Dial Plan The LIP phone incorporates a Dial Plan, which monitors the user dialed digits for patterns matching the Dial Plan number. If a matching pattern is dialed, the phone will modify the digits and process the call using the modified digit string. The Dial Plan is defined as either a Routing Table or a Digit Map.Table. - Page 84 LIP-6812 & LIP-6830 Installer Guide In addition to the dial pad digits, special characters can be defined as follows: ?– matches any single digit. ~ – matches a string of characters of any length. , – locates the position of a Pause.
-
Page 85: Digit Map Table
LIP-6812 & LIP-6830 Installer Guide To delete an entry from Current Routing Table: 1) Select the check box in fornt of the desired entry. 2) Click the button. To delete all the entries: 1) Enter ‘all’ as the index. 2) Click the button. - Page 86 LIP-6812 & LIP-6830 Installer Guide - [ ] – matches a digit from a group of digits. Use with “.” to define a range, [2-6] matches a digit 2 to 6 inclusive. A matching number can be assigned to be modified prior to call set-up. The Digit Map Number Process defines the modification procedures including: TRNC –...
- Page 87 LIP-6812 & LIP-6830 Installer Guide 2) Click the button. June, ‘07...
-
Page 88: Phone Information
Installer Guide Phone Information Figure 4.6-1 Phone Information The Phone Information screen displays the version information of the LIP-6812/LIP-6830 and the Phone Name. In addition, the password can be changed from this screen. To change the Phone Name: 1) Enter the desired name. -
Page 89: Phone Settings
The Number of Lines – The number of programmable buttons used for SIP call appearances or ‘Lines (min. 2); the maximum number of Lines is the maximum number of buttons available on the LIP Phone (LIP-6812=11, LIP-6830=24). o Lock Outgoing Call – Locking an outgoing call, user must enter the LCD Menu password to place calls. - Page 90 LIP-6812 & LIP-6830 Installer Guide o Call Pick – Softkey display for Call Pick-up from park function. o Directed Call Pickup – Softkey display for DIrected Call Pick-up funciton. o Group Call Pickup – Softkey display for Group Call Pick-up function.
-
Page 91: Phone Book
LIP-6812 & LIP-6830 Installer Guide Phone Book Figure 4.8-1 Phone Book The LIP Phone includes a Phone Book with 100 records. Each record can be accessed with a Speed Number (00-99). The Speed Dial numbers are maintained in the Phone Book. The Phone Book entries can be added, editted or deleted from the Phone Book screen. - Page 92 LIP-6812 & LIP-6830 Installer Guide Figure 4.8-2 Add a Phone Book Entry 2) When complete, select the button to store the new number to the Phone Book. To modify an entry: 1) Select Modify in the desired entry and enter the new values in the Phone Book Entry screen.
- Page 93 LIP-6812 & LIP-6830 Installer Guide sample *.csv file SpeedNumber,Name,PhoneNumber,Information 1,Lee Myunghee,1000,lmh@abc.com 2,baragirl,2000, 3,lmh,3000,korea June, ‘07...
-
Page 94: Flexible Button
Flexible Button Figure 4.9-1 LIP-6830 Flexible Button The LIP-6812 has 12 flexible buttons with one assigned for Headset, and the LIP-6830 has 24 flexible buttons. Unused buttons (not used for Lines) can be assigned to various functions (refer Table 3-1 Flexible Button Functions for available functions). - Page 95 1) Enter the Ethernet MAC address of the DSS Console in the “DSS Registration” box. 2) Select the button. Changing the DSS Registration requires a reboot of the LIP-6812/LIP-6830; when you leave the menu, you will receive a Reboot notice. June, ‘07...
-
Page 96: Call Log
LIP-6812 & LIP-6830 Installer Guide 4.10 Call Log Figure 4.10-1 Call Log The Call Log is a list of all calls (incoming, outgoing or missed) at the extension. The log indicates the Call type (InComing/OutGoing/Missed), the other Party’s Address, Call time, Call duration and Call state. -
Page 97: Network Time Configuration
LIP-6812 & LIP-6830 Installer Guide 4.11 Network Time Configuration Figure 4.11-1 Network Time Configuration The Network Time Configuration screen allows you to set up the Time and Daylight Savings Time Configuration. Within Network Time Configuration, the following parameters can be set. - Page 98 LIP-6812 & LIP-6830 Installer Guide - Date Format – Sets the format of the LCD date display. - DST Configuration - The DST Configuration configures the format for Daylight Savings Time. The Start and End for DST can be configured in the Month/Day/Time format or the North American Standard, Month/Week/Day/Time format.
-
Page 99: Upgrade Configuration
LIP-6812 & LIP-6830 Installer Guide 4.12 Upgrade Configuration Figure 4.12-1 Upgrade Configuration In the Upgrade Configuration screen, the results of the most recent download can be viewed. Upgrade result messages are defined in Appendix C, Download LCD Messages. A log is provided displaying any error conditions for the Configuration file download. - Page 100 TFTP Server Address – IP address or FQDN of TFTP server for location of upgrade files. When the checkbox “Received by DHCP on boot” is checked, the LIP-6812/LIP-6830 will only use the IP address of TFTP server retrieved from the DHCP server.
- Page 101 If no transport type is indicated by the radial buttons, Software and Configuration file download is disabled. Changes made to the Upgrade Configuration require a reboot of the LIP-6812/LIP-6830; when you leave the menu, you will receive a Reboot notice.
-
Page 102: Qos Configuration
The VLAN tag provides the definition for Ethernet frame priority and VLAN ID based on IEEE 802.1p/Q. The VLAN tag is assigned separately for the LIP-6812/LIP-6830 PC and LAN (voice) port. When VLAN ID is assigned, only frames with the ID are accepted and frames sent by the LIP-6812/LIP-6830 include the LAN port the VLAN information. - Page 103 1) Select the parameter, and either enter a new value or select a value from the drop-down menu. 2) When complete, select to load the new values in the LIP-6812/LIP-6830 memory. Modifications made to the IEEE 802.1p/Q Configuration require a reboot of the LIP- 6812/LIP-6830;...
-
Page 104: Load Default
Installer Guide 4.14 Load Default Figure 4.14-1 Load Default The Load Default Configuration screen permits the LIP-6812/LIP-6830 Configuration to be returned to Factory Deefault values (refer to Appendix A, Factory Default Configuration). To set the LIP-6812/LIP-6830 to default values 1) Select and confirm. -
Page 105: Reboot
Installer Guide 4.15 Reboot Figure 4.15-1 Reboot The Reboot screen is used to manually reboot the LIP-6812/LIP-6830. To reboot the LIP-6812/LIP-6830: 1) Select the button. 2) The IP Phone will save and load any changes in the Configuration to active memory and will reboot using the changed configuration data. -
Page 106: Troubleshooting
Troubleshooting Information The LIP-6812 and LIP-6830 provide the means to quickly view the Network parameters (IP address, Default Gateway address, and Subnet-mask), Server IP addresses (Call Server, TFTP Server, and SNTP Server), and view recent download information for configuration and software files. - Page 107 1. Network Mode: DHCP Make sure Network Mode is DHCP. Make sure the RJ-45 LAN cable is connected securely to your LIP-6812/LIP-6830 and LAN, hub, or router. Make sure that all network ports, routers, or hubs are alive. Network setting error Make sure your network supports DHCP.
-
Page 108: Appendix A. Factory Default Configuration
LIP-6812 & LIP-6830 Installer Guide Appendix A. Factory Default Configuration Factory default configurations are settings for the configuration which are set at the factory. The default values for configurable settings are given in Table A below. Config File Parameter/Field Default Value... - Page 109 LIP-6812 & LIP-6830 Installer Guide Config File Parameter/Field Default Value Section Name Start RTP Port 23000 VMS Address Not Assigned prack mode** disabled User Name* Not Assigned Replaces header** enabled Local UDP Port 5060 Register Expires 3600 seconds SIP Session timer** SIP T1 timer** 500 msec.
- Page 110 LIP-6812 & LIP-6830 Installer Guide Config File Parameter/Field Default Value Section Name Language** English Lock Outgoing Call unlock Use Speed Number enabled Web Server** enabled telnet_server* allow. function call_park* disable phone password Not Assigned [SYSTEM] function call_pickup* disable function group_call_pickup*...
- Page 111 LIP-6812 & LIP-6830 Installer Guide Config File Parameter/Field Default Value Section Name Auto Answer Disabled Forwarding Condition* 0 off Forwarding Address* Not Assigned Forwarding No Answer Time* 10 seconds Intercom Notification enabled ACD* disabled ACD Primary Line ACD Unavailable, completed*...
-
Page 112: Appendix B. Lip-6812/Lip-6830 Specification
LIP-6812 & LIP-6830 Installer Guide Appendix B. LIP-6812/LIP-6830 Specification Table B provides the basic specifications of the LIP-6812/LIP-6830. Table B. LIP-6812/LIP-6830 Specifications Item LIP-6812 LIP-6830 Network Interface RJ-45 IEEE 802.3 Ethernet/Fast Ethernet switch port PC/Workstation Interface RJ-45 IEEE 802.3 Ethernet/Fast Ethernet switch port Power 802.3af or AC/DC Power Adapter... -
Page 113: Appendix C. Download Lcd Messages
LIP-6812 & LIP-6830 Installer Guide Appendix C. Download LCD Messages Table C-1 provides the messages displayed for the most recent Software download. Table C-1 Software Download Message Message Description LOAD FLAG OFF S/W load is disabled NULL SERVER ADDR TFTP/WEB server address is 0.0.0.0... -
Page 114: Appendix D. Using The Configuration File
Table D-2 shows selections available for the time-zones. Figure D provides a blank LIP-6812/LIP-6830 Configuration file. Values need only be assigned in the Configuration files if other than default (refer to the comments in the example configuraiton file for proper entry of values). - Page 115 LIP-6812 & LIP-6830 Installer Guide Valid values are static and dhcp. Default is dhcp. To manually configure your IP settings, you must set this parameter to static. Note: Basic provisioning parameters are requested from the local DHCP Server, as below:...
- Page 116 LIP-6812 & LIP-6830 Installer Guide Default is 1. (Optional) Time zone in which the phone is located. Valid values are region numbers representing various time timezone zones shown in Table 2. Default is 3 (Pacific Standard). (Optional) Time format for LCD displaying.
- Page 117 LIP-6812 & LIP-6830 Installer Guide (Optional) Address of the outbound proxy server in dotted IP address or URL format. When an outbound proxy is enabled, all SIP requests are outbound_proxy_server sent to the outbound proxy server instead of to the linen_proxy_address.
- Page 118 (Optional) The number of programmable buttons used for SIP lines and features. Valid values are as follows: max_line_num • LIP-6812 phone — 1 to 11 • LIP-6830 phone — 1 to 24 Default is 2. Address of the SIP proxy servers that are used by the phones.
- Page 119 LIP-6812 & LIP-6830 Installer Guide (Optional) Line type can be configured by ITSPs. Valid values are as follows: • private — A line that is only presented with any call appearance that is only visible and accessible through the original endpoints involved in setting up the call.
- Page 120 LIP-6812 & LIP-6830 Installer Guide Valid values are 1 (on) and 0 (off). Default is 1 (on). (Optional) Enables voice activation detection (VAD). Valid values are 1 (on) and 0 (off). Default is 0. (Optional) Specifies the DTMF payload type for RFC2833.
- Page 121 LIP-6812 & LIP-6830 Installer Guide Six value time array (on off on off on off). Valid range is 0 to 30000 milliseconds. Default is 500 0 0 0 0 0 (Optional) Ring cadence when ACD call in Alert Info header.
- Page 122 Valid values are as follows when the max line number is 2 (default value): prog • LIP-6812 phone — 2 to 11 • LIP-6830 phone — 2 to 24 (Optional) Specifies the function to assign. Valid values are as follows: •...
- Page 123 LIP-6812 & LIP-6830 Installer Guide Default is enable. (Optional) Enables or disables beep tone for Auto Answer intercom calls. intercom_noti Valid values are enable and disable. Default is enable. (Optional) Enables or disables the ACD agent feature. Valid values are enable and disable.
- Page 124 LIP-6812 & LIP-6830 Installer Guide • 0 — disable • 1 — enable Default is 1 (enable). (Optional) Specifies the LCD Menu and Phone Lock password Valid value is 4-digits string. phone_password Default is a null string. (Optional) Specifies soft key access for Call Park Valid values are disable and enable.
- Page 125 LIP-6812 & LIP-6830 Installer Guide (Optional) Specifies the hexadecimal value composed by a 3- bit field flag for HTTPS certification verification. 0x01 checks valid certification authority. 0x02 checks whether a server verifying_cert name is valid. 0x04 checks whether a certification is expired.
- Page 126 ;================================================================================================ ; This file can be used as a global configuration file for all LIP-6800 series phones (LIP-6804, LIP-6812& LIP_6830) and as a phone-specific configuration file. The Global file defines characteristics common to all the phones using the sysconf_68??d_sip.cfg file name (??= 04, 12, or 30).
- Page 127 LIP-6812 & LIP-6830 Installer Guide line1_password line1_type line1_bla_prim line1_extension line1_acd_activity line1_acdgroupid linen_proxy_address linen_proxy_port linen_displayname linen_name linen_authname linen_password linen_type linen_bla_prim linen_extension linen_acd_activity linen_acdgroupid ;Note ‘n” is the line number assigned consecutively to the “max_line_num”. ;!!! Repeat above parameters for each line on the phone up to the “max_line_num” !!!!!!! [ROUTE] ;Call Routing Table Configurations...
- Page 128 LIP-6812 & LIP-6830 Installer Guide func = 0 for no function 1 for Speed Dial 2 for Phone Book 3 for Call Log 4 for Mute 5 for Headset 6 for Redial 7 for Return 8 for FWRD 9 for CONF...
- Page 129 LIP-6812 & LIP-6830 Installer Guide smartup_confirm decrypt_key cfg_download sw_download [NETTIME] ;SNTP, Timezone and DST Configurations sntp_server_address interval timezone dst_auto_adjust dst_start_month dst_start_day dst_start_day_of_week dst_start_week_of_month dst_start_time dst_stop_month dst_stop_day dst_stop_day_of_week dst_stop_week_of_month dst_stop_time time_format date_format ;================================================================================================ Figure D LIP-6812/LIP-6830 Example Configuration File June, ‘07...
- Page 130 LIP-6812 & LIP-6830 Installer Guide Country Country GMT-12:00 Int.Date Line, West GMT+01:00 Oslo, Norway GMT-11:00 Midway/Samoa GMT+01:00 Paris, France GMT-10:00 Hawaii GMT+01:00 Rome, Italy GMT-09:00 Alaska GMT+01:00 Stocholm, Sweden GMT-08:00 Los Angeles, Califonnia GMT+01:00 Vienna, Austria GMT-08:00 Pacific Standard GMT+02:00 Athens, Greece...
-
Page 131: Appendix E. Dial Pad Mode
LIP-6812 & LIP-6830 Installer Guide Appendix E. Dial Pad Mode The LIP 6812 and LIP-6830 dial pad can be used to input digits dialed or alphanumeric characters to enter a hostname. Table E provides the input information for dial pad mode. -
Page 132: Appendix F. Auto Provisioning Routine
IP address from DHCP Option #66 or #150 or the TFTP server in memory when Option 66/150 is disabled or not provided by DHCP. The LIP Phone will request the TFTP server send the Global Configuration file (“sysconf_6812d_sip.cfg” for the LIP-6812 or “sysconf_6830d_sip.cfg” for the LIP-6830). - Page 133 These files along with the version file are available from LG-Nortel. If desired, comments may be added to the version file using “#” as the leading character of the comment line.
- Page 134 These files along with the version file are available from LG-Nortel. If desired, comments may be added to the version file using “#” as the leading character of the comment line.
- Page 135 LIP-6812 & LIP-6830 Installer Guide June, ‘07...
- Page 136 LIP-6812 & LIP-6830 Installer Guide LGN68126830-1224IG-01.05 June, ‘07...