Henny Penny 600 User Manual
Henny penny corp. fryer user manual
Hide thumbs
Also See for HENNY PENNY 600:
- Service manual (270 pages) ,
- Operator's manual (100 pages) ,
- Technical manual (236 pages)
Table of Contents
Advertisement
Quick Links
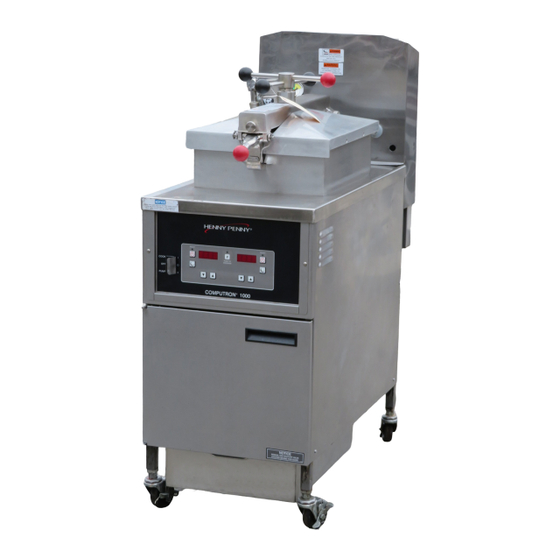
3-1. OPERATING COMPONENTS
Fig.
Item
Description
No.
No.
3-1
1
Digital Display
3-1
2
3-1
3
3-1
4
3-1
5
3-1
6 & 7
608
SECTION 3. OPERATING INSTRUCTIONS
C1000 Controls - Reference Figure 3-1.
Shows the shortening temperature, the timer countdown in
the Cook Cycle, and the selections in the Program Mode; the
temperature of the shortening can be shown by pressing
once, or twice to view set-point temperature;
if shortening temperature exceeds 425°F (218°C), the display
reads "E-5, FRYER TOO HOT"
This LED lights when the shortening temperature is within 5°
of the setpoint temperature, signaling the operator that the
shortening temperature is now at the proper temperature for
dropping product into the frypot
The timer buttons are used to start and stop Cook Cycles
The idle buttons are used to start an Idle Mode which reduces
the temperature of the shortening during non-use periods; press
and hold to exit the Idle Mode
The program button is used to access the Program Modes;
also, once in the Program Mode, it is used to advance to the
next parameter
Used to adjust the value of the currently displayed setting
in the Program Mode and to change set-point temperature of the
shortening
Model 500/561/600
Function
3-1
Advertisement
Table of Contents

Related Manuals for Henny Penny HENNY PENNY 600


Summary of Contents for Henny Penny HENNY PENNY 600
-
Page 1: Section 3. Operating Instructions
425°F (218°C), the display reads “E-5, FRYER TOO HOT” This LED lights when the shortening temperature is within 5° of the setpoint temperature, signaling the operator that the... -
Page 2: Operating Components
3-1. OPERATING COMPONENTS (Continued) Figure 3-1 Model 500/561/600... - Page 3 This deadweight style, pressure relief valve maintains a constant level of steam pressure within the frypot; excess steam is vented through the exhaust stack Failure to clean the deadweight assembly daily could result in the fryer building too much pressure. Severe injuries and burns could result. Model 500/561/600...
- Page 4 If safety relief valve activates, turn main power switch to the OFF position. To avoid serious burns and injuries, have fryer serviced before next use. DO NOT PULL THIS RING. SEVERE BURNS FROM THE STEAM WILL RESULT.
- Page 5 3-1. OPERATING COMPONENTS (Continued) Fig. Item Description Filter Drain Pan Filter Union Filter Valve Condensation Drain Line Condensation Drain Rinse Hose (Optional) Gas Control Valve (Gas Models Only) High Temperature Limit Electric Breakers-Push Button Reset (Electric Models Only) Contactors (Electric Models Only) Circuit Breaker (Single Phase Only)
-
Page 6: Electric Model
Model 500/561/600 3-1. OPERATING COMPONENTS (Continued) ELECTRIC MODEL Figure 3-2. Operating Controls... -
Page 7: Gas Model
3-1. OPERATING COMPONENTS (Continued) GAS MODEL Figure 3-3. Operating Controls Model 500/561/600... - Page 8 Model 500/561/600 3-1. OPERATING COMPONENTS (Continued) Figure 3-7. Figure 3-4. Figure 3-5. Figure 3-8. Figure 3-6. Figure 3-9.
-
Page 9: Filling Or Adding Shortening
Fire or damage to the frypot could result. It is recommended that a high quality frying shortening be used in the fryer. Some low grade shortenings have a high moisture content and will cause foaming and boiling over. To avoid severe burns when pouring hot shortening into frypot, wear gloves and take care to avoid splashing. -
Page 10: Care Of The Shortening
To protect, and get the maximum life out of the shortening, press to lower the temperature to 250° F (135° C) when the fryer is not in immediate use. Deteriorated shortening smokes badly, even at lower temperatures. Frying breaded food products requires frequent filtering to keep the shortening clean. - Page 11 GUIDELINES The following table provides the suggested frying times and temperatures for single-stage cooking, using the Henny Penny Pressure Fryer com- bined with our special blends of PHT Fryer Breading Mixes. All the suggested time and temperature settings are for a 10 pound (4.5 kg) load.
- Page 12 Shortening Refer to filling and Adding 4. Make sure electrical power is connected to fryer. Gas units, make sure gas lines are connected to fryer and gas valve is turned on - See GAS PILOT & BURNER LIGHTING AND SHUT DOWN PROCEDURE Section 5.
- Page 13 3-5. CHICKEN FRYING PROCEDURES (Continued) Step 8 Step 9 Step 11 Step 12 8. Take the chicken parts, either 4 or 5 cut-up chickens, from the cooler and place in a scullery sink. Wash the chicken and, at this point, break the thigh from the joint of the backbone. 9.
- Page 14 3-5. CHICKEN FRYING PROCEDURES (Continued) Step 13 Step 17 3-14 13. If a breading machine is not used, the food should be placed in the dry mix and hand tumbled so that each piece of food is completely covered. 14. Knock off any excess breading and place the breaded product on a tray for cooler storage.
- Page 15 - if pressure does not build, check Troubleshooting Section or call your local Henny Penny service agent if need be • Check the drain and filter valve for leaks 23. At the end of the Cook Cycle (the timer reaches zero), the fryer automatically depressurizes, the timer buzzer sounds, and the display flashes “DONE”.
- Page 16 IF THE SHORTENING TEMPERATURE EXCEEDS 420°F (216°C), IMMEDIATELY SHUT OFF THE POWER AT THE MAIN CIRCUIT BREAKER AND HAVE THE FRYER REPAIRED. IF SHORTENING TEMPERATURE EXCEEDS ITS FLASHPOINT, FIRE WILL OCCUR, RESULTING IN SEVERE BURNS AND/OR PROPERTY DAMAG...
- Page 17 Special Programming is used to set the items below: Fahrenheit or Celsius Initialize System Lock or Unlock Controls Fryer Type – Open or Pressure Heat Source – Electric; Gas w/electronic ignition Vat Type - Full or Split Oil Type - Solid or Liquid 1.
- Page 18 3-7. C1000 SPECIAL PROGRAMMNG (Continued) 3-18 6. Press and “HEAT” shows in the display. Use to change the heat source: “ELEC” for electric models; “GAS” for units with standing pilot; SSI for units with solid state ignition. 7. Press and “VAT” and “FULL” should show in the displays if controls are set to “PRES”...
-
Page 19: Regular Maintenance Schedule
Clean safety relief valve 3-9. FILTER PUMP MOTOR PROTECTOR- MANUAL RESET As in all food service equipment, the Henny Penny pressure fryer does require care and proper maintenance. The table below provides a summary of scheduled maintenance. Frequency As required... -
Page 20: Filtering Of Shortening
4. As the shortening drains from the frypot, use fryer brushes (Henny Penny part number 12105 includes both brushes) to clean the side of the frypot and the heating elements (if electric unit). - Page 21 After the sides and bottom are cleaned, open the drain valve. 7. If an optional filter rinse hose is available on your fryer, the following cleaning procedure may be used. a. Attach the filter rinse hose with its quick disconnect fitting to the male fitting inside the door next to the filter valve handle.
- Page 22 3-10. FILTERING OF SHORTENING (Continued) Step 7b Step 7c Step 7f 3-22 b. While holding the wooden handle, make sure the hose nozzle is pointed down into the bottom of the frypot. Pull the lid down over the nozzle, close the filter valve, and move the main power switch to the PUMP position.
- Page 23 3-10. FILTERING OF SHORTENING (Continued) Step 9 Step 11 9. When the pump is pumping air only, the shortening in the frypot will appear to be boiling. Close the filter valve first and then move the main power switch from PUMP to OFF. This will keep the filter pump and lines from filling up with shortening.
- Page 24 3-11. CLEANING THE OPTIONAL CRUMB PAN Electric Electric Electric Electric 3-24 The crumb pan allows improved filtration process because finer, hard to filter particles are now retained within the pan. Crumb accumulation within the filter pan is reduced, and it is quicker to pump the shortening back into the frypot.
-
Page 25: Changing The Filter Envelope
3-12. FILTER PUMP PROBLEM PREVENTION 3-13. CHANGING THE FILTER ENVELOPE Step 3 Filter Union Step 4 The following steps will help prevent filter pump problems: Make certain the charcoal filter is installed with the smooth side down and the arms on the frame are clamped down over the protrusions on the outside of the frame. - Page 26 3-13. CHANGING THE FILTER ENVELOPE (Continued) Step 7 Step 8 Step 9 3-26 6. Unthread the suction standpipe from the screen assembly. 7. Remove the crumb catcher and clean thoroughly with soap and water. Rinse thoroughly with hot water. 8. Remove the filter clips and discard the filter envelope. 9.
- Page 27 16. Connect the filter union by hand. Do not use a wrench to tighten. 17. Slide the condensation drain pan back into place. The fryer is now ready to operate. Model 500/561/600...
-
Page 28: Changing The Charcoal Filter
3-14. CHANGING THE CHARCOAL FILTER Step 3 Step 7 Step 7 3-28 The charcoal filter should be changed every day or whenever it be- comes clogged with crumbs. Proceed as follows: 1. Move the main power switch to the OFF position. 2. -
Page 29: Cleaning The Frypot
Hot shortening can splash out. Severe burns could result. The filter drain pan must be as far back under the fryer as it will go, and the cover in place. Be sure the hole in the cover lines up with the drain before opening the drain. - Page 30 4. Fill the frypot to the level indicator with hot water. Add 4 to 6 ounces of fryer cleaner (Henny Penny part number 12101) to the water and mix thoroughly. The fry basket can be placed inside frypot for cleaning.
- Page 31 7. Let the cleaning solution stand for 15 to 20 minutes with the unit off. 8. Using the fryer brush (Henny Penny part number 12105), scrub the inside of the frypot, the lid liner, and around the countertop of the fryer.
-
Page 32: Cleaning The Deadweight Assembly
Failure to clean the deadweight assembly daily could result in the fryer building too much pressure. Severe injuries and burns could result. 3. Clean the exhaust tube with stainless steel brush (Henny Penny part number 12147). Model 500/561/600... - Page 33 1. Filter the shortening per Filtering of Shortening Section. 2. Move the main power switch to the OFF positions. 3. Place the fryer basket in a sink for cleaning. 4. Clean the deadweight assembly per Cleaning the Deadweight Assembly Section.
- Page 34 3-34 1. Connect the female quick disconnect, that is attached to the hose in the rear of the fryer, to the correct male quick disconnect at the wall. Once attached, the hose can remain connected unless the fryer is moved. Figure 1.
-
Page 35: Reversing The Lid Gasket
3-19. REVERSING THE LID GASKET 1002 Reversing the lid gasket helps to prevent early failure of lid gasket and the loss of pressure during a cook cycle. 1. Back the 4 lid liner screws (2 on each side) out about 1/2 inch (12.7 mm). -
Page 36: Lid Lubrication
Turn the spindle counterclockwise until it stops, line up the lid cover with the cross bar, pull the release pin out, and firmly press the cross bar back into place. The fryer is now ready for use. Model 500/561/600... -
Page 37: Limit Stop Adjustment
Turn spindle clockwise until it stops. The lid gasket is now touching the frypot rim. From the front of the fryer, turn the spindle at least 3/4 of a turn, but not over 1 turn. One of the spindle arms should be lined up with the red ball of the latch, at this time. -
Page 38: Cleaning The Safety Relief Valve
Use a wrench to loosen the valve from the pipe elbow, turn counterclockwise to remove. Clean the inside of the pipe elbow with hot water. Turn the safety relief valve towards the rear of the fryer when reinstalling the relief valve. Immerse the safety relief valve in a soapy water solution for 24 hours. - Page 39 5/16” socket or wrench, tighten all the element spreader screws. If the bolts or spreaders are missing or damaged, order kit no. 14685 from your nearest Henny Penny distributor. Pump shortening back into frypot and unit is now ready for use.
-
Page 40: Seasonal Shutdown
3. Bread the pieces in advance (if using Henny Penny Fryer Breading Mix) so that the breaded chicken will be held at least 30 minutes before frying. Breading in advance will give the breading an opportunity to permeate the meat and adhere better to the product. - Page 41 1. Wash and drain the chops thoroughly. 2. Bread the pork chops (4 oz. portion, 1/2-inch to 3/4-inch (.11 kg, 12.7-19 mm) thick)with the Henny Penny Fryer Mix. 3. Fry at 315°F (157°C) for 5 minutes. If the chops are larger, allow an additional minute for each 2 ounce (.06 kg) increase per...
- Page 42 3-30. BARBECUED RIBS (Continued) 3-31. TOP SIRLOIN STEAK AND FILET MIGNON 3-32. FISH FILLETS 3-33. FROG LEGS 3-34. OYSTERS 3-35. SHRIMP 3-42 3. The ribs should be fried for 13 minutes at 275°F (135°C). 4. Ribs should then be brushed well on both sides with barbecue sauce, or placed in a pan of warm sauce.
- Page 43 3-36. ROCK LOBSTER TAIL 3-37. POTATOES 3-38. CORN ON THE COB 3-39. CAULIFLOWER 1. Clean, wash, and drain. 2. Fry for 6 minutes at 315°F (157°C). 1. Use U.S. No. 1 grade Idaho potatoes, unpeeled. Wash and cut into 8 wedges. Drain and bread. 2.