
Related Manuals for Pro-Form XP 550s


Summary of Contents for Pro-Form XP 550s
- Page 1 ModeJ No. 831.29675.1 SeriaJ No. LL EXERCIS Serial Number Decal User's Manual • Assembly • Operation , Maintenance , Part List and Drawing Sears, Roebuck and Co., Hoffman Estates, IL 60179...
-
Page 2: Table Of Contents
TABLE OF CONTENTS iMPORTANT PRECAUTIONS ..............BEFORE YOU BEGIN ..............ASSEMBLY ................OPERATION AND ADJUSTMENT ............. HOW TO FOLD AND MOVE THE TREADMILL ..........TROUBLESHOOTING ..............CONDiTiONiNG GUiDELiNES ............... PART LiST ................ORDERING REPLACEMENT PARTS ..........Back Cover FULL 90 DAY WARRANTY ............ -
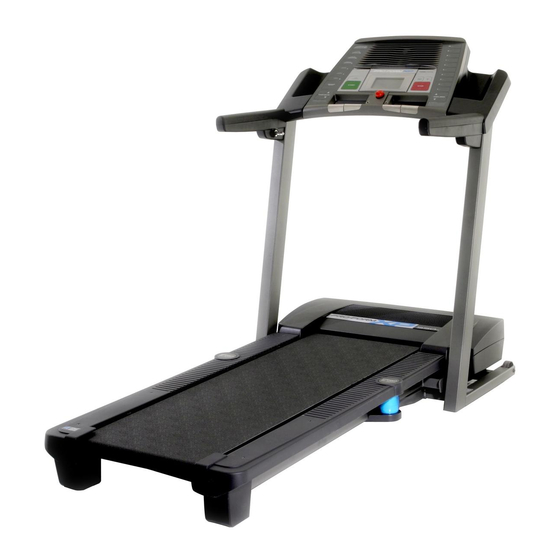
Page 4: Product View
Thank you for selecting the revolutionary PROFORM ® ing this manual, call 1-800-4-MY-HOME ®(1-800-469- XP 550S treadmill. The XP 550S treadmill offers an 4663).To help us assist you, please note the product model number and serial number before calling. The impressive array of features designed to make your model number of the treadmill is 831.29675.1. -
Page 5: Assembly
ASSEMBLY Make sure that the power cord is unplugged. Assembly requires two persons. Set the treadmill in a cleared area and remove all packing materials. Do not dispose of the packing materials until assembly is completed. Note: The underside of the treadmill walking belt is coated with high-performance lubricant. - Page 6 Remove t heknobfromthepin.Makesurethatthecollar andthespring areon thepin. Knob Insert t hepinintotheLeftBottom Handgrip ( 43),and tighten theknobbackontothepin. Place thetreadmill in thestorage position (seeHOW TO FOLD THETREADMILL F ORSTORAGE o npage21). Spring Collar Have a second person tipthe Uprights ( 97)forward and holdthem. Orient t heU-base (89)so theBasePads(99)areun- derneath it,andposition theU-base against t hebaseof theUprights (97)as shown.
- Page 7 Attach fourBasePads(99)tothebaseof theUprights (97)withfourBasePadScrews (40)inthelocations shown. Attach the two Wheels (94) to the base of the Uprights (97) with two Wheel Bolts (90), four Wheel Spacers (79), and two Nuts (20) as shown. Do not overtighten Nuts; the Wheels must be able to turn freely. With the help of a second person, carefully raise the Uprights (97) to the vertical position.
-
Page 8: To Plug In Power Cord
OPERATION AND ADJUSTMENT THE PRE=LUBRICATED WALKING BELT an equipment-grounding conductor and a grounding plug. Plug the power cord into a surge suppressor, Your treadmill features a walking belt coated with high- and plug the surge suppressor into an appropriate performance lubricant, iMPORTANT: Never apply sil- outlet that is properly installed and grounded accordance... -
Page 9: Console Diagram
CONSOLEDIAGRAM i FiT PROGRAM START SELECT FEATURES OF THE CONSOLE home stereo, computer, or VCR and play special iFIT.com MP3, CD, and video programs (iFIT.com MP3 The treadmill console offers an impressive array of programs, CDs, and vide.cassettes are available sepa- features designed to make your workouts more effec- rately), iFIT.com programs automatically control the tive. -
Page 10: To Turn On Power
HOWTOTURNONTHEPOWER crease and decrease buttons. Each time a Pluginthepower c ord(seepage 8). button is pressed, the speed setting will change by 0.1 mph; if a Locate thereset/off button is held down, the circuit b reaker n ear speed setting will change in increments of 0.5 thepower cord.Make mph. - Page 11 The left side of the dis- move the sheets of clear play will show the incline level of the treadmill, the plastic from the metal contacts. elapsed time, the ap- proximate number of In addition, make sure that grams of carbs you have Contacts burned, and the distance you have walked or run.
-
Page 12: To Use Preset Program
tings for the next four segments will be shown in HOW TO USE A PRESET PROGRAM the four columns to the right. insert the key fully into the console. When only three seconds remain in the first seg- ment of the program, both the Current Segment column and the column to the right will flash and a See HOW TO TURN ON THE POWER on page series of tones will sound. -
Page 13: To Create Custom Programs
Press the Start button or the Speed increase Follow your progress with the display. button and program the desired speed and in- See step 5 on page 10. cline settings. A moment after the button is pressed, the walking Measure your heart rate if desired. belt will begin to move. -
Page 14: To Use Custom Programs
speed settings for the next four segments are HOW TO USE CUSTOM PROGRAMS shown in the columns to the right. insert the key into the console. When only three seconds remain in the first seg- ment of the program, both the Current Segment column and the column to the right will flash, a See HOW TO TURN ON THE POWER on page series of tones will sound, and the speed setting... -
Page 15: Connecting Treadmill To Use Ifit Programs
HOW TO CONNECT YOUR PORTABLE STEREO Note: if your stereo has an RCA-type AUDIO OUT jack, see instruction A below, if your stereo has a 1/8" LINE OUT jack, see instruction B. If your To use iFIT.com MP3 or CD programs, the treadmill stereo has only a PHONES jack, see instruction C. - Page 16 HOW TO CONNECT YOUR HOME STEREO HOW TO CONNECT YOUR COMPUTER Note: if your stereo has an unused LiNE OUT jack, A. Plug one end of a long 1/8" to 1/8" stereo audio see instruction A below. If the LiNE OUT jack is cable (available at electronics stores) into the input jack on the console.
- Page 17 HOW TO CONNECT YOUR VCR HOW TO USE AN IFIT.COM MP3, CD, OR VIDEO PROGRAM Note: if your VCR has an unused AUDIO OUT jack, see instruction A below, if the AUDIO OUT jack is being used, see instruction B. If you have a TV To use an iFIT.com MP3, CD, or video program, the with a built=in VCR, see instruction B.
- Page 18 If the speed or incline settings are too high or too , Make sure that the audio cable is properly connected. low, you can manually override the settings at any time by pressing the Speed or Incline buttons on , if you are using a portable CD player and the the console.
- Page 19 eturn to the treadmill and stand on the foot rails. Find the clip attached to the key and slide the clip onto the waistband of your clothes. When the on-screen countdown ends, the program Our Web site at www.iFIT.com allows you to access will begin and the walking belt will begin to move.
- Page 20 THE INFORMATION MODE/DEMO MODE played in a store. When the console is in the demo mode, the power cord can be plugged in, the key can The console features an information mode that keeps be removed from the console, and the indicators in the track of the total number of hours that the treadmill has display will automatically appear in a preset sequence, been operated and the total number of miles that the...
-
Page 21: How To Fold And Move The Treadmill
HOW TO FOLD AND MOVE THE TREADMILL NOW TO FOLD THE TREADMILL FOR STORAGE Before folding the treadmill, adjust the incline to the lowest position. If this is not done, the treadmill may be perma= nently damaged. Remove the key and unplug the power cord. CAUTION: You must be able to safely lift 45 pounds (20 kg) to raise, lower, or move the treadmill. -
Page 22: Troubleshooting
TROUBLESHOOTING Most treadmill problems can be solved by following the simple steps below. Find the symptom that applies, and follow the steps listed, if further assistance is needed, call toll=free 1-800-4-MY-HOME ® (1-800-469-4663). PROBLEM: The power does not turn on SOLUTION: a. - Page 23 With the help of a second person, carefully raise the Uprights (97) as shown. Carefully pivot the Hood (93) off. Locate the Reed Switch (22) and the Magnet (19) on the left side of the Pulley (18). Turn the Pulley until the Magnet is aligned with the Reed Switch.
-
Page 24: Conditioning Guidelines
CONDiTiONiNG GUiDELiNES is to burn fat, adjust the speed and incline of the tread- mill until your heart rate is near the lowest number in your training zone. For maximum fat burning, adjust the speed and incline of the treadmill until your heart rate is near the middle number in your training zone. - Page 25 SUGGESTED STRETCHES The correct form for several basic stretches is shown at the right. Move slowly as you stretch--never bounce. 1. Toe Touch Stretch Stand with your knees bent slightly and slowly bend forward from your hips. Allow your back and shoulders to relax as you reach down toward your toes as far as possible.
-
Page 26: Part List
PART LiST--Model No. 831.29675.1 RO406A To locate the parts listed below, see the EXPLODED DRAWING attached in the center of this manual. Key No. Qty. Description Key No. Qty. Description Left Foot Rail Static Decal Foot Rail Screw 3/4" Tek Screw Console Belly Pan Clip Isolator Decal... - Page 27 Key No. Qty. Description Key No. Qty. Description Console Base Ground Screw 12" Blue Wire, M/F Optic Disk Ground Screw/Choke Screw 14" Blue Wire, F/F 6" Blue Wire, F/F Key Clip Handrail Extension 20" Black Wire, M/F Console Fan 22" Red Wire, M/F User's Manual Base Pad Spacer Rear Roller Bracket...
- Page 28 EXPLODED DRAWINGmModel No. 831.29675,1 Ro4o6A '_--2 111_ _-12...
- Page 29 EXPLODED DRAWINGmModel No. 831.29675,1 RO4O6A _112 107_...
-
Page 30: Full 90 Day Warranty
Your Home For repair - in your home - of all major brand appliances, lawn and garden equipment, or heating and cooling systems, no matter made it, no matter who sold For the replacement parts, accessories, and user's manuals that you need to do-it-yourself. For Sears professional installation of home appliances...