Table of Contents
Advertisement
Available languages
Available languages
Advertisement
Chapters
Table of Contents

Related Manuals for Aube Technologies TH104PLUS


Summary of Contents for Aube Technologies TH104PLUS
- Page 1 Owner’s Guide TH104PLUS Programmable Thermostat...
-
Page 2: Table Of Contents
Table of contents Overview About your new thermostat ..............1 Controls ....................2 Display....................3 Installation Installation guidelines ................4 Wiring ....................5 Thermostat mounting ................6 Clock and day setting ................7 Operation Automatic (Auto) mode................8 Manual (Man) mode ................10 Away mode.................. -
Page 3: About Your New Thermostat
TH104PLUS About your new thermostat This thermostat is designed to control an electric heating system such as a baseboard heater, a radiant ceiling, a convector or a fan-forced heater. The thermostat CANNOT be used with: • a resistive load under 0.83 A •... -
Page 4: Controls
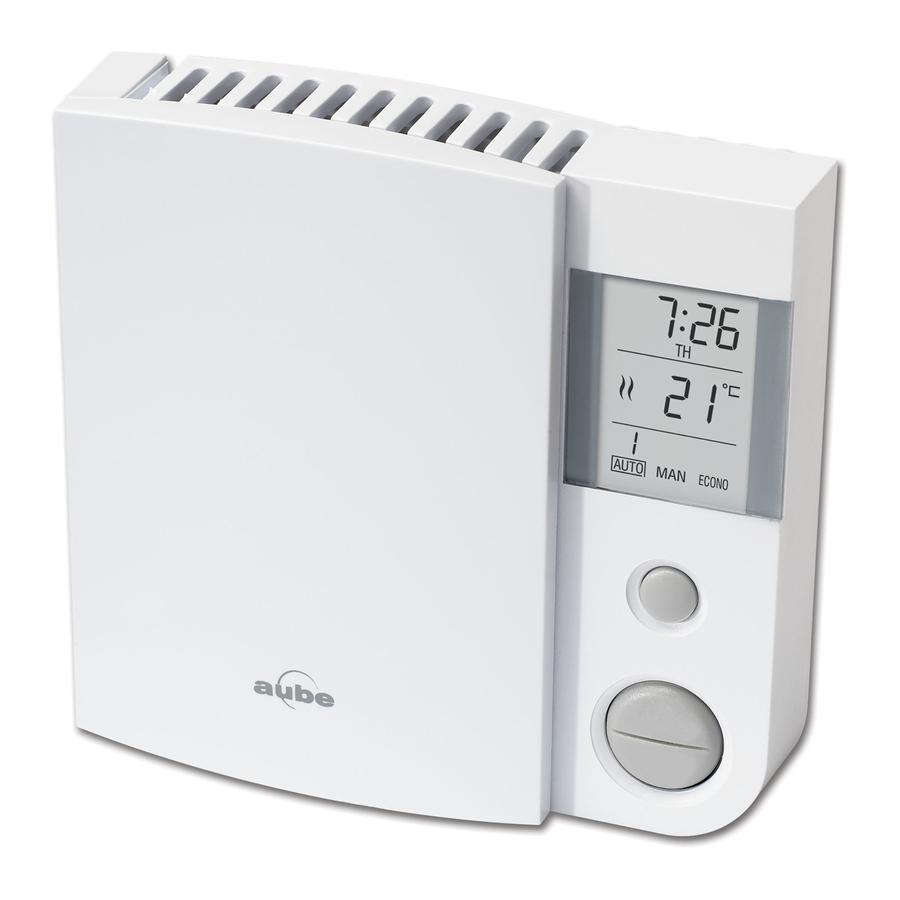
Owner’s Guide Controls Day button Hour button Minute button Program button Backlit screen * Return button Mode button (see pages 8 & 10) Up and Down buttons * The screen is backlit for 12 seconds when you press any button. -
Page 5: Display
TH104PLUS Display Time and day Setpoint temperature * Appears when power to the thermostat is cut off ndicates that the settings (see page 7) are locked (see page 11) Room temperature Appears if the thermostat is configured Heating intensity indicator... -
Page 6: Installation Guidelines
Owner’s Guide Installation guidelines TURN OFF POWER TO THE HEATING SYSTEM AT THE MAIN POWER PANEL TO AVOID ELECTRICAL SHOCK. All cables and connections must comply with local electrical codes. This thermostat has tinned copper wires for line and load connec- ... -
Page 7: Wiring
TH104PLUS Wiring Connect the thermostat wires to the power and to the load using solderless connectors for copper wires. 2-wire Installation 4-wire Installation... -
Page 8: Thermostat Mounting
Owner’s Guide Thermostat mounting Push the excess wires back inside the electrical box. Secure the thermostat to the electrical box using the provided screws. Insert the screws through either the right or left pair of mounting holes on the thermostat. NOTE: If there is a protective film or sticker on the thermostat’s screen, peel it off. -
Page 9: Clock And Day Setting
TH104PLUS Clock and day setting Press the Day button The clock must be set to set the day. when the time is incorrect Use the Hour and Min or flashes on the screen. buttons to set the clock. Press the button to exit. -
Page 10: Automatic (Auto) Mode
Owner’s Guide Automatic mode In Automatic mode, the thermostat adjusts its temperature set- point according to the period of the day. To place the thermostat in this mode, press the Mode button until Auto appears on the screen. The current period name also appears (unless the ther- mostat has not been programmed with a schedule). - Page 11 TH104PLUS Automatic mode (cont’d) To modify the schedule: Press the Pgm button. Each time you press the Pgm button, the thermostat displays one of the periods of the schedule in the following order: Weekdays Weekend (MO TU WE TH FR)
-
Page 12: Manual (Man) Mode
Owner’s Guide Manual (Man) mode To place the thermostat in Manual mode, press the Mode button until Man appears on the screen. In this mode, any modification to the temperature setpoint must be done manually. To set the temperature, press the Up or Down button. -
Page 13: Advanced Settings
TH104PLUS Advanced settings Press the Pgm button for 3 The first parameter seconds. appears when the To display the next parameter, menu is displayed. press the Pgm button. To modify the displayed parameter, press the Up or Down button. To exit the menu, press the button or do not press any button for 1 minute. - Page 14 Owner’s Guide Advanced settings (cont’d) Display Parameter Options Default setting Temperature unit °C / °F °C Time format 12 hr / 24 hr 24 hr No / Yes Away temperature 5.0°C - 30.0°C (41°F - 86°F) 15.0°C (59°F) Daylight Saving Time On / Off Year 00 - 99...
- Page 15 TH104PLUS Advanced settings (cont’d) Place at Yes if you have a fan-forced heater (to prevent premature burnout of the motor). Leave at No for better temperature regulation if you do not have a fan-forced heater. Away temperature Set the temperature you wish to use when the thermostat is in Away mode (see page 10).
-
Page 16: In Case Of Difficulty
Owner’s Guide In case of difficulty PROBLEM SOLUTIONS This condition is normal. Ensure that the heater capac- Thermostat is hot. ity does not exceed the thermostat’s maximum load. Correct it if any of the following situations exists: Wrong temperature is •... -
Page 17: Resetting The Thermostat (Default Settings)
TH104PLUS Resetting the thermostat (default settings) WARNING: All parameters, except the clock (time and day), return to their default settings when the thermostat is reset. Press the Mode button until Standby appears on the screen. Press the button for 6 seconds. -
Page 18: Specifications
Owner’s Guide Specifications Supply: 120/240 V AC, 60 Hz Minimum load: 0.83 A (resistive only) 200 W @ 240 V AC 100 W @ 120 V AC Maximum load: 14.6 A (resistive only) 3500 W @ 240 V AC 1750 W @ 120 V AC Display range: 0°C to 50.0°C (32°F to 99°F) Setpoint range: 5.0°C to 30.0°C (41°F to 86°F) Resolution: 0.5°C (1°F) -
Page 19: 3-Year Limited Warranty
Honeywell that the defect or malfunction was caused by damage which occurred while the product was in the possession of a consumer. Honeywell's sole responsibility shall be to repair or replace the product within the terms stated above. HONEYWELL SHALL NOT BE LIABLE FOR ANY LOSS OR DAMAGE OF ANY KIND,... -
Page 20: Customer Assistance
Owner’s Guide Customer Assistance If you have any questions about the product, contact us at: 705 Montrichard Avenue Saint-Jean-sur-Richelieu, Quebec J2X 5K8 Canada Tel: 1-800-831-2823 E-mail: aube.service@honeywell.com For more information on our products, go to www.aubetech.com Printed in USA 69-2691EF-01 11-2011... - Page 21 Guide du propriétaire TH104PLUS Thermostat programmable...
- Page 22 Table des matières Vue d'ensemble À propos de votre nouveau thermostat ..........1 Commandes ..................2 Affichage ....................3 Installation Consignes d'installation................. 4 Câblage ....................5 Installation du thermostat ..............6 Réglage de l'heure et du jour ..............7 Fonctionnement Mode Automatique (Auto) ..............
-
Page 23: À Propos De Votre Nouveau Thermostat
TH104PLUS À propos de votre nouveau thermostat Ce thermostat est conçu pour commander un système de chauffage électrique comme une plinthe chauffante, un plafond chauffant, un convecteur ou un ventiloconvecteur. Vous NE pouvez PAS utiliser ce thermostat avec : • une charge résistive inférieure à 0,83 A •... -
Page 24: Commandes
Guide du propriétaire Commandes Bouton Day Bouton Hour Bouton Minute Bouton Program Écran rétroéclairé * Bouton Return Bouton Mode (voir pages 8 et 10) Boutons Haut et Bas * L'écran est rétroéclairé pendant 12 secondes lorsque vous appuyez sur un bouton. -
Page 25: Affichage
TH104PLUS Affichage Heure et jour Température de consigne * Apparaît lorsque le thermostat est hors Indique le verrouillage tension (voir page 7) des réglages Température de la pièce Apparaît si le thermostat est configuré pour un Indique l'intensité ventiloconvecteur du chauffage... -
Page 26: Consignes D'installation
Guide du propriétaire Consignes d'installation METTRE LE SYSTÈME DE CHAUFFAGE HORS TENSION AU PANNEAU D'ALIMENTATION AFIN D'ÉVITER LES RISQUES DE CHOC ÉLECTRIQUE. Tous les câbles et toutes les connexions doivent être conformes aux codes de l'électricité locaux. Ce thermostat est muni de fils de cuivre étamés pour la connexion de ... -
Page 27: Câblage
TH104PLUS Câblage Connecter les fils du thermostat à l'alimentation et à la charge en utilisant les connecteurs sans soudure pour les fils de cuivre. Installation à quatre fils Installation à deux fils... -
Page 28: Installation Du Thermostat
Guide du propriétaire Installation du thermostat Pousser l'excédent de fils à l'intérieur de la boîte de raccordement. Fixer le thermostat à la boîte de raccor- dement en utilisant les vis fournies. Insérer les vis dans les trous de fixation de droite ou de gauche du thermostat. NOTE: Enlever le film protecteur ou l'autocollant sur l'écran du thermostat, le cas échéant. -
Page 29: Réglage De L'heure Et Du Jour
TH104PLUS Réglage de l'heure et du jour Appuyer sur le bouton Vous devez régler l'horloge lorsque l'heure n'est pas la Day pour régler le jour. bonne ou si elle clignote à Utiliser les boutons l'écran. Hour et Min pour régler l'heure. -
Page 30: Mode Automatique (Auto)
Guide du propriétaire Mode Automatique (Auto) En mode Automatique, le thermostat ajuste automatiquement sa température de consigne selon la période de la journée. Pour placer le thermostat en ce mode, appuyer sur le bouton Mode jusqu'à ce que Auto apparaisse à l'écran. Le nom de la période en cours apparaît aussi (à... - Page 31 TH104PLUS Mode Automatique (suite) Modification de l'horaire : Appuyer sur le bouton Pgm. Chaque fois que vous appuyez sur le bouton Pgm, le thermostat affiche une des périodes dans l’ordre suivant : Jours de semaine Fin de semaine (MO TU WE TH FR)
-
Page 32: Mode Manuel (Man)
Guide du propriétaire Mode Manuel (Man) Pour placer le thermostat en mode Manuel, appuyer sur le bouton Mode jusqu'à ce que Man apparaisse à l'écran. Dans ce mode, toute modification à la température de consigne doit être effectuée manuellement en appuyant sur le bouton Haut ou Bas. La température par défaut est de 21,0 °C (70 °F). -
Page 33: Paramètres Avancés
TH104PLUS Paramètres avancés Appuyer sur le bouton Pgm Le premier paramètre pendant trois secondes. apparaît lorsque le Pour afficher le paramètre menu est affiché. suivant, appuyer sur le bouton Pgm. Pour modifier le paramètre affiché, appuyer sur le bouton Haut ou Bas. - Page 34 Guide du propriétaire Paramètres avancés (suite) Affichage Paramètre Options Réglage par défaut Unité de la température °C / °F °C Format de l’heure 12h / 24h Ventiloconvecteur No (non) / Yes (oui) Température Absence 5,0 °C - 30,0 °C (41 °F - 86 °F) 15,0 °C (59 °F) Heure avancée On (activée) / Off (désactivée)
- Page 35 TH104PLUS Paramètres avancés (suite) Ventiloconvecteur Placer à Oui (Yes) si vous utilisez un ventiloconvecteur (pour éviter que le moteur s’use prématurément). Laisser à Non (No) pour une meilleure régulation de la température si vous n’utilisez pas un ventiloconvecteur. Température Absence Régler la température désirée lorsque le thermostat est en mode Absence (Away) (voir la...
-
Page 36: Dépannage
Guide du propriétaire Dépannage PROBLÈME SOLUTIONS Ceci est normal. S’assurer que l’appareil de chauffage Le thermostat est chaud. n’excède pas la charge maximale du thermostat. À corriger si l’une des situations suivantes existe : Le thermostat n'affiche pas • Le thermostat est exposé à un courant d'air. la bonne température. -
Page 37: Réinitialisation (Réglages Par Défaut)
TH104PLUS Réinitialisation (réglages par défaut) MISE EN GARDE : Tous les paramètres, sauf l’horloge (l’heure et le jour), reviennent à leurs valeurs par défaut une fois le thermostat réinitialisé. Appuyer sur le bouton Mode jusqu’à ce que Standby apparaisse à l’écran. -
Page 38: Fiche Technique
Guide du propriétaire Fiche technique Alimentation : 120/240 V CA, 60 Hz Charge minimale : 0,83 A (résistive seulement) 200 W @ 240 V CA 100 W @ 120 V CA Charge maximale : 14,6 A (résistive seulement) 3 500 W @ 240 V CA 1 750 W @ 120 V CA Plage d'affichage : 0 °C à... -
Page 39: Garantie Limitée De 3 Ans
Garantie limitée de 3 ans Honeywell garantit ce produit, à l'exception des piles, contre tout vice de fabrication ou de matière dans la mesure où il en est fait une utilisation et un entretien convenables, et ce, pour trois (3) ans à... -
Page 40: Service À La Clientèle
Pour toute question sur ce produit, prière de nous joindre à : 705, avenue Montrichard Saint-Jean-sur-Richelieu (Québec) J2X 5K8 Canada Tél: 1 800 831-2823 Courriel : aube.service@honeywell.com Pour de plus amples informations sur nos produits, visiter www.aubetech.com Imprimé aux É.-U. 69-2691EF-01 11-2011...