Table of Contents
Advertisement
Quick Links
Advertisement
Table of Contents

Related Manuals for Zte WP623


Summary of Contents for Zte WP623
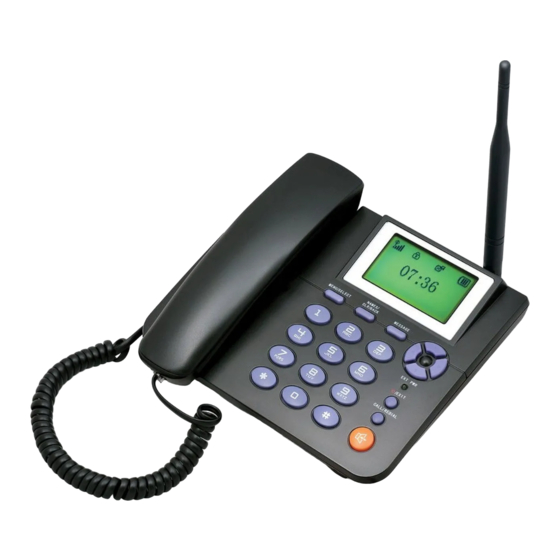
- Page 1 ZTE WP623 GSM Wireless Phone User Manual...
- Page 2 ZTE Corporation. The manual is published by ZTE Corporation. We reserve the right to make modifications on print errors or update specifications without prior notice.
-
Page 3: Table Of Contents
Contents 1 General Information..............6 1.1 Welcome..................6 1.2 Security..................6 1.3 For Your Safety ................6 1.4 Cleaning and Maintenance............9 1.5 Limit Warranty ................9 1.6 Limitation of Liability ..............9 2 Getting Started ..............11 2.1 Configuration ................11 2.2 Technical Specifications ............ - Page 4 4.1 New Message................22 4.2 Creating Message ..............22 4.3 Inbox..................23 4.4 Outbox ..................23 4.5 Preformatted Message .............. 23 4.6 Message Settings ..............23 5 Phone Menus ..............25 5.1 Viewing Calls ................25 5.2 Calls Duration ................25 5.3 Diverting Calls ................
- Page 5 9.1 Multitap Input ................38 9.2 Numbers Input ................38 9.3 eZiText Input................38 9.4 Symbols Input................38 10 Troubleshooting..............39...
-
Page 6: General Information
1 General Information 1.1 Welcome Thank you for choosing ZTE WP623 GSM Wireless Phone (hereinafter referred to as "phone"). To guarantee your phone always works in its best condition, please read this manual carefully and keep it for future use. - Page 7 explosive gases or explosive products being processed, because even if your phone is in idle state, it still transmits radio frequency (RF) energy. Therefore, power off your phone if required. Do not touch the antenna while calling. Otherwise it will affect the quality of calling and waste battery energy.
- Page 8 press CALL/REDIAL key to send. Do not attempt to disassemble the phone by yourself. Non-expert handling of the devices may damage them. Do not attempt to disassemble the mobile phone and battery by yourself. Changes and modifications made to the phone without the approval of manufacturer could void your authority to operate this phone.
-
Page 9: Cleaning And Maintenance
1.6 Limitation of Liability ZTE shall not be liable for any loss of profits or indirect, special, incidental or consequential damages resulting from or arising out of or in connection with using this product, whether or not ZTE had been... - Page 10 advised, knew or should have known the possibility of such damages.
-
Page 11: Getting Started
Parts Quantity Phone set Handset (Receiver) Ni-MH battery External power adapter Antenna Phone Receiver Cord 2.2 Technical Specifications Phone set Type WP623 Dimensions (Length×Width×Thickness) 200mm×170mm×77mm Weight About 870g (Battery Included) Battery Continuous Above 72h (Subject to Network) standby time Continuous... - Page 12 External Interface: (1) Antenna connector ANT (2) Data interface DATA (used for programming the phone; not used for GPRS) (3) External power socket (4) Battery switch BATT Power Supply:100V-240V( AC) 50/60Hz Please refer to the real objects for other relative parameters about the battery and charger.
-
Page 13: Key Instruction
2.3 Key Instruction Description MENU/SELECT Enter main Menu, select or confirm options in Menu and left bottom submenu on the display. In condition of character input, confirm the character chosen. Enter right bottom submenu on the display. Press CLR key to erase character while editing or dialing. -
Page 14: Lcd Screen Description
Description Power on/power off. Exit from any window interface to standby mode Send telephone number or redial. CALL/REDIAL In standby mode, press CALL/REDIAL key to enter to view all recent calls list. HANDFREE key Hand free call. 0~9 Number Use the number keys to enter numbers and characters. -
Page 15: Antenna
- During a call, alert may interrupt your call. - ZTE WP623 turns off automatically when in extreme low-voltage. 2.6 Switching Power Switch ZTE WP623 “BATT” at rear back of phone to “∣” to power on battery, and to “O” to power off battery supply. 2.6.1 Power-on... -
Page 16: Power-Off
When abnormal power blackout causes abnormal phone restart, please disconnect and connect again external power adapter, and then switch on/off ZTE WP623. Please switch BATT at rear back of phone to “O” to power off battery supply, or remove battery if phone won’t be in use for a long time. -
Page 17: Connecting The Network
are to avoid the illegal usage of SIM card and phone. To Enter PIN code of SIM card and Enter lock code to Unlock the phone, and then press MENU/SELECT key to confirm to start using the phone. If inputting wrong PIN three times continuously, SIM card will be locked by network. -
Page 18: Basic Operations
(Fri) 03/31/2006 Menu Names 1. Power-on ZTE WP623. 2. To either make or answer a call, you can pick up the receiver or press HANDFREE key, or key in number directly and press CALL/REDIAL key to dial. 3. Make a call or answer a call as steps detailed in the following. -
Page 19: Dialing A Number In The List
HANDFREE key and hook-on receiver afterwards). 3.1.5 Redialing ZTE WP623 supports saving dialed phone numbers. When pick up receiver or press HANDFREE key, press CALL/REDIAL key to display dialed numbers on the screen, use Up/Down key to select one dialed phone number, and then press CALL/REDIAL key to dial this number directly. -
Page 20: Answering A Call
last one dialed will not be saved. 3.2 Answering a Call When the phone rings, press CALL/REDIAL key directly, or pick up the receiver, or press HANDFREE key to answer. Usually, originating caller’s number displays in the screen. If the number is listed in the contacts already, the corresponding name will be shown. - Page 21 3. Press MENU/SELECT key to confirm or CLR/BACK key to return to the previous menu level. Press exit to standby mode. Bottom menu function: If options are displayed on the bottom of the screen, press MENU/SELECT key and then Up/Down key to select. Press MENU/SELECT key or CLR/BACK key to set or exit.
-
Page 22: Messages
4 Messages This is an introduction to knowing how to send, receive, erase short messages in your phone. Press MENU/SELECT key→ Short Messages, or press MESSAGE key directly to enter Short Messages menu. Short Messages submenu: New Msg, Inbox, Outbox, and Msg Settings. -
Page 23: Inbox
Choose one to Save the number or Send Message to the number. 4.5 Preformatted Message ZTE WP623 has a group of some common built-in phrases and sentences, such as, “Please call me immediately”, “Please wait, I am on the way.” etc. - Page 24 Templates: Some built-in phrases and sentences in phone. Write, edit and send templates, see “4.5 Preformatted Message”. Msg Centre: Input Message Centre number (contact network service provider to get), press Save to finish setting. Msg Validity: Set validity period as 1 Hour, 2 Hours, 6 Hours, 1 Day, 2 Days, 1Week, 1 Month or 6 Months within which the message is repeatedly sent by short message center till it is sent successfully.
-
Page 25: Phone Menus
5 Phone Menus Phone Menus includes Calls, Diverts, Firewall, etc. 5.1 Viewing Calls Information of All Calls, Missed Calls, Received Calls and Dialled Calls including the name, phone number, conversation time and Call Duration are saved in Calls. 1. Select Menu→ Phone Menus→ Calls. 2. -
Page 26: Diverting Calls
5.3 Diverting Calls Use Diverts to forward an incoming call to a preset designated phone number. After setting of call forwarding, phone will automatically dial network to set the function in active. Note: This function needs network support. Please consult with network service provider to get corresponding service application. - Page 27 in the list, “List Empty” will be displayed. 1. Key in phone number to Add New prefix directly, or select from Names. 2. Select Clear prefix list to delete all contacts in Friend List. 3. Or scroll to one contact listed and select Options: Add: Add another new contact prefix.
-
Page 28: Settings
6 Settings Press and select MENU/SELCET key→ Settings to enter Settings menu. The phone has different functions in Settings to meet your requirement. They are: Phone Settings, Display Settings, Audio, Clock Settings, Call Settings, Network Settings, Security Settings, and Factory Settings. -
Page 29: Audio Settings
6.3 Audio Settings 1. Select Menu→Settings→Audio. 2. You can adjust the tone and volume in submenu in the following, and press MENU/SELECT key to confirm. Volume:Press Up/Down key or Left/Right key to adjust the volume. Ringing Volume: Set the volume of the ring tone. Speaker Volume: Set the volume of the speaker. -
Page 30: Network Settings
Note: This function needs network support. Please consult with network service provider to get corresponding service application. On:Register and activate Call Waiting function. Off:Cancel Call Waiting function. Status:Check whether Call Waiting is activated or not. Select “On” to activate the Call waiting function. The network will notify you of an incoming call while you have a call in progress. -
Page 31: Factory Settings
Bar. 2. Set types of bar, press MENU/SELECT key. International Calls: Bar international call(s). All Except Home: Bar all calls except for home number. Incoming Calls: Bar incoming call(s). Incoming If Abroad: Bar incoming call(s) overseas. Outgoing Calls: Bar sending call(s). Cancel All: Cancel barring call(s) setting. -
Page 32: Toolkit
7 Toolkit Select MENU→Toolkit to enter Toolkit menu. The phone offers Alarm Clock in Toolkit. 7.1 Set Alarm Set Alarm Clock at a certain time. 7.1.1 Normal Alarm Set alarm alert at a normal time. The phone clock only alarms once. 1. -
Page 33: Contacts In Names
8 Contacts in Names Press CLR/BACK key in standby mode or any submenu to enter Names. You can save, search, view and edit contacts information in Names. If there is no contact in the list, “List empty” will be displayed. All the contacts will be list by the letter of the name. -
Page 34: Viewing All Names
8.3 Viewing all Names Information of all contacts including the name, phone number, group are displayed. 1. Press CLR/BACK key →Names. 2. Scroll Up/Down key to view contact and select one. Press CALL/REDIAL key to call out. 3. Or select one entry of the records and press Right key to view the information of the contact including the name, phone number, group. -
Page 35: Editing Names
8.5 Editing Names 1. Press CLR/BACK key →Names. 2. Press MENU/SELECT key to select Edit in Options. 3. Edit information of the contact selected including Number, Name, Group, etc. Press MENU/SELECT key to confirm, press # key to switch Text Input. 8.6 Deleting Names 1. - Page 36 Move SIM to mem.: Move all the contact information in SIM card to Phone’s memory. Delete All In SIM: Delete all of records in SIM card. Delete All In Phone: Delete all of records in Phone’s memory.
-
Page 37: Text Input
9 Text Input Your phone offers text input modes: Multitap Input (ABC/abc), Numbers Input (123), eZiText Input (Eng), and Symbol Input (Symbols). Input mode includes capital letter and lowercase mode. You can key in letters, digits, characters and symbols when writing text or editing contact record information in Names or Messages etc., following the common instruction in hereinafter table. -
Page 38: Multitap Input
9.1 Multitap Input Select Multitap Input (ABC/abc) — Each key stands for multiple letters. Press key till your letter appears. When the cursor moves, enter the next letter. “ABC” and “abc” stand for letters in capitalization and lowercase. 9.2 Numbers Input Select Numbers Input (123) —... -
Page 39: Troubleshooting
10 Troubleshooting If your phone appears following phenomenon in the process of application, please read following relative information at first. If the problems still can not be solved, please contact with the distributor or service provider. Problem Check Point When switching on the Please input your PIN Code which phone, it prompts “Enter offered with SIM card together. - Page 40 Problem Check Point message. or message centre setting, see “4.6 Message Settings”. Other abnormal Please first refer to user manual, then phenomenon. check whether power connected correctly or not, if there are no problems, please power off and re-start the phone again.