Table of Contents
Advertisement
FOUR INCH BELT AND
6 INCH DISC SANDER
ASSEMBLY AND OPERATING INSTRUCTIONS
3491 Mission oaks Blvd., CaMarillo, Ca 93011
VISIT OUR WEB SITE AT hTTP://WWW.hARBORfREIGhT.COM
Copyright
2006 by Harbor Freight Tools
©
this manual or any artwork contained herein may be reproduced in any shape
or form without the express written consent of Harbor Freight Tools.
for technical questions and replacement parts, please call 1-800-444-3353
93981
due to continuing improvements, actual product may
differ slightly from the product described herein.
. all rights reserved. no portion of
®
Advertisement
Table of Contents

Related Manuals for Central Machinery 93981


Summary of Contents for Central Machinery 93981
- Page 1 2006 by Harbor Freight Tools © this manual or any artwork contained herein may be reproduced in any shape or form without the express written consent of Harbor Freight Tools. for technical questions and replacement parts, please call 1-800-444-3353 93981 due to continuing improvements, actual product may differ slightly from the product described herein.
-
Page 2: Specifications
There is an increased risk of electric shock if your body is grounded. Do not expose power tools to rain or wet conditions. Water entering a power tool will increase the risk of electric shock. skU 93981 For technical questions, please call 1-800-444-3353 SPECIfICATIONS... -
Page 3: Personal Safety
Use safety equipment. Always wear eye protection. dust mask, non-skid safety shoes, hard hat, or hearing protection must be used for appropriate conditions. skU 93981 For technical questions, please call 1-800-444-3353 eliminates the need for the three wire grounded power cord... - Page 4 Always wear ANSI approved safety impact eye goggles and heavy work gloves when using the Belt Sander. Using personal safety devices reduce the risk for injury. safety impact eye goggles and work gloves are available from Harbor Freight Tools. skU 93981...
- Page 5 Avoid unintentional starting. Make sure you are prepared to begin work before turn- ing on the Belt sander. Do not force the Belt Sander. This tool will do the work better and safer at the speed and capacity for which it was designed.
-
Page 6: Grounded Tools: Tools With Three Prong Plugs
Tools marked “double insulated” do not require grounding. They have a special double insulation system which satisfies osHa requirements and complies with the applicable standards of Underwriters laboratories, inc., the Canadian standard association, and the national Electrical Code. (See figure B.) skU 93981 For technical questions, please call 1-800-444-3353 GROUNDING WARNING! -
Page 7: Extension Cords
12.1 – 16.0 16.1 – 20.0 Table A * Based on limiting the line voltage drop to five volts at 150% of the rated amperes. skU 93981 For technical questions, please call 1-800-444-3353 ExTENSION CORDS (120 OR 240 VOLT) ExTENSION CORD LENGTh... -
Page 8: Feet Placement
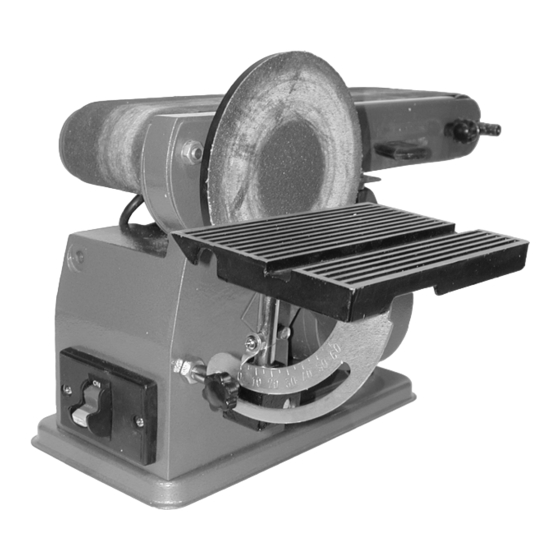
When unpacking, check to make sure that all the parts are included. refer to the assembly section, and the assembly drawing and Parts list at the end of this manual. if any parts are missing or broken, please call Harbor Freight Tools at the number on the cover of this manual as soon as possible. - Page 9 Place the Belt sander so that it is sitting on its feet. on disc (22), loosen the set screw (17) with a Hex Wrench (not supplied). slide the disc all the way onto the drive shaft (6) so that the set screw (17) faces the flat surface on the drive shaft (6).
-
Page 10: Controls And Adjustments
Bolt (20) with Flat Washer (21). securely tighten. OPERATING INSTRUCTIONS horizontal to Vertical Pivot hex Nuts (13) Angle Pointer (58) Switch (16) Switch Key skU 93981 For technical questions, please call 1-800-444-3353 Mounting the Block Stop Controls and Adjustments Belt Tracking Ad- justing Knob (35) Belt Tension... -
Page 11: Adjusting The Sanding Belt Tracking
The locking on/off switch (16) needs to have the switch key inserted before the switch can be used. This feature prevents unauthorized use of the Belt sander. The locking switch operates as follows. insert plastic switch key into locking switch (16). -
Page 12: Inspection, Maintenance, And Cleaning
Hex nuts (13). INSPECTION, MAINTENANCE, AND CLEANING WARNING! Make sure the Power Switch of the Belt Sander is in its “Off” position and that the tool is unplugged from its electrical outlet before performing any inspec- tion, maintenance, or cleaning procedures. -
Page 13: Sanding Belt Replacement
Push the Belt Tension lever (34) to the left to tighten the Belt (4). Turn on the Belt sander to test the new Belt. if the Belt tracks to one side, go to page 11 and follow the procedure for Belt Tracking adjustment. -
Page 14: Parts List
BUYER ASSUMES ALL RISK AND LIABILITY ARISING OUT Of hIS OR hER REPAIRS TO ThE ORIGINAL PRODUCT OR REPLACEMENT PARTS ThERETO, OR ARISING OUT Of hIS OR hER INSTALLATION Of REPLACEMENT PARTS ThERETO. skU 93981 For technical questions, please call 1-800-444-3353 PARTS LIST Qty. -
Page 15: Assembly Drawing
Note: if product has no serial number, record month and year of purchase instead. Note: some parts are listed and shown for illustration purposes only, and are not available individually as replacement parts. skU 93981 Page 15 For technical questions, please call 1-800-444-3353... -
Page 16: Warranty Card
LIMIteD 90 DAy/1 yeAr wArrAnty Harbor Freight Tools Co. makes every effort to assure that its products meet high quality and durability standards, and warrants to the original purchaser for a period of ninety days from date of purchase that the motor, the belts (if so equipped), and the blades (if so equipped) are free of defects in materials and workmanship.