Table of Contents
Advertisement
HAMMER DRILL - 1/2 INCH
HAMMER DRILL - 1/2 INCH
HAMMER DRILL - 1/2 INCH
HAMMER DRILL - 1/2 INCH
HAMMER DRILL - 1/2 INCH
V V V V V ARIABLE SPEED - REVERSIBLE
ARIABLE SPEED - REVERSIBLE
ARIABLE SPEED - REVERSIBLE
ARIABLE SPEED - REVERSIBLE
ARIABLE SPEED - REVERSIBLE
ASSEMBLY AND OPERATING INSTRUCTIONS
3491 MISSION OAKS BLVD., CAMARILLO, CA 93011
VISIT OUR WEB SITE AT HTTP://WWW.HARBORFREIGHT.COM
Copyright © 2003 by Harbor Freight Tools
this manual or any artwork contained herein may be reproduced in any shape
or form without the express written consent of Harbor Freight Tools.
For technical questions and replacement parts, please call 1-800-444-3353
45338
®
. All rights reserved. No portion of
Advertisement
Table of Contents

Related Manuals for Chicago Electric 45338


Summary of Contents for Chicago Electric 45338
- Page 1 Copyright © 2003 by Harbor Freight Tools this manual or any artwork contained herein may be reproduced in any shape or form without the express written consent of Harbor Freight Tools. For technical questions and replacement parts, please call 1-800-444-3353 45338 ®...
-
Page 2: Specifications
Keep bystanders, children, and visitors away while operating a power tool. Distractions can cause you to lose control. Protect others in the work area from debris such as chips and sparks. Provide barriers or shields as needed. SKU 45338 SPECIFICATIONS D e s c rip tio n 1 2 0 V A C , 6 0 H z , s in g le p h a s e , 6 .3 a m p s (lo a d ),... -
Page 3: Electrical Safety
This Double insulated Hammer Drill is equipped with a polarized plug (one blade is wider than the other). This plug will fit in a polarized outlet only one way. If the plug does not fit fully in the outlet, reverse the plug. - Page 4 25. When servicing a tool, use only identical replacement parts. Follow instructions in the “Inspection, Maintenance, And Cleaning” section of this manual. Use of unauthorized parts or failure to follow maintenance instructions may create a risk of electric shock or injury. SKU 45338 Tool Use and Care Service Page 4...
- Page 5 Avoid unintentional starting. Make sure you are prepared to begin work before turning on the Hammer Drill. Do not force the Hammer Drill. This tool will do the work better and safer at the speed and capacity for which it was designed.
-
Page 6: Grounded Tools: Tools With Three Prong Plugs
Laboratories, Inc., the Canadian Standard Association, and the National Electrical Code. (See Figure B above.) Double insulated tools may be used in either of the 120 volt outlets shown in the following illustration. (See Figure B above.) SKU 45338 GROUNDING WARNING! Figure B... -
Page 7: Extension Cords
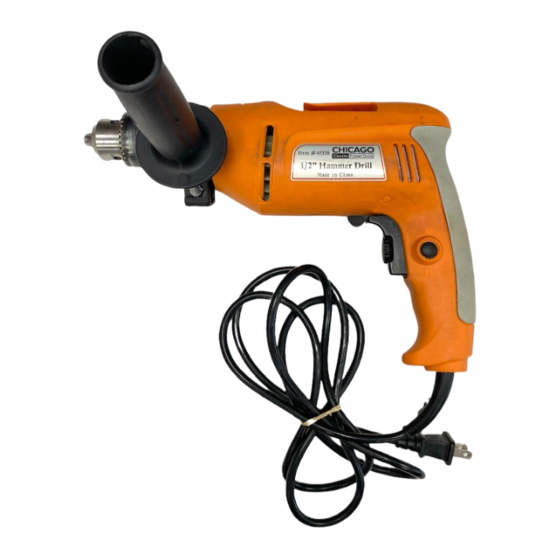
7.1 – 12.0 12.1 – 16.0 16.1 – 20.0 * Based on lim iting the line voltage drop to five volts at 150% of the rated am peres. SKU 45338 EXTENSION CORDS Table A (120 VO LT) EXTENSIO N CO R D LENG TH... - Page 8 Chuck (2) Depth Gauge (502) Auxiliary Handle (501) Chuck Key (3) If any parts are missing or broken, please call Harbor Freight Tools at the number on the cover of this manual as soon as possible. SKU 45338 Page 8...
-
Page 9: Drill Operation
OPERATING INSTRUCTIONS Inserting and Removing Drill and Hammer Bits The Hammer Drill is equipped with a keyed Chuck (2). Follow these steps to insert a bit. Insert the Chuck Key (3) into the Chuck (2) and turn counterclockwise to open the mouth of the Chuck. - Page 10 On the top of the Hammer Drill, push the Gear Setting Control to select plain drilling or hammer drilling. A symbol for a drill bit indicates plain drilling is selected. If a hammer is shown, it is set for hammer drilling. See Figure F below.
-
Page 11: Inspection, Maintenance, And Cleaning
Store in a clean and dry location when not in use. Periodically, using a rag and light oil, wipe drill bits and other steel parts of the drill to keep them from rusting. Periodically blow out the motor air vents of dust and debris using compressed air. -
Page 12: Parts List
Item No. 501. 502. NOTE: Some parts are listed and shown for illustra- tion purposes only and are not available individually as replacement parts. SKU 45338 PARTS LIST Description Qty. Screw, M6x25 Chuck Chuck Key Spindle Steel Ball, 3 Circle Seal... -
Page 13: Assembly Drawing
ASSEMBLY DRAWING SKU 45338 Page 13...