Table of Contents
Advertisement
Advertisement
Table of Contents

Related Manuals for Parrot ASTEROID CLASSIC


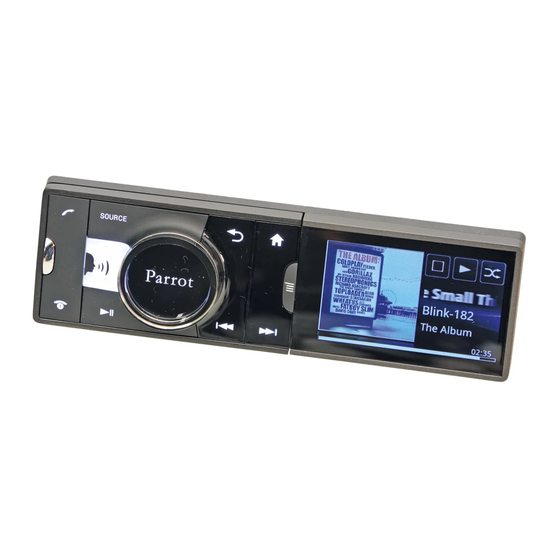
Summary of Contents for Parrot ASTEROID CLASSIC
- Page 1 User guide...
-
Page 2: Table Of Contents
Connecting two phones .................................13 Synchronising the phonebook .................................14 Phone .........................15 Receiving a call .................................15 Making a call .................................15 Using the Parrot ASTEROID Classic while on a call .................................17 Music .........................19 Using the voice recognition function .................................19 Radio .................................19 iPod .................................21 USB storage device .................................22... - Page 3 Internet .........................26 Connecting the Parrot ASTEROID Classic to the internet .................................26 Using the ASTEROID Market .................................28 Settings .........................31 Clock .................................31 Phone .................................31 Network .................................32 Audio .................................32 Music .................................35 Display .................................36 Troubleshooting .........................36 Before you begin .................................36 Problems while using the phone function .................................37...
-
Page 4: Before You Begin
A steering wheel control interface can be used to connect your vehicle’s steering wheel controls to your Parrot car stereo. With this interface, you will be able to make phone calls via the steering wheel controls while keeping your hands on the wheel. Refer to... -
Page 5: Installation
Installation N ote: We advise our custom ers to have the Parrot ASTEROID C lassic fitted by a professional. Safety instructions Turn the ignition off before installing the Parrot ASTEROID Classic. Install the Parrot ASTEROID Classic only on vehicles with a 12 V battery. -
Page 6: Installing The Car Stereo
2. Pull audio and power cables of the vehicle to the outside of the dashboard, through the mounting bracket. 3. Connect the audio and power connectors of the Parrot ASTEROID Classic to the ones of your vehicle. 4. Check the wiring (as explained in the Final check section). -
Page 7: Final Check
ASTEROID Classic. We recommend you connect all audio cables to the Parrot ASTEROID Classic even if you do not plan on using them. Route the audio cables to a suitable location in your vehicle such as the glove box or arm rest compartment. -
Page 8: Installing The Microphone
Installing the microphone We recommend that you slide the cable into the groove behind the door seal. If the cable runs above the pedals, ensure that it is properly secured. Wa rning: Do not run the m icrophone cable through the heating, ventilation or air conditioning system s or in front of the side airbags. -
Page 9: Installing The Gps Antenna
Installing the GPS antenna Install the GPS Antenna in an unobstructed area. Clean the dashboard, then use the adhesive located on the back of the GPS Antenna to attach it to the dashboard. Then wait for approximately 2 hours without handling the dongle to ensure that it adheres properly. Athermic windshields and windows with a built-in antenna can interfere with GPS reception and reduce the reliability of information from navigation applications. -
Page 10: Getting Started
N ote: With the exception of the Line Input source, audio sources that you use with the Parrot ASTEROID C lassic only appear in the SOU RC E m enu when they are connected. You have the possibility of deactivating display of the Line Input in the source m enu. -
Page 11: Customizing The Main Menu
To validate your entry, select OK. If your entry contains an error, select Connecting a phone to the Parrot ASTEROID Classic Compatibility Refer to the compatibility section of our website to check if your phone is compatible with the Parrot ASTEROID Classic. - Page 12 The Parrot ASTEROID C lassic is visible by default. Pairing a phone Prior to using the Parrot ASTEROID Classic with your phone for the very first time, you must initially pair both devices. To do so: 1. From your phone, search for Bluetooth® peripherals and select “Parrot ASTEROID Classic ".
-
Page 13: Connecting Two Phones
3. Select Delete. Managing the "Memory full" problem You can pair up to 10 devices with the Parrot ASTEROID Classic. If you attempt to pair an 11th phone, you will get the « Memory full » message. You must then delete a phone from the paired devices list. -
Page 14: Synchronising The Phonebook
You can receive calls to the main or secondary phones. Only the phonebook for your main phone may be accessed through the Parrot ASTEROID Classic. You can only make calls using the main phone. However, you can easily switch between the connected phones. To do so : 1. -
Page 15: Phone
1. Press the button to launch the voice recognition feature. > The Parrot ASTEROID Classic asks you the name of the contact you want to call. 2. Say the name of the contact and the type of number («Work», «Cellphone»...) if there are several numbers associated to your contact. - Page 16 If there are several phone numbers associated to the contact you want to call, you can specify the type of number: - Home - Work - Mobile - Other - At home - At work - Cellular - General - Office - Cell - Default - At office...
-
Page 17: Using The Parrot Asteroid Classic While On A Call
3. Select a number using the jogwheel and press the jogwheel to confirm. 4. Select to make the call. Using the Parrot ASTEROID Classic while on a call Adjusting the volume Use the jog wheel during a call to adjust the communication volume. The volume setting is saved for subsequent calls. - Page 18 Managing voice mail The Parrot ASTEROID Classic allows you to send DTMF while on call. To do so, press the jogwheel.Then select the numbers using the jogwheel. N ote: DTM F is a m echanism for navigating voice user interfaces using the phone's num eric keypad.
-
Page 19: Music
Several m inutes of loading m ay be necessary when connecting your audio peripheral (U SB / SD / iPod) to the Parrot ASTEROID C lassic for the first tim e, particularly if you are using audio peripheral with a large capacity or containing m any audio files. This loading tim e will allow your audio files to be accessible via voice recognition. - Page 20 Fullscan. N ote: A Fullscan is proposed while using the Parrot ASTEROID C lassic for the 1st tim e. If so, select Yes. At any time you can refresh the list of available stations. To do so, press the button and select Refresh.
-
Page 21: Ipod
Several m inutes of loading m ay be necessary when connecting your audio peripheral (U SB / SD / iPod) to the Parrot ASTEROID C lassic for the first tim e, particularly if you are using audio peripheral with a large capacity or containing m any audio files. This loading tim e will allow your audio files to be accessible via voice recognition. -
Page 22: Usb Storage Device
Several m inutes of loading m ay be necessary when connecting your audio peripheral (U SB / SD / iPod) to the Parrot ASTEROID C lassic for the first tim e, particularly if you are using audio peripheral with a large capacity or containing m any audio files. This loading tim e will allow your audio files to be accessible via voice recognition. -
Page 23: Sd Card
Several m inutes of loading m ay be necessary when connecting your audio peripheral (U SB / SD / iPod) to the Parrot ASTEROID C lassic for the first tim e, particularly if you are using audio peripheral with a large capacity or containing m any audio files. This loading tim e will allow your audio files to be accessible via voice recognition. -
Page 24: Analogue Audio Player
2 different phones without having to disconnect one of them . Compatibility You can use the Parrot ASTEROID Classic to listen to songs stored on your mobile phone or Bluetooth audio device. To do so, your phone / audio device must support the Bluetooth A2DP profile (Advanced Audio Distribution Profile). - Page 25 Bluetooth audio reception is displayed, then you can use this phone with the Parrot ASTEROID Classic via Bluetooth . Playing a music file If you are using a Bluetooth audio player for the first time, you have to pair both devices.
-
Page 26: Internet
N ote: To ensure optim um reception quality, do not connect your 3G key to the back of the Parrot ASTEROID C lassic: use a U SB cable to install the accessory on the dashboard (or any other unobstructed area). - Page 27 If you have a telephone that supports the Bluetooth profile, DUN (Dial-Up Networking) or PAN (Personal Area Network), the Bluetooth connecting your telephone to the Parrot ASTEROID Classic will allow for sharing of the telephone's 3G connection. 1. Connect your telephone to the Parrot ASTEROID Classic via Bluetooth .
-
Page 28: Using The Asteroid Market
N ote: Do not use the white iPod U SB port to connect your phone to the Parrot ASTEROID C lassic. 2. Select your APN (Access Point Name) from the suggested list, then check the option Select. - Page 29 Downloading and installing an application Before starting, you must create your account onASTEROID Market and link this account with your Parrot ASTEROID Classic (see previous sections). You can download an application from your Parrot ASTEROID Classic on the Asteroid market site. N ote: To reduce data consum ption, we recom m end you download your applications from the site https://www.parrotasteroid.com /asteroidm arket.
- Page 30 Buffer m em ory size depends on the capacity of the SD card that is inserted into Parrot ASTEROID C lassic. Data download stops when the buffer m em ory is full. To ensure that you do not continue to use 3G data, you must close the application.
-
Page 31: Settings
Settings Clock You will be asked to set the time and date the first time you use the Parrot ASTEROID Classic. Automatic update The Parrot ASTEROID Classic time can be updated automatically via the RDS signal. To activate automatic updating of time, select Settings >... -
Page 32: Network
Parrot ASTEROID Classic to determine your exact position. This information is required when you use geolocation or driving assistance applications. You can enable/disable this option when your Parrot ASTEROID Classic connects to the Internet. You can also activate this option by selecting Settings > Advanced settings >... - Page 33 - Select Line input to change the volume when you use the Parrot ASTEROID Classic with an audio player connected via the Jack / Jack cable. Using the Virtual Super Bass effect The Virtual Super Bass effect amplifies bass frequencies psychoacoustically.
- Page 34 Changing the balance You can change the sound balance in the passenger cell to achieve optimal listening comfort for all occupied seats in your vehicle. To do this: 1. Select AudioFX > Balance. 2. Use the knob to adjust the balance (right / left) and press the knob to confirm. 3.
-
Page 35: Music
If there are no images included in the tags of your audio files, you can add an image in .jpg format to the corresponding folder. If there are several images in the folder, the Parrot ASTEROID Classic will display the image entitled cover.jpg by preference. N ote: The im age size m ust be less than 1 M B. -
Page 36: Display
Refer to the Checking the wiring section for more information. Reset the Parrot ASTEROID Classic. To do so, remove the faceplate then use a paper clip to press the Reset button. Hold down the Reset button for 3 seconds. -
Page 37: Problems While Using The Phone Function
Problems while using the music function Several minutes of loading may be necessary when connecting your audio peripheral (USB / SD / iPod) to the Parrot ASTEROID Classic for the first time, particularly if you are using audio peripheral with a large capacity or containing many audio files. -
Page 38: General Information
General information Warranty Without prejudice of legal warranty, Parrot products are warranted during 1 year from the date of purchase for defects in materials and workmanship, provided that no deterioration to the product has been made, and upon presentation of proof of purchase (invoice) to the retailer. - Page 39 As part of our ongoing concern to upgrade and improve our products, the product that you have purchased may differ slightly from the model described in this guide. If so, a later version of this guide might be available in electronic format at Parrot’s website at www.parrot.com.
- Page 40 Declaration of Conformity We, Parrot S.A. 174 quai de Jemmapes, 75010 Paris, France, declare under our sole responsibility that our product, the Parrot ASTEROID Classic to which this declaration relates is in conformity with appropriate standards EN 60065 :2002/A1 :2006/A11 :2008, EN 50371 (2002), EN 300328 v1.7.1 and EN 301 489-17 v1.3.2 following the provision of Radio Equipment and...