Table of Contents
Advertisement
Dear customer
Thank you for purchasing this product.
For optimum performance and safety, please read these instructions carefully.
Before connecting, operating or adjusting this product, please read the instructions completely.
Please keep this manual for future reference.
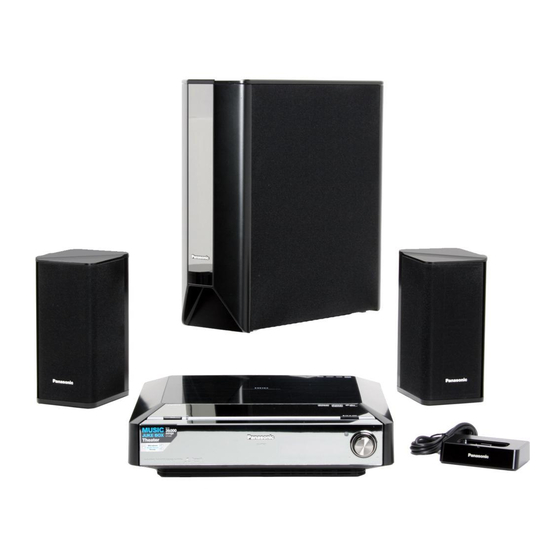
System
Main unit
Front/center
speakers
Subwoofer
Region number supported by this unit
Region numbers are allocated to DVD players and DVD-Video according to
where they are sold.
≥The region number of this unit is "2".
≥
The unit will play DVD-Video marked with labels containing "2" or "ALL".
Web Site: http://www.panasonic-europe.com
[Note]
"EB" on the packaging indicates the United Kingdom.
EB
SC-PTX7
SA-PTX7
SB-FCX9
SB-HWX7
Operating Instructions
DVD Home Theater Sound System
Model No.
VOLUME
SC-PTX7
Example:
2
2
3
ALL
5
RQT8927-B
Advertisement
Table of Contents

Related Manuals for Panasonic SC-PTX7


Summary of Contents for Panasonic SC-PTX7
-
Page 1: Operating Instructions
Region numbers are allocated to DVD players and DVD-Video according to Example: where they are sold. ≥The region number of this unit is “2”. ≥ The unit will play DVD-Video marked with labels containing “2” or “ALL”. Web Site: http://www.panasonic-europe.com [Note] “EB” on the packaging indicates the United Kingdom. RQT8927-B... -
Page 2: Features
(➜ page 44) (➜ page 74) VOLUME By using the optional Panasonic wireless audio kit SH-FX570K (not included), you can enjoy You can import WMA/MP3 from a PC via a audio tracks from your PC on this unit network connection. -
Page 3: Caution For Ac Mains Lead
Caution for AC Mains Lead For your safety, please read the following text carefully. 2. Replace the fuse and close or attach the fuse cover. This appliance is supplied with a moulded three pin Figure A Figure B mains plug for your safety and convenience. Fuse Fuse A 5-ampere fuse is fitted in this plug. -
Page 4: Table Of Contents
Table of contents ■ Information Features ............. 2 Getting Caution for AC Mains Lead....... 3 Disc handling care ........19 Started Unit care ........... 19 ■ Read Me First Discs used with this unit ......20 Safety precautions ........6 About compatible USB devices ..... - Page 5 ■ Advanced radio operations ■ OPTION port Advanced Operating iPod with this unit....72 Advanced radio operations ....59 Operations Playing tracks of iPod with the remote Setting preset stations automatically..59 control for this unit......... 73 Selecting the preset channels ....59 Recording tracks from iPod to the HDD ..
-
Page 6: Safety Precautions
Do not spray insecticides onto or into the unit. They misused, compromised, or any damage or loss occurs contain flammable gases which can ignite if sprayed as a result, Panasonic will not accept any responsibility. into the unit. Please be aware of this before using this unit. -
Page 7: Hdd (Hard Disk Drive) Handling Care
HDD (Hard disk drive) handling care The HDD is a high precision recording instrument and because of its long recording capability and high speed operation it is a very special device that is easily susceptible to damage. ∫ The HDD is a device that is not built to withstand vibration/shock or dust Depending on the setup environment and handling of the HDD some content may become damaged and play and recording may no longer be possible. -
Page 8: Accessories
≥Most major credit and debit cards accepted. ≥All enquiries transactions and distribution facilities are provided directly by Panasonic UK Ltd. ≥It couldn’t be simpler! Your attention is drawn to the fact that the recording ≥Also available through our Internet is direct shopping... -
Page 9: Control Reference Guide
Control reference guide QUICK START GUIDE QUICK START GUIDE QUICK START GUIDE Remote control Instructions for operations are generally described using the remote control. 1 Turn the unit on (➜ page 16) 2 Select the HDD drive (➜ page 31) 3 Select the DVD/CD drive 4 Select channels and title numbers, etc./Enter numbers 5 Cancel items... - Page 10 Control reference guide QUICK START GUIDE QUICK START GUIDE QUICK START GUIDE Main unit When opening and closing the front cover, be careful not to touch the standby/on switch, especially during recording. OPEN/CLOSE SELECTOR VOLUME VOLUME TUNING MUSIC PORT Adjust the volume of the main unit.
-
Page 11: Progress Indicator
The unit’s display DDTS DDTS DDTS TG RND RND D.MIX D.MIX D.MIX SLP SLP MONO MONO MONO ST CT CT ST CT EQ H.BASS EQ H.BASS EQ H.BASS VS VS VS W2 W2 1 Lights when connected USB device is ready to use. ;... -
Page 12: Step1 Speaker Location
Speaker location STEP QUICK START GUIDE QUICK START GUIDE QUICK START GUIDE This unit comes equipped with a Dolby Virtual Speaker circuit installed. Using just the front/center speakers, the subwoofer, and by reproducing acoustic effects very similar to 5.1ch surround, you can enjoy a true “home theater” experience even within a limited space. - Page 13 Speaker installation options ∫ Attaching to a wall You can attach the front/center speakers to a wall. ≥The wall or pillar on which the speakers are to be attached should be capable of supporting 10 kg per screw. Consult a qualified building contractor when attaching the speakers to a wall. Improper attachment may result in damage to the wall and speakers.
-
Page 14: Step2 Basic Connections
Basic connections STEP QUICK START GUIDE QUICK START GUIDE QUICK START GUIDE Included parts to be used Speaker cable for front/ Speaker cable for FM indoor aerial center speakers subwoofer Using FM outdoor aerial (optional) (➜ page 59). ≥Look on the bottom of the speakers to identify the left and right speakers. Speaker cable for front/ White center speakers... - Page 15 AC mains lead Television (not included) Sound from the television (➜ page 38, To play audio from your television through this unit’s speakers) 21-pin Scart lead (not included) SPEAKERS S-VIDEO VIDEO TV IN CENTER (8 ) SUB- WOOFER DIGITAL (4 ) (TV) COMPONENT OPTICAL...
-
Page 16: Step3 Performing Quick Setup
Performing QUICK SETUP STEP QUICK START GUIDE QUICK START GUIDE QUICK START GUIDE Press [3 4] to select “Yes” and press [ENTER]. Setup QUICK SETUP Select the type of TV you have connected. Standard (Direct View TV) CRT Projector LCD TV/Projector Projection TV SELECT Plasma TV... -
Page 17: Step4 Setting The Clock
Setting the clock STEP QUICK START GUIDE QUICK START GUIDE QUICK START GUIDE Press [3 4] to select “Setting the Day and Time” and press [ENTER] . Setting the Day and Time Adjusting Time - - : - - SELECT VOLUME ENTER CANCEL... -
Page 18: Step5 Setting The Fm Radio Stations Presets
Setting the FM radio stations presets STEP QUICK START GUIDE QUICK START GUIDE QUICK START GUIDE Setting preset channels Up to 30 stations can be set. Preparation To display the picture turn on the television and select BAND the appropriate video input to suit the connections to SELECT this unit. -
Page 19: Disc Handling Care
Disc handling care ∫ How to hold a disc ∫ Handling precautions ≥Do not attach labels or stickers to discs. (This may DO NOT cause disc warping and un-balanced rotation, Do not touch the rendering it unusable.) recorded surface. ≥Write on the label side of the disc only with a soft, oil- ∫... -
Page 20: Discs Used With This Unit
Discs used with this unit Discs that can be recorded to this unit’s HDD ([HDD]) Disc Logo Data type Remarks Music discs ≥This unit is not compatible with HDCD. ≥Operation and sound quality of CDs that do [CD] not conform to CD-DA specifications (copy control CDs, etc.) cannot be guaranteed. - Page 21 ∫ Recorded discs ( ≤ : Can be used, : Cannot be used) — Recorded on a Recorded on PC, etc. Necessity DVD recorder, etc. Disc Logo §6 of finalize [DVD-VR] §2 [DVD-V] §4 [WMA] [MP3] [JPEG] [MPEG4] [DivX] ≤ ≤...
-
Page 22: Tips For Making Data Discs
DVD-RAM standard)/MPEG4 (Simple Profile) video system/G.726 audio system] “.ASF” [MPEG4] DVD-R/RW recorded with the Panasonic SD multi cameras or DVD recorders with this “.asf” CD-R/RW unit. ≥The recording date may differ from that of the actual date. ≥Plays all versions of DivX video (including DivX ®... -
Page 23: About Compatible Usb Devices
About compatible USB devices The USB connectivity enables you to connect and play or record tracks or files from USB mass storage class devices. Typically, USB memory devices (Bulk only transfer). ∫ Compatible devices Devices which are defined as USB mass storage class: –USB devices that support bulk only transfer. -
Page 24: Utilizing The Start Menu
Utilizing the Start menu By using the Start menu you can access the main functions quickly and easily. Press [START]. Start Listen Watch Import/Record Setup ENTER Main Screen Press [3 4] to select an item and press [ENTER]. Each sub-level menu is displayed. Follow the on-screen instructions for operation. Listen: Import/Record: Play music or receive radio broadcasts... -
Page 25: Before Recording
Before recording A brief introduction about recording and importing from a PC Recording This unit can record audio to the internal HDD from a variety of sources including commercial CDs, radio, music files (WMA/MP3), and audio from externally connected devices (portable digital audio players, etc.). -
Page 26: You Can Make These Kinds Of Recordings
Before recording You can make these kinds of recordings Recording tracks from a Digital music CD (CD-DA) recording (Commercial CD, Recordable CD) Recording WMA/MP3 tracks from recordable discs Analogue This unit’s HDD (Recordable CD or DVD) or recording USB devices VOLUME Analogue Recording from the FM radio... -
Page 27: Recording Modes
Recording modes With these settings you can adjust the audio quality when recording tracks to the HDD. Recordings made with higher bitrates use more space, reducing the total available space on the HDD. Recording mode Recording mode/ Possible Explanation bitrate recording time Higher The audio signal is digitally recorded without... -
Page 28: Recording From A Cd
Recording from a CD a CD Setting the recording mode/ recording method Use the following methods to change the settings for audio quality of recordings and how recording is executed. ≥You will also perform this procedure when SELECT recording audio formats other than CD. Items VOLUME displayed will change depending on the audio CANCEL... -
Page 29: Basic Recordings
To record a track while playing Basic recordings [Possible only when the recording method is set to “Listening while Recording” (➜ page 28, step 5)]. On the remote control: press [¥ HDD REC]. While the disc is playing, press [¥ HDD REC]. On the main unit: press [¥... -
Page 30: A Brief Introduction About Search And Playback Of Tracks Recorded To The Hdd
A brief introduction about search and playback of tracks recorded to the HDD You can easily search for tracks that have been recorded to this unit’s HDD by using a variety of categories based on your preferences. From the lists created by your search, you can select the tracks that you want to listen to. -
Page 31: Playing Tracks From The Hdd
Playing tracks from the HDD Operations during playback STOP Stop SELECT VOLUME CANCEL CANCEL PAUSE Pause STOP STOP PAUSE PAUSE PLAY PLAY ≥Press [1] (PLAY) to restart play. MENU PLAYLIST FUNCTIONS Skip ≥Operate in the Main Screen. ENERGETIC MELLOW RELAXING EMOTIONAL HDDREC CH SELECT... -
Page 32: Searching For Tracks In The Hdd
Searching for tracks in the HDD You can use several methods to easily find tracks in the HDD that you want to listen to. Searching for/selecting tracks in the HDD 1 From the Music 2 Select the desired playlist. 3 Tracks are shown 4 Playback starts. - Page 33 Searching by album name Searching by artist name From the top menu of the Music Collection From the top menu of the Music Collection Press [3 4] to select “Albums” Press [3 4] to select “Artists” and and press [ENTER]. press [ENTER].
- Page 34 Searching for tracks in the HDD Press [3 4] to select the track and Searching from various user- press [ENTER]. specific playlists ≥With [2 1] you can select the other playlists. From the top menu of the Music Collection The selected track starts playing. Press [3 4] to select “Other ≥The playlist including the selected track will Playlists”...
- Page 35 Music Shuffle TIPS Tracks are automatically Using Music Shuffle directly with the remote selected from the Music control Shuffle collection playlist. ENERGETIC MELLOW RELAXING EMOTIONAL This function generates playlists that contain only tracks that have been analysed and identified as By pressing the “MUSIC SHUFFLE”...
-
Page 36: Playing A Cd Or Vcd
Playing a CD or VCD Operations during playback STOP Stop SELECT The position is memorized when “RESUME” VOLUME CANCEL CANCEL appears on the unit’s display. ≥Press [1] (PLAY) to resume. (Resume play) STOP STOP PAUSE PLAY PLAY ≥Press [∫] to clear the position. MENU PLAYLIST MENU PLAYLIST FUNCTIONS... -
Page 37: Playing Dvd-Video, Recordable Dvd Or Dvd-Audio
Playing DVD-Video, recordable DVD or DVD-Audio Operations during playback STOP Stop The position is memorized while “RESUME” is on the unit’s display. SELECT ≥Press [1] (PLAY) to resume. (Resume play) ≥Press [∫] to clear the position. VOLUME CANCEL CANCEL ≥Even after the unit is turned off or the selector is changed, the position is memorized (Normal STOP STOP... -
Page 38: Different Methods Of Play For Recordable Dvds
Playing DVD-Video, recordable DVD To play audio from your television or DVD-Audio through this unit’s speakers Different methods of play for recordable DVDs [DVD-VR] ≥Titles appear only if they have been entered. ≥You cannot edit playlists and titles. SELECT SELECT Playing the programs VOLUME VOLUME... -
Page 39: Using The Fm Radio
Using the FM radio Selecting the preset channels To preset channels (➜ page 18, Setting preset channels) SELECT §1 Press [TUNER] to switch the VOLUME selector to “FM”. CANCEL CANCEL Press the numbered buttons to STOP PAUSE PLAY select the channel. MENU PLAYLIST MENU PLAYLIST FUNCTIONS... -
Page 40: Recording Wma/Mp3 On Recordable Discs Or Usb Devices
Recording WMA/MP3 on recordable discs or USB devices [WMA] [MP3] To return to the previous screen WMA/MP3 tracks from recordable discs or USB devices Press [RETURN]. will be recorded to the HDD as an analogue recording. ≥WMA/MP3 recording is performed in “Listening while NOTE Recording”... -
Page 41: Recording Fm Radio Broadcasts
Recording FM radio broadcasts ≥When dividing tracks, create at least a 2-second You can record FM radio broadcasts to the HDD. After space between two tracks. (Tracks divided with less recording starts, track data will be recorded and divided than 2-second of space cannot be divided.) using the time settings selected before the recording ≥Tracks recorded in “Manual”... -
Page 42: Recording Audio From External Devices
Recording audio from external devices You can record audio tracks to the HDD from externally Press [¥ HDD REC]. connected devices. After recording starts, track data will Auto 5 Minutes, Auto 10 Minutes, Manual: be recorded and divided using the time settings Recording starts. - Page 43 NOTE ≥Audio from external devices cannot be recorded by pressing [¥ CD 1HDD] on the main unit. Use [¥ HDD REC] on the remote control. ≥The audio may sound broken up in the space between tracks recorded to the HDD. ≥Depending on the audio quality or volume of external devices connected, obtaining the title information with the Gracenote database, the...
-
Page 44: Importing Wma/Mp3 From A Pc
Importing WMA/MP3 from a PC [WMA] [MP3] Main unit operations With a network connection (LAN home network), you From the Main Screen (➜ page 24) can save WMA/MP3 data from your PC in the HDD of Press [SUB MENU]. this unit. Press [3 4] to select “Import from PC”... - Page 45 Tracks that finished importing up to the point stopped problems such as tracks to fail to import, or imported can be recorded. tracks may be unusable, etc. Panasonic and/or its retailer’s responsibility are limited to gross negligence To return to the previous screen or malicious intent by Panasonic and/or its retailers.
-
Page 46: Managing Data On The Hdd
Managing data on the HDD [HDD] Performing conversion and analysis You can increase the available disc space on the HDD immediately or you can obtain detailed information about the HDD/ tracks. AAC conversion and analysis for Music Shuffle is usually executed two minutes after the unit is set to Preparation standby mode. -
Page 47: Compressing Lpcm Tracks To Aac
Compressing LPCM tracks to AAC Viewing track or HDD information By converting tracks recorded in LPCM to AAC, you can Displays the detailed information of the track or HDD. increase the amount of available space on the HDD. Compression is performed on the playlist that includes From the Main Screen (➜... -
Page 48: Playing Music Or Video Files On Recordable Discs Or Usb Devices
Playing music or video files on recordable discs or USB devices [WMA] [MP3] [JPEG] [MPEG4] Playing from the selected item (Navigation [DivX] (Discs only) Menu) For information about which data formats can be played Press [MENU]. on this unit, refer to pages 20 23, “Discs that can be played”, “About compatible USB devices”. -
Page 49: Playing Highmat
∫ Searching by a content or group title About DivX VOD content Press [MENU]. [DivX] (Discs only) ≥Press [2 1] to highlight a group title to search a group, or a content title to search its content. DivX Video-on-Demand (VOD) content is encrypted for copyright protection. -
Page 50: Play Mode Settings Of Tracks Recorded On The Hdd
Play mode settings of tracks recorded on the HDD [HDD] Random playback You can configure various playback methods of tracks recorded on the HDD, such as repeat playback, random playback or play range (setting that defines the end Press [PLAY MODE]. point of playback). -
Page 51: Changing The Play Range Settings
Changing the play range settings Press [PLAY MODE]. Music Collection Play Mode Settings Repeat Playback Random Playback Play Range Playlist ENTER RETURN Press [3 4] to select “Play Range” and press [ENTER]. Play Range Settings One Track Playlist Play All Playlists ENTER Cancel Press [3 4] to select the play range and press... -
Page 52: Various Playback Methods Of Discs Or Data On A Usb Device
Various playback methods of discs or data on a USB device [DVD-V] [DVD-VR] [DVD-A] [CD] [VCD] If “Picture Adjustment” is selected, on-screen picture [WMA] [MP3] [JPEG] [MPEG4] [DivX] §1 §1 §2 adjustments appear. §1 Except for WMA/MP3 files recorded on this unit’s e.g., Contrast adjustment Contrast §2 Discs only... -
Page 53: Switching Subtitles And Soundtracks
Press [ENTER] and [3 4] to select “ALL”, then press disc has the subtitle information. [ENTER] again to register. ≥Subtitle on/off information cannot be recorded using Panasonic DVD Changing or clearing the program Recorders. Press [3 4] to select an item. - Page 54 Various playback methods of discs or data on a USB device Changing play speed Changing the order and speed of play [DVD-VR] [DVD-V] All group play While playing [DVD-A] Press [FUNCTIONS]. While stopped Press [3 4] to select “Other Settings”and Press [PLAY MODE] several times.
-
Page 55: Other Convenient Features
Other convenient features Displaying current playback condition (Quick OSD) Press [QUICK OSD]. Basics ------------> Details ^-------- Off ,-------b ∫ Basics e.g., [DVD-V] Current playback number Elapsed play time 0 : 00 : 22 Title Chapter Time Playback condition Program Playback Play mode Current position ∫... -
Page 56: Using On-Screen Menu
Various playback methods of discs or data on a USB device Using on-screen menu The on-screen menu, which appears when is pressed while the disc is playing or stopped, allows you [FUNCTIONS] to turn subtitles on or off, switch audio tracks, and change a variety of other settings. Functions Title 2 / 5... -
Page 57: Play Menu
If you have chosen “480p/576p”, “720p”, Other Settings “1080i” or “1080p” (➜ left), select the method of conversion to suit the type of Play Speed (➜ page 54, Changing play speed) material. ∫ Play Menu ≥When the tray is opened, the setting will return to Auto or Auto1. -
Page 58: Audio Menu
Various playback methods of discs or data on a USB device ∫ Picture Menu Just Fit Zoom (➜ page 52, Zoom) With HDMI connection (When “Video Manual Zoom (➜ page 52, Zoom) Mode” is set to “On”) (➜ page 87, “HDMI” menu) Video contents Bit Rate Display On ,------. -
Page 59: Advanced Radio Operations
Advanced radio operations Radio operations are described mainly with the remote Using FM outdoor aerial (optional) control. Use a television aerials (not included) if FM radio You can alternatively use the corresponding button on reception is poor. the main unit. ≥Disconnect the FM indoor aerial. -
Page 60: Editing Playlists
Editing playlists [HDD] Creating a user playlist/adding tracks You can create a user playlist with the tracks you like in the order you want them to play. You can also edit the One playlist can contain up to 99 tracks. order of tracks in playlists other than just the user While the playlist you want to add tracks from is playlists. -
Page 61: Removing Tracks From A Playlist
Removing tracks from a playlist Changing the order of a playlist Tracks can be removed from the playlists while keeping You can change the order of playlists. This function can the tracks on the HDD. This function can be used with be used with playlists “User Playlists”, “Favorites”, playlists “User Playlists”... -
Page 62: Changing The Name Of A Playlist
Editing playlists ∫ Entering text Changing the name of a playlist You can give names to recorded tracks, etc. You can change the names of playlists. This function can be used with playlists “User Playlists”, “Analogue The maximum number of characters: Recorded”, “Artists”, and “Albums”. -
Page 63: Deleting A User Playlist
Deleting a user playlist Removing a track from “Favorites” This function will delete the user playlists, but the tracks While stopped, press [SUB MENU]. will remain on the HDD. Press [3 4] to select “Edit Playlist” and press [ENTER]. While the user playlist that you want to delete is Press [3 4] to select “Remove Track(s) from stopped, press [SUB MENU]. -
Page 64: Setting Of Music Shuffle Information
Editing playlists Setting of Music Shuffle information Clearing the history for “Most Often Played” and/or “Recently Ripped” You can set if this unit will use Music Shuffle information playlists indicated in the track when generating Music Shuffle lists. You can clear the history and create new “Most Often Played”... -
Page 65: Deleting Tracks
Deleting tracks [HDD] Unnecessary tracks can be deleted from the HDD. You NOTE can select and delete a single track, or several tracks at ≥When a track is deleted, it will also be deleted once from a playlist. from any playlists containing the track. Tracks that are deleted cannot be recovered, therefore carefully check the tracks before TIPS... -
Page 66: Changing Titles
Changing titles [HDD] [CD] Changing an artist name or album name Artist and album names can be manually input, or the manually Gracenote database can be used to automatically obtain track information. [HDD] You can change the names of albums and artists for About obtaining track title information multiple tracks. -
Page 67: Searching For Track Names, Artist Names And Album Names Within The Gracenote Database And Entering Them Automatically
Searching for track names, artist names TIPS and album names within the Gracenote ≥You can also perform the operations left from the database and entering them automatically Track List. Press [3 4] to select “Obtain Track [HDD] Title” and press [ENTER]. Then operate from step You can use the Gracenote database to search for and obtain title information for recordings made from sources other than CD-DA. -
Page 68: Dividing And Combining Tracks On The Hdd
Dividing and combining tracks on the HDD [HDD] Dividing tracks Tracks recorded as LPCM can be divided and combined. Only tracks recorded as LPCM can be divided. This 1 track can be divided into 2 tracks. Alternately, 2 tracks function can be used with playlists “Albums” and can be combined into 1 track. -
Page 69: Combining Tracks
To stop partway through Combining tracks Press [∫]. Only tracks recorded in LPCM format can be combined To return to the previous screen with other LPCM tracks. This function can be used with Press [RETURN]. playlists “Albums” and “Analogue Recorded”. When the track you want to designate as the first track is stopped, NOTE... -
Page 70: Viera Link "Hdavi Control
VIERA Link “HDAVI Control” cable. VIERA Link “HDAVI Control” is a convenient function Recommended part number: that offers linked operation of this unit, and a Panasonic RP-CDHG15 (1.5 m), RP-CDHG30 (3.0 m), television (VIERA) under “HDAVI Control”. RP-CDHG50 (5.0 m), etc. -
Page 71: Auto Input Switching
∫ Auto input switching ∫ VIERA Link Control only with TV’s remote ≥When you switch the television input to TV tuner control (for “HDAVI Control 2”) mode, this unit will automatically switch to “TV You can control the disc menus of this unit with the TV’s §... -
Page 72: Operating Ipod With This Unit
Operating iPod with this unit By inserting Universal Dock for iPod (SH-PD10, not included) into the OPTION port on the back of this unit, you can charge and play or record tracks from a connected iPod. Also make sure to read the operating instructions for SH- PD10. -
Page 73: Playing Tracks Of Ipod With The Remote
By inserting SH-PD10 (not included) into the OPTION Recording tracks from iPod to the HDD port and connecting iPod, you can play tracks (audio) through this unit’s speakers. Additionally, you can use You can record tracks from iPod to the HDD. the remote control for this unit to perform operations Press [¥... -
Page 74: Playing Audio Tracks Wirelessly From Your Pc With This Unit
Playing audio tracks wirelessly from your PC with this unit Expand your listening options with the Panasonic wireless audio kit SH-FX570K. By using the optional Panasonic wireless audio kit SH-FX570K (not included), you can enjoy audio tracks from your PC on this unit wirelessly! -
Page 75: Basic Play
By performing the following operations on the remote Recording wirelessly transmitted tracks to control, you can play or record tracks from your PC. the HDD Preparation You can record tracks from your PC to the HDD in this 1 Connect the SH-FX570K as shown on page 74. unit. -
Page 76: Changing Audio Quality/Sound Field
Changing audio quality/sound field ≥The following sound effects may not be available or ∫ To switch the subwoofer level have no effect with some sources, or when When “SW.LEVEL” is selected, press [SELECT]. headphones are used (➜ page 80). Each time the button is pressed, it switches as shown ≥You may experience a reduction in sound quality when below. -
Page 77: Setting The Dolby Virtual Speaker
∫ To change the subwoofer trim levels Back of the main unit OPTICAL When [TRIM SW (SW ch)] is selected, press To DIGITAL [3 4]. IN (TV) DISC SFC TG HDMI D.MIX MONO SLP ST CT Optical digital audio cable (not included) HDCD MODE H.BASS... -
Page 78: Using The Scheduled Timer Recording Function
Using the scheduled timer recording function 4 Press [3 4] to select “Time” and press When the previously set time and day of the week is [ENTER]. reached, the power will turn on and the unit will record from an external audio source or radio to the HDD, and REC Timer 1 Time Setting when the recording time is finished, the unit will turn off Start Time... -
Page 79: Selecting The Settings For The Scheduled Timer Recording You Want To Use
Selecting the settings for the scheduled NOTE timer recording you want to use ≥Only radio and externally connected devices can You can use only the scheduled timer recording that you be recorded with the scheduled timer recording want to use by switching only the desired scheduled function. -
Page 80: Using Other Convenient Functions
Using other convenient functions Setting the sleep timer Using headphones Press [SLEEP]. Reduce the volume and connect the headphones (not included). MONO Headphone plug type: ‰3.5 mm stereo mini plug HDCD MODE H.BASS VOLUME While the time is shown OPEN/CLOSE SELECTOR VOLUME TUNING... -
Page 81: Backing Up Hdd Data To A Pc
≥When creating a backup, we recommend using a fast network connection such as 100BASE-T LAN. ≥For further information about backups visit the following homepage. http://panasonic.jp/support/global/cs/audio Backup destination PC with Windows XP SP2 installed... -
Page 82: Backing Up Data Recorded To The Hdd
Backing up HDD data to a PC To cancel backup Backing up data recorded to the HDD 1 Press and hold [Í] during backup. Backup Cautions about backup data: This function will pause and the power will turn off immediately. Be careful not to perform any of the following: Do you want to continue? ≥Do not open backup data with applications or... -
Page 83: Restoring Backed Up Data
To cancel restore Restoring backed up data 1 Press and hold [Í] during restoring. Restore This function will restore the backup data that was This function will pause and the power will saved on your PC to this unit. turn off immediately. Do you want to continue? If the HDD requires service, please wait until the HDD has been repaired before restoring the backup to the... -
Page 84: For Reference: Connecting This Unit Directly To A Pc
For reference: connecting this unit directly to a PC When importing WMA/MP3 data (➜ page 44), creating a backup (➜ page 82), or restoring backed up data (➜ page 83), you can connect this unit directly to your PC with a cross LAN cable. When using this connection method, changes to the settings on this unit and your PC are necessary. -
Page 85: Changing The Settings
Changing the settings Preparation 1 To display the picture turn on the television and select the appropriate video input to suit the connections to this unit. Press [Í] Changing video settings Press [SETUP]. Setup To return to the previous screen Setup for Video VIDEO HDMI... - Page 86 Changing the settings ∫ “Video” menu ([SETUP] ➜ “Setup for Video” ➜ “Video”) ≥4:3 Pan&Scan: Regular aspect television (4:3) TV Aspect The sides of the widescreen picture are cut off so it fills the Choose the setting to suit screen (unless prohibited by the disc). your television and preference.
- Page 87 ∫ “Audio” menu ≥Off Dynamic Range ≥On: Adjusts for clarity even when the volume is low by compressing the range of Compression the lowest sound level and the highest sound level. Convenient for late night viewing. (Only works with Dolby Digital.) –This function works only when the selector is set to “DVD/CD”.
-
Page 88: Changing Other Settings
Changing the settings Changing other settings Press [SETUP]. Setup To return to the previous screen Setup for Video VIDEO HDMI Press [RETURN]. DISPLAY Other Setup Remote Control To exit the screen Clock / Timer Power On/Off TV Audio Input Press [RETURN] several times. Network Maintenance ENTER... - Page 89 Software Program Update ≥Cancel Updates and improves the system software. –Information about obtaining system update discs will be made available on the support page. For more information, check the following website. http://panasonic.jp/support/global/cs/audio Language code list Abkhazian: 6566 Chinese: 9072 Hindi:...
-
Page 90: Optional Remote Control Settings
Optional remote control settings Television operation When other Panasonic equipment is located nearby You can operate the television through the unit’s remote control. Change the remote control code on the main unit and Point the remote control at the television the remote control (the two must match) if you place While pressing [Í... -
Page 91: Optional Connections
TV. However, while recording a CD to the HDD (➜ page 28), audio will not be output from the television speakers. NOTE ≥It is recommended that you use Panasonic’s HDMI cable. [Recommended part number: RP-CDHG15 (1.5 m), RP-CDHG30 (3.0 m), RP-CDHG50 (5.0 m), etc.] ≥Non-HDMI-compliant cables cannot be utilized. -
Page 92: Connecting To The Set Top Box, Satellite Receiver Or Video Cassette Recorder
Optional connections Connecting to the set top box, satellite receiver or video cassette recorder Use the following connections when you want to output audio of your set top box, satellite receiver or VCR through this unit’s speakers. ≥Do not connect through the video cassette recorder. Due to copy guard protection, the picture may not be displayed properly. -
Page 93: Connecting To The Other Audio Equipment
Connecting to the other audio equipment AUX and Music Port allow you to enjoy music from a tape deck or other external devices (e.g. MP3 player etc.) through this unit. For more information about using these connections, see page 42 and 80. Audio cable When using AUX terminal (not included) -
Page 94: Network Connection
When you have a dedicated Internet connection (such as cable, broadband, etc.), after checking with your Internet Service Provider (ISP) and the service agreement, make connections and settings using indicated equipment. For further information about network connection visit the following homepage. http://panasonic.jp/support/global/cs/audio Main unit Internet TV IN... - Page 95 ≥Implementing router security requires a high level of knowledge of networking. If you are setting security levels, do so at your own risk. Panasonic accepts no responsibility for problems caused by security settings. Furthermore, Panasonic cannot address questions relating to the settings and usage of each device.
-
Page 96: Changing The Network Settings
Changing the network settings These settings are used if you will connect this unit to a Manually setting the DNS server network. Preparation In most cases, default settings can normally be used without making any changes. 1 To display the picture turn on the television and When setting an assigned DNS server from your ISP, select the appropriate video input to suit the perform the following settings. -
Page 97: Frequently Asked Questions
Frequently asked questions Connecting to other devices Page ≥The speaker terminals on this unit cannot be used with speakers other I want to connect this unit — to other speakers. than the included speakers. By using the included speakers with this unit, you can obtain the appropriate audio. -
Page 98: Messages
Messages Television displays (in general) Page ≥Another playlist with the same name already exists and you are trying to Another playlist with the — same name already exists, create a combined playlist that will be in excess of 99 tracks. The but you cannot combine maximum number of tracks that can be added to a single playlist is 99. - Page 99 Television displays (in general) Page ≥Select the appropriate title from the list of title suggestions found. Several suggestions for titles have been found. Please choose one. ≥There are no tracks recorded to the HDD. There are no tracks in the —...
- Page 100 Messages Unit displays (in general) Page ≥Trouble may have occurred. The number following “H” and “F7” depends H∑∑ or F7∑∑ — (∑∑ stands for a number.) on the status of the unit. Turn the unit off and then back to ON. Alternatively, turn the unit off, disconnect the AC mains lead, and then reconnect it.
-
Page 101: Troubleshooting Guide
“Please set your remote control to Mode 1 (or 2).” is displayed. ≥Are you using other Panasonic products at the same time? The remote Using remote controls for other devices causes control signals may be similar, so change the remote control mode. - Page 102 Troubleshooting guide General Issues Operation Page ≥Are the left and right cords connecting the speakers or the external device Audio does not sound correct. The left and right reversed? Check the cord for the speakers and the external device and channels are reversed.
- Page 103 Playback Issues Operation Page ≥This unit may not play WMA that contains still picture data. Play doesn’t start. — ≥If a disc contains CD-DA and other formats, proper playback may not be — possible. ≥If playing DivX VOD content, refer to the homepage where you —...
- Page 104 Troubleshooting guide Playback Issues Picture Page ≥Ensure that the unit is not connected through a video cassette recorder. Picture distorted. ≥Have you selected an item in “Video Output Mode” that is incompatible with the connected equipment? Depending on the current connection status, perform corresponding steps.
- Page 105 Playback Issues HDMI and progressive Page ≥This problem is caused by the editing method or material used on DVD- There is ghosting when HDMI or progressive Video, but should be corrected if you use interlaced output. output is on. –When using the COMPONENT VIDEO OUT terminal, set “Video Output Mode”...
-
Page 106: Specifications
4:2:2 or 4:4:4). Extremely long and narrow Front: pictures may not be displayed. Front Section (both ch driven) 35 W per ch (8 ≠) §5 MPEG4 data recorded with Panasonic SD multi 100 Hz 1.0 % total harmonic distortion cameras or DVD recorders 70 W(4 ≠) - Page 107 SPEAKER SECTION GENERAL [Front\&\center\channel\SB-FCX9] Power supply AC 230 to 240 V, 50 Hz ∫ Front speaker section Power consumption 90 W Type Dimensions (WtHtD) 360 mmk105.5 mmk334 mm Mechanical 2 way, 1 speaker system (Bass reflex) Mass Approx. 4.7 kg Full range 6.5 cm Cone type (Dimensions and Mass do not include the speakers.)
-
Page 108: Glossary
Glossary AAC (Advanced Audio Coding) Film and video An audio compression method that compresses audio DVD-Videos are recorded using either film or video. to approximately 1/12 of its size with CD-level quality. This unit can determine which type has been used, then uses the most suitable method of progressive output. - Page 109 Using progressive output, you can enjoy the high- resolution video recorded on media such as DVD-Video. Your television must be compatible to enjoy progressive video. Panasonic televisions with 576 (625)/50i · 50p, 480 (525)/60i · 60p input terminals are progressive compatible. Router...
- Page 110 Gracenote ® Corporate Description Music recognition technology and related data are provided by Gracenote ® . Gracenote is the industry standard in music recognition technology and related content delivery. For more information visit www.gracenote.com. Gracenote ® Proprietary Legends CD and music-related data from Gracenote, Inc., copyright © 2007 Gracenote. Gracenote Software, copyright ©...
- Page 111 Manufactured under license from Dolby Laboratories. Dolby, Pro Logic and the double-D symbol are trademarks of Dolby Laboratories. “DTS” and “DTS Digital Surround” are registered trademarks of DTS, Inc. This product incorporates copyright protection technology that is protected by method claims of certain U.S.
-
Page 112: Index
HDAVI Control....70 Zoom ..... 52 Matsushita Electric Industrial Co., Ltd. Web Site: http://panasonic.net RQT8927-B F0307SS0...