Table of Contents
Advertisement
User Manual
www.argusdirect.com
Whilst e2v technologies has taken care to ensure the accuracy of the information contained herein it accepts no responsibility for the
consequences of any use thereof and also reserves the right to change the specification of goods without notice. e2v technologies accepts
no liability beyond the set out in its standard conditions of sale in respect of infringement of third party patents arising from the use of tubes
or other devices in accordance with information contained herein.
e2v technologies (uk) limited, Waterhouse Lane, Chelmsford, Essex CM1 2QU United Kingdom Holding Company: e2v technologies plc
Telephone: +44 (0)1245 493493 Facsimile: +44 (0)1245 492492
Contact e2v by e-mail:
enquiries@e2v.com
or visit
www.e2v.com
for global sales and operations centres.
e2v technologies (uk) limited 2013
CR 114528
21 Mar 2013
DAS775571AA Version 2, page 1
Advertisement
Table of Contents

Related Manuals for Argus Mi-TIC


Summary of Contents for Argus Mi-TIC
-
Page 1: User Manual
User Manual www.argusdirect.com Whilst e2v technologies has taken care to ensure the accuracy of the information contained herein it accepts no responsibility for the consequences of any use thereof and also reserves the right to change the specification of goods without notice. e2v technologies accepts no liability beyond the set out in its standard conditions of sale in respect of infringement of third party patents arising from the use of tubes or other devices in accordance with information contained herein. -
Page 2: Table Of Contents
CONTENTS This manual contains information covering operation of the system and operating techniques, user maintenance and care of the product. SAFETY AND REGULATORY INFORMATION ..........3 INTRODUCTION ....................4 OPERATION AND USE ................... 5 3.1 System Configuration (Camera Rear) .............. 5 3.2 System Configuration (Camera Front) .............. -
Page 3: Safety And Regulatory Information
• ® The Argus Mi-TIC camera can only be serviced by authorised personnel. • Where the camera is used at an ambient temperature greater than +40 °C, suitable protective gloves shall be worn to hold the camera; these should have a temperature rating at least 20 °C above the ambient temperature. -
Page 4: Introduction
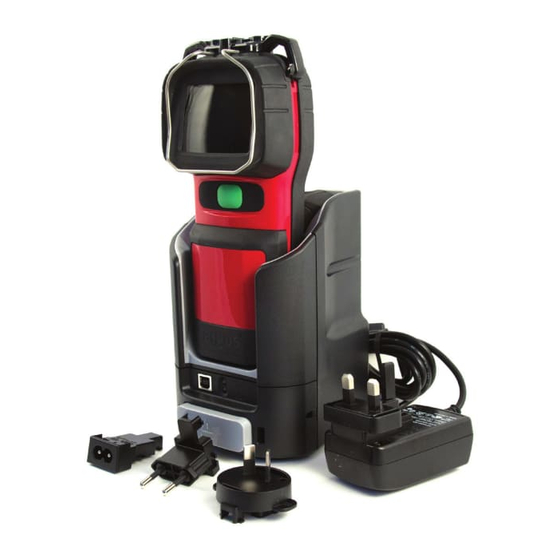
® Every Argus Mi-TIC is supplied with a unique dual use desktop / in-truck charger station which securely retains and charges both the thermal imager and a spare battery. The charger stations can be daisychained together up to a maximum of six units. -
Page 5: Operation And Use
3. OPERATION AND USE 3.1 System Configuration (Camera Rear) 1. 2.7” LCD Display 5. Lanyard Loops 2. Function button 1 (Zoom*) 6. Display Bumper 3. Function button 2 (Application Mode*) 7. ON/OFF Button 4. Battery 8. Docking latch *default settings 9. -
Page 6: System Configuration (Accessories)
3.3 System Configuration (Accessories) M3 x 8 screws MIL-STD-1913 (Picatinny) rail M4 x 30 shoulder screws Double lanyard loop Pocket Clip Sun/smoke shroud* * purchased separately e2v technologies (uk) limited 2013 CR 114528 05 Apr 2013 DAS775571AA Version 1, page 6... -
Page 7: System Configuration (Charger Front)
3.4 System Configuration (Charger Front) Docking bay 1 (camera with battery) Camera lock mechanism Docking bay 2 (spare battery) USB port (front) Camera release button Charging status LEDs Camera eject mechanism Front cover (removable) Up to six chargers can be powered in a “daisychain” configuration. Connections should be made via the green power connectors located underneath the removable front cover. -
Page 8: Display
3.6 Display 12 13 1. Colour reference bar Video Capture* 2. Spot Temperature Target Zoom indicator 3. Spot Temperature Value 10. Time and Date 4. Battery Bar 11. Low Sensitivity Mode Indicator 5. Application mode indicator 12. General System Failure Warning 6. -
Page 9: Getting Started
3.7 Getting Started The packing case contains the following items (see Quick Start Guide): • Camera with lanyard loops • Charger Station • Quick Start Guide • Two rechargeable battery packs • USB Lead • Retractable lanyard • Power Supply Kit: •... -
Page 10: Camera Features
3.8 Camera Features 3.8.1 Application Modes ® The Argus Mi-TIC has two application modes: o FIRE A white-hot grey and colour scale, expanded to cover the dynamic range of the scene. Colourisation is added gradually at scenes temperatures above 150 °C. The colour changes through orange (600 °C) to saturated red at... -
Page 11: Tri-Mode Sensitivity
3.8.3 Tri-Mode Sensitivity ® The Argus Mi-TIC has three levels of sensitivity: High, Low and Extended Low. These levels provide the user with a thermal image ® over the widest possible temperature range. The Argus... -
Page 12: Time And Date
3.9 Display Warning Graphics ® The Argus Mi-TIC is equipped with an advanced microprocessor based control and user warning system. In addition to controlling the automatic operation of the camera to ensure the best possible picture at all times, the... -
Page 13: Camera Features (Optional)
3.10 Camera Features (optional) 3.10.1 Image Capture Up to 1,000 images can be captured. Images are stored in the camera embedded storage. These images can then be viewed or deleted using the camera or by downloading on to a PC (see section 5). To capture an image, press the function button assigned to image capture (see section 6.6 for function button set- up). -
Page 14: Operating Notes
3.11 Operating Notes • Interpreting The Image – Relative Temperatures The image displayed is simply a black and white picture of the infrared energy entering the lens. The camera displays relative temperature differences between individual objects their surroundings irrespective of overall ambient temperature. The camera is set up to display objects at various shades between black for cooler items and white for hotter bodies, e.g. - Page 15 • Heat Layers in Closed Spaces In a major fire, a layer of hot gases may build up in the upper region of the closed space. Attempting to use the camera in this hot layer will cause the image to become featureless. By bringing the camera down beneath this layer, the unit is able to provide the fire-fighter with a clearer picture of the scene ahead.
-
Page 16: Batteries And Charging
4. BATTERIES AND CHARGING ® ® The Argus Mi-TIC camera is supplied with two Argus Mi-TIC Lithium Ion Phosphate Rechargeable Battery Packs (ARG_MI_BLPS) designed to power the camera for over 2 hours from a full charge. Batteries must be fully charged before first use. - Page 17 Mi-TIC Charger Station Fixed Installation ® The Argus Mi-TIC Charger Station can be mounted on any surface either horizontal or vertically using the universal mounting plate and mounting screws supplied. Note: fixings for attaching the mounting plate to the surface are NOT supplied.
- Page 18 Fasten the charger station to the universal mounting plate with the M4 x 30 mounting screws using the 3 mm hex key as shown. Replace the front panel on the charger station. 4.3.2 Vertical Mounting Follow the same procedure as for a horizontal mounting, but on a vertical surface.
- Page 19 3. Replace the front panels on the charger stations. e2v technologies (uk) limited 2013 CR 114528 05 Apr 2013 DAS775571AA Version 1, page 19...
-
Page 20: Connecting The Camera To A Pc
Station and the supplied USB lead. The computer should recognise the memory card as a ‘Mass Storage Device’ and open a file explorer window. Copy the image file from the computer to the top level ‘ARGUS TIC’ directory. Close the window. -
Page 21: How To Copy The Memory Card Contents To A Pc
Images and videos can be copied to a PC as follows: Turn the camera on. ® Connect the camera to the computer via the Argus Mi-TIC Charger Station and the supplied USB lead. The computer should recognise the memory card as a ‘Mass Storage Device’. -
Page 22: Diagnostic File
5.3 Diagnostic File The diagnostic file can be found in the top level ‘ARGUS TIC’ directory on the memory card. The name of the file is: MInnnnnn.txt (nnnnnn is the camera serial number) The diagnostic file contains information about the camera which may be useful to e2v in diagnosing any camera faults. -
Page 23: Configuration Software
Mi-TIC to your computer using the ® Argus Mi-TIC Charger Station and the supplied USB cable. The camera is recognised as a removable disk. Navigate to the removable disk and open it. Note: If the camera is not recognised as a removable disk, check that the camera is connected to the PC and correctly docked in the charger station and switch the camera off and back on again. -
Page 24: Setting The Temperature Units
6.2 Setting the Temperature Units Select either C or F, then click the ‘Save Changes’ button circled in red below. Eject the camera from the charger dock. Do not switch the camera off and back on again. The new settings will be enabled. 6.3 Setting the Time and Date Format Select either GB or US, then click the ‘Save Changes’... -
Page 25: Black Box" Video Recording
6.5 “Black Box” Video Recording* Check the “Black Box Video Recording” box, then click the ‘Save Changes’ button. Eject the camera from the charger dock. Do not switch the camera off and back on again. The new settings will be enabled. Note: When “Black box”... -
Page 26: Cleaning, Maintenance And Replaceable Parts
The following items are available as spares and accessories from e2v: Part No. Description ARG_MI_BLPS Mi-TIC Rechargeable Battery Standard (2.5 hours) ARG_MI_BLPL Mi-TIC Rechargeable Battery Pack Large (5 hours) ARG_MI_CS Mi-TIC Charger Station ARG_MI_PSU Mi-TIC Power Supply ARG_MI_SS Mi-TIC Sunshroud... -
Page 27: Replacing The Germanium Window Assembly
7.4 Replacing the Germanium Window Assembly 7.4.1 Removal Using a small flat tool, e.g. a small flat head screwdriver, depress the window release latch and turn the Germanium window assembly clockwise. Note the Germanium window assembly contains a reverse bayonet coupling. ... - Page 28 7.4.2 Refitting Locate the window assembly on the front of the camera and turn the window assembly anti-clockwise until a click is heard. e2v technologies (uk) limited 2013 CR 114528 05 Apr 2013 DAS775571AA Version 1, page 28...
-
Page 29: Warranty Terms
8. WARRANTY TERMS Express Warranty e2v technologies ("e2v") warrants that this product is free from mechanical defects or faulty workmanship for two (2) years from the date of shipment, with the exception that the warranty period for the rechargeable battery pack is one (1) year from that date, provided it is maintained and used in accordance with e2v’s instructions and/or recommendations.