
Related Manuals for Argus BeanSpraut VGA Carabiner Camera


Summary of Contents for Argus BeanSpraut VGA Carabiner Camera
- Page 1 User Manual Package Contents: Bean Sprout Carabiner Camera LiIon Rechargeable Battery USB Cable User Guide Video Cable ArcSoft PhotoImpression and Driver Installation CD...
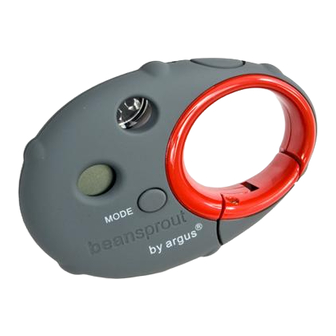
- Page 2 1. Camera description 1 ...
- Page 3 2. Using your camera 2.1 Charging battery Your camera uses a Lithium battery. The USB port serves as a charger for the battery. To charge the battery, simply connect the device via the USB cable to your PC. If the battery power is low, the LCD display will flicker and the device will power off. Should this occur, download your photos to your PC as soon as possible, and then charge the device. Charging time is around six hours. WARNING: Before taking photos, please test the device’s functioning in order to avoid · disappointing results. Should the device fail to work, please contact us immediately. Static Electricity may effect your device by powering it off. To restart, · simply power on again. 2.2 Sleep mode (automatic powersaving mode) If your camera is not connected to the computer and you are not using the camera ...
- Page 4 u You can turn the camera to sleep mode manually by pressing the MODE button, then the LCD screen shows “of.” Press the Trigger Button; you will hear a beep as the camera will go into sleep mode. u Press the MODE button to activate the camera. The digits on the LCD screen and the beep sound will confirm that camera has been activated. 2.3 Taking photos Press the MODE button to power up the camera. Slide the Viewfinder Button up to retract Viewfinder. Look through the lens and aim at the desired scene. Press the Shutter Button to take a picture. The number on the LCD screen will decrease, and a beep will confirm a picture has been taken. ...
- Page 5 consecutively; the interpretations are as follows: R e a d y to c lo s e o r H i r e s o l u t i o n p i c t u r e s s h u td o w n m o d e C o n t i n u o u s ...
- Page 6 PS: Only 2 digits, the compression low resolution mode will display two times, 2&08 means 208,1&10 means 110. 2.4.1 “St” Selftimer mode Press the MODE button until the LCD screen displays “St”, then press the Shutter Button. Camera will “beep” ten times and automatically take a picture after ten seconds. 2.4.2 “d8” AVI mode Press the MODE button and select “d8,” then press the Shutter Button. Camera will continuously capture the scene, as long as you keep the Shutter Button down, or until camera’s memory becomes full (approx 6 sec). 2.4.3 ...
- Page 7 Press the MODE button to select "CA". Press the Shutter Button to confirm your selection. The digits on the LCD screen will start to blink. Press the Shutter Button again to delete all images from the camera. 2.4.5 “CL” Clear last / Delete last taken picture Press the MODE button to select "CL". Press the Shutter Button, and the camera will beep and delete the last picture taken. The LCD screen will show a higher number. If the last photo taken was taken using the Continuous mode, then the entire recorded clip will be deleted. 2.4.6 “LO” / “HI” resolution Press the MODE button to select desired resolution mode; LO = low resolution you can save more pictures, or HI = high resolution better ...
- Page 8 You can change the resolution at any time as needed. 2.4.7 “50 / 60” frequency Various countries use different frequencies of the electrical power; 50Hz or 60Hz. Select “50 / 60” mode to avoid flickering images. This setting depends on your current location. Press the MODE to select “50/60" mode, then press the Shutter Button to confirm your selection. 2.4.8“Hd / Ld” Compression rate You can select Hd (high density), or Ld (low density) compression rate modes. Note that at the Hd (high density) you can compress / store more pictures, and less pictures when you select the Ld (low density) mode; however Hd compression rate will slightly limit the quality of your images. Press the MODE Button to select desired “Hd” or “Ld” compression mode. Press the Shutter Button to confirm selection. 3. Installation Software Do not connect the camera to computer before your software installation is fully completed 7 ...
- Page 9 Insert the CD in your computer’s CDROM drive, and follow the stepbystep installation on your computer screen. An interface will appear. On the right of the interface there are four buttons. 3.1 Driver Installation Insert CD in your CDROM drive, Click on <Install Camera Driver> Continue with its stepbystep instructions to finish the installation. Restart the computer. <Dual Mode Camera> will appear on the desktop of your computer. 3.2 Photo Express installation 8 ...
- Page 10 Insert CD into the CDROM drive and select <Install Arcsoft Photoimpress 4.0> Follow the onscreen instructions and complete the installation. Restart your computer. 3.2 Transferring photos to your computer â Connect your camera to the computer with the USB cable. â Doubleclick the Photo Express icon and start the program â Click on "Get Photo" and select the Digital Camera â Select "data source": Dual Mode Camera â Click on "Acquire" in the bottom left corner. The photo transfer window will appear on the screen. Click the "Download" button. All photos from the camera will appear inside the interface window. Using the mouse, select any picture; right click if you would like to zoom in on a picture. You may left click and "Select All Photos" in the interface, then click on the "Transfer ...
- Page 11 Pictures folder, etc.) When you have pictures transferred / downloaded into the computer, then you can delete images from camera and take more pictures. Photo Management: with the new Photo Impression interface it is very easy to process your photos. Editing: Photoimpression has a wide range of editing options, such as correcting brightness and contrast that are all easily accessible. Please visit www.adobe.com if you need more information regarding Photo Express application software. Help To access the ArcSoft Photoimpression 4 Manual on the CDROM, you will need Adobe PDF Reader software. This is available as a free download from http://www.adobe.com Uploading a photo with increased resolution 3.3 10 ...
- Page 12 After downloading photos, click on the "Edit Image" button in the upload window and select "Increase Resolution", then click on the "OK" button to confirm. Select the “Transfer” button to transfer those photos to Arcsoft Photo 400K Impression 4.0 Software, then photos will be uploaded with pixels resolution. 3.4 Creating / saving video clips Video clips are saved with the "AVI capture" mode. Connect your camera to your computer and select “MyDSC.exe” located in the folder ‘Dual Mode Camera’ on your desktop. ...
- Page 13 4. Problemsolving Here are the most common problems: When pressing the mode button, the camera does not turn on: Battery level is low. You should charge the battery for more than 6 hours. The camera cannot download photos, or displays “no photos”: Check that the folder Dual Restart the computer and reconnect the camera. Mode Camera is in the Control Panel / System settings. If the device is not present, then disconnect the camera and reinstall the driver again. If the camera driver was successfully installed, but still you can’t see images, then disconnect the camera, uninstall the software and restart your computer. Finally, reinstall the Driver and application software from the CD again. Then reconnect the camera to the computer. ...
- Page 14 Focusing range: 0.5m –infinity Storage Capacity: 2MB Photos: Highresolution (640X480 pixels), 26 pictures Compression, highresolution pictures, 52 pictures Lowresolution (320X240 pixels), 104 pictures Compression, lowresolution, 208 pictures Power supply: Lithium battery (builtin) or USB cable Charge: By USB cable Interface:USB port System compatibility: Pentium II and above Personal Computers Windows 98SE/2000/ME/XP/Vista Operating System 32 MB or above Memory (64 MB or above Recommended) 60 MB Hard Disk Capacity CDROM Drive Color Monitor (Not Lower than 800*600, 24 Bit) USB interface 13 ...