
Related Manuals for Fisher M-Scope 1236-X2


Summary of Contents for Fisher M-Scope 1236-X2
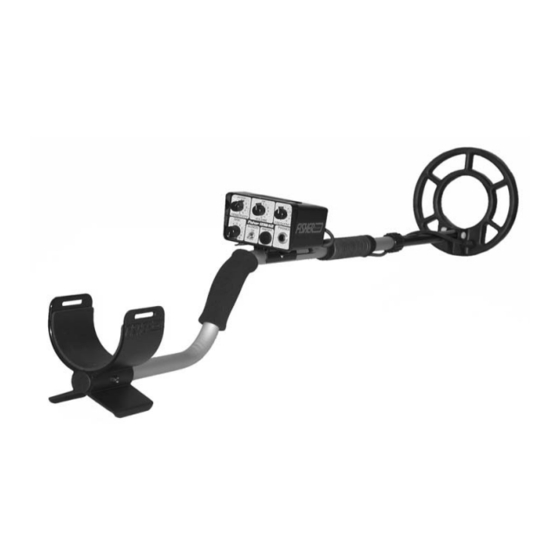
- Page 1 1236-X2 Silent, Discriminating Metal Detector Operating Manual F I S H E R R E S E A R C H L A B O R A T O R Y...
-
Page 2: Table Of Contents
CONTENTS About Your 1236-X2 ............... pg. 1 Condensed Operating Instructions ........pg. 4 Setting Up................pg. 5 Body or Hipmounting ............pg. 7 Control Functions ..............pg. 8 Discrimination Points ............. pg. 10 Searching ................pg. 12 Pinpointing ................pg. 14 No-Motion Pinpoint Mode ............ -
Page 3: About Your 1236-X2
ABOUT YOUR DETECTOR Your 1236-X2 was designed to do one thing well provide all the quality tools necessary to help you find good, deep targets in trashy or mineralized soil with minimum hassle. The 1236-X2 does this by providing you a wealth of powerfully, well-designed instrument controls and features that give you maximum flexibility of adjustment to accommodate your unique style of detecting. - Page 4 ABOUT YOUR DETECTOR No-Motion Pinpoint Mode With VCO Audio: At the push of a button, the all-metal no-motion pinpoint mode kicks in with VCO (Voltage Controlled Oscillator) audio response for precise target locating. A located target responds with increasing volume and pitch. The tone gets louder and higher, so there’s virtually no doubt when you’re directly over a target.
- Page 5 If you have any questions, suggestions, or interesting 1236-X2 stories, drop us a line. In the meantime... Happy Hunting! Fisher Research Laboratory...
-
Page 6: Condensed Operating Instructions
That’s why we recommend that you read the entire manual first. But if you just can’t wait any longer or you’ve already used a Fisher “X” detector, here’s some quick instructions: 1. Set the controls as follows: FREQUENCY = 0 (center frequency = 5.7 KHz) -
Page 7: Setting Up
SETTING UP Your new 1236-X2 is just about ready to go, but take a look at the following illustration before proceeding. 1. Unpack your 1236-X2 carefully, and save the carton: it may come in handy if you ever have to return the instrument for service. - Page 8 SETTING UP semicircle around the front of the operator. 4. Hand tighten the lock nut and search coil adjusting wing nut. 5. With the stem length properly adjusted, wrap the search coil cable snugly around the upper handle and secure it with velcro straps. Leave just enough slack near the coil to allow it to be tilted completely backward and forward.
-
Page 9: Body Or Hipmounting
4. Reconnect the search coil cable to the control housing. 5. The control housing can then be mounted on your belt or on the optional Fisher Chest Harness. It is especially important that the cable connector be installed tightly (hand tightened only) to prevent false signals during body-mount use. -
Page 10: Control Functions
CONTROL FUNCTIONS 1. SILENCER: When the toggle switch is flipped ON, the 1236-X2 runs in the 3rd derivative SILENCER discrimination mode, eliminating the annoying “pops” and “clicks” heard when searching in extremely trashy areas. Flipping it to OFF, the 1236-X2 runs in classic 2nd derivative discrimination mode. - Page 11 CONTROL FUNCTIONS A faint tone indicates weak batteries and no tone means that it’s time for a battery change. 4. VOLUME: This control switches the 1236-X2 on and off and controls the volume of the audio response. A setting of 10 provides maximum audio signal volume.
-
Page 12: Discrimination Points
DISCRIMINATION POINTS By adjusting the DISCRIMINATION Control, you will be able to ignore (or “reject”) small pieces of metallic trash and ground minerals while detecting valuable targets. The lowest setting at which an object is rejected is referred to as its “discrimination point.”... - Page 13 DISCRIMINATION POINTS Figure 6. Typical 1236-X2 audio reponses (with silencer off) for 2-inch deep targets with search coil sweeping 1 to 2 inches above ground 10. Large pieces of trash such as beer cans or jar lids may sound like a good target no matter what you do. With a little practice, however, you will be able to tell the difference between a large target and a small coin sized object.
-
Page 14: Searching
SEARCHING Now comes the fun part if you follow a few simple rules. Good search techniques are every bit as important as a good detector. 1. The 1236-X2 has two operating modes. The “Search” mode is activated simply by turning the unit on. - Page 15 SEARCHING a. In relatively non-trashy soil use a low level of discrimination (2 for example) with the SILENCER OFF. In this manner the 1236-X2 will detect all metal targets within its range and you can instantly increase the discrimination for further identification. b.
-
Page 16: Pinpointing
PINPOINTING The pinpoint mode requires no tuning and no motion to precisely locate the target. With the Pinpoint push-button depressed, the 1236-X2 is in an all-metal mode, meaning that any discrimination setting you might have selected will no longer apply. The VCO (Voltage Controlled Oscillator) circuitry indicates the presence of a target by increasing both the volume and frequency of the audio output. -
Page 17: Pinpointing In The Motion Search Mode
PINPOINTING IN MOTION SEARCH MODE Pinpointing in the Search Mode will take a little practice, but you may find that for most targets it’s even quicker than the No- Motion Pinpointing Mode. Simply use the same procedure as in steps 2 through 5 on p. 14. The only difference will be that when you stop the coil over the target you will lose the audio signal. -
Page 18: Target Recovery
TARGET RECOVERY Once you have pinpointed a target, your objective is to recover it quickly and neatly, leaving virtually no trace of your excavation. There are almost as many ways to do this as there are treasure hunters. Whatever works for you is good enough as long as you don’t break any laws, damage vegetation, or leave your search area looking like a World War II battlefield. -
Page 19: Operating Tips
OPERATING TIPS 1. We’ve already said it, but it bears repeating: TAKE YOUR TIME AND OVERLAP YOUR SWEEPS. 2. Use good headphones. You won’t miss faint targets, you won’t attract unwanted attention and you won’t bother others. 3. Practice pinpointing. There’s nothing sacred about the methods described in this manual. -
Page 20: False Signals
FASLE SIGNALS A “false signal” occurs when something that shouldn’t sounds like a good target. Your 1236-X2 does an excellent job of ignoring junk, but it’s so sensitive to good targets that it can be fooled by bad targets with similar electrical characteristics. Large pieces of trash, for example, or even some kinds of bottle caps and pull tabs can fool you. - Page 21 FALSE SIGNALS one, you’re probably over a nail or some other large object. But a very shallow coin or a coin on edge will give the same response. SOLUTIONS: In all cases, the target will be between the beeps, or if you sweep at right angles to your original direction, you’ll receive a single beep directly over the target (except for a very shallow coin.) One...
-
Page 22: Battery Replacement
BATTERY REPLACEMENT Two 9-volt transistor batteries are located in separate compartments at the rear of the housing of the 1236-X2. When it’s time to replace the batteries, always replace both of them. 1. To open the battery compartments, press gently down and out on the battery door latch. -
Page 23: Maintenance
MAINTENANCE Your 1236-X2 doesn’t require a lot of care, but there are a few things you should do to keep it in peak operating condition. 1. If you’re not going to be using it for awhile, take the batteries out. Acid damage caused by leaking batteries can be severe. -
Page 24: Where To Use Your Metal Detector In The U.s
Where To Use Your Metal Detector In The U.S. National Forest and Federal Lands—Metal detecting is allowed only by special permit acquired from the federal government. Each area has a district office. Corps of Engineers, Lakes, Shorelines and Lands—Permission has been granted only on predisturbed sites, such as beaches and attached swimming areas. -
Page 25: Specifications
SPECIFICATIONS VLF 3rd Derivattive SILENCER MODE Discrimination Pinpoint (No-Motion Mode) VLF All Metal Audio Response ................416 Hz Search Mode ..................VCO Pinpoint Mode ..................Yes Audio Threshold ................... Yes Volume Control ................5.7 KHz Operating Modes .......... Derivative Discrimination Search (Motion-Mode) .............. - Page 26 SPECIFICATIONS NOTES 1. Subject to improvement or modification without notice. 2. In Search Mode, the 1236-X2 operates under two modes of discrimination. With the SILENCER off, it operates in a classic 2nd derivative discrimination mode that allows all pops, clicks and partial target responses to be heard for maximum target information.
- Page 28 R E P U T A T I O N Fisher produced the first patented metal detector in 1931. For over 70 years, the Fisher logo has been a mark of excellence. L I F E T I M E W A R R A N T Y...