Motorola HT1550-XLS User Manual
Professional series two-way radio
Hide thumbs
Also See for HT1550-XLS:
- Brochure (30 pages) ,
- Service manual (96 pages) ,
- User manual (96 pages)

Related Manuals for Motorola HT1550-XLS


Summary of Contents for Motorola HT1550-XLS
- Page 1 Professional Series Two-Way Radio User Guide Séries professionnelles Guide de l'utilisateur de radio bidirectionnelle HT1550•XLS...
-
Page 3: Table Of Contents
Battery Charge Status... . . 20 CONTENTS Contents ......1 Attaching the Battery. - Page 4 Sending a Message ....33 Deleting a Nuisance Channel/Talkgroup Receiving a Message ....34 (System Scan Operation Only) .
- Page 5 Recorded Message Playback ..67 Headsets ..... . . 87 Recorded Message Delete ... . 68 CommPort™...
-
Page 6: Computer Software Copyrights
Motorola. Furthermore, the purchase of Motorola products shall not be deemed to grant either directly or by implication, estoppel, or otherwise, any license under the copyrights, patents or patent... -
Page 7: Safety
RF Exposure booklet enclosed with your radio (Motorola Publication part number 68P81095C98) to ensure compliance with RF energy exposure limits. For a list of Motorola-approved antennas, batteries, and other accessories, visit the following web site which lists approved accessories: http://www.motorola.com/cgiss/ index.shtml. - Page 8 Notes English...
-
Page 9: Radio Overview
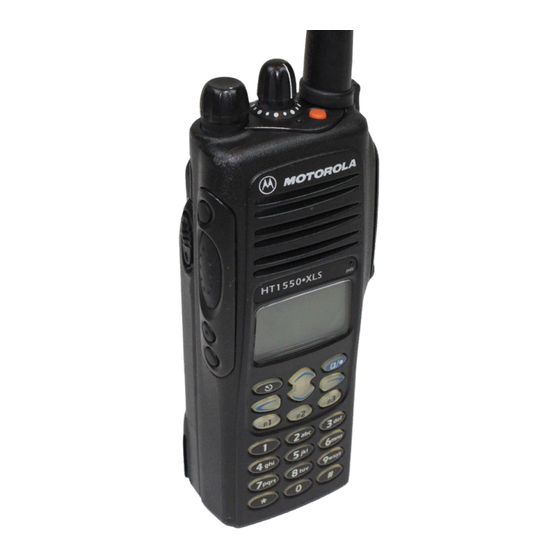
RADIO OVERVIEW PARTS OF THE RADIO ™ • HT1550 Model Channel, Talkgroup, Zone or Top Button (D) Menu Selector Knob (programmable) On/Off/Volume Knob LED Indicator Side Button 1 (A) (programmable) Microphone Push-to-Talk (PTT) LCD Screen Button Menu Keys Side Button 2 (B) P1, P2, P3 Keys (programmable) Side... -
Page 10: On/Off/Volume Knob
On/Off/Volume Knob LED Color Indicates Turns the radio on or off, and adjusts the Double Selective call received (LTR only) radio’s volume. flashing yellow Channel or Zone/Menu Selector Knob Momentary Radio has powered-up green successfully Switches the radio to different conventional or Single System or All Group Scan trunked zones. - Page 11 Each button can be programmed to select up Also, where a choice exists, have your dealer to two features, depending on the type of indicate whether the button press is short press (SP) or long press (LP). button press: Check with your dealer for a complete list of •...
- Page 12 Programmable Features Feature Indicator Short Press Long Press Hold Down Page Button Check the battery’s Battery Gauge — — Color charge status. Emergency Alert Initiate Cancel Emergency — (Top button Emergency Alert. Alert. only) Directly access your favorite trunked Home Channel —...
- Page 13 Programmable Features (Continued) Feature Indicator Short Press Long Press Hold Down Page Button Toggle transmit power level between high Power Level — † and low. † Radio Call ‡ Directly access radio call menu. — Color Toggle between using a conventional Repeater/ repeater or transmitting directly to —...
- Page 14 Programmable Features (Continued) Feature Indicator Short Press Long Press Hold Down Page Button Voice Storage † — Delete recorded messages. — Playback Delete Sound a tone for — Volume Set — — adjusting your radio’s volume level. Add, Delete, or prioritize talkgroups or —...
-
Page 15: Push-To-Talk (Ptt) Button
Push-to-Talk (PTT) Button Menu/Select Key Press and hold down this button to talk; Used to enter Menu Mode. When in Menu release it to listen. Mode, this key is also used to make menu selections. Microphone Exit Key When sending a message, hold the Used to move to the previous Menu level (short microphone 1 to 2 inches (2.5 to 5 cm) away press) or to exit Menu Mode (long press). -
Page 16: Keypad Keys
Keypad Keys 1 2 3 4 5 6 7 8 9 * 0 # These keys are used for: • Dialing a phone number • Making a radio call • Entering information when programming radio call, scan, and phone lists. Each key can generate several different characters. - Page 17 Entering Characters Using the Keypad Number of Times Key is Pressed < > & Á Ç à á ç È É Ê è é ê Í ì í Ñ Ó Ô ò ó ô ö Ú ù ú Blank ’ ”...
-
Page 18: Lcd Screen
LCD Screen The top two screen rows show menu and radio status information. Symbol Indication The X-Pand feature is activated. When in narrow ™ Conventional 1 band, this feature X-Pand improves audio quality. 469.992500 CSQ Low Power “ R ” or High Menu Power “... - Page 19 Symbol Indication Symbol Indication When the green LED is A Program List is being blinking, indicates that the edited. Programming Mode System or All Group Scan or Conventional Scan The keypad is locked. feature has been activated. Keypad Lock Scan When the green LED is off, The more bars, the indicates that non-...
-
Page 20: Audio Indicators For Programmable Buttons
Button Low-High Tone High-Low Tone Symbol Indication Scan Start Scan Stop Scan You are not transmitting through a repeater Low power High power Power Level Talkaround (conventional operation selected selected only). Squelch (no Tight squelch Normal squelch The number of bars (0 - 4) visual indicator) shown indicates the Option Board... -
Page 21: Getting Started
GETTING STARTED LED Color Battery/Charger Status No LED Indication Battery inserted incorrectly. BATTERY INFORMATION Single Green Successful charger power-up. Charging the Battery Flash If a battery is new or its charge level is very Flashing Red* Battery unchargeable or not low, you need to charge it before you can use making proper contact. -
Page 22: Battery Charge Status
Battery Charge Status Battery chargers will only charge the Motorola- authorized batteries listed below; other You can check your battery’s charge status in batteries may not charge. two ways: The charge status is shown by the P Part No. Description •... -
Page 23: Attaching The Battery
Attaching the Battery Removing the Battery Battery Latches 1 Fit the extensions at the bottom of the battery 1 Turn off the radio (see page 20). into the bottom slots on the radio. 2 Slide both battery latches downward. 2 Press the top part of the battery toward the radio until you hear a double click. -
Page 24: Accessory Information
ACCESSORY INFORMATION Removing the Antenna Attaching the Antenna 1 Turn the antenna counterclockwise to remove 1 Turn the antenna clockwise to attach it. English... -
Page 25: Attaching The Belt Clip
Attaching the Belt Clip Removing the Belt Clip Belt Clip Tab 1 Align the grooves of the belt clip with those of 1 Use a key to press the belt clip tab away from the battery. the battery. 2 Press the belt clip downward until you hear a 2 Slide the belt clip upward to remove it. -
Page 26: Attaching The Side Connector Cover
Attaching the Side Connector Cover TURNING THE RADIO ON OR OFF Antenna Loop Slot Thumbscrew Turn the On/Off/ Turn the On/Off/ Volume Control knob Volume knob 1 Place the loop (attached to the side connector counterclockwise until clockwise. cover) over the antenna; then slide it you hear a click. -
Page 27: Entering Your Password
ENTERING YOUR PASSWORD ADJUSTING THE VOLUME If Radio Lock is programmed by your dealer, Turn the On-Off/Volume Control knob you are prompted to enter a four-digit clockwise to increase the volume or password to gain access to your radio. The counterclockwise to decrease the volume. -
Page 28: Zone
To select a zone: SELECTING A CHANNEL OR TALKGROUP Note:The selection of zones can be programmed by your dealer either on the Selector knob or via Your radio offers up to 160 channels (10 zones the Menu. of 16 channels each) and up to 15 LTR zones Use the Zone/Channel/Menu Selector knob to with 16 talkgroups each. -
Page 29: Sending A Conventional Call
5 Release the PTT button to listen. until you see the desired channel/tkgp. to select the desired channel/tkgp. SENDING A TRUNKED CALL SENDING A CONVENTIONAL CALL 1 Turn your radio on. Note: In the United States, FCC regulations 2 Select the desired zone and talkgroup (see require you to monitor the conventional page 26 “Selecting a Channel/Talkgroup”). -
Page 30: Receiving A Trunked Or Conventional
RECEIVING A TRUNKED OR 4 Press and hold the PTT button. CONVENTIONAL CALL –or– Press and release the PTT button and wait 3 1 Turn your radio on. seconds. • If access to the trunked system was 2 Adjust your radio’s volume (see page 25). successful, the LED indicator lights steady red. -
Page 31: Radio Calls
RADIO CALLS to locate the desired ID in the Radio Call List. MAKING A SELECTIVE CALL – or– Enter the ID number of the radio you want to call. You can make a selective call to a particular radio or group or radios, as programmed by Press the PTT button to send the call. -
Page 32: Receiving A Selective Call
RECEIVING A SELECTIVE CALL F ) to select Radio Call When you receive a selective call: until Call Alert The LCD screen displays F and the prepro- • grammed name or ID of the calling radio. ) to select Call Alert •... -
Page 33: Receiving A Call Alert Page
RADIO CHECK to return to Call Alert Radio Check allows you to determine if a radio – or– is within range and turned on, without Hold down to exit Menu Mode. disturbing the user of that radio. This feature can also be used when attempts with Selective RECEIVING A CALL ALERT PAGE Call and Call Alert fail. -
Page 34: Sending A Status
To send a Status: Press the PTT button. to enter Menu Mode. You see Call in Prog Status until If the Call Alert page is received, Status to select you see Acknowledge to locate the desired status in the If not received, preprogrammed list. -
Page 35: Sending A Message
SENDING A MESSAGE After 3 seconds, the selected status is shown at the top of the display and, This feature allows you to send and receive preprogrammed messages. Data messages you see Status make more efficient use of channels compared Lunch to voice transmissions. -
Page 36: Receiving A Message
SENDING AN EMERGENCY ALERT E RECEIVING A MESSAGE When your radio receives a message: Emergency Alert can be programmed on the orange top button by your dealer. This feature • You hear two alert tones. allows you to send a priority Emergency Alert •... -
Page 37: Call Stacking
CALL STACKING Q to view the missed calls. Call Stacking allows you to track Call Alerts, #01* SC 12:00P Display shows Voice Selective Calls, and message packets that you received while on another call or away New # from your radio. Time Stamp New Call Call Type... -
Page 38: Editing A Radio Call List
EDITING A RADIO CALL LIST K 7 ) to select Edit Entry? Your radio has a Radio Call list that contains until you locate the desired entry. the names and radios IDs of several talkgroups or individuals. to select the entry. The ID numbers in your Radio Call List are programmed by your dealer, and cannot be 10 Use your keypad to edit the entry (see... -
Page 39: Repeater Or Talkaround Mode
REPEATER OR TALKAROUND J 3 ) to select Rptr/Talkarnd MODE ( CONVENTIONAL OPERATION ONLY) Repeater Mode until Talkaround Mode enables you to communicate or until Talkarnd Mode with another radio when either: to confirm your selection. • The repeater is not operating –or–... -
Page 40: Setting The Power Level
received. If the received signal is weak, the until Utilities transmit level will be set to high, and vice- versa. 3 ) to select Utilities Note: Be aware that a message received from a nearby radio might change your until Squelch radio’s power level to low. -
Page 41: Name And Call Alert Tone Tagging
3 ) to select Audio/Tones until Power High Name Tone Tag or until Power Low until 5 ) to select Name Tone Tag or until Power Auto until you see the name you want to tag. to confirm the selection. to confirm the selection. - Page 42 To tag a type of radio call: 1 ) to enter Menu Mode. until Audio/Tones 3 ) to select Audio/Tones until Call Tone Tag 5 ) to select Call Tone Tag until you see the call type you want to tag. to confirm the selection.
-
Page 43: Special Calls
SPECIAL CALLS to locate the desired status in the preprogrammed list. Status STATUS CALLS On Break A status is a code for transmitting prearranged Lunch messages; for example, status “04” could On Duty indicate “On Break.” – – Making a Status Call You can make a Status Call in two ways: Press the button that has been preprogrammed for a specific status to jump to and select from... - Page 44 3 Press the PTT button to make the call. Press the button that has been preprogrammed for a specific status to jump to you see Update in and select from the list shown on the display. Progress For example, pressing 2, Note: You cannot retransmit the current you see: Status...
-
Page 45: Receiving A Status Call
You can also dial a number, using * 9 Receiving a Status Call * to designate it as an emergency number. When your radio receives a status call: To make an emergency call: • The radio sounds a long, low tone. Press the preprogrammed Emergency button •... -
Page 46: Priority Calls
When your radio receives an emergency call: To make a broadcast call: • The radio sounds a long, low tone or a ring * 1 1 *, followed by the radio tone, and group number. Emergency • You see: Press the PTT button or #. PRIORITY CALLS The radio sounds a long, low tone. -
Page 47: Dtmf
DTMF DTMF (Dual Tone Multi Frequency), is used when a radio must operate in a radio system with an interface to telephone systems. A system-dependent access code is normally needed for DTMF. Please contact your dealer or network manager for further information on access codes. - Page 48 Notes English...
-
Page 49: Scan
AUTO GROUP SCAN G SCAN (LTR TRUNKED OPERATION ONLY) Your radio is equipped with the Scan feature, Auto Group Scan automatically scans which allows you to search for, lock onto, and talkgroups within an LTR zone as programmed monitor voice activity on trunked talkgroups by your dealer. -
Page 50: (Ltr Trunked Operation Only)
The G symbol appears on the LCD • Note: If you enter menu mode while the radio is scanning, scanning stops. It resumes when screen when non-prioritized Auto Group you exit menu mode. Scan has been activated. The G symbol appears on the LCD To start or stop an All Group Scan •... -
Page 51: System Scan
SYSTEM SCAN G –or– (LTR AND CONVENTIONAL Do the following: OPERATION) 1 ) to enter menu mode. System Scan scans trunked talkgroups and conventional channels between LTR and until System Scan conventional zones, as programmed by your 3 ) to select dealer. -
Page 52: Deleting A Nuisance Channel/Talkgroup (System Scan Operation Only)
DELETING A NUISANCE CHANNEL/ EDITING A SCAN LIST (SYSTEM TALKGROUP (SYSTEM SCAN SCAN OPERATION ONLY) OPERATION ONLY) One Scan list is assigned to each of the 16 positions on the Zone/Channel Selector knob. If a talkgroup or channel continually generates Each Scan list can contain up to 16 talkgroups unwanted calls (a “nuisance”... -
Page 53: Adding Or Deleting Channels Or Talkgroups In A Scan List
ADDING OR DELETING CHANNELS 10 If you added a channel or talkgroup, OR TALKGROUPS IN A SCAN LIST you see Entry Saved? – or– ) to enter Menu Mode. If you deleted a channel or talkgroup, until Program Lists Delete? you see ) to select to confirm the deletion. -
Page 54: Prioritizing A Channel/Talkgroup In A Scan List
PRIORITIZING A CHANNEL/ Setting Priority Channels or Talkgroups TALKGROUP IN A SCAN LIST ) to enter Menu Mode. You may want to check the activity on one or Program Lists two channels more frequently than others. You until can do this by prioritizing them: Program Lists 3 ) to select Priority Channel... - Page 55 to prioritize that channel. 12 ( to return to Edit Priority? –or– Hold down ( to exit Menu Mode. Note: You cannot reprioritize a Priority 1 channel or talkgroup to Priority 2. If you want to reprioritize all channels or talkgroups, you must delete each priority channel from the scan list and add it back.
- Page 56 Notes English...
-
Page 57: Phone
PHONE 2 ) to enter menu mode. –or– Your radio allows you to place and receive Press the preprogrammed Phone button, and telephone calls through trunked and skip to step 5. conventional systems (depending on phone line –or– availability). Telephone calls through a repeater Press and release the Speed Dial button to allow only one person to speak at a time. -
Page 58: Making A Phone Call Through A Conventional System
MAKING A PHONE CALL D 5 Press and Release the PTT button. THROUGH A CONVENTIONAL • If phone access is successful, a dial tone SYSTEM sounds. To initiate a phone call: • If phone access is unsuccessful, a low- pitched alternating tone sounds. Discon- Press the preprogrammed Phone button, and nect the call (see step 8) and try again. - Page 59 (For conventional operation with auto access a) Press and release the preprogrammed only). You hear a series of tones, indicating Speed Dial button (see step 2 on page 55) that an access code is being sent to use the Speed Dial feature. automatically, and see your access code: b) Press the key (1 to 9) corresponding to the –or–...
-
Page 60: Receiving A Phone Call Through An Ltr Or Conventional System
RECEIVING A PHONE CALL D 10 To disconnect a phone call, do one of the THROUGH AN LTR OR following: CONVENTIONAL SYSTEM Enter the deaccess code using the keypad. –or– To receive a phone call: If your radio has the deaccess code programmed, go to step 9. -
Page 61: Modifying The Phone List
MODIFYING THE PHONE LIST Add Entry? ) to select Your radio contains a Phone list that holds up Enter Name You see: to 25 phone numbers. The Phone list is shared between trunked and conventional Phone Use the keypad to enter the name (see page operation. - Page 62 To Delete an Entry: 11 ( to return to Delete Entry? ) to enter menu mode. –or– Program Lists until Hold down ( to exit Menu Mode. ) to select Program Lists To Edit an Entry: Phone List until ) to enter Menu Mode. ) to select Phone List Program Lists...
- Page 63 until Edit Name? (to edit the name), –or– until Edit Number? (to edit the phone number), Edit Location? –or– until (to edit the location in the phone list). 11 ) to confirm your selection. 12 Use the keypad to edit the entry (see page 15), –or–...
- Page 64 Notes English...
-
Page 65: Voice Storage
VOICE STORAGE Number of Equal Slot Length Length Slots (Seconds) The HT1550•XLS radio’s voice storage feature enables your radio to perform seven types of voice related functions: • All Incoming Call Recording • Voice Memo Recording • Recorded Message Playback When recording calls, keep in mind these time slot guidelines: •... -
Page 66: Incoming Call Recording
If a voice storage A confirmation tone sounds, indicating that the radio begins recording. record function is requested, the LCD 2 The radio records the call until the message screen shows: Memory Full slot is full or until you release the preprogrammed Record/Playback button. -
Page 67: To Record All Incoming Calls
To Record All Incoming Calls: 9 While your readio is recording, 1 ) to enter menu mode. you see: Recording The radio also records the time stamp and the Voice Storage until channel alias to the message slot. 3 ) to select Voice Storage 10 Press ( to stop recording. -
Page 68: Voice Memo Recording
VOICE MEMO RECORDING 2 Without pressing the PTT button, speak clearly into the microphone to record your In addition to recording calls received, the memo. The radio records your memo until the HT1550•XLS radio offers you the ability to message slot is full or until you release the record voice memos (or personal reminders) preprogrammed Record/Playback button. -
Page 69: Recorded Message Playback
To play back a message using the prepro- 8 Without pressing the PTT button, speak grammed Record/Playback button: clearly into the microphone to record your memo. The radio records your memo until the 1 Press and release the preprogrammed message slot is full or until you press (. Record/Playback button. -
Page 70: Recorded Message Delete
To playback a message using the menu: RECORDED MESSAGE DELETE The HT1550•XLS radio allows you to delete to enter menu mode. previously recorded incoming call or voice Voice Storage memo messages. You can delete a message until using either the preprogrammed Record/ Voice Storage 3 ) to select Playback button (see page 11) or your radio’s... -
Page 71: Recorded Message Transmission
To delete a message using the menu: RECORDED MESSAGE TRANSMISSION 1 ) to enter menu mode. This feature allows you to transmit a recorded until message to another radio user. Voice Storage To transmit a recorded message: 3 ) to select Voice Storage Press and hold the PTT button to initiate the message transmission. -
Page 72: Automatic Message Reply: "When Available
AUTOMATIC MESSAGE REPLY: To record a message: “WHEN AVAILABLE” until Recorded Msg The automatic Message Reply feature allows you to transmit a recorded message to a caller 2 ) to select when your radio receives an MDC selective Recorded Msg call. - Page 73 To disable the Automatic Message Reply feature: ) to enter menu mode. Utilities until Utilities ) to select until When Available ) to select When Available AutoReply Off? until ) to select English...
- Page 74 Notes English...
-
Page 75: Audio/Tone Settings
AUDIO/TONE SETTINGS You can customize the audio and tone feature settings on your radio by: ) to enter Menu Mode. Audio/Tones until ) to select Audio/Tones until you see the feature you want to change (see the following table). ) to select the feature. You see the feature’s current setting. - Page 76 Audio/Tone Settings Feature What it Does Settings Alert Vol Lvl Makes the volume level of the audio and alert tones Ind Alert Off independent. If turned on it makes the alert tones follow Ind Alert On the settings in the CPS. If turned off, the alert tones follow the setting of the volume knob.
-
Page 77: Utilities
UTILITIES You can customize some of your radio’s feature 1 ) to enter menu mode. until Utilities 3 ) to select Utilities until you see the feature you want to change (see table on the next page). 5 ) to select the feature. You see the fea- ture’s current setting. - Page 78 Utilities Features Feature What it Does Settings Radio Lock Sets Radio Lock password or turns the Radio Lock option on or off Radio Lock On (see page 25). Radio Lock Off Change Password Squelch § Sets radio squelch at either normal or tight (see page 37). Sqlch Normal Sqlch Tight Power Level...
- Page 79 Utilities Features Feature What it Does Settings Light Turns the display and keypad backlight feature on or off. Lights On Disable Lights Off Software Displays the radio’s software version number when you press —— Ver # When Transmits a recorded message to a caller when your radio Audio Reply On Available receives a Selective Call.
-
Page 80: Setting The Clock
SETTING THE CLOCK 8 When a setting is blinking, you can change it To set the clock: with Hour (AM or 3:05 PM 1 ) to enter menu mode. Minutes (AM/PM or 24 hr) until Utilities Note: You cannot select “24 hr” for Reminder Alarm 3 ) to select Set Time? -
Page 81: Home Channel Revert
HOME CHANNEL REVERT The Home Channel Revert feature allows you to instantly access your favorite trunked talkgroup or conventional channel at the touch of a button. To activate Home Channel Revert: Press the preprogrammed Home Channel Revert button (see page 10). HOME REVERT AUTOKEY (LTR OPERATION ONLY) This feature is recommended for use on LTR... - Page 82 Notes English...
-
Page 83: Warranty
One (1) Year the Product with any ancillary equipment, and all such equipment is expressly excluded from this Motorola, at its option, will at no charge either warranty. Because each system which may use repair the Product (with new or reconditioned... - Page 84 INCONVENIENCE, COMMERCIAL LOSS, LOST authorized warranty service location. Warranty PROFITS OR SAVINGS OR OTHER service will be provided by Motorola through one INCIDENTAL, SPECIAL OR CONSEQUENTIAL of its authorized warranty service locations. If you DAMAGES ARISING OUT OF THE USE OR...
- Page 85 Product or interfere with Motorola's normal warranty inspection and testing of the Product to verify any warranty MOTOROLA will defend, at its own expense, any claim. suit brought against the end user purchaser to Product which has had the serial number the extent that it is based on a claim that the removed or made illegible.
- Page 86 MOTOROLA with such claim; respect to infringement of patents by the Product B) that MOTOROLA will have sole control of the or any parts thereof. defense of such suit and all negotiations for Laws in the United States and other countries its settlement or compromise;...
-
Page 87: Accessories
NTN9857_R NiMH 1800 mAh 7.5 V, enhance the productivity of your two-way radio. Intrinsically Safe Many of the available accessories are listed NTN9858_R NiMH 1800 mAh 7.5 V below. For a complete list, see your Motorola dealer. CARRY ACCESSORIES ANTENNAS Carry Cases NAD6563 VHF whip (136–174 MHz) -
Page 88: Belt Clips
CHARGERS HLN9701 Nylon Case with Belt Loop for use with NiCd, NiMH, and Li- NLN7967 Wall mount for multi-unit Ion batteries charger NTN5243 Shoulder Strap NLN7968 Rack mount for multi-unit TDN9675 Wrist Strap charger NTN1177 Multi-unit, rapid rate, 110V Belt Clips NTN1667 Single-Unit, universal tri- HLN9714... -
Page 89: Headsets
NNTN4285 Remote speaker mic adapter NMN6246 Ultra-light headset with boom mic and in-line PTT; ear bud style receiver (requires Headsets BDN6676 adapter) BDN6635 Heavy-duty VOX headset with NMN6258 Medium-weight headset, over- boom mic (requires BDN6673 the-head with in-line PTT adapter cable) NMN6259 Medium-weight headset, BDN6636... -
Page 90: Surveillance Kits
NTN1736 CommPort with snap-on side BDN6670 Earpiece with mic and PTT sep- PTT (includes BDN6676 arate (3-wire), exceeds OSHA adapter) limits, beige BDN6719 Earpad, with 3.5mm threaded Surveillance Kits plug BDN6726 Receive only earpiece with BDN6664 Receive only earpiece with standard earphone earloop standard earphone... -
Page 91: Earpieces
BDN6732 Earpiece with mic and PTT sep- 0180358B38 Push-to-Talk Ring Switch arate (3-wire), exceeds OSHA 0180300E83 Push-to-Talk Body Switch limits, black 0180300E25 Earguard with Adjustable Loop Earpieces Radio Interface Modules for Ear Switches BDN6780 Single earbud with mic and PTT (requires BDN6676 adapter) BDN6671 Push-to-talk (PTT) and voice-... - Page 92 English...
- Page 93 Selecting a Conventional Zone and Channels, Trunked Zone, and Talkgroup • Turn Zone/channel selector knob to appropriate Zone/Talkgroup or ™ HT1550•XLS Radio Quick Reference Card • Press up or down to appropriate Zone or channels/Talkgroups. Sending a Call Record the functions for your radio’s programmable buttons in the table provided below. For further information, see pages 7 through 18 in this User’s Guide.
-
Page 94: Menu Navigation Chart
Menu Navigation Chart ‡ — Available in LTR Trunked Zones only (Refer to Menu Navigation guidelines— § — Available in conventional Zones only lower, left-hand corner of this page) Rptr/ Radio Call All Group Voice System Program Phone Utilities Audio/Tones Talkarnd§... - Page 96 MOTOROLA and the Stylized M Logo are registered in the U.S. Patent and Trademark Office. All other product or service names are the property of their respective owners. © Motorola, Inc. 2005. MOTOROLA et le logo stylisé M sont homologués au Patent and Trademark Office des Etats-Unis.