Table of Contents
Advertisement
Available languages
Available languages
Quick Links
©2010 Manufactured or imported by Targus Europe
Ltd., Hounslow, Middlesex, TW4 5DZ, UK. All rights
reserved. Targus is either a registered trademark or
trademark of Targus Group International, Inc. in the
United States and/or other countries. Features and
specifications are subject to change without notice. All
trademarks and registered trademarks are the property
of their respective owners.
USB 2.0
LAPTOP DOCKING
STATION WITH VIDEO
User Guide
N2953
Advertisement
Table of Contents

Related Manuals for Targus LAPTOP DOCKING STATION


Summary of Contents for Targus LAPTOP DOCKING STATION
- Page 1 STATION WITH VIDEO ©2010 Manufactured or imported by Targus Europe Ltd., Hounslow, Middlesex, TW4 5DZ, UK. All rights reserved. Targus is either a registered trademark or trademark of Targus Group International, Inc. in the United States and/or other countries. Features and specifications are subject to change without notice.
- Page 2 Targus USB 2.0 Laptop Docking Station with Video Targus USB 2.0 Laptop Docking Station with Video Table of Contents NL - Nederlands USB 2.0 Koppelstation voor de Laptop met videotoepassingen ....172 GB – English NO – Norsk USB 2.0 Laptop Docking Station With Video ..........4 USB 2.0 dokkingstasjon med video for bærbare PC-er .....196...
-
Page 3: Package Contents
Targus USB 2.0 Laptop Docking Station with Video GB - Introduction Package Contents Congratulations on your purchase of the Targus USB 2.0 Laptop In addition to this user guide, the package contains: Docking Station with Video. This portable expansion module allows •... - Page 4 Connecting the Docking Station to Your Computer To use the Targus Docking Station, you must first install the driver onto your computer. Then, connect the docking station to your computer and Windows After installing the docking station software, you are ready to connect the plug-and-play will install the hardware drivers for each port.
-
Page 5: Docking Station Ports
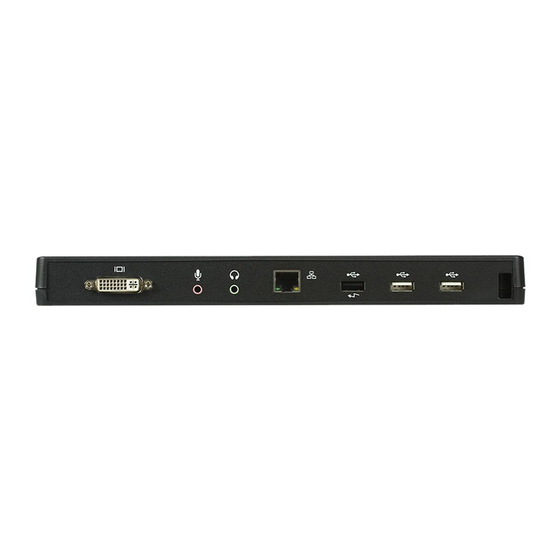
Targus USB 2.0 Laptop Docking Station with Video Targus USB 2.0 Laptop Docking Station with Video Docking Station Ports Connecting New Devices To avoid possible damage when connecting a new device, do not force the Audio In (MIC) Audio Out (SPK) USB Ports (White) cable connector into the port on the docking station. - Page 6 Targus USB 2.0 Laptop Docking Station with Video Targus USB 2.0 Laptop Docking Station with Video Connecting and Configuring an Audio Device NOTE: AUDIO DEVICES WILL NOT WORK SIMULTANEOUSLY ON THE PORT STATION AND THE HOST COMPUTER 1. Plug your headphones or speakers into the green 3.5mm Audio Out port on the docking station.
- Page 7 Targus USB 2.0 Laptop Docking Station with Video Targus USB 2.0 Laptop Docking Station with Video Controlling the Display using Docking Extend: You are using your notebook screen as your primary display and your monitor or LCD is a secondary screen.
- Page 8 Targus USB 2.0 Laptop Docking Station with Video Targus USB 2.0 Laptop Docking Station with Video Mirror: You are using your notebook screen as your primary display and your Primary (Notebook Monitor Off): You are using your monitor or LCD as monitor or LCD replicates your notebook screen.
- Page 9 Targus USB 2.0 Laptop Docking Station with Video Targus USB 2.0 Laptop Docking Station with Video Controlling the Display using Windows Off: You are using your notebook screen as your primary display and your monitor or LCD is turned off.
- Page 10 Targus USB 2.0 Laptop Docking Station with Video Targus USB 2.0 Laptop Docking Station with Video Extend Mode: To set the display into this mode, check the box marked ‘Ex- 1. In Display Properties window, using the drop down list, select the monitor tend my Windows desktop onto this monitor’...
- Page 11 Targus USB 2.0 Laptop Docking Station with Video Targus USB 2.0 Laptop Docking Station with Video 2. After selecting the corresponding monitor, check the box next to “extend 3. Then, check the box next to “This is my main monitor” (for Vista) “ Use this the desktop onto this monitor”...
- Page 12 Display Properties dialog box. To do this on Windows 7, right click on the desktop, click on “Personalize” and then select the ‘Display” and then “Change display setting’ link. Or right click on “Targus USB Video adapter” icon in the notification area and choose “advance”.
-
Page 13: Automatic Updates
Targus USB 2.0 Laptop Docking Station with Video Targus USB 2.0 Laptop Docking Station with Video Automatic Updates Supported Resolution Automatic Updates is a product maintenance feature from DisplayLink. The automatic update mechanism ensures that the Docking Station’s graphics Resolution... -
Page 14: Troubleshooting
Targus USB 2.0 Laptop Docking Station with Video Targus USB 2.0 Laptop Docking Station with Video Troubleshooting Verifying Devices are Installed Device Not Working You can view the devices installed on the docking station from the Device Manager window in System Properties. Right-click My Computer, Proper- •... -
Page 15: Usb 2.0 Laptop Dockstation Mit Video
Targus USB 2.0 Laptop Docking Station with Video DE - Einführung Packungsinhalt Vielen Dank, dass Sie sich für die Targus USB 2.0 Dockstation mit Zusätzlich zu dieser Bedienungsanleitung enthält die Verpackung: Video entschieden haben. Dieses tragbare Erweiterungsmodul • Targus USB 2.0 Laptop Dockstation mit Video erlaubt Ihnen, bis zu 4 USB-Geräte, Monitor, Netzwerkanschluss... - Page 16 Targus USB 2.0 Laptop Docking Station with Video Gerät und Treiber installieren Anschluss der Dockstation an den Um die Targus Dockstation nutzen zu können, müssen Sie zuerst den Computer Treiber auf Ihrem Computer installieren. Schließen Sie die Dockstation an Ihren Computer an, und Windows Plug-and-Play wird die Hardwaretreiber Nach der Installation der Dockstation-Software können Sie die Docksta-...
- Page 17 Targus USB 2.0 Laptop Docking Station with Video Targus USB 2.0 Laptop Docking Station with Video Ports der Dockstation Anschluss neuer Geräte Zwingen Sie, um mögliche Beschädigungen beim Anschluss eines neuen Audioausgang (LAUT- USB Ports Gerätes zu vermeiden, den Kabelstecker nicht mit Gewalt in den Port der Dock-...
- Page 18 Targus USB 2.0 Laptop Docking Station with Video Targus USB 2.0 Laptop Docking Station with Video Anschluss und Konfiguration eines HINWEIS: AUDIOGERÄTE ARBEITEN NICHT GLEICHZEIZIG MIT DER PORTSTATION UND DEM HAUPTRECHNER. Audiogerätes VORSICHT: ALLE AUDIO- ODER MULTIMEDIAANWENDUNGEN MÜSSEN BEENDET WERDEN, BEVOR ZWISCHEN AUDIOAUSGABE DER PORTSTATION UND AUDIOAUSGABE DES HAUPTRECHNERS 1.
- Page 19 Targus USB 2.0 Laptop Docking Station with Video Targus USB 2.0 Laptop Docking Station with Video Kontrolle des Displays über die Video- Erweitert: Sie verwenden Ihren Notebookbildschirm als Primärdisplay, und Ihr Monitor oder LCD ist ein sekundärer Bildschirm. Menüoptionen der Dockstation Wählen Sie, um die Anzeige auf diesen Modus einzustellen, “Erweitert”...
- Page 20 Targus USB 2.0 Laptop Docking Station with Video Targus USB 2.0 Laptop Docking Station with Video Spiegel: Sie verwenden Ihren Notebookbildschirm als Primärdisplay und Ihr Primär: Sie verwenden Ihren Monitor oder LCD als Ihr Primärdisplay und Monitor oder LCD reproduzieren den Notebookbildschirm.
- Page 21 Targus USB 2.0 Laptop Docking Station with Video Targus USB 2.0 Laptop Docking Station with Video Kontrolle des Displays über Windows Aus: Sie verwenden Ihren Notebookbildschirm als Primärbildschirm und Monitor oder LCD ist abgeschaltet. Displayeigenschaften (für Windows XP und Windows Vista) Die Videoeinstellung der Dockstation kann auch über die Dialogfelder der...
- Page 22 Targus USB 2.0 Laptop Docking Station with Video Targus USB 2.0 Laptop Docking Station with Video Erweiterungsmodus: Um das Display auf diesen Modus einzustellen, 1. Wählen Sie den an die Dockstationen angeschlossenen Monitor in der markieren Sie die Box “Windows Desktop auf diesen Monitor erweitern” (1 Aufklappliste im Fenster Grafikeigenschaften.
- Page 23 Targus USB 2.0 Laptop Docking Station with Video Targus USB 2.0 Laptop Docking Station with Video 2. Markieren Sie, nachdem Sie den entsprechenden Monitor gewählt haben, 3. Markieren Sie dann die Box neben “Mein Hauptmonitor” (bei Vista), die Box neben “Desktop auf diesen Monitor erweitern” (bei Vista) oder “Primärgerät”...
- Page 24 Windows Displayeigenschaften konfiguriert werden. Um dies bei Win- dows 7 zu tun, rechtsklicken Sie den Desktop. Klicken Sie “Anpassen”, wählen Sie “Anzeige” und dann den Link “Displayeigenschaften ändern”. Sie können auch das Symbol “Targus USB Video Adapter” im Mitteilungs- bereich rechtsklicken und “Fortgeschritten” wählen. Windows XP Windows Vista HINWEIS: SIE KÖNNEN NOCH BEQUEMER MIT EINEM LAPTOP ARBEITEN, WENN SIE SEINE AKTION...
- Page 25 Targus USB 2.0 Laptop Docking Station with Video Targus USB 2.0 Laptop Docking Station with Video Automatische Updates Unterstützte Auflösung Automatische Updates sind eine Produktwartungsfunktion von Display- Link. Der Automatische Updates-Mechanismus stellt sicher, dass der Grafi- Auflösung Bildwiederholung- Auflösung Bildwiederholung- kadapter der Dockstation über die modernsten Treiber und Software ver-...
- Page 26 Targus USB 2.0 Laptop Docking Station with Video Targus USB 2.0 Laptop Docking Station with Video Problemlösung Sichern, dass Geräte installiert sind Das Gerät arbeitet nicht Sie können die an der Dockstation installierten Geräte im Fenster Geräteman- ager unter Systemeigenschaften einsehen. Rechtsklicken Sie Systemsteuerung, •...
-
Page 27: Usb 2.0 Dockingstation Med Video
DK - Introduktion Pakkens indhold Foruden denne brugervejledning indeholder pakken: Tillykke med købet af Targus USB 2.0 Dockingstation med Video. • Targus USB 2.0 Laptop Docking Station med Video Denne bærbare dockingstation giver dig mulighed for at tilslutte • Højhastigheds USB 2.0 upstream-kabel op til 4 USB enheder, monitor, netværksforbindelse (ethernet/... - Page 28 Tilslutning af dockingstationen til din computer For at anvende Targus Dockingstationen er det nødvendigt først at installere driveren på din computer. Derefter tilsluttes docking stationen til din computer Efter at dockingstationens software er installeret, er du klar til at tilslutte dock- og Windows plug-and-play vil automatisk installere driverne for hver port.
- Page 29 Targus USB 2.0 Laptop Docking Station with Video Targus USB 2.0 Laptop Docking Station with Video Porte på dockingstationen Tilslutning af nye enheder For at undgå mulig skade når en ny enhed tilsluttes, må kabelstikket ikke force- Audio ud (HØJT- TALER) res ind i porten på...
- Page 30 Targus USB 2.0 Laptop Docking Station with Video Targus USB 2.0 Laptop Docking Station with Video Tilslutning og konfiguration af Audio-enhed BEMÆRK: AUDIO-ENHEDERNE VIRKER IKKE SAMTIDIG PÅ STATIONSPORTEN OG HOSTCOMPUT- EREN 1. Sæt hovedtelefonerne eller højttalerne i den grønne 3,5mm Audio ud port på...
- Page 31 Targus USB 2.0 Laptop Docking Station with Video Targus USB 2.0 Laptop Docking Station with Video Styring Skærmen hjælp Udvidelse: du anvender din notebooks skærm som primær skærm og din mon- itor eller LCD som sekundær skærm. dockingstationens valgmuligheder i Videomenu For at indstille visning i denne tilstand, vælges ‘Extend’...
- Page 32 Targus USB 2.0 Laptop Docking Station with Video Targus USB 2.0 Laptop Docking Station with Video Spejl: du anvender din notebook som primær skærm ,og din monitor eller LCD Primær: (Notebook Monitor Off (slukket)): Du anvender din monitor eller kopierer din notebooks skærm.
- Page 33 Targus USB 2.0 Laptop Docking Station with Video Targus USB 2.0 Laptop Docking Station with Video Styring af Display ved hjælp af Windows Off (Slukket): Du bruger din notebook skærm som primær skærm, og din moni- tor eller LCD er slukket.
- Page 34 Targus USB 2.0 Laptop Docking Station with Video Targus USB 2.0 Laptop Docking Station with Video Udvidelsesfunktion: Displayet indstilles til denne funktion ved at sætte kryds 1. I vinduet Skærmindstillinger, vælges, ved hjælp af dropdownlisten, den i boksen “Extend my Windows desktop onto this monitor” (udvid skrivebordet monitor, der er forbundet til Dockingstationen over til denne skærm) (1 i Figur 1).
- Page 35 Targus USB 2.0 Laptop Docking Station with Video Targus USB 2.0 Laptop Docking Station with Video 2. Når du har valgt den tilsvarende monitor, sættes kryds i boksen ved siden 3. Derefter sættes kryds i boksen ved siden af “This is my main monitor” (dette af “extend the desktop onto this monitor”...
- Page 36 (for XP) og klik “Apply” (anvend) Dockingstationens videoindstilling kan også konfigureres fra Windows Skær- mindstillinger. Dette gøres i Windows 7 ved at klikke på “Personlige Indstill- inger”, vælge “Display” og “Skift skærmindstilling”. Eller højreklik på “Targus USB Video adapter” og vælge “advanced” (avanceret). Windows XP...
- Page 37 Targus USB 2.0 Laptop Docking Station with Video Targus USB 2.0 Laptop Docking Station with Video Automatiske Opdateringer Understøttet Opløsning Automatiske Opdateringer er en produktvedligeholdelsesfunktion fra Dis- playLink. Den automatiske opdatering sikrer, at Dockingstationens grafiske Opløsning Opdateringshas- Opløsning Opdateringshas- adapter har den mest opdaterede driver og software, som giver brugeren den...
- Page 38 Targus USB 2.0 Laptop Docking Station with Video Targus USB 2.0 Laptop Docking Station with Video Problemløsning Check at Apparat er Installeret Apparatet virker ikke Du kan se indstillede apparater på dockingstationen i Device Manager vinduet i Systemindstilling. Højreklik på Min Computer, Indstillinger og klik på Hard- •...
-
Page 39: Docking Station Usb 2.0 Con Vídeo Para Portátiles
Enhorabuena por su compra de la Docking Station USB 2.0 con Vídeo Junto con esta guía de usuario, la caja contiene: para Portátiles de Targus. Este módulo portátil de expansión le permite • Docking Station USB 2.0 con Vídeo para Portátiles de Targus conectarse a través de una simple conexión USB a hasta 4 dispositivos... - Page 40 Conectar la Docking Station a su Ordenador Para utilizar la Docking Station de Targus, deberá instalar primero el driver en su ordenador. Luego conecte la docking station a su ordenador y Windows Después de instalar el software de la Docking Station, estará listo para plug-and-play instalará...
- Page 41 Targus USB 2.0 Laptop Docking Station with Video Targus USB 2.0 Laptop Docking Station with Video Puertos de la docking station Conectar Dispositivos Nuevos Para evitar posibles daños cuando conecta un dispositivo nuevo, no fuerce Entrada de Audio Salida de Audio Puertos USB el conector del cable en el puerto de la docking station.
- Page 42 Targus USB 2.0 Laptop Docking Station with Video Targus USB 2.0 Laptop Docking Station with Video Conectar y Configurar un Dispositivo Audio Para Windows 7 Vaya al Panel de Control y seleccione Hardware y Sonido. Seleccione Soni- 1. Enchufe los auriculares o altavoces en el puerto Salida de Audio verde de do.
- Page 43 Targus USB 2.0 Laptop Docking Station with Video Targus USB 2.0 Laptop Docking Station with Video Control de la Pantalla usando el menú de Extend (Ampliación): Usted está utilizando su ordenador portátil como pantalla principal y la pantalla o monitor LCD como pantalla secundaria.
- Page 44 Targus USB 2.0 Laptop Docking Station with Video Targus USB 2.0 Laptop Docking Station with Video Principal: Está utilizando su monitor o la pantalla LCD como pantalla prin- Espejo: Está utilizando la pantalla de su portátil como su pantalla principal y cipal, y la pantalla de su ordenador portátil está...
- Page 45 Targus USB 2.0 Laptop Docking Station with Video Targus USB 2.0 Laptop Docking Station with Video Administrar la pantalla utilizando Apagado: Esta utilizando la pantalla de su ordenador como dispositivo prin- cipal y su monitor LCD se encuentra apagado. Windows Display (para Windows XP y Windows Vista) La configuración de la docking station también puede ser administrada...
- Page 46 Targus USB 2.0 Laptop Docking Station with Video Targus USB 2.0 Laptop Docking Station with Video Modo extendido: Para configurar la pantalla en este modo, verifique la 1. En la ventana de Propiedades de Pantalla, usando la lista despegable, casilla marcada Extender el escritorio en este monitor (1 en la Figura 1 en seleccione el monitor conectado la docking station.
- Page 47 Targus USB 2.0 Laptop Docking Station with Video Targus USB 2.0 Laptop Docking Station with Video 2. Después de seleccionar le correspondiente monitor, marque la siguiente 3. Seguidamente marque la casilla junto a “Este es mi monitor principal” casilla junto a “extender el escritorio a este monitor” (para Vista) o “ex- (para Vista)”...
- Page 48 Windows 7, haga clic con el botón derecho sobre el escritorio, haga clic en “Personalizar” y seleccione la opción “Pantalla”, y luego seleccione “Cambiar de configuración de pantalla”. O haga clic con el botón derecho sobre el icono “Adaptador Targus USB para Video” en el área de notificación y seleccione “avanzar” Windows XP Windows Vista NOTA: ES POSIBLE TRABAJAR DE FORMA MAS CÓMODA CON UN PORTÁTIL CON LA TAPA CERRADA...
- Page 49 Targus USB 2.0 Laptop Docking Station with Video Targus USB 2.0 Laptop Docking Station with Video Actualizaciones Automáticas Resolución Soportada Las actualizaciones automáticas son una característica de mantenimiento de producto de Display-Link. El mecanismo de actualización automática Resolución Tasas de refresco Resolución...
- Page 50 Targus USB 2.0 Laptop Docking Station with Video Targus USB 2.0 Laptop Docking Station with Video Solución de problemas Verificando que los dispositivos se Dispositivo no funciona encuentran instalados • Asegúrese de que el dispositivo esté totalmente insertado en el puerto correcto Puede ver los dispositivos instalados en la docking station desde la ventana de la Docking Station.
-
Page 51: Usb 2.0 Kannettavan Tietokoneen Telakka-Asema Näyttö-Liitännällä
Targus USB 2.0 Laptop Docking Station with Video Targus USB 2.0 Laptop Docking Station with Video FI - Johdanto Pakkauksen sisältö Onnittelut hankkimasi Targus USB 2.0 videolla varustetun Tämän käyttöoppaan lisäksi pakkaukseen sisältyy: kannettavan tietokoneen telakka-aseman johdosta. Tämä • Targus USB 2.0 kannettavan tietokoneen telakka-asema näyttö-liitännällä... - Page 52 Targus USB 2.0 Laptop Docking Station with Video Targus USB 2.0 Laptop Docking Station with Video Laitteen ja ajurien asennus Telakka-aseman liittäminen tietokoneeseesi Käyttääksesi Targus telakka-asemaa, sinun täytyy ensin asentaa ohjainohjelmisto tietokoneellesi. Yhdistä sitten telakka-asema Kun olet asentanut telakka-aseman ohjelmiston, voit liittää telakka-asemasi tietokoneeseesi ja Windowsin liitä-ja-käytä...
- Page 53 Targus USB 2.0 Laptop Docking Station with Video Targus USB 2.0 Laptop Docking Station with Video Telakka-aseman portit Uusien laitteiden liittäminen Välttääksesi mahdollisia vahinkoja kun liität uusia laitteita, älä työnnä kaapeli- Mikrofoni-liitäntä Kaiutin liitäntä (SPK) USB-portit (valkoi- (MIC) liitintä väkisin telakka-aseman porttiin. Jos kaapeliliitin ei liity helposti, käännä...
- Page 54 Targus USB 2.0 Laptop Docking Station with Video Targus USB 2.0 Laptop Docking Station with Video Äänentoistolaitteen liittäminen ja konfigurointi HUOM: ÄÄNENTOISTOLAITTEET EIVÄT TOIMI SAMAAN AIKAAN PORTTIASEMASSA JA ISÄNTÄTIETO- KONEESSA 1. Kytke kuulokkeesi tai kaiuttimesi telakka-aseman vihreään 3,5mm ään- entoiston lähtöliitäntä -porttiin.
- Page 55 Targus USB 2.0 Laptop Docking Station with Video Targus USB 2.0 Laptop Docking Station with Video Näytön hallinta käyttämällä telakka- Laajenna (Extend): Käytät kannettavasi näyttöä päänäyttönäsi ja monitoriasi tai LCD:täsi toissijaisena näyttönä. aseman Videovalikkovaihtoehtoja Asettaaksesi näytön tähän tilaan, valitse ‘Laajenna (Extend)’ telakka- aseman kuvakesovellusvalikosta.
- Page 56 Targus USB 2.0 Laptop Docking Station with Video Targus USB 2.0 Laptop Docking Station with Video Pääsääntöinen/Primary (Kannettavan näyttö pois päältä): Käytät moni- Peili (Mirror): Käytät kannettavasi näyttöä päänäyttönäsi ja monitorisi tai toriasi tai LCD:täsi päänäyttönäsi ja kannettavasi näyttö on pois päältä. (pääset LCD:si toistaa kannettavasi näytön.
- Page 57 Targus USB 2.0 Laptop Docking Station with Video Targus USB 2.0 Laptop Docking Station with Video Näytön hallinta Windowsin näytön Pois päältä (Off): Käytät kannettavasi näyttöä päänäyttönäsi ja monitorisi tai LCD:si on pois päältä. ominaisuuksia käyttämällä (Jos sinulla on Windows XP tai Vista) Telakka-aseman videoasetukset voi konfiguroida myös Windowsin näytön...
- Page 58 Targus USB 2.0 Laptop Docking Station with Video Targus USB 2.0 Laptop Docking Station with Video Laajennustila (Extend Mode): Asettaaksesi näytön tähän tilaan, valitse 1. Vaihtoehdossa Näytön ominaisuudet (Display Properties), käyttämällä pu- vaihtoehto nimeltä ‘Laajenna Windows työpöytäni tähän monitoriin (Extend dotusvalikkoa, valitse se monitori joka on liitetty telakka-asemaan.
- Page 59 Targus USB 2.0 Laptop Docking Station with Video Targus USB 2.0 Laptop Docking Station with Video 2. Kun olet valinnut vastaavan monitorin, valitse ruutu vaihtoehdolle “laajen- 3. Valitse sitten vaihtoehto “Tämä on päänäyttöni (This is my main monitor)” na työpöytä tähän monitoriin (extend the desktop onto this monitor)” (Vista) (Vista) “Käytä...
- Page 60 Targus USB 2.0 Laptop Docking Station with Video Targus USB 2.0 Laptop Docking Station with Video Näytön hallinta käyttämällä Windows 5. Valitse kannettavan monitori käyttämällä pudotusvalikkoa ja poistamalla valinta kohdasta “laajenna työpöytä tähän monitoriin (extend the desktop Näytön ominaisuuksia onto this monitor)” (Vista) tai “Laajenna Windows työpöytäni tähän monito- (Jos sinulla on Windows 7) riin (Extend my Windows desktop onto this monitor)”...
- Page 61 Targus USB 2.0 Laptop Docking Station with Video Targus USB 2.0 Laptop Docking Station with Video Automaattiset päivitykset Tuettu resoluutio Automaattiset päivitykset on DisplayLinkin ylläpito-ominaisuus tuotteelle. Automaattinen päivitysmekanismi varmistaa että telakka-aseman näytöno- Resoluutio 32-bittisenä Resoluutio 32-bittisenä hjaimessa on uusimmat ajurit ja ohjelmisto, tarjoten käyttäjälle parannetun...
- Page 62 Targus USB 2.0 Laptop Docking Station with Video Targus USB 2.0 Laptop Docking Station with Video Vianetsintä Laitteiden asennuksen varmistaminen Laite ei toimi Voit katsella telakka-asemaan asennettuja ohjelmia Järjestelmän ominaisu- uksissa sijaitsevan Laitteenhallinta-ikkunan kautta. Napauta hiiren oikeaa • Varmista että laite on täysin kiinni oikeassa telakka-aseman portissa.
- Page 63 En plus de ce guide d’utilisateur, vous trouverez avec votre achat : 2.0 TARGUS avec vidéo pour ordinateur portable. Ce module • Une station d’accueil USB 2.0 TARGUS avec vidéo pour ordinateur d’extension vous permet, via une simple connexion USB, de portable connecter votre ordinateur portable à...
- Page 64 Installation de la station et de son pilote l’ordinateur Avant d’utiliser votre station d’accueil Targus, vous devez installer son pilote sur l’ordinateur puis connecter la station à l’ordinateur. Windows détectera Si vous avez suivi toutes nos instructions, vous pouvez maintenant con- la station et installera le pilote pour chaque port.
- Page 65 Targus USB 2.0 Laptop Docking Station with Video Targus USB 2.0 Laptop Docking Station with Video Connexion de périphériques à la base Ports de la station d’accueil Sortie audio (haut- Ne forcez jamais le connecteur du périphérique dans le port de la station.
- Page 66 Targus USB 2.0 Laptop Docking Station with Video Targus USB 2.0 Laptop Docking Station with Video Connexion et configuration d’un périphérique audio Pour Windows 7 Ouvrez le Panneau de configuration, sélectionnez Hardware and 1. Branchez vos écouteurs ou vos haut-parleurs sur le port de sortie 3,5 Sound (Matériel et son) puis Sound (Son).
- Page 67 Targus USB 2.0 Laptop Docking Station with Video Targus USB 2.0 Laptop Docking Station with Video Contrôle de l’affichage depuis le menu Extend (Extension) : Vous voulez utiliser l’écran de l’ordinateur comme écran principal et le moniteur ou l’écran LCD comme écran secondaire.
- Page 68 Targus USB 2.0 Laptop Docking Station with Video Targus USB 2.0 Laptop Docking Station with Video Option Mirror (Miroir) : Vous voulez afficher le contenu exact de l’écran de Écran principal : vous voulez utiliser uniquement le moniteur ou l’écran l’ordinateur sur le moniteur ou l’écran LCD.
- Page 69 Targus USB 2.0 Laptop Docking Station with Video Targus USB 2.0 Laptop Docking Station with Video Contrôle de l’affichage depuis la fenêtre OFF (Arrêt) : Vous voulez utiliser uniquement l’écran de l’ordinateur et étein- dre le moniteur ou l’écran LCD.
- Page 70 Targus USB 2.0 Laptop Docking Station with Video Targus USB 2.0 Laptop Docking Station with Video Mode extension : pour travailler en mode extension d’écran, cochez 1. Dans la fenêtre Paramètres d’affichage, sélectionnez l’écran branché sur l’option “Étendre le Bureau à ce moniteur” (1 dans la Figure 1). Sélectionnez la station dans la liste déroulante.
- Page 71 Targus USB 2.0 Laptop Docking Station with Video Targus USB 2.0 Laptop Docking Station with Video 2. Cliquez sur la case de sélection “Étendre le Bureau à ce moniteur“ (pour 3. Cliquez sur la case de sélection “Il s’agit de mon moniteur principal (pour Vista et XP).
- Page 72 “Affichage’ puis le lien “Modifier les paramètres d’affichage”. Vous pouvez également cliquer avec le bouton droit de la souris sur l’icône “Targus USB Video adapter” (“Adaptateur vidéo USB de Targus”) dans la zone de notification et choisir “advance” (Avancé).
- Page 73 Certains périphériques (par exemple les imprimantes et équipements op- tiques) requièrent davantage de puissance que les ports USB standards ne 1920 x 1200 1152 x 870 peuvent en fournir. Pour ces périphériques, votre base Targus offre deux 2048 x 1152 1280 x 720 50 60 ports USB de 1000 mA, soit le double de la puissance fournie par un port USB standard.
- Page 74 à nouveau, vérifiez les spécifications électriques du périphérique. • Cartes graphiques USB Limitations du produit - Targus USB Video Adapter (Cartes Targus USB vers DVI) Certains périphériques ne fonctionnent pas normalement pendant un transfert • Écran de données à grande vitesse. Par exemple, l’impression de graphiques ou un - Targus USB Video Adapter (Cartes Targus USB vers DVI) trafic réseau important suffit pour allonger les temps de réponse de la souris.
- Page 75 Congratulazioni per aver acquistato la Docking Station Targus USB 2.0 con video. Questo modulo portatile d’espansione permette • Docking Station Targus USB 2.0 per Notebook con video di collegare, grazie a un singolo collegamento USB, fino a 4 • Cavo Upstream Alta velocità USB 2.0 apparecchi USB, monitor, rete (Ethernet/LAN) casse e microfono.
- Page 76 Collegare la Docking Station al computer Per usare la Docking Station Targus prima occorre installare il driver sul computer poi collegare la docking station al computer e Windows plug-and-play Dopo aver installato il software della docking station siete pronti a col- installerà...
- Page 77 Targus USB 2.0 Laptop Docking Station with Video Targus USB 2.0 Laptop Docking Station with Video Porte della Docking Station Collegare nuovi apparecchi Per evitare danni quando si collega un nuovo apparecchio non forzare il Audio in (Mic) Audio out (CASSE) Porte USB (Bianche) connettore del cavo nella porta o nella docking station.
- Page 78 Targus USB 2.0 Laptop Docking Station with Video Targus USB 2.0 Laptop Docking Station with Video Collegare e configurare un apparecchio audio. Per Windows 7 Andare su Pannello di Controllo, selezionare Hardware e Su- 1. Collegare le cuffie o le casse nella porta Audio verde da 3.5 mm sulla ono e scegliere Suono.
- Page 79 Targus USB 2.0 Laptop Docking Station with Video Targus USB 2.0 Laptop Docking Station with Video Controllare il display usando le opzioni Extend (Espandere): Si usa lo schermo del notebook come visualizzatore principale e il monitor o l’LCD come schermo secondario.
- Page 80 Targus USB 2.0 Laptop Docking Station with Video Targus USB 2.0 Laptop Docking Station with Video A specchio: Si usa lo schermo del computer come visualizzatore principale Monitor principale: Si sta usando il monitor o lo schermo LCD come moni- e il monitor o LCD copia esattamente lo schermo del computer.
- Page 81 Targus USB 2.0 Laptop Docking Station with Video Targus USB 2.0 Laptop Docking Station with Video Controllare il Display tramite le Propri- Off: Si usa lo schermo del notebook come display principale e il monitor o LCD è spento. età di visualizzazione di Windows...
- Page 82 Targus USB 2.0 Laptop Docking Station with Video Targus USB 2.0 Laptop Docking Station with Video Modalità d’espansione: Per impostare il display in questa modalità, contr- 1. nella finestra delle Proprietà del display, usare la lista a tendina, selezi- ollare il riquadro contrassegnato con “Espandere il desktop di windows su onare il monitor collegato alla Docking Station.
- Page 83 Targus USB 2.0 Laptop Docking Station with Video Targus USB 2.0 Laptop Docking Station with Video 2. Dopo aver selezionato il monitor corrispondente, spuntare il riquadro vi- 3. Poi spuntare il riquadro vicino a “Questo è il mio monitor principale” (per cino a “espandere il desktop su questo monitor”...
- Page 84 Per farlo con Windows 7 fare clic su “Personalizza” selezionare “Schermo” e poi il link “Cambiare le impostazioni dello schermo”. In alternativa fare clic con il tasto destro del mouse sull’icona “Adattatore Video Targus USB” nell’area degli avvisi e scegliere “Avanzate”...
- Page 85 Targus USB 2.0 Laptop Docking Station with Video Targus USB 2.0 Laptop Docking Station with Video Aggiornamenti automatici Risoluzione compatibile Gli aggiornamenti automatici sono una caratteristica di manutenzione del prodotto da Display-Link, Il meccanismo di aggiornamento automatico as- Risoluzione Velocità di ripris- Risoluzione Velocità...
- Page 86 Targus USB 2.0 Laptop Docking Station with Video Targus USB 2.0 Laptop Docking Station with Video Risoluzione dei problemi Verificare che gli apparecchi siano installati L’apparecchio non funziona • Assicurarsi che l’apparecchio sia collegato correttamente alla porta corretta Si possono vedere gli apparecchi installati sulla docking station dalla finestra della docking station.
- Page 87 Behalve deze handleiding bevat de verpakking ook: Station With Video (Targus USB 2.0 Docking Station (Koppelstation) voor • Targus USB 2.0 Laptop Docking Station with Video (Targus USB 2.0 de Laptop met videotoepassingen). Met deze draagbare uitbreidingsmodule Docking Station (Koppelstation) voor de laptop met videotoepassingen.
- Page 88 Het docking station (koppelstation) op uw computer aansluiten U moet, om het Targus Docking Station (Koppelstation) te gebruiken, eerst de driver op uw computer installeren. Sluit het koppelstation vervolgens aan op uw computer; Windows ‘plug-and-play’ (insteken en spelen) zal de U bent, nadat u de software voor het docking station (koppelstation) hebt hardware- drivers voor elke uitgang installeren.
- Page 89 Targus USB 2.0 Laptop Docking Station with Video Targus USB 2.0 Laptop Docking Station with Video Uitgangen van docking station (koppelstation) Nieuwe apparaten aansluiten Gebruik, om mogelijke schade te voorkomen wanneer u een nieuw apparaat Audio-uitgang (SPK) USB uitgangen (Wit)
- Page 90 Targus USB 2.0 Laptop Docking Station with Video Targus USB 2.0 Laptop Docking Station with Video Een audioapparaat aansluiten en configureren Voor Windows 7 Ga naar het Configuratiescherm en selecteer Hardware en Geluid en 1. Steek uw koptelefoon of luidsprekers in de groene 3.5mm Audio-uitgang op het kies Geluid.
- Page 91 Targus USB 2.0 Laptop Docking Station with Video Targus USB 2.0 Laptop Docking Station with Video Beeldschermweergave regelen met Uitbreiden: u gebruikt uw laptopscherm als uw hoofdscherm en uw moni- tor of LCD scherm als tweede scherm. behulp van de video-menuopties van het Selecteer, om de beeldschermweergave in deze modus te zetten, ‘Ex-...
- Page 92 Targus USB 2.0 Laptop Docking Station with Video Targus USB 2.0 Laptop Docking Station with Video Spiegel: U gebruikt uw laptopscherm als uw hoofdscherm. Uw monitor of Hoofdscherm: u gebruikt uw monitor of LCD scherm als uw hoofdscherm LCD scherm kopiëren uw laptopscherm.
- Page 93 Targus USB 2.0 Laptop Docking Station with Video Targus USB 2.0 Laptop Docking Station with Video De beeldschermweergave controleren met Uit: U gebruikt uw laptopscherm als uw hoofdscherm en uw monitor of LCD scherm is uitgeschakeld. behulp van Eigenschappen voor Beelds-...
- Page 94 Targus USB 2.0 Laptop Docking Station with Video Targus USB 2.0 Laptop Docking Station with Video Uitbreidmodus: Vink, om de beeldschermweergave in deze modus te 1. Selecteer, in het venster Eigenschappen voor Beeldscherm, met behulp zetten, het vakje ‘Het Windows-bureaublad uitbreiden naar deze monitor’ (1 van de keuzelijst, de monitor die aan het docking station (koppelstation) in Figuur 1).
- Page 95 Targus USB 2.0 Laptop Docking Station with Video Targus USB 2.0 Laptop Docking Station with Video 2. Vink, nadat u de juiste monitor heeft geselecteerd, het vakje naast “Het bu- 3. Vink vervolgens het vakje aan naast “Dit is mijn hoofdmonitor” (voor Vista) reaublad uitbreiden naar deze monitor”...
- Page 96 Windows. Om dit in Windows 7 te doen, klikt u met rechtermuisknop op het bureaublad. Klik dan op “Aan Persoonlijke voorkeur aanpassen” en selecteer de link “Beeldscherminstellingen” en dan “Verander beeldscherminstelling”. Of klik met rechtermuisknop op het “Targus USB Video adapter” pictogram in het berich- tenvenster en kies “doorgaan”. Windows XP...
- Page 97 Targus USB 2.0 Laptop Docking Station with Video Targus USB 2.0 Laptop Docking Station with Video Automatische updates Ondersteunde resolutie Automatische updates is een onderhoudsonderdeel van Display-Link. Het automatische update- mechanisme zorgt ervoor dat de grafische adapter Resolutie Vernieuwing- Resolutie...
- Page 98 Targus USB 2.0 Laptop Docking Station with Video Targus USB 2.0 Laptop Docking Station with Video Probleemoplosser Controleren of de apparaten geïnstalleerd zijn Apparaat werkt niet U kunt de apparaten die op het docking station (koppelstation) geïnstalleerd zijn bekijken via het venster Apparaatbeheer in systeemeigenschappen. Klik met •...
-
Page 99: Usb 2.0 Dokkingstasjon Med Video For Bærbare Pc-Er
Gratulerer med kjøpet av en Targus USB 2.0-dokkingstasjon med I tillegg til denne brukerveiledningen inneholder pakken: video for bærbare PC-er. Denne bærbare utvidelsesmodulen lar deg • Targus USB 2.0 dokkingstasjon med video for bærbare PC-er koble til opptil 4 USB-enheter, skjerm, nettverksforbindelse (Ethernet/ • Høyhastighets USB 2.0-oppstrømskabel LAN), høyttalere og mikrofon via én enkelt USB-forbindelse. - Page 100 Installere enheten og driverne Koble dokkingstasjonen til datamaskinen For å bruke Targus-dokkingstasjonen må du først installere driveren på datamaskinen din. Koble deretter dokkingstasjonen til datamaskinen din, så vil Windows plug-and-play installere maskinvaredriverne for hver port. Når du har installert programvaren for dokkingstasjonen, er du klar til å koble dokkingstasjonen til datamaskinen.
- Page 101 Targus USB 2.0 Laptop Docking Station with Video Targus USB 2.0 Laptop Docking Station with Video Dokkingstasjonsporter Koble til nye enheter For å unngå mulig skade ved tilkobling av en ny enhet, ikke tving kabelkontak- ten inn i porten på dokkingstasjonen. Hvis kabelkontakten ikke går inn med én Lyd inn (MIK) Lyd ut (HØYT)
- Page 102 Targus USB 2.0 Laptop Docking Station with Video Targus USB 2.0 Laptop Docking Station with Video Koble til og konfigurere en lydenhet MERK: LYDENHETER VIL IKKE FUNGERE SAMTIDIG PÅ PORTSTASJONEN OG VERTSDATAMASKINEN 1. Sett hodetelefonene eller høyttalerne dine inn i den grønne 3,5 mm lyd ut- porten på...
- Page 103 Targus USB 2.0 Laptop Docking Station with Video Targus USB 2.0 Laptop Docking Station with Video Kontrollere displayet hjelp Utvide: Du bruker PC-skjermen som primærdisplay, og skjermen eller LCD- skjermen din som sekundær skjerm. dokkingstasjonens videomenyalternativer For å stille displayet inn på denne modusen, velg “Extend” (Utvid) på dok- kingstasjonens programikonmeny.
- Page 104 Targus USB 2.0 Laptop Docking Station with Video Targus USB 2.0 Laptop Docking Station with Video Speile: Du bruker PC-skjermen som primærdisplay, og skjermen eller LCD- Primær (PC-skjerm av): Du bruker skjermen eller LCD-skjermen din som skjermen din reproduserer PC-skjermen.
- Page 105 Targus USB 2.0 Laptop Docking Station with Video Targus USB 2.0 Laptop Docking Station with Video Kontrollere displayet via Egenskaper Av: Du bruker PC-skjermen som primærdisplay, og skjermen eller LCD-skjer- men er slått av. for skjerm i Windows (for Windows XP og Vista) Dokkingstasjonens videoinnstillinger kan også...
- Page 106 Targus USB 2.0 Laptop Docking Station with Video Targus USB 2.0 Laptop Docking Station with Video Utvidet modus: For å stille displayet inn på denne modusen haker du av i 1. I vinduet for Skjermegenskaper, bruk nedtrekkslisten for å velge skjermen boksen “Utvid Windows-skrivebordet til denne skjermen”...
- Page 107 Targus USB 2.0 Laptop Docking Station with Video Targus USB 2.0 Laptop Docking Station with Video 3. Hak deretter av i boksen ved siden av “Dette er hovedskjermen” (for Vista) 2. Når du har valgt tilsvarende skjerm, haker du av i boksen ved siden av “Utvid eller “Bruk denne enheten som primærskjerm”...
- Page 108 Windows Egenskaper for skjerm. For å gjøre dette i Windows 7, høyreklikk på skrivebordet, klikk på “Tilpass” og velg deretter “Skjerm” og koblingen “En- dre skjerminnstilling”. Eller du kan høyreklikke på ikonet “Targus USB-video- adapter” i varslingsområdet og velge “advance” (fremskynd).
- Page 109 Targus USB 2.0 Laptop Docking Station with Video Targus USB 2.0 Laptop Docking Station with Video Automatiske oppdateringer Støttet oppløsning Automatiske oppdateringer er en funksjon for produktvedlikehold fra Display- Link. Mekanismen for automatiske oppdateringer sørger for at dokkingstasjo- Oppløsning Oppdateringshas- Oppløsning...
- Page 110 Targus USB 2.0 Laptop Docking Station with Video Targus USB 2.0 Laptop Docking Station with Video Feilsøking Bekrefte at enheter er installert Enheten fungerer ikke Du kan se enhetene som er installert på dokkingstasjonen fra vinduet for En- hetsbehandling under Systemegenskaper. Høyreklikk på Min datamaskin, •...
- Page 111 Além deste guia do utilizador, a embalagem inclui: Parabéns pela sua compra da Docking Station (Base de Ligação) USB 2.0 para PC Portátil com Vídeo da Targus. Este módulo de • Docking Station (Base de Ligação) USB 2.0 para PC Portátil com Vídeo expansão portátil, através de uma única ligação USB, permite-lhe...
- Page 112 Ligação da Docking Station (Base de Ligação) ao seu Computador Para utilizar a Docking Station (Base de Ligação) Targus, em primeiro lugar, é necessário instalar o controlador no seu computador. De seguida, ligue a Depois da instalação do software da docking station (base de ligação), docking station base de ligação ao seu computador e a função “plug-and-...
- Page 113 Targus USB 2.0 Laptop Docking Station with Video Targus USB 2.0 Laptop Docking Station with Video Portas da Docking Station (Base de Ligação) Ligação de Novos Dispositivos Para evitar possíveis danos quando ligar um novo dispositivo, não force a entrada Audio In (Entrada do conector do cabo na porta da docking station (base de ligação).
- Page 114 Targus USB 2.0 Laptop Docking Station with Video Targus USB 2.0 Laptop Docking Station with Video Ligação e Configuração de um Dispositivo de Áudio Para Windows 7 Vá ao Control Panel (Painel de Controlo) e seleccione Hardware (hard- 1. Ligue os seus auscultadores ou colunas de som na porta verde Audio Out ware) e Sound (Som) e escolha Sound (Som).
- Page 115 Targus USB 2.0 Laptop Docking Station with Video Targus USB 2.0 Laptop Docking Station with Video Controlar a Visualização utilizando as Extend (Expandir): Está a utilizar o ecrã do seu PC portátil como disposi- tivo de visualização principal e o monitor ou LCD como ecrã secundário.
- Page 116 Targus USB 2.0 Laptop Docking Station with Video Targus USB 2.0 Laptop Docking Station with Video Primário: Está a usar o seu monitor ou LCD como visualização primária Mirror (Espelho): Está a utilizar o ecrã do seu PC portátil como dispositivo de visualização principal e o seu monitor ou LCD reproduzem o ecrã...
- Page 117 Targus USB 2.0 Laptop Docking Station with Video Targus USB 2.0 Laptop Docking Station with Video Controlar a Visualização utilizando Windows Off (Desligado): Está a utilizar o ecrã do seu PC portátil como dispositivo de visualização principal e o monitor ou LCD estão desligados.
- Page 118 Targus USB 2.0 Laptop Docking Station with Video Targus USB 2.0 Laptop Docking Station with Video Modo Expandido: Para configurar a visualização para este modo, marque a 1. Na janela Display Properties (Propriedades de Visualização), utilizando caixa “Extend my Windows desktop onto this monitor” (“Expandir o ambiente a lista pendente, seleccione o monitor que está...
- Page 119 Targus USB 2.0 Laptop Docking Station with Video Targus USB 2.0 Laptop Docking Station with Video 2. Depois de seleccionar o monitor correspondente, marque a caixa junto a 3. De seguida, marque a caixa junto a “This is my main monitor” (“Este é...
- Page 120 “Personalize” (personalizar), depois em “Display” (Visualizar) e a seguir em “Change display setting” (mudar a configuração do ecrã). Ou clique com o lado direito do rato em “Targus USB Video adapter” (adaptador Targus do USB vídeo) na área de notificação e escolha “advance” (avançar).
- Page 121 Targus USB 2.0 Laptop Docking Station with Video Targus USB 2.0 Laptop Docking Station with Video Actualizações Automáticas Resolução Suportada As Actualizações Automáticas são uma funcionalidade de manutenção do produto de Display-Link. O mecanismo de actualização automática asse- gura que o Adaptador de gráficos da Docking Station (Base de Ligação) Resolução...
- Page 122 Targus USB 2.0 Laptop Docking Station with Video Targus USB 2.0 Laptop Docking Station with Video Verificação dos Dispositivos Instalados Resolução de problemas O Dispositivo não Funciona Pode consultar os dispositivos instalados na docking station (base de ligação) na • Certifique-se de que o dispositivo está devidamente ligado na porta correcta da janela do Device Manager (Gestor do Dispositivo) em System Properties (Pro- docking station (base de ligação).
-
Page 123: Usb 2.0 Laptop Dockningsstation Med Video
Targus USB 2.0 Laptop Docking Station with Video SE - Introduktion Paketet innehåller Grattis till ditt köp av Targus USB 2.0 laptop dockingsstation med Utöver denna användarguide innehåller paketet följande: video. Denna portabla expansionsmodul möjliggör för dig att ansluta • Targus USB 2.0 laptop dockningsstation med video upp till 4 USB- enheter, monitorer, nätverksanslutningar (Ethernet/... - Page 124 Targus USB 2.0 Laptop Docking Station with Video Targus USB 2.0 Laptop Docking Station with Video Installation av utrústning och drivrutiner Anslutning av dockningsstationen till din dator För att använda dockningsstationen måste du först installera drivrutinerna i din dator. Anslut därefter dockningststationen till din dator vilket kommer leda till Efter det att du installerat mjukvaran för dockningsstation kommer du vara...
- Page 125 Targus USB 2.0 Laptop Docking Station with Video Targus USB 2.0 Laptop Docking Station with Video Ingångar för dockningsstationen Anslutning av nya enheter För att undvika tänkbar skada när en ny enhet ansluts ombedes du inte att tv- Ljud ut (SPK) USB ingångar (Vit)
- Page 126 Targus USB 2.0 Laptop Docking Station with Video Targus USB 2.0 Laptop Docking Station with Video Anslutning och konfiguaration av en ljudenhet OBS: LJUDUTRUSTNINGEN KOMMER INTE ATT FUNGERA SIMULTANT UTIFRÅN INGÅNGSSTATIONEN OCH ´HOST´ DATORN. 1. Sätt i dina hörlurar eller högtalare i den gröna 3.5mm Ljud Ut ingången på...
- Page 127 Targus USB 2.0 Laptop Docking Station with Video Targus USB 2.0 Laptop Docking Station with Video Styrning av displayen med användning av Utöka: Du använder din skräm på din notebook som din primära display och din monitor eller LCD som en sekundär skärm.
- Page 128 Targus USB 2.0 Laptop Docking Station with Video Targus USB 2.0 Laptop Docking Station with Video Spegel: Du använder din notebookskärm som din primära display och din mon- Primär (Notebook Monitor Av): Du använder din monitor eller LCD som itor eller LCD replikerar din notebooksskärm.
- Page 129 Targus USB 2.0 Laptop Docking Station with Video Targus USB 2.0 Laptop Docking Station with Video Styrning av displayen med användning av Av: Du använder din notebooksskärm som din primära skärm samtidigt som din monitor eller LCD är avstängda. Windows Display Egenskaper (för Windows XP och Vista)
- Page 130 Targus USB 2.0 Laptop Docking Station with Video Targus USB 2.0 Laptop Docking Station with Video Utökat läge: För att försätta displayen i detta läge, kontrollera att boxen är 1. I fönstret för display egenskaper med användning av rullgardinsmenyn, välj märkt med ‘Extend my Windows desktop onto this monitor’...
- Page 131 Targus USB 2.0 Laptop Docking Station with Video Targus USB 2.0 Laptop Docking Station with Video 3. Därefter, kontrollera boxen bredvid “This is my main monitor” ( “Detta är min 2. Efter det att du valt den överensstämmande monitorn, kontrollera boxen huvudmonitor”) (för Vista) “Use this device as the primary monitor”...
- Page 132 “Change display setting’ (“Ändra Display Inställn- ingar’). Eller högerklicka på De överensstämmande funktionerna är tillgängliga i Windows XP genom att högerklicka på “Targus USB Video adapter” (“Targus USB Video adapter”) ikonen i meddelandeområdet, varpå du väljer “advance”...
- Page 133 Targus USB 2.0 Laptop Docking Station with Video Targus USB 2.0 Laptop Docking Station with Video Automatiska uppdatteringar Stödjande upplösning Automatiska uppdatteringar ingår som en underhållsfunktionsprodukt från DisplayLink. De automatiska uppdatteringsmekanismerna försökrar dig om Upplösning Refresh Rates Upplösning Refresh Rates...
- Page 134 Targus USB 2.0 Laptop Docking Station with Video Targus USB 2.0 Laptop Docking Station with Video Felsökning Verifiera att enheter har installerats Utrustning som inte fungerar Du kan se enheterna som installerats till dockningsstationen genom fönstret för enhetshanteraren i systemegenskaper. Högerklicka på Min Dator, Egen- •...