Table of Contents
Advertisement
SPECIFICATIONS :
Input ......................................... 2100 W
No Load Speed ........................ 8000-23000 min
Collet Capacity.......................... 6.35 mm (1/4")
Plunge Capacity ....................... 60 mm
Net Weight ................................ 7.5 kg
THANK YOU FOR BUYING A RYOBI PLUNGE ROUTER
Your new plunge router has been engineered and manufactured to Ryobi's high standard for dependability,
ease of operation and operator safety. Properly cared for, it will give you years of rugged, trouble free
performance.
CAUTION: Carefully read through this entire owner's manual before using your
Pay close attention to the Rules for Safe Operation, Warnings, and Cautions.
If you use your plunge router properly and only for what it is intended, you will enjoy years of safe, reliable
service.
Thank You again for buying Ryobi tools.
OWNER'S OPERATING MANUAL
PLUNGE ROUTER
MODEL ERT2100VK
12.7 mm (1/2")
plunge router.
SAVE THIS MANUAL FOR FUTURE REFERENCE.
-1
DOUBLE
INSULATED
N197
Advertisement
Table of Contents

Related Manuals for Ryobi ERT2100VK


Summary of Contents for Ryobi ERT2100VK
- Page 1 THANK YOU FOR BUYING A RYOBI PLUNGE ROUTER Your new plunge router has been engineered and manufactured to Ryobi's high standard for dependability, ease of operation and operator safety. Properly cared for, it will give you years of rugged, trouble free performance.
-
Page 2: Save These Instructions
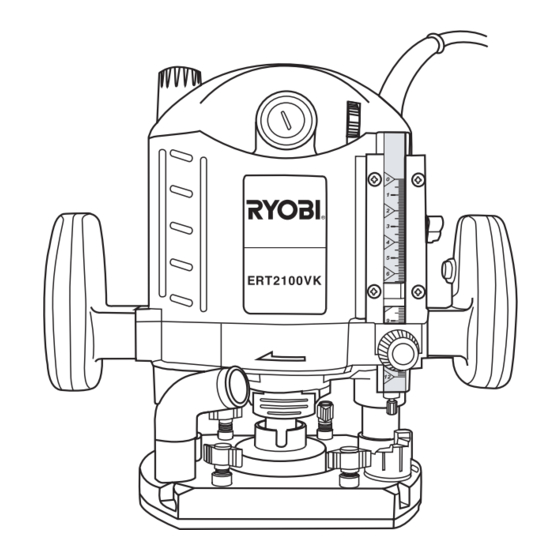
RULES FOR SAFE OPERATION 9. DRESS PROPERLY. Do not wear loose clothing or The purpose of safety rules is to attract your attention to possible jewellery. They can be caught in moving parts. Rubber dangers. The safety symbols and the explanations with them, gloves and non-skid footwear are recommended when require your careful attention and understanding. - Page 3 FEATURES 11. Depth Stop 1. On/Off Switch 2. Lock-on Button 12. Speed Selector 13. Plunge Lock Lever 3. Collet 14. Fine Adjustment Knob 4. Router Base 5. Locking Bolts For Parallel Fence 15. Carbon Brush Holder 16. Cord Sleeve 6. Dust Port 17.
- Page 4 APPLICATIONS FEATURES Use your router only for the purposes listed below: PLUNGE LOCK LEVER SHOWN IN ORIGINAL LOCKED POSITION (Fig. 2) Routing grooves, shaping edges, freehand designs, etc. in wood. WARNING: Chamfering, rebating, dadoing and dovetailing in wood. Failure to unplug your router could result in Routing edges on laminates.
- Page 5 ADJUSTMENTS CUTTER INSTALLATION (Fig. 4&5) UNPLUG YOUR ROUTER. WARNING: Failure to unplug your router could result in accidental starting causing serious injury. CAUTION: To prevent damage to the spindle or spindle lock, always allow motor to come to a complete stop before engaging spindle lock.
- Page 6 ADJUSTMENTS Fig. 7 Fig. 8 SETTING DEPTH OF CUT Unplug your router. Loosen the locking bolt for depth stop and release the plunge lock lever. Set the depth stop to required cutting depth with scale indication and tighten the locking bolt. Push the machine down to the depth stop.
- Page 7 ADJUSTMENTS Fig. 10 Fig. 13 Collet Nut Work Peice Template Template Guide Router Base Fig. 11 Fig. 14 ROUTING (Fig. 15) For ease of operation and maintaining proper control, your router has two handles, one on each side of the router base. When using your router, hold it firmly with both hands.
- Page 8 ADJUSTMENTS ROUTING GROOVES (Fig. 16) When routing across the face of boards, set router at desired depth of cut, place the edge of router base against workpiece and turn on the router. Slowly feed the cutter into the workpiece along desired line of cut. Fig.
- Page 9 RYOBI NEW ZEALAND PTY. LTD. AUCKLAND: 27 Clemow Drive, Mt Wellington, N.Z. Tel: (09) 573 0230 - Free Call: 0800 279 624 - Fax: (09) 573 0231 - www.ryobi.co.nz Contact during normal business hours. This Guarantee Form Should Be Retained By The Customer At All Times For your record and to assist in establishing date of purchase (necessary for in-guarantee service) please keep your purchase docket and this form completed with the following particulars.