AEG Electrolux 79301 KF-N Installation And Operating Instructions Manual
Ceramic hob
Hide thumbs
Also See for 79301 KF-N:
- Installation and operating instructions manual (32 pages) ,
- Installation and operating instructions manual (96 pages)
Table of Contents
Advertisement
Quick Links
Advertisement
Table of Contents

Related Manuals for AEG Electrolux 79301 KF-N


Summary of Contents for AEG Electrolux 79301 KF-N
- Page 1 79301 KF-N Ceramic hob Installation and Operating Instructions...
-
Page 2: Dear Customer
Dear Customer, Please read these user instructions carefully and keep them to refer to later. Please pass the user instructions on to any future owner of the appli- ance. The following symbols are used in the text: Safety instructions Warning! Notes that concern your personal safety. Important! Notes that show how to avoid damage to the appliance. -
Page 3: Table Of Contents
Contents Operating Instructions ........Safety instructions. - Page 4 Installation Instructions ........30 Electrical Connection Diagram ........31 Installation proud of the work surface .
-
Page 5: Operating Instructions
Operating Instructions 1 Safety instructions Please comply with these instructions. If you do not, any damage re- sulting is not covered by the warranty. This appliance conforms with the following EU Directives: – 73/23/EEC dated 19.02.1973 Low Voltage Directive – 89/336/EEC dated 03.05.1989 EMC Directive inclusive of Amending Directive 92/31/EEC –... -
Page 6: Safety During Use
Safety during use • Remove stickers and film from the glass ceramic. • There is the risk of burns from the appliance if used carelessly. • Cables from electrical appliances must not touch the hot surface of the appliance or hot cookware. •... -
Page 7: Description Of The Appliance
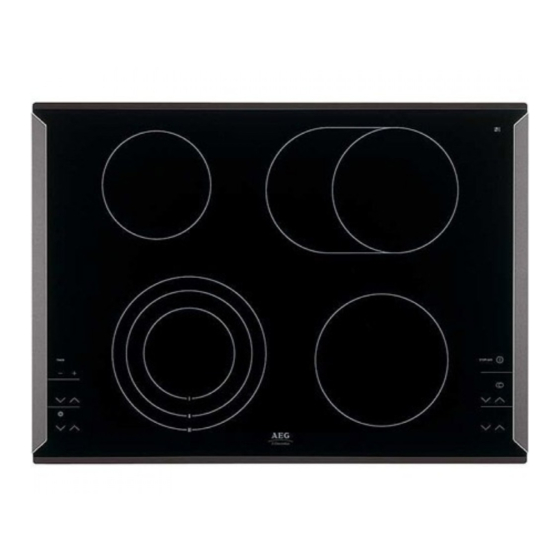
Description of the Appliance Cooking zones and control panel Single ring cooking zone Casserole zone 1200W 2200W Control Panel Control Panel Triple ring cooking zone Single ring cooking zone 2300W 1800W Sensor panel ”Stop+Go” Sensor field “Timer” with ”On/Off” Pilot indicators Browning zone sensor panel Browning zone... -
Page 8: Digital Displays
Digital displays The four display panels that belong to the four cooking zones indicate: – ¾ after having been switched on, – u when a keep warm setting has been selected, – ¿ to Ç, depending on the cooking setting selected, –... -
Page 9: Operating The Hob
Operating the hob Touch Control sensor field To operate the Touch Control sensor field place your finger from above flat onto the required field until the appropriate displays come on or go out or the required function is carried out. Switching on the appliance The entire appliance is switched on using the ”On/Off”... -
Page 10: Heat Settings Selecting
Switching off the appliance To completely switch off the appliance, actuate the “On/Off” sensor panel I. Touch the “On/Off” sensor panel for approx. one second. After switching off a single cooking zone or the entire cooking surface, the existing residual warmth will be displayed in the digital displays of the corresponding cooking zones in the form of h (for “hot”). -
Page 11: Switching The Triple Ring Zone On And Off
Switching the triple ring zone on and off According to the size of the saucepan or frying pan, when using the tri- ple ring cooking zone you can switch from a smaller cooking zone to a larger cooking zone using the “triple ring zone” sensor panel. You can only switch to the next size if a heat setting has already been set for the smaller heating ring. -
Page 12: Switching The Casserole Zone On And Off
3. Touch the “triple ring” sensor panel to activate the outer heating ring. The upper control lamp will illuminate. 4. To switch off the outer heating ring, touch the “triple ring” sensor pan- el, and the heating ring that is outermost at the time will switch off. Switching the casserole zone on and off 1. -
Page 13: Stop+Go Function
STOP+GO function When the “Stop+Go” sensor panel is actuated all cooking zones that are switched on are simultaneously switched to the keep warm setting. The control light for the “Stop+Go” sensor panel will illuminate. The keep warm setting will be indicated in the display with u. When the “Stop+Go”... -
Page 14: Residual Heat Indicator
Residual Heat Indicator When an individual cooking zone or the entire hob is switched off, any residual heat is shown with an h (for “Hot”) in the digital display for the appropriate cooking zones. Even after the cooking zone has been switched off, the residual heat indicator only goes out when the cooking zone is cold. -
Page 15: Cooking Using The Automatic Warm Up Function
Cooking using the automatic warm up function All of the cooking surface’s four cooking zones can be adjusted to any of nine settings, and are equipped with an automatic warm up func- tion: – ¿, lowest heat setting – Ç, highest heat setting –... -
Page 16: Cooking Without The Automatic Warm Up Function
Cooking without the automatic warm up function If you wish to use the cooking zones without the automatic warm up function, select the desired heat setting using the heat setting selector sensor panel 1. Touch the heat setting selector sensor panel in order to set the de- sired heat setting from Ç... -
Page 17: Child Safety Lock
Child safety lock You can use the child safety lock to safeguard against unwanted use of the cooking surface. Switching on the child safety lock To be able to switch on the child safety lock the appliance must be switched on, but all the cooking zones must be switched off. 1. - Page 18 Overriding the child safety lock The child safety lock can be overridden in order to use the appliance (until the appliance is switched off again). When the appliance is switched on again the child safety device is activated once again. 1.
- Page 19 Switching off the child safety lock 1. Switch on the appliance. When the child safety device has been activated, l will be displayed. 2. Touch the sensor field for approx. three seconds. An acoustic signal will sound as confirmation. 3. Touch any heat setting sensor field The displays will become dark, and the child safety device is switched off.
-
Page 20: Timer
Timer There are two ways to use the timer: – as a safety cut-out function. Set a cooking period for a cooking zone, and after this time has elapsed the cooking zone will automati- cally switch itself off. This function can be used for more than one cooking zone simultaneously. - Page 21 2. While the control lamp is flashing rapidly, use the + or - timersetting sensor panels to set the desired period of time for this cooking zone up until the point where it automatically switches itself off (e.g. 15 minutes). The safety cut-out function will be activated after several minutes The control lamp will now flash more slowly and the remaining cooking time will be shown in the display as it elapses.
-
Page 22: Countdown Timer
Switching off the safety cut-out function before it has come to an end There are two ways to switch off the safety cut-out function before it has come to an end. Switch off the cooking zone and timer simultaneously 1. Using the heat setting selector sensor panel, reset the desired cook- ing zone to zero: the cooking zone and timer will switch themselves off. -
Page 23: Uses, Tables And Tips
Uses, tables and tips Pans • You can recognise good pans by their bases. The base should be as thick and flat as possible. • Pay particular attention when buying new pans to the diameter of the base. Manufacturers often give only the diameter of the upper rim. -
Page 24: Advice On Cooking With And Without Automatic Warm Up
Advice on cooking with and without automatic warm up The automatic warm up function is suitable for: • dishes that start off cold, are heated up at high power and do not need to be continually watched when cooking on the selected heat setting, •... -
Page 25: Settings For Cooking On The Zones
Settings for Cooking on the Zones The figures in the following table are benchmark figures. The switch setting required for a certain cooking method depends on the quality of the pans and the type and amount of food. Automatic Switch warm up func- Cooking Examples for use... -
Page 26: Cleaning And Care
Cleaning and care Take care! Risk of burns from residual heat. Let the appliance cool down. Important Sharp objects and abrasive cleaning materials will damage the appliance. Clean with water and washing up liquid. Important Residues from cleaning agents will damage the appliance. Remove residues with water and washing up liquid. -
Page 27: Metal Décor Strips
Metal décor strips Warning! Do not use vinegar, lemon juice or lime slaking agents on the cooking surface's décor strips, otherwise dull spots will result. When cleaning do not introduce flat objects (e.g. knives) under the dé- cor strips, as otherwise these can possibly become detached. 1. - Page 28 … you cannot switch on the cooking zones. Check whether – a period of more than 10 seconds has elapsed between when the On/ Off button was actuated and the desired cooking zone switches on (see chapter “Switching on the appliance”). –...
-
Page 29: Disposal
Disposal Packaging material The packaging materials are environmentally friendly and can be recy- cled. The plastic components are identified by markings, e.g. >PE<, >PS<, etc. Please dispose of the packaging materials in the appropriate container at your local waste disposal facilities. Old appliance The symbol on the product or on its packaging indicates that this... -
Page 30: Installation Instructions
Installation Instructions Safety instructions The laws, ordinances, directives and standards in force in the country of use are to be followed (safety regulations, proper recycling in accord- ance with the regulations, etc.) Installation may only be carried out by a qualified electrician. The minimum distances to other appliances are to be observed. -
Page 31: Electrical Connection Diagram
A device must be provided in the electrical installation which allows the appliance to be disconnected from the mains at all poles with a contact opening width of at least 3 mm Suitable isolation devices include line protecting cut-outs, fuses (screw type fuses are to be removed from the holder), earth leakage trips and contactors. -
Page 32: Installation Proud Of The Work Surface
Installation proud of the work surface • Clean the worktop in the area of the cut-out section. • Stick the one-sided self-adhesive sealing tape supplied all the way round the lower edge of the cooking surface along the outer edge of the glass ceramic panel. -
Page 33: Assembly
Assembly... -
Page 36: Rating Plate
Rating Plate... -
Page 37: Warranty Conditions
Great Britain Standard guarantee conditions We, AEG, undertake that if within 12 months of the date of the purchase this AEG appliance or any part thereof is proved to be defective by reason only of faulty workmanship or materials, we... -
Page 39: Service And Spare Parts
AEG appliance, or for further information on AEG products please contact our Customer Care Depart- ment by letter or telephone at the address below or visit our website at www.aeg.co.uk. Customer Care Department For Customer Service in the Republic AEG Domestic Appliances... - Page 40 USD 14 billion in more than 150 countries around the world. AEG Hausgeräte GmbH Postfach 1036 D-90327 Nürnberg http://www.aeg.hausgeraete.de © Copyright by AEG 822 925 078-A-011204-01 Subject to change without notice...