Pioneer VSX-1020-K Operating Insructions
Audio/video multi-channel receiver
Hide thumbs
Also See for VSX-1020-K:
- Operating instructions for the user (404 pages) ,
- Service manual (132 pages) ,
- Specifications (2 pages)
Table of Contents
Advertisement
Available languages
Available languages
Quick Links
Download this manual
See also:
Service Manual
Advertisement
Chapters
Table of Contents

Related Manuals for Pioneer VSX-1020-K


Summary of Contents for Pioneer VSX-1020-K
- Page 1 audio/video multi-channel receiver récepteur audiovisuel multicanal...
- Page 2 IMPORTANT CAUTION RISK OF ELECTRIC SHOCK DO NOT OPEN CAUTION: The lightning flash with arrowhead symbol, The exclamation point within an equilateral within an equilateral triangle, is intended to TO PREVENT THE RISK OF ELECTRIC triangle is intended to alert the user to the alert the user to the presence of uninsulated SHOCK, DO NOT REMOVE COVER (OR presence of important operating and...
-
Page 3: Operating Environment
Information for users on collection and disposal of old equipment and used batteries Symbol for These symbols on the products, packaging, and/or accompanying documents mean equipment that used electrical and electronic products and batteries should not be mixed with general household waste. For proper treatment, recovery and recycling of old products and used batteries, please take them to applicable collection points in accordance with your national legislation. -
Page 4: Table Of Contents
Thank you for buying this Pioneer product. Please read through these operating instructions so you will know how to operate your model properly. After you have finished reading the instructions, put them away in a safe place for future reference. - Page 5 06 Listening to your system 10 The Advanced MCACC menu Auto playback ......57 Making receiver settings from the Advanced Listening in surround sound .
- Page 6 12 Additional information Troubleshooting..... . 108 Power ......108 No sound .
-
Page 7: Flow Of Settings On The Receiver
Flow of settings on the receiver The unit is a full-fledged AV receiver equipped The colors of the steps indicate the following: with an abundance of functions and terminals. Required setting item It can be used easily after following the procedure below to make the connections and Setting to be made as necessary settings. -
Page 8: Before You Start
Before you start Chapter 1: Before you start Checking what’s in the box Loading the batteries Please check that you’ve received the following supplied accessories: • Setup microphone (cable: 5 m) • Remote control unit The batteries included with the unit are to •... -
Page 9: Controls And Displays
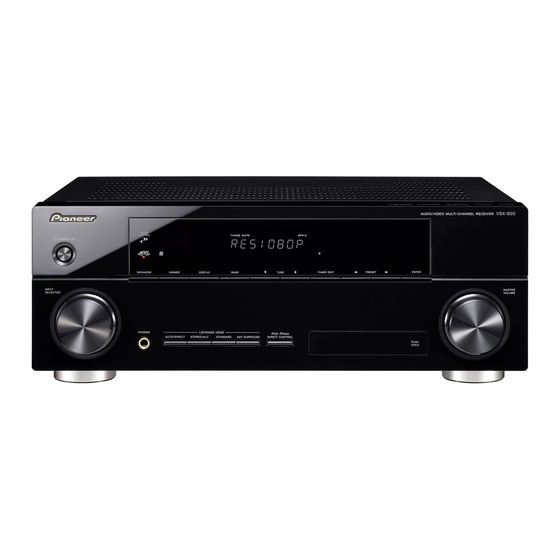
Controls and displays Chapter 2: Controls and displays Front panel VSX-1020 AUDIO/ VIDEO MULTI- CHANNEL RECEIVER TUNE PHASE CONTROL STANDBY/ON PRESET PRESET TUNE ADVANCED iPod SPEAKERS CONTROL MULTI-ZONE ON/OFF MCACC PQLS HDMI iPhone BAND TUNER EDIT ENTER MASTER INPUT VOLUME SELECTOR PHONES LISTENING MODE... - Page 10 Controls and displays iPod/iPhone – Lights to indicate iPod/ 15 VSX-1020/VSX-1025 only: HDMI input iPhone is connected (page 45). connector Use for connection to a compatible HDMI Tuner controls device (Video camera, etc.)(page 34). BAND – Switches between the AM and FM radio bands (page 50).
-
Page 11: Display
Controls and displays Display DIGITAL PLUS TUNED RDS AUTO TrueHD WMA9Pro MULTI-ZONE PQLS STEREO DTS HD ES 96/24 HDMI S.RTRV SOUND UP MIX OVER MONO DIGITAL ANALOG TUNER VIDEO MSTR CD-R iPod HDMI [ 2 ] [ 3 ] [ 4 ] AUTO SURROUND STREAM DIRECT PROLOGIC x Neo:6... - Page 12 Controls and displays Analog signal indicators 19 Remote control mode indicator Light to indicate reducing the level of an analog Lights to indicate the receiver’s remote control mode setting. (Not displayed when set to 1.) signal (page 75). (page 77) 10 Tuner indicators TUNED –...
-
Page 13: Remote Control
Controls and displays Remote control This section explains how to operate the The remote has been conveniently color-coded remote control for the receiver. according to component control using the following system: • White – Receiver control, TV control RECEIVER MULTI SOURCE •... -
Page 14: Operating Range Of Remote Control Unit
Controls and displays ///, ENTER ADV SURR – Switch between the various Use the arrow buttons when setting up your surround modes (page 59). surround sound system (page 86) and the 10 Remote control LED Audio or Video options (page 68 or 71). Lights when a command is sent from the Receiver controls remote control (page 77). -
Page 15: Connecting Your Equipment
Connecting your equipment Chapter 3: Connecting your equipment This receiver provides you with many connection possibilities, but it doesn’t have to be difficult. This page explains the kinds of components you can connect to make up your home theater system. Important •... - Page 16 Connecting your equipment CAUTION • Before making or changing the connections, switch off the power and disconnect the power cord from the power outlet. Plugging in should be the final step. Important • The input functions below are assigned by default to the receiver’s different input terminals.
-
Page 17: Determining The Speakers' Application
Connecting your equipment [B] 9.1 channel surround system (Front Determining the speakers’ wide) application • Speaker System setting: Normal(SB/FW) This unit permits you to build various surround systems, in accordance with the number of speakers you have. • Be sure to connect speakers to the front left and right channels (L and R). -
Page 18: Other Speaker Connections
Connecting your equipment [D] 5.1 channel surround system & Front Important Bi-amping connection (High quality • The Speaker System setting must be surround) made if you use any of the connections • Speaker System setting: Front Bi-Amp shown above other than [A] (see Speaker Bi-amping connection of the front speakers for system setting on page 101). -
Page 19: Placing The Speakers
Connecting your equipment Placing the speakers Some tips for improving sound quality Refer to the chart below for placement of the Where you put your speakers in the room has speakers you intend to connect. a big effect on the quality of the sound. The following guidelines should help you to get the best sound from your system. -
Page 20: Connecting The Speakers
Connecting your equipment Important Connecting the speakers • Please refer to the manual that came with Each speaker connection on the receiver your speakers for details on how to connect comprises a positive (+) and negative (–) the other end of the speaker cables to your terminal. -
Page 21: Installing Your Speaker System
Connecting your equipment Installing your speaker system At the very least, front left and right speakers only are necessary. Note that your main surround speakers should always be connected as a pair, but you can connect just one surround back speaker if you like (it must be connected to the left surround back terminal). -
Page 22: Bi-Amping Your Speakers
Connecting your equipment Bi-amping your speakers Front left Front right Center High High Subwoofer Bi-amp compatible Bi-amp compatible speaker speaker HDMI BD IN COAXIAL OPTICAL ASSIGNABLE ( 10/100 ) ASSIGNABLE ASSIGNABLE ADAPTER PORT ( OUTPUT 5 V 100 mA MAX ) AC IN ( DVD ) ( CD ) -
Page 23: Selecting The Speaker System
Connecting your equipment Bi-Amping setup Selecting the Speaker system Bi-amping connection of the front speakers for The front height terminals can be used for front high sound quality with 5.1-channel surround wide and Speaker B connections, in addition to sound. for the front height speakers. -
Page 24: About The Audio Connection
Connecting your equipment About the audio connection About the video converter There are several types of audio input and output The video converter ensures that all video terminals on this receiver. The receiver selects sources are output through all of the MONITOR OUT jacks. -
Page 25: Connecting Your Tv And Playback Components
Connecting your equipment Connecting your TV and playback components Connecting using HDMI If you have an HDMI or DVI (with HDCP) equipped component (BD: Blu-ray disc player, etc.), you can connect it to this receiver using a commercially available HDMI cable. If the TV and playback components support the Control with HDMI function, the convenient Control with HDMI functions can be used (see Control with HDMI function on page 63). -
Page 26: About Hdmi
Connecting your equipment • Input of the following digital audio About HDMI formats: The HDMI connection transfers – Dolby Digital, Dolby Digital Plus, DTS, uncompressed digital video, as well as almost High bitrate audio (Dolby TrueHD, DTS-HD every kind of digital audio that the connected Master Audio, DTS-HD High Resolution component is compatible with, including DVD- Audio), DVD-Audio, CD, SACD (DSD... -
Page 27: Connecting Your Dvd Player With No Hdmi Output
Connecting your equipment Connecting your DVD player with no HDMI output This diagram shows connections of a TV (with HDMI input) and DVD player (or other playback component with no HDMI output) to the receiver. DVD player etc. Select one Select one COMPONENT VIDEO OUT VIDEO OUT... -
Page 28: Connecting Your Tv With No Hdmi Input
Connecting your equipment Connecting your TV with no HDMI input This diagram shows connections of a TV (with no HDMI input) and DVD player (or other playback component) to the receiver. • With these connections, the picture is not output to the TV even if the DVD player is connected with an HDMI cable. -
Page 29: Connecting A Satellite/Cable Receiver Or Other Set-Top Box
Connecting your equipment Connecting a satellite/cable Connecting a HDD/DVD receiver or other set-top box recorder, VCR and other video sources Satellite and cable receivers, and terrestrial digital TV tuners are all examples of so-called This receiver has two sets of audio/video ‘set-top boxes’. -
Page 30: Connecting Other Audio Components
Connecting your equipment • If your turntable has line-level outputs (i.e., Connecting other audio it has a built-in phono pre-amp), connect it to the CD inputs instead. components • If you’re connecting a recorder, connect This receiver has both digital and analog the analog audio outputs to the analog inputs, allowing you to connect audio audio inputs on the recorder. -
Page 31: Connecting Am/Fm Antennas
Connecting your equipment Place the AM antenna on a flat surface Connecting AM/FM antennas and in a direction giving the best reception. Connect the AM loop antenna and the FM wire Connect the FM wire antenna into the FM antenna as shown below. To improve reception antenna socket. -
Page 32: Multi-Zone Setup
Connecting your equipment Basic MULTI-ZONE setup (ZONE 2) MULTI-ZONE setup Connect a separate amplifier to the This receiver can power up to two independent AUDIO ZONE 2 OUT jacks and a TV monitor systems in separate rooms after you have to the VIDEO ZONE 2 OUT jack, both on this made the proper MULTI-ZONE connections. -
Page 33: Connecting Optional Bluetooth Adapter
Bluetooth ADAPTER connected. Doing so could cause damage or faulty contact. Note 1 • The Bluetooth wireless technology enabled device must supports A2DP profiles. • Pioneer does not guarantee proper connection and operation of this unit with all Bluetooth wireless technology enabled devices. -
Page 34: Connecting To The Network Through Lan
Connecting your equipment Connecting to the network Connecting an HDMI-equipped through LAN interface component to the front panel input By connecting this receiver to the network via the LAN terminal, you can listen to Internet (VSX-1020/VSX-1025 only) radio stations. There is an HDMI input terminal on the front panel. -
Page 35: Connecting To The Front Panel Video Terminal
Connecting your equipment VSX-1020/VSX-1025: Connecting to the front panel CONTROL ON / OFF video terminal MASTER VOLUME (VSX-920 only) Front video connections are accessed via the VIDEO CAMERA iPod INPUT SELECTOR dial (front panel) or INPUT iPhone MCACC HDMI 5 SETUP MIC SELECT buttons (remote control). -
Page 36: Connecting A Usb Device
USB terminal on the front panel of this the MCACC software in the computer. receiver. The MCACC software to output the results is available from the support area of the Pioneer website (http://www.pioneer.eu). Instructions CONTROL ON / OFF MASTER VOLUME for using the software are also available here. -
Page 37: Connecting An Ir Receiver
IR receiver (such as a Niles or Xantech unit) to control your system instead • If you want to link a Pioneer component to of the remote sensor on the front panel of this the IR receiver, see Operating other Pioneer receiver. -
Page 38: Plugging In The Receiver
Check the power cord once in a while. If you find it damaged, ask your nearest Pioneer authorized independent service company for a replacement. Continue the chain in the same way for as •... -
Page 39: Basic Setup
Basic Setup Chapter 4: Basic Setup Select ‘OK’ to change the language. Changing the OSD display The setting is completed and the System Setup menu reappears automatically. language (OSD Language) The language used on the Graphical User Automatically conducting Interface (GUI) screen can be changed. •... - Page 40 Basic Setup ® The Full Auto MCACC display appears once the microphone is connected. THX is a trademark of THX Ltd., which may be registered in some jurisdictions. All rights 1a.Full Auto MCACC A/V RECEIVER reserved. : Normal ( SB/FH ) Speaker System EQ Type : SYMMETRY...
- Page 41 Basic Setup Press RECEIVER and then select START. The configuration shown on-screen should reflect the actual speakers you have. Follow the instructions on-screen. • If you see an ERR message (or the speaker Make sure the microphone is connected, and if configuration displayed isn’t correct), you’re using a subwoofer, make sure it is there may be a problem with the speaker...
-
Page 42: Problems When Using The Auto Mcacc
Basic Setup The settings made in the Auto MCACC Setup RECEIVER Press on the remote control, should give you excellent surround sound from then press HOME MENU. your system, but it is also possible to adjust A Graphical User Interface (GUI) screen these settings manually using The Advanced appears on your TV. -
Page 43: Input Function Default And Possible
Basic Setup Input function default and possible • If your component is connected via a component video cable to an input settings terminal other than the default, you must The terminals on the receiver generally tell the receiver which input terminal your correspond to the name of one of the input component is connected to, or else you functions. -
Page 44: Basic Playback
Basic playback Chapter 5: Basic playback It is possible to check on the front panel display Playing a source whether or not multi-channel playback is being performed properly. Here are the basic instructions for playing a source (such as a DVD disc) with your home When using a surround back speaker, PLIIx theater system. -
Page 45: Playing A Source With Hdmi Connection
• Features such as the equalizer cannot be controlled using this receiver, and we recommend switching the equalizer off before connecting. • Pioneer cannot under any circumstances accept responsibility for any direct or indirect loss arising from any inconvenience or loss of recorded material resulting from the iPod failure. - Page 46 Basic playback Finding what you want to play Switching the iPod controls When your iPod is connected to this receiver, You can switch over the iPod controls between you can browse songs stored on your iPod by the iPod and the receiver. playlist, artist name, album name, song name, Press iPod CTRL to switch the iPod genre or composer, similar to using your iPod...
-
Page 47: Playing A Usb Device
(MP3 players) of format FAT12/16/32. It is not possible to connect this unit to a personal computer for USB playback. • Pioneer cannot guarantee compatibility (operation and/or bus power) with all USB mass storage devices and assumes no responsibility for any loss of data that may occur when connected to this receiver. -
Page 48: Playing Back Photo Files Stored On A Usb Memory Device
Basic playback Playing back photo files stored on a Slideshow Setup Make the various settings for playing USB memory device slideshows of photo files here. Use / to select ‘Photos’ from the USB Use / to select ‘Slideshow Setup’ Top menu. from the USB Top menu. -
Page 49: About Playable File Formats
Basic playback About playable file formats The USB function of this receiver supports the following file formats. Note that some file formats are not available for playback although they are listed as playable file formats. Music files Category Extension Stream .mp3 MPEG-1, 2, 2.5 Audio Sampling frequency... -
Page 50: Listening To The Radio
Basic playback Using Neural Surround Listening to the radio This feature uses Neural Surround™ The following steps show you how to tune in to technologies to achieve optimal surround FM and AM radio broadcasts using the sound from FM radio. automatic (search) and manual (step) tuning •... -
Page 51: Saving Station Presets
Basic playback Saving station presets Input the name you want. Choose from the following characters for a If you often listen to a particular radio station, name up to eight characters long. it’s convenient to have the receiver store the frequency for easy recall whenever you want to ABCDEFGHIJKLMNOPQRSTUVWXYZ listen to that station. -
Page 52: An Introduction To Rds
Basic playback An introduction to RDS Searching for RDS programs One of the most useful features of RDS is the Radio Data System (RDS) is a system used by ability to search for a particular kind of radio most FM radio stations to provide listeners with program. -
Page 53: Bluetooth® Adapter For Wireless Enjoyment Of Music
Basic playback Wireless music play Bluetooth ® ADAPTER for When the Bluetooth ADAPTER (Pioneer Model Wireless Enjoyment of Music No. AS-BT100) is connected to this unit, a product equipped with Bluetooth wireless technology (portable cell phone, digital music Device not equipped with player, etc.) can be used to listen to music... -
Page 54: Listening To Music Contents Of A Bluetooth Wireless Technology Device With Your System
Bluetooth Check to see that the Bluetooth ADAPTER SIG, Inc. and any use of such marks by Pioneer is detected by the Bluetooth wireless Corporation is under license. Other technology device. -
Page 55: Listening To Internet Radio Stations
Basic playback Press NET RADIO to switch to the Listening to Internet radio Internet radio input. The Internet Radio list screen is displayed. stations Use / to select the Internet radio Internet radio is an audio broadcasting service station to play back, and then press ENTER. transmitted via the Internet. - Page 56 When the connection is made with the • If you select “Delete”, information receiver, the following programming screen regarding the Internet radio stations will be displayed. programmed into the currently selected Pioneer Top Menu memory will be deleted. Internet Radio Setting Title J-POP...
-
Page 57: Listening To Your System
Listening to your system Chapter 6: Listening to your system • When listening to the ADAPTER PORT Important input, the SOUND RETRIEVER AIR feature is selected automatically (see Listening in • The listening modes and many features stereo on page 59 for more on this). described in this section may not be available depending on the current source, ALC –... - Page 58 Listening to your system • NEURAL SURR – Up to 7.1 channel • If the source is Dolby Digital, DTS, or Dolby Surround encoded, the proper decoding (surround back) sound, especially suited to format will automatically be selected and music sources shows in the display.
-
Page 59: Using The Advanced Surround Effects
Listening to your system Using the Advanced surround effects • EXT.STEREO – Gives multichannel sound to a stereo source, using all of your The Advanced surround effects can be used for speakers a variety of additional surround sound effects. Most Advanced Surround modes are designed •... -
Page 60: Using Front Stage Surround Advance
Listening to your system Using Front Stage Surround Using Stream Direct Advance Use the Stream Direct modes when you want to hear the truest possible reproduction of a The Front Stage Surround Advance function source. All unnecessary signal processing is allows you to create natural surround sound bypassed, and you’re left with the pure analog effects using just the front speakers and the... -
Page 61: Selecting Mcacc Presets
Listening to your system Selecting MCACC presets Choosing the input signal • Default setting: MEMORY 1 On this receiver, it is possible to switch the input signals for the different inputs as If you have calibrated your system for different described below. -
Page 62: Better Sound Using Phase Control
Listening to your system Better sound using Phase Control This receiver’s Phase Control feature uses phase correction measures to make sure your sound source arrives at the listening position in phase, preventing unwanted distortion and/ or coloring of the sound. Phase Control technology provides coherent sound reproduction through the use of phase matching... -
Page 63: Control With Hdmi Function
Important the wall socket. • With Pioneer devices, Control with HDMI After completing all connections, connect functions are referred to as “KURO LINK”. the power cords to the wall socket. -
Page 64: Hdmi Setup
Control with HDMI function Select the ‘Control Mode’ setting you HDMI Setup want. Choose whether you want to enable HDMI You must adjust the settings of this receiver as for all linked functions or the PQLS function well as the connected Control with HDMI- only. -
Page 65: Before Using Synchronization
The Control with HDMI-compatible The operations below can also be used on component connected to the receiver operates Pioneer Control with HDMI-compatible TVs. in sync as described below. • When the receiver’s volume is adjusted or • From the menu screen of the Control with... -
Page 66: About Connections With A Product Of A Different Brand That Supports The Control With Hdmi Function
PQLS effect is enabled, the PQLS effect is disabled. • When this receiver is connected by HDMI cable to a Pioneer player that is compatible with the PQLS function via HDMI connection and a CD is played or HDMI reauthentication is performed (the HDMI indicator blinks), the PQLS effect is enabled and the listening mode is set to AUTO SURROUND if a listening mode other than AUTO SURROUND, ALC, DIRECT, PURE DIRECT or STEREO is selected. -
Page 67: Cautions On The Control With Hdmi Function
Control with HDMI function Cautions on the Control with HDMI function • Connect the TV directly to this receiver. Interrupting a direct connection with other amps or an AV converter (such as an HDMI switch) can cause operational errors. • Only connect components (Blu-ray disc player, etc.) you intend to use as a source to the HDMI input of this receiver. -
Page 68: Using Other Functions
Using other functions Chapter 8: Using other functions Setting the Audio options RECEIVER There are a number of additional sound Press , then press AUDIO settings you can make using the AUDIO PARAMETER. PARAMETER menu. The defaults, if not stated, Use /... - Page 69 Using other functions Setting What it does Option(s) Adjusts the amount of treble. –6 to +6 (dB) TREBLE Default: 0 (dB) S.RTRV With the Sound Retriever function, DSP processing is used to (Sound Retriever) compensate for the loss of audio data upon compression, improving the sound’s sense of density and modulation.
- Page 70 Using other functions Setting What it does Option(s) Provides a better blend of the front speakers by spreading the 0 to 7 C. WIDTH center channel between the front right and left speakers, making (Center Width) Default: 3 it sound wider (higher settings) or narrower (lower settings). (Applicable only when using a center speaker)
-
Page 71: Setting The Video Options
Using other functions i. This feature is only available when the connected display supports the automatic audio/video synchronizing capability (‘lipsync’) for HDMI. If you find the automatically set delay time unsuitable, set A. DELAY to OFF and adjust the delay time manually. - Page 72 Using other functions Setting What it does Option(s) Specifies the aspect ratio when analog video input signals are THROUGH (Aspect) output at the HDMI output. Make your desired settings while NORMAL checking each setting on your display (if the image doesn’t match your monitor type, cropping or black bands appear).
-
Page 73: Switching The Speaker Terminals
Using other functions Switching the speaker terminals Using the MULTI-ZONE controls If you selected Speaker B at Speaker system The following steps use the front panel setting on page 101, you can switch between controls to adjust the sub zone volume and speakers using the SPEAKERS button. -
Page 74: Making An Audio Or A Video Recording
Using other functions When Speaker System is set to ZONE 2, Making an audio or a video use the MASTER VOLUME dial to adjust the volume for the sub zone. recording When you’re finished, press MULTI-ZONE You can make an audio or a video recording CONTROL again to return to the main zone from the built-in tuner, or from an audio or controls. -
Page 75: Reducing The Level Of An Analog Signal
Using other functions Refer to the instructions that came with the Dimming the display recorder if you are unsure how to do this. Most video recorders set the audio recording level You can choose between four brightness automatically—check the component’s levels for the front panel display. -
Page 76: Resetting The System
Using other functions Setting Default Resetting the system DIsplay Power Off Use this procedure to reset all the receiver’s settings to the factory default. Use the front panel Power On Level LAST controls to do this. Set MULTI-ZONE to OFF. Volume Limit •... -
Page 77: Controlling The Rest Of Your System
Controlling the rest of your system Chapter 9: Controlling the rest of your system However, there are cases where only certain Operating multiple receivers functions may be controllable after assigning the proper preset code, or the codes for the Up to four receivers can be operated discretely manufacturer in the remote control will not using this receiver’s remote control when work for the model that you are using. -
Page 78: Selecting Preset Codes Directly
Press the input function button for the component you want to control. The LED blinks once and flashes continuously. Note 1 The remote can store about 120 preset codes from other components (this has been tested with codes of Pioneer format only). -
Page 79: Controls
Controlling the rest of your system Point the two remote controls towards Erasing one of the remote each other, then press the button that will be doing the learning on this receiver’s remote control button settings control. This erases one of the buttons you have The LED blinks once and flashes continuously. -
Page 80: Resetting The Input Assignment Of One Of The Input Function Buttons
Controlling the rest of your system Direct function Resetting the input assignment • Default setting: On of one of the input function You can use the direct function feature to buttons control one component using the remote This procedure resets the input assignment control while at the same time using your preset at the remote control’s input function receiver to play a different component. -
Page 81: Multi Operation And System Off
In some cases, even if this receiver is programmed to perform these commands, power to the non-Pioneer devices may not be switched on and off correctly. Program the receiver to perform these commands if the non-Pioneer device uses separate signals for power on/off. -
Page 82: Using Multi Operations
Controlling the rest of your system Using System off With Pioneer components, you don’t need to program the power to switch off in a shutdown Press MULTI OPERATION. sequence (except DVD recorders). The LED flashes continuously. Repeat steps 3 to 4 to program a Within five seconds, press ... -
Page 83: Clearing All The Remote Control Settings
Controlling the rest of your system Clearing all the remote control RECEIVER MULTI SOURCE OPERATION settings R.SETUP DVR/BDR HDMI This will erase all preset remote control preset codes and programmed buttons. NET RADIO ADAPTER iPod USB TUNER VIDEO TV CTRL Press and hold R.SETUP, then press “0”... - Page 84 Controlling the rest of your system Button(s) TV (Monitor) BD/DVD HDD/DVR SAT/CATV SOURCE POWER ON/ POWER ON/ POWER ON/ POWER ON/ POWER ON/ POWER ON/ Number numerics numerics numerics numerics numerics numerics buttons • (dot) • (dot) KURO LINK CLEAR ENTER ENTER...
- Page 85 Controlling the rest of your system CD/CD-R/ Button(s) MD/DAT TAPE Button(s) SACD (Projector) SOURCE POWER ON/ POWER ON/ POWER ON/ POWER ON/ SOURCE POWER ON MOVIE Number numerics numerics numerics STANDARD buttons DYNAMIC • (dot) >10/CLEAR CLEAR CLEAR USER1 ENTER ENTER...
-
Page 86: The Advanced Mcacc Menu
ACoustic Calibration) system was developed in 3. Data Management 4. System Setup Pioneer’s laboratories with the aim of making it possible for home users to perform adjustments of the same level as in a studio easily and with high precision. The acoustic... -
Page 87: Mcacc Menu
The Advanced MCACC menu CAUTION Automatic MCACC (Expert) • The test tones used in the Auto MCACC If your setup requires more detailed settings Setup are output at high volume. than those provided in Automatically conducting optimum sound tuning (Auto Select ‘Auto MCACC’... - Page 88 The Advanced MCACC menu Connect the microphone to the MCACC After a single calibration is performed, each of the following three correction curves can be SETUP MIC jack on the front panel. stored separately in the MCACC memory. Make sure there are no obstacles between the SYMMETRY implements symmetric speakers and the microphone.
- Page 89 The Advanced MCACC menu Wait for the Auto MCACC Setup to finish • If Reverse Phase is displayed, the outputting test tones. speaker’s wiring (+ and –) may be A progress report is displayed on-screen while inverted. Check the speaker connections. –...
-
Page 90: Manual Mcacc Setup
The Advanced MCACC menu You can also choose to view the settings by Manual MCACC setup selecting individual parameters from the MCACC Data Check screen: You can use the settings in the Manual • Speaker Setting – The size and number of MCACC setup menu to make detailed speakers you’ve connected (see page 102 adjustments when you’re more familiar with... -
Page 91: Fine Channel Level
The Advanced MCACC menu Select ‘Manual MCACC’ from the Select ‘Fine Channel Level’ from the Advanced MCACC menu. Manual MCACC setup menu. See Making receiver settings from the Advanced The volume increases to the 0.0 dB reference MCACC menu on page 86 if you’re not already level. -
Page 92: Standing Wave
The Advanced MCACC menu Select each channel in turn and adjust the Standing Wave distance as necessary. • Default setting: ON /ATT 0.0dB (all filters) Use / to adjust the delay of the speaker Acoustic standing waves occur when, under you selected to match the reference speaker. -
Page 93: Acoustic Calibration Eq Adjust
The Advanced MCACC menu • Freq / Q / ATT – These are the filter • The OVER! indicator shows in the display parameters where Freq represents the if the frequency adjustment is too drastic frequency you will be targeting and Q is the and might distort. - Page 94 The Advanced MCACC menu • Type A: Reverberance of high vs. low Using Acoustic Calibration EQ Professional frequencies Select ‘EQ Professional’, then press Low frequencies ENTER. Level High frequencies Select an option and press ENTER. • Reverb Measurement – Use this to Conventional MCACC measure the reverb characteristics of your EQ calibration range...
- Page 95 The Advanced MCACC menu • EQ ON – You will see the reverb If ‘Advanced EQ Setup’ is selected, select the MCACC memory to be stored, then enter characteristics of your listening area with the equalization performed by this receiver the desired time setting for calibration, and (after calibration).
-
Page 96: Checking Mcacc Data
The Advanced MCACC menu Press RETURN to go back to the MCACC Checking MCACC Data Data Check menu, repeating steps 2 and 3 to check other settings. At the procedure of Automatically conducting optimum sound tuning (Auto MCACC) on When you’re finished, press RETURN. page 39, the procedure of Automatic MCACC You will return to the Home Menu. -
Page 97: Standing Wave
The Advanced MCACC menu Standing Wave Output MCACC data Use this to display the standing wave related Before continuing, make sure you have adjustment values for the various MCACC completed step 2 in Checking MCACC Data on memories. See Standing Wave on page 92 for page 96. -
Page 98: Data Management
The Advanced MCACC menu When you’re finished, press RETURN. • MCACC Memory Clear – Clear any You will return to the MCACC Data Check MCACC presets that you don’t want (see menu. Continue with other operations in the Clearing MCACC presets on page 99). MCACC Data Check menu if necessary. -
Page 99: Clearing Mcacc Presets
The Advanced MCACC menu Select the MCACC preset you’ll be copying the settings ‘From’, then specify where you want to copy them (‘To’). Make sure you don’t overwrite an MCACC preset you’re currently using (this can’t be undone). Select ‘OK’ to confirm and copy the settings. -
Page 100: The System Setup And Other Setup Menus
The System Setup and Other Setup menus Chapter 11: The System Setup and Other Setup menus • OSD Language – The GUI screen’s display Making receiver settings from language can be changed (see Changing the OSD display language (OSD Language) the System Setup menu on page 39). -
Page 101: Speaker System Setting
The System Setup and Other Setup menus Select ‘Manual SP Setup’, then press Select the speaker system setting. ENTER. • Normal(SB/FH) – Select for normal home See Making receiver settings from the System theater use with front height speakers in Setup menu above if you’re not already at this your main (speaker system A) setup. -
Page 102: Speaker Setting
The System Setup and Other Setup menus Speaker Setting • FH – Select LARGE if your front height speakers reproduce bass frequencies Use this setting to specify your speaker effectively, or select SMALL to send bass configuration (size, number of speakers and frequencies to the other speakers or crossover frequency). -
Page 103: Channel Level
The System Setup and Other Setup menus • SW – LFE signals and bass frequencies of Select ‘Channel Level’ from the Manual channels set to SMALL are output from the SP Setup menu. subwoofer when YES is selected. Choose The test tones will start. the PLUS setting if you want the subwoofer Adjust the level of each channel using / to output bass sound continuously or you... -
Page 104: X-Curve
The System Setup and Other Setup menus Select ‘Speaker Distance’ from the Network Setup menu Manual SP Setup menu. Set up the network to listen to Internet radio on Adjust the distance of each speaker using this receiver. /. You can adjust the distance of each speaker in RECEIVER Press on the remote control,... -
Page 105: Checking The Mac Address
The System Setup and Other Setup menus IP Address Select ‘IP Address, Proxy’ from the Network Setup menu. The IP address to be entered must be defined within the following ranges. If the IP address Select the DHCP setting you want. defined is beyond the following ranges, you When you select ON, the network is cannot listen to Internet radio stations. -
Page 106: The Other Setup Menu
0.5 dB. • HDMI Setup – Synchronizes this receiver It is not possible to set a volume level greater with your Pioneer component supporting than the value specified at Volume Limit setup Control with HDMI (see HDMI Setup on (see below). -
Page 107: Remote Control Mode Setup
The System Setup and Other Setup menus Remote Control Mode Setup • Default setting: 1 This sets this receiver’s remote control mode to prevent erroneous operation when multiple units of the receiver are being used. Select ‘Remote Control Mode Setup’ from the Other Setup menu. -
Page 108: Additional Information
Sometimes the trouble may lie in another component. Investigate the other components and electrical appliances being used. If the trouble cannot be rectified even after exercising the checks listed below, ask your nearest Pioneer authorized independent service company to carry out repair work. -
Page 109: No Sound
AMP ERR blinks in the • The receiver may have a serious problem. Do not try switching the receiver display, then the power on. Unplug the receiver from the wall and call a Pioneer authorized automatically switches off. independent service company. -
Page 110: Other Audio Problems
Additional information Symptom Remedy No sound from subwoofer. • Check that the subwoofer is connected properly, switched on and the volume turned up. • If your subwoofer has a sleep function, make sure it is switched off. • Make sure that the Subwoofer setting is YES or PLUS (see Speaker Setting on page 102). - Page 111 Additional information Symptom Remedy Noise is output when • This is not a malfunction of the receiver. The scan function of your player scanning a DTS CD. alters the digital information, making it unreadable, resulting in noise being output. Lower the volume when scanning. •...
-
Page 112: Video
Additional information Video Symptom Remedy No image is output when an • Check the video connections of the source component (see page 29). input is selected. • For HDMI, or when digital video conversion is set to OFF and a TV and another component are connected with different cords (in Setting the Video options on page 71), you must connect your TV to this receiver using the same type of video cable as you used to connect your video component. -
Page 113: Settings
Additional information Settings Symptom Remedy The Auto MCACC Setup • The ambient noise level may be too high. Keep the noise level in the room as continually shows an error. low as possible (see also Problems when using the Auto MCACC Setup on page 42). -
Page 114: Professional Calibration Eq Graphical
Additional information Professional Calibration EQ graphical output Symptom Remedy The EQ response displayed in • There are cases where the graph does not appear flat (even when selecting the graphical output ALL CH ADJ in the Auto MCACC Setup) due to adjustments made to following calibration does not compensate for room characteristics to achieve optimal sound. -
Page 115: Remote Control
• Make sure that there is no fluorescent or other strong light shining on to the remote sensor. • Check the connections of the CONTROL IN jacks (see Operating other Pioneer components with this unit’s sensor on page 37). Other components can’t be •... -
Page 116: Hdmi
Additional information HDMI Symptom Remedy The HDMI indicator blinks • Check all the points below. continuously. No picture or sound. • This receiver is HDCP-compatible. Check that the components you are connecting are also HDCP-compatible. If they are not, please connect them using the component or composite video jacks. -
Page 117: Important Information Regarding The Hdmi
Additional information Symptom Remedy When Control with HDMI is • Even when Control with HDMI is set to ON, for Digital In assignment of set to ON, the HDMI Input HDMI 1 is not canceled, so in this case use the HDMI IN 1 input. assignment at Input Setup is canceled. -
Page 118: Usb Interface
Additional information USB interface Symptoms Causes Remedies The folders/files stored on The folders/files are currently stored Store the folders/files in the FAT region. a USB memory device are in a region other than the FAT (File not displayed. Allocation Table) region. The number of levels in a folder is Limit the maximum number of levels in a more than 8. -
Page 119: Adapter Port
Additional information ADAPTER PORT Symptom Remedy The Bluetooth wireless • Check that no object that emits electromagnetic waves in the 2.4 GHz technology device cannot band (microwave oven, wireless LAN device or Bluetooth wireless be connected or operated. technology apparatus) is near the unit. If such an object is near the unit, Sound from the Bluetooth set the unit far from it. - Page 120 Additional information Symptoms Causes Remedies Cannot listen to Internet Broadcast is in a format not This receiver cannot play audio in formats radio stations. (“File compatible with this receiver. other than MP3 or WMA. Also, even if they Format Error” shows in are MP3 or WMA formats, this receiver may the display.) not be able to play back.
-
Page 121: About Ipod
Additional information Manufactured under license from Dolby About iPod Laboratories. Dolby, Pro Logic, Surround EX and the double-D symbol are trademarks of Dolby Laboratories. The DTS technologies are explained below. See www.dtstech.com for more detailed information. “Made for iPod” means that an electronic accessory has been designed to connect specifically to iPod and has been certified by the developer to meet Apple performance... -
Page 122: Auto Surround, Alc And Stream Direct With Different Input Signal Formats
Additional information Auto Surround, ALC and Stream Direct with different input signal formats The following charts show what you will hear with different input signal formats, depending on the Stream Direct mode (see Using Stream Direct on page 60) you have selected. Stereo (2 channel) signal formats Auto Surround / ALC / Input signal format... -
Page 123: Preset Code List
78). example: Category Preset code Pioneer 0180 Manufacturer Pioneer 0180, 0185, 0186, Anitech 0017, 0025, 0027, Beon 0034, 0037, 0040 Clatronic 0010, 0017, 0025, 0187, 0189, 0192, 0193, 0198 0039, 0040 0026, 0027, 0028, 0034, 0035,... - Page 124 Additional information Diamant 0040 Geloso 0027, 0030, 0039 Interactive 0010 Magnadyne 0023, 0029, 0037 Diamond 0113 General Technic 0027, 0039 Interbuy 0027, 0039 Magnafon 0017, 0026, 0029, Dixi 0027, 0034, 0037, 0039, Genexxa 0028, 0031, 0034, Interfunk 0010, 0023, 0031, 0113 Magnum 0025, 0027 0040, 0114...
- Page 125 Additional information Opera 0040 Radiotone 0010, 0034, 0039, Sony 0001, 0003, 0027, 0032, Trakton 0114 0040 0046, 0053, 0057, 0070, 0073, Orbit 0034, 0040 Trans Continens 0040, 0114 0082, 0086, 0096, 0110, 0112 Rank 0032 Orion 0027, 0034, 0037, 0039, Transtec 0113 Sound &...
- Page 126 Additional information If operations are not possible using the preset codes below, you may be able to conduct operations with the preset codes for the BD, DVR (BDR, HDR). Pioneer 2246, 2215 Goodmans 2027, 2070, 2089 Pacific 2086 Tevion 2002, 2086, 2092...
- Page 127 DVR (BDR, HDR) If operations are not possible using the preset codes below, you may be able to conduct operations with the preset codes for the DVD, BD. Pioneer 2238, 2239, 2240, Sony 2170, 2173, 2174, 2175, 2241, 2242, 2243, 2244, 2245...
- Page 128 Yokan 1007, 1017 Sontec 1005 Tensai 1000, 1005, 1007, 1017 Yoko 1004, 1005, 1007, 1017 Sony 1011 Satellite Set Top Box Pioneer 6096, 6095, 6080, AtSky 6114 Cherokee 6070 Digisky 6062 6176, 0196 Audioline 6108 Chess 6089, 6056, 6114, 6104...
- Page 129 Additional information Eutra 6106 Ingelen 6089, 6137 MegaSat 6065 Phonotrend 6109 Evesham 6094 Inno Hit 6104 Metronic 6132, 6076, 6056, Pilotime 6154 6055, 6078, 6126, 6114, 6120 Exator 6076 International 6132 Pino 6114 Metz 6053 Interstar 6072 Pixx 6067 Fagor 6079 Micro 6112, 6131, 6076, 6056, Intervision 6131 Planet 6137...
- Page 130 Additional information SEG 6089, 6068, 6103, 6093, SR 6132 Telesat 6131 Van Hunen 6102 6104 Star Sat 6072 Telestar 6089, 6112, 6091, Variosat 6053 SEI 6170 Starland 6056 6098, 6092, 6099, 6103, 6114, VEA 6121 Septimo 6078 6108, 6104 Starlite 6090 Ventana 6090 Teletech 6089 Serd 6075...
- Page 131 Additional information Cable Set Top Box Pioneer 0197, 6081 General Instrument 6152, NTL 6152, 6097 Scientific Atlanta 6101 6142 StarHub 6152 ABC 6142 Optus 6152 Supercable 6152 Humax 6100, 6124 ADB 6051 Orange 6136 Auna 6051 Telewest 6101 Jerrold 6152, 6142...
-
Page 132: Specifications
Additional information Integrated control section Specifications Control (SR) terminal. . .Ø 3.5 Mini-jack (MONO) Control (IR) terminal . . .Ø 3.5 Mini-jack (MONO) Audio section IR signal ..High Active (High Level: 2.0 V) Rated power output Miscellaneous Front, Center, Surround, Surround back... -
Page 133: Cleaning The Unit
® This product includes FontAvenue fonts licenced by NEC corporation. FontAvenue is a registered trademark of NEC Corporation Published by Pioneer Corporation. Copyright © 2010 Pioneer Corporation. All rights reserved. - Page 134 IMPORTANT ATTENTION DANGER D´ELECTROCUTION NE PAS OUVRIR Ce symbole de l’éclair, placé dans un ATTENTION : Ce point d’exclamation, placé dans un triangle équilatéral, a pour but d’attirer POUR ÉVITER TOUT RISQUE triangle équilatéral, a pour but d’attirer l’attention de l’utilisateur sur la présence, à D’ÉLECTROCUTION, NE PAS ENLEVER LE l’attention de l’utilisateur sur la présence, l’intérieur du coffret de l’appareil, de...
- Page 135 Information à destination des utilisateurs sur la collecte et l’élimination des équipements et batteries usagés Ces symboles qui figurent sur les produits, les emballages et/ou les documents Marquage pour les d’accompagnement signifient que les équipements électriques et électroniques et équipements batteries usagés ne doivent pas être jetés avec les déchets ménagers et font l’objet d’une collecte sélective.
- Page 136 Nous vous remercions pour cet achat d’un produit Pioneer. Nous vous demandons de lire soigneusement ce mode d’emploi ; vous serez ainsi à même de faire fonctionner l’appareil correctement. Après avoir bien lu le mode d’emploi, le ranger dans un endroit sûr pour pouvoir s’y référer ultérieurement.
- Page 137 09 Commander le reste de votre Nommer des stations préréglées ..51 Pour écouter les stations préréglées ..51 système Présentation du système RDS ... 51 Exploitation de plusieurs récepteurs .
- Page 138 11 Configuration du système et autres réglages Réglages du récepteur depuis le menu System Setup ..... . . 100 Réglage manuel des enceintes... 100 Configuration du Speaker System .
-
Page 139: Organigramme Des Réglages Sur Le Récepteur
Organigramme des réglages sur le récepteur Cet appareil est un récepteur AV à part entière Les couleurs des étapes ont la signification suivante : présentant un grand nombre de fonctions et de Réglage nécessaire prises. Il peut être utilisé facilement lorsque les raccordements et les réglages mentionnés ci- Réglage à... -
Page 140: Avant De Commencer
Chapitre 1 : Avant de commencer Vérification des accessoires Mise en place des piles livrés avec l’appareil Veuillez vérifier que les accessoires suivants sont livrés avec l’appareil : • Microphone de configuration (câble : 5 m) • Télécommande Les piles de la télécommande fournies avec •... -
Page 141: Commandes Et Affichages
Chapitre 2 : Commandes et affichages Panneau frontal VSX-1020 AUDIO/ VIDEO MULTI- CHANNEL RECEIVER TUNE PHASE CONTROL STANDBY/ON PRESET PRESET TUNE ADVANCED iPod SPEAKERS CONTROL MULTI-ZONE ON/OFF MCACC PQLS HDMI iPhone BAND TUNER EDIT ENTER MASTER INPUT VOLUME SELECTOR PHONES LISTENING MODE iPod iPhone AUTO/ALC/DIRECT... - Page 142 TUNE / – Permet de rechercher des fréquences radio (page 50). PRESET / – Pour rechercher des stations préréglées (page 50). Cadran MASTER VOLUME 10 Voir la section PHONES Permet de brancher un casque ou des écouteurs. Lorsque le casque est branché, les enceintes ne fournissent aucun son.
-
Page 143: Affichage
Affichage DIGITAL PLUS TUNED RDS AUTO TrueHD WMA9Pro MULTI-ZONE PQLS STEREO DTS HD ES 96/24 HDMI S.RTRV SOUND UP MIX OVER MONO DIGITAL ANALOG TUNER VIDEO MSTR CD-R iPod HDMI [ 2 ] [ 3 ] [ 4 ] AUTO SURROUND STREAM DIRECT PROLOGIC x Neo:6 ADV.SURROUND... - Page 144 19 Indicateur du mode de commande à (PHASE CONTROL) distance S’allume lorsque le contrôle de phase est S’allume pour indiquer le mode de commande activé (page 62). à distance spécifié pour le récepteur. Indicateurs de signal analogique (N’apparaît pas quand 1 est spécifié.) S’allument pour indiquer le niveau d’un signal (page 77) analogique (page 75).
-
Page 145: Télécommande
Télécommande RECEIVER Cette section explique l’utilisation de la télécommande de l’appareil. Permet de commuter le récepteur entre veille et mise sous tension. MULTI OPERATION – Cette touche permet RECEIVER MULTI SOURCE OPERATION d’effectuer des opérations multiples (page 81). R.SETUP DVR/BDR HDMI R.SETUP –... -
Page 146: Portée De La Télécommande
Commandes du récepteur 10 Témoin de télécommande S’allume lorsqu’un signal de commande est Appuyez d’abord sur pour accéder RECEIVER envoyé par la télécommande (page 77). au menu : 11 TV CTRL PHASE CTRL – Pour activer/désactiver le Permet de commander votre téléviseur, après contrôle de phase (page 62). -
Page 147: Raccordement De Votre Équipement
Chapitre 3 : Raccordement de votre équipement Ce récepteur vous offre de nombreuses possibilités de liaisons, ce qui ne signifie pas nécessairement que cela soit compliqué. Cette page explique les différents types de composants que vous pouvez raccorder pour réaliser votre système de home cinéma. Important •... - Page 148 ATTENTION • Avant de réaliser ou de modifier des liaisons, éteignez les appareils et débranchez le cordon d’alimentation de la prise électrique. La prise secteur se branche en tout dernier lieu. Important • Les fonctions d’entrée suivantes sont affectées par défaut aux différentes prises d’entrée du récepteur.
-
Page 149: Détermination Des Enceintes À Utiliser
[B] Système surround à 9.1 canaux Détermination des enceintes à (surround avant large) • Configuration du Speaker System : utiliser Normal(SB/FW) Cet appareil vous permet de créer différents systèmes surround, en fonction du nombre d’enceintes que vous possédez. • Il est nécessaire de connecter des enceintes sur les canaux avant gauche et droit (L et R). -
Page 150: Autres Possibilités D'installation Des
[D] Système surround à 5.1 canaux et Important connexion d’enceintes avant Bi-amping • Si vous utilisez un des systèmes (surround haute qualité) d’enceintes ci-dessus autre que [A], il est • Configuration du Speaker System : nécessaire de configurer les enceintes à Front Bi-Amp l’aide de la fonction Speaker System Liaison à... -
Page 151: Installation Des Enceintes
Installation des enceintes • Pour obtenir un effet stéréo optimal, écartez les enceintes avant de 2 à 3 mètres Consultez le graphique ci-dessous pour le en les plaçant à égale distance du placement des enceintes que vous prévoyez de téléviseur. connecter. -
Page 152: Raccordement Des Enceintes
Bornes d’enceintes B : Raccordement des enceintes Torsadez ensemble les brins de fil Pour chaque enceinte le récepteur comporte dénudés. une borne positive (+) et une borne négative Poussez sur les languettes pour les ouvrir (–). Prenez soin de les faire correspondre avec et insérez le fil dénudé. -
Page 153: Installation De Votre Système D'enceintes
Installation de votre système d’enceintes Les enceintes avant gauche et droite sont les seules obligatoires. Notez que vos enceintes surround principales doivent toujours être raccordées par paire. Cependant, si vous le souhaitez, vous pouvez ne connecter qu’une seule enceinte surround arrière (elle doit être raccordée à la borne surround arrière gauche). -
Page 154: Double Amplification Des Enceintes
Double amplification des enceintes Avant gauche Avant droite Centrale High Caisson de High basses Enceinte de double Enceinte de double amplification amplification HDMI BD IN COAXIAL OPTICAL ASSIGNABLE ( 10/100 ) ASSIGNABLE ASSIGNABLE ADAPTER PORT ( OUTPUT 5 V 100 mA MAX ) AC IN ( DVD ) ( CD ) -
Page 155: Sélection D'un Speaker System
Réglage pour la double amplification Sélection d’un Speaker System Liaison à double amplification des enceintes avant pour un son surround de grande qualité Les bornes d’enceintes avant-haut peuvent à 5.1 canaux. être utilisées pour la connexion des enceintes avant-large et des enceintes B, en plus des Raccordez des enceintes compatibles enceintes avant-haut. -
Page 156: À Propos De La Liaison Audio
À propos de la liaison audio À propos du convertisseur vidéo Ce récepteur présente différents types de Avec le convertisseur vidéo, vous avez la bornes d’entrée et de sortie audio. Il garantie que toutes les sources vidéo seront sélectionne le premier signal disponible dans restituées par toutes les prises MONITOR l’ordre suivant quand AUTO est sélectionné... -
Page 157: Raccordement D'un Téléviseur Ou De Lecteurs
Raccordement d’un téléviseur ou de lecteurs Connexion au moyen de l’interface HDMI Si vous avez un composant équipé d’une prise HDMI ou DVI (avec HDCP) (BD : Lecteur de disque Blu-ray, etc.), vous pouvez le raccorder à ce récepteur à l’aide d’un câble HDMI disponible dans le commerce. - Page 158 • Entrée des signaux audio numériques aux À propos de HDMI formats suivants : La liaison HDMI transfère des signaux vidéo – Dolby Digital, Dolby Digital Plus, DTS, numériques non compressés de même que la Son à débit élevé (Dolby TrueHD, DTS-HD plupart des signaux audio compatibles avec le Master Audio, DTS-HD High Resolution composant raccordé, par exemple les signaux...
-
Page 159: Raccordement D'un Lecteur Dvd Sans Sortie Hdmi
Raccordement d’un lecteur DVD sans sortie HDMI Le schéma montre comment raccorder un téléviseur (avec entrée HDMI) et un lecteur DVD (ou un autre lecteur sans entrée HDMI) au récepteur. Lecteur DVD, etc. Sélectionnez-en une Sélectionnez-en une COMPONENT VIDEO OUT VIDEO OUT AUDIO OUT DIGITAL OUT... -
Page 160: Raccordement D'un Téléviseur Sans Entrée Hdmi
Raccordement d’un téléviseur sans entrée HDMI Le schéma montre comment raccorder un téléviseur (sans entrée HDMI) et un lecteur DVD (ou un autre lecteur) au récepteur. • Avec ces liaisons, le signal vidéo n’est pas transmis au téléviseur même si le lecteur DVD est raccordé... -
Page 161: Connexion D'un Récepteur Satellite/Câble Ou D'un Autre Boîtier Décodeur
Connexion d’un récepteur Raccordement d’un enregistreur satellite/câble ou d’un autre HDD/DVD, d’un magnétoscope boîtier décodeur et d’autres sources vidéo Les récepteurs satellites et par câble, ainsi que Ce récepteur est équipé de deux séries les syntoniseurs de téléviseur numérique d’entrées et de sorties audio/vidéo adaptées terrestre sont tous des exemples de ce que l’on au raccordement d’appareils vidéo appelle boîtiers décodeurs. -
Page 162: Raccordement D'autres Appareils Audio
• Si vous raccordez un enregistreur, connectez les sorties audio analogiques Raccordement d’autres aux entrées audio analogiques de appareils audio l’enregistreur. Ce récepteur est pourvu d’entrées numériques À propos du décodeur WMA9 Pro et analogiques, ce qui permet de raccorder des Cet appareil intègre un décodeur Windows composants audio pour la lecture. -
Page 163: Raccordement Des Antennes Am/Fm
Placez l’antenne AM sur une surface plane en l’orientant vers une direction qui offre la Raccordement des antennes AM/ meilleure réception. Raccordez l’antenne filaire FM à la prise Raccordez l’antenne cadre AM et l’antenne d’antenne FM. filaire FM comme indiqué ci-dessous. Pour Pour de meilleurs résultats, déroulez améliorer la réception et la qualité... -
Page 164: Configuration Multi-Zone
Configuration de base MULTI-ZONE Configuration MULTI-ZONE (ZONE 2) Ce récepteur peut alimenter jusqu’à deux Raccordez un second amplificateur aux systèmes indépendants se trouvant dans des prises AUDIO ZONE 2 OUT et un écran de pièces séparées une fois que vous avez télévision à... -
Page 165: Raccordement De L'adaptateur Bluetooth Optionnel
Remarque 1 • L’équipement sans fil Bluetooth doit prendre en charge les profils A2DP. • Pioneer ne garantit pas que cet appareil se connecte et fonctionne correctement avec tous les périphériques dotés de la technologie sans fil Bluetooth. -
Page 166: Raccordement Au Réseau Par L'interface
Raccordement au réseau par Raccordement d’un composant l’interface LAN pourvu d’une prise HDMI à l’entrée du panneau avant En connectant cet appareil à votre réseau domestique via la prise LAN, vous pouvez (VSX-1020/VSX-1025 uniquement) écouter les stations de radio sur Internet. La borne HDMI se trouve sur le panneau avant. -
Page 167: Raccordement À La Borne Vidéo Du Panneau Frontal
VSX-1020/VSX-1025 : Raccordement à la borne vidéo CONTROL ON / OFF MASTER du panneau frontal VOLUME (VSX-920 uniquement) Les connexions vidéo du panneau avant de VIDEO CAMERA iPod l’appareil sont accessibles en utilisant le iPhone MCACC HDMI 5 SETUP MIC bouton rotatif INPUT SELECTOR (sur le panneau avant) ou les touches INPUT SELECT (de la télécommande). -
Page 168: Raccordement D'un Appareil Usb
USB à la prise iPod/iPhone/USB peuvent alors être importées sur l’ordinateur à sur le panneau avant de ce récepteur. l’aide du logiciel MCACC. Le logiciel MCACC permettant d’afficher les résultats est disponible sur le site de Pioneer, CONTROL ON / OFF MASTER VOLUME dans la section assistance (http:// www.pioneer.eu). -
Page 169: Raccordement D'un Récepteur Infrarouge
• Si vous souhaitez relier un composant zone, vous pouvez utiliser un récepteur Pioneer à un récepteur infrarouge, infrarouge facultatif (par exemple, un appareil consultez la section Fonctionnement Niles ou Xantech) pour commander votre d’autres composants Pioneer avec le... -
Page 170: Branchement Du Récepteur
à autre. Si le cordon est endommagé, demandez-en le remplacement auprès du service après- vente agréé Pioneer le plus proche. • N’utilisez aucun autre cordon Continuez la chaîne de la même façon pour tous les composants que vous possédez. -
Page 171: Configuration De Base
Chapitre 4 : Configuration de base Changement de la langue de Configuration optimale l’affichage sur écran (OSD automatique du son (Auto Language) MCACC) La langue de l’interface utilisateur (IUG) peut La configuration MCACC automatique être changée. mesure les caractéristiques acoustiques de votre zone d’écoute, en tenant compte du •... - Page 172 ® L’indication Full Auto MCACC apparaît lorsque le microphone est branché. THX est une marque commerciale de THX, Ltd., qui peut être déposée sous certaines 1a.Full Auto MCACC A/V RECEIVER juridictions. Tous droits réservés. Speaker System : Normal ( SB/FH ) EQ Type : SYMMETRY MCACC...
- Page 173 Suivez les instructions affichées à l’écran. La configuration affichée à l’écran doit Assurez-vous que le microphone est connecté indiquer les enceintes que vous avez et, si vous utilisez un caisson de graves, que réellement installées. celui-ci est allumé et réglé sur un volume •...
-
Page 174: Problèmes Lors De L'utilisation De La Configuration Mcacc Automatique
indiquer au récepteur la prise à laquelle Lorsque la configuration MCACC automatique est terminée, n’oubliez pas de débrancher le l’appareil numérique est raccordé de sorte que microphone du récepteur. les touches de la télécommande correspondent aux appareils raccordés. Les réglages effectués avec la configuration automatique MCACC permettent Allumez le récepteur et votre téléviseur. -
Page 175: Réglages Possibles Et Par Défaut De La Fonction D'entrée
Sélectionnez la (les) entrée(s) à laquelle Réglages possibles et par défaut de (auxquelles) vous avez connecté votre la fonction d’entrée composant. Les bornes du récepteur correspondent Par exemple, si votre lecteur DVD possède généralement au nom de l’une des fonctions uniquement une sortie optique, vous devrez d’entrée. -
Page 176: Lecture De Base
Chapitre 5 : Lecture de base Vous pouvez vérifier sur l’afficheur du panneau avant si la lecture s’effectue ou non Lecture d’une source correctement sur les différents canaux. Voici les instructions de base pour lire une Si vous utilisez une enceinte surround arrière, source (telle qu’un DVD) avec votre système PLIIx MOVIE s’affiche pour la lecture des home cinéma. -
Page 177: Lecture D'une Source Avec Une Liaison Hdmi
• La fonction d’égalisation ne peut pas être commandée à l’aide de ce récepteur. Nous recommandons de désactiver l’égaliseur avant de connecter le récepteur. • Pioneer ne peut en aucun cas accepter de responsabilité pour toute perte directe ou indirecte résultant d’un problème ou de la perte de matériel enregistré dus à une panne de l’iPod. - Page 178 Recherche des morceaux à écouter Commandes de lecture de base Lorsque votre iPod est raccordé à ce récepteur, Les touches de la télécommande de cet vous pouvez localiser les chansons enregistrés appareil peuvent être utilisées pour les sur votre iPod en fonction de la liste d’écoute, fonctions de lecture de base des fichiers du nom d’auteur, du nom d’album, du nom de stockés sur un iPod.
-
Page 179: Lecture À Partir D'un Périphérique Usb
à un ordinateur pour la lecture USB. • Pioneer n’est pas en mesure de garantir la compatibilité (fonctionnement et/ou alimentation du bus) avec tous les périphériques de stockage de masse USB existants et n’endosse aucune responsabilité quant à la perte éventuelle de données susceptible de se produire en cas de raccordement de ces périphériques à... -
Page 180: Lecture Des Fichiers Photo Enregistrés Sur L'appareil Usb
Lecture des fichiers photo Réglage du diaporama Les différents réglages nécessaires pour voir enregistrés sur l’appareil USB des diaporamas de vos fichiers photos Utilisez / pour sélectionner ‘Photos’ s’effectuent ici. sur le menu USB Top. Utilisez / pour sélectionner Utilisez / pour sélectionner un ‘Slideshow Setup’... -
Page 181: À Propos Des Formats De Fichiers Lisibles
À propos des formats de fichiers lisibles La fonction USB de ce récepteur prend en charge les formats de fichiers suivants. Notez que certains formats de fichiers ne sont pas disponibles pour la lecture bien qu’ils figurent comme formats de fichiers lisibles. -
Page 182: Pour Écouter La Radio
Utilisation de Neural Surround Pour écouter la radio Cette fonction emploie les technologies Neural Surround™ pour diffuser des émissions radio Les étapes suivantes décrivent la façon de FM d’une qualité sonore optimale. régler les bandes FM et AM à l’aide de la •... -
Page 183: Nommer Des Stations Préréglées
Appuyez sur T.EDIT (TUNER EDIT). Pour écouter les stations préréglées L’écran affiche PRESET MEMORY, puis une Vous devez mémoriser des stations préréglées classe de mémoire qui clignote. pour avoir accès à cette fonction. Si vous n’avez pas encore mémorisé de stations Appuyez sur CLASS pour sélectionner préréglées, consultez la section Mémorisation l’une des sept classes, puis appuyez sur... - Page 184 Affichage d’informations RDS RELIGION – Programmes COUNTRY – Musique La touche DISP permet d’afficher les différents religieux country PHONE IN – Opinion NATION M – Musique types d’informations RDS disponibles. publique par téléphone populaire dans une autre TRAVEL – Voyages et •...
-
Page 185: Adaptateur Bluetooth® Pour Profiter De La Musique Sans Fil
Lecture de musique sans fil ADAPTATEUR Bluetooth® pour Lorsque l’ADAPTATEUR Bluetooth (modèle Pioneer nº AS-BT100) est raccordé à cet profiter de la musique sans fil appareil, un produit équipé de la technologie sans fil Bluetooth (téléphone portable, lecteur Périphérique non de musique numérique, etc.) peut être utilisé... -
Page 186: Écoute De Musique Avec Votre Système À Partir D'un Équipement Sans Fil Bluetooth
Lorsque le périphérique Bluetooth est raccordé : marques déposées appartenant à Bluetooth L’indication CONNECTED s’affiche sur l’écran SIG, Inc. et Pioneer Corporation utilise ces de l’appareil. marques sous licence. Les autres marques commerciales et noms commerciaux appartiennent à leurs propriétaires respectifs. -
Page 187: Écoute Des Stations Radio Internet
Appuyez sur NET RADIO pour sélectionner la source radio Internet. Écoute des stations radio La liste des stations de radio Internet s’affiche. Internet Utilisez les touches / pour La radio Internet est un service radio diffusé sélectionner la station radio Internet voulue, par Internet. - Page 188 Utilisez les touches / pour Une fois la connexion établie avec l’appareil, la sélectionner la liste des stations de radio fenêtre ci-dessous apparaît. Internet que vous souhaitez éditer, puis Pioneer Top Menu appuyez sur ENTER. Internet Radio Setting Title J-POP...
-
Page 189: Écoute De Sources À L'aide De Votre Système
Chapitre 6 : Écoute de sources à l’aide de votre système • Pendant l’écoute d’une émission radio Important FM, la fonction Neural Surround est automatiquement sélectionnée (consultez • Les modes d’écoute et de nombreuses fonctions décrites dans la présente section la section Utilisation de Neural Surround à... - Page 190 • Pendant l’écoute d’une source, appuyez • Neo:6 MUSIC – Jusqu’à 7.1 canaux RECEIVER , puis appuyez sur (surround arrière), particulièrement adapté STANDARD. aux sources musicales Si besoin, appuyez plusieurs fois sur cette • NEURAL SURR – Jusqu’à 7.1 canaux touche pour sélectionner un mode d’écoute.
-
Page 191: Utilisation Des Effets Surround Avancés
Utilisation des effets surround • EXT.STEREO – Restitue un son multi- canaux à partir d’une source stéréo et avancés utilise toutes les enceintes Les effets Advanced surround peuvent être • PHONES SURR – Lors d’une écoute avec utilisés pour une large gamme d’effets sonores un casque, vous pouvez obtenir un effet surround supplémentaires. -
Page 192: Utilisation Des Modes Stream Direct
Utilisation de la fonction Front Utilisation des modes Stream Stage Surround Advance Direct La fonction Front Stage Surround Advance Les modes Stream Direct permettent de vous permet de créer des effets sonores reproduire une source de la manière la plus naturels de type surround en utilisant fidèle possible. -
Page 193: Sélection Des Préréglages Mcacc
Sélection des préréglages Choix du signal d’entrée MCACC Ce récepteur permet de commuter les signaux d’entrée pour les différentes entrées, comme • Réglage par défaut : MEMORY 1 décrit ci-dessous. Si vous avez calibré votre système pour • Appuyez sur RECEIVER , puis appuyez différentes positions d’écoute... -
Page 194: Un Meilleur Son Grâce À La Fonction Phase Control
Un meilleur son grâce à la fonction Phase Control La fonction de contrôle de phase de ce récepteur utilise les mesures de correction de phase pour garantir que votre source sonore arrive en phase en position d’écoute, empêchant ainsi toute déformation et/ou coloration indésirable du son. -
Page 195: Fonction Control Hdmi
Fonction Control HDMI Les opérations synchronisées décrites ci-après sont possibles avec un téléviseur ou un lecteur Connexions pour la fonction Blu-ray Pioneer compatible avec la fonction Control HDMI Control HDMI, lorsque l’équipement est La fonction d’Ajustement HDMI peut être connecté à l’appareil via un câble HDMI. -
Page 196: Menu "Hdmi Setup
1 à 3), la fonction Control HDMI peut • ON – Pour activer la fonction Control seulement être utilisée avec un maximum HDMI. Lorsque cet appareil est hors de trois lecteurs de disque DVD ou Blu-ray tension et qu’un équipement connecté ou trois enregistreurs de disque DVD ou prenant en charge la fonction Control Blu-ray. -
Page 197: Avant La Synchronisation
HDMI. Les opérations suivantes sont aussi À propos des opérations disponibles avec les téléviseurs Pioneer synchronisées compatibles avec la fonction Control HDMI. Cette section décrit le fonctionnement de la •... -
Page 198: À Propos Des Connexions Avec Un Équipement D'une Autre Marque Prenant En Charge La Fonction Control Hdmi
PQLS est validé, l’effet PQLS sera invalidé. • Lorsque ce récepteur est raccordé à l’aide d’un câble HDMI à un lecteur Pioneer compatible avec la fonction PQLS par une liaison HDMI et qu’un CD est lu ou qu’une nouvelle authentification HDMI est effectuée (le témoin HDMI clignote), l’effet PQLS est validé... -
Page 199: Recommandations Concernant La Fonction Control Hdmi
Recommandations concernant la fonction Control HDMI • Raccordez le téléviseur directement à ce récepteur. L’interruption d’un raccordement direct avec d’autres amplificateurs ou un convertisseur AV (comme un commutateur HDMI) peut provoquer des erreurs de fonctionnement. • Ne raccordez que les composants (lecteur de disque Blu-ray, etc.) que vous voulez utiliser comme source à... -
Page 200: Utilisation D'autres Fonctions
Chapitre 8 : Utilisation d’autres fonctions Réglage des options audio Vous pouvez effectuer des réglages Appuyez sur RECEIVER , puis sur AUDIO supplémentaires pour le son sur le menu des PARAMETER. AUDIO PARAMETER. Si elles ne sont pas Utilisez les touches / pour expressément marquées comme telles, les sélectionner le paramètre que vous souhaitez options par défaut sont présentées en gras. - Page 201 Paramètre Fonction Option(s) Ajuste les sons aigus. –6 à +6 (dB) TREBLE Réglage par défaut : 0 (dB) S.RTRV Lorsque la correction du son est en service, le traitement DSP est utilisé pour compenser la perte de données audio due à la (Sound Retriever) compression de manière à...
- Page 202 Paramètre Fonction Option(s) Permet une meilleure fusion des enceintes avant en étendant le 0 à 7 C. WIDTH canal central sur les enceintes avant droite et gauche, ce qui Réglage par défaut : (Center Width) élargit (réglages plus élevés) ou rétrécit (réglages moins élevés) le (Disponible son.
-
Page 203: Réglages Des Options Vidéo
i. Cette fonction n’est disponible que si l’écran raccordé prend en charge la synchronisation audio/vidéo automatique (‘lipsync’) du HDMI. Si le délai d’attente paramétré automatiquement ne vous convient pas, réglez A. DELAY sur OFF et ajustez le délai d’attente manuellement. Pour de plus amples informations sur la fonction lipsync de votre écran, adressez-vous directement au fabricant. - Page 204 Paramètre Fonction Option(s) Spécifie le format des signaux vidéo analogiques à leur sortie de THROUGH (Format) la prise HDMI. Effectuez les réglages souhaités en vérifiant NORMAL l’image obtenue sur l’écran (si l’image ne correspond pas à votre écran, des parties seront tronquées ou des bandes noires apparaîtront).
-
Page 205: Commutation Des Bornes D'enceintes
Commutation des bornes Utilisation des commandes d’enceintes MULTI-ZONE Si vous avez sélectionné l’option Speaker B Les commandes du panneau avant du lors de la configuration du Configuration du récepteur sont utilisées ci-dessous pour régler Speaker System à la page 101, vous pouvez le volume de la zone secondaire et pour commuter les enceintes à... -
Page 206: Enregistrer Un Contenu Audio Ou Vidéo
• Modèle VSX-920 seulement : Les fonctions iPod/USB et INTERNET RADIO ne peuvent Enregistrer un contenu audio ou pas être sélectionnées dans une vidéo configuration MULTI-ZONE. Vous pouvez enregistrer un contenu audio ou Lorsque le Speaker System est réglé sur vidéo à... -
Page 207: Réduction Du Niveau D'un Signal Analogique
Préparez l’appareil enregistreur. • Vous pouvez vérifier le temps restant avant Insérez une cassette, un MD, une cassette le passage en mode veille en appuyant une fois sur la touche SLEEP. Vous faites défiler vidéo vierge, etc. dans l’appareil d’enregistrement et réglez les niveaux les options de sommeil en appuyant d’enregistrement. -
Page 208: Réinitialisation Du Système
Paramètre Réglage par défaut Réinitialisation du système Réglage du volume à la LAST Respectez cette procédure pour rétablir les mise sous tension réglages d’usine du récepteur. Utilisez les Volume limite commandes du panneau frontal pour ce faire. Réglez MULTI-ZONE sur OFF. Mute Level FULL •... -
Page 209: Commander Le Reste De Votre Système
Chapitre 9 : Commander le reste de votre système composant, enregistré dans la télécommande. Exploitation de plusieurs Toutefois, dans certains cas, seules quelques récepteurs fonctions peuvent être contrôlées après Jusqu’à quatre appareils peuvent être affectation du code de préréglage adéquat et ou les codes fabricant dans la télécommande commandés individuellement à... -
Page 210: Sélectionner Directement Des Codes De
Le voyant DEL clignote une fois puis reste allumé. Remarque 1 La télécommande peut stocker environ 120 codes de préréglage d’autres équipements (ceci a été vérifié avec des codes de préréglage au format Pioneer uniquement). -
Page 211: Effacement D'un Réglage De Touche De La Télécommande
Orientez les deux télécommandes l’une vers l’autre et appuyez sur la touche Effacement d’un réglage de effectuant l’apprentissage sur la touche de la télécommande télécommande du récepteur. Cette fonction permet d’effacer l’une des Le voyant DEL clignote une fois puis reste touches programmées et de restaurer son allumé. -
Page 212: Réinitialisation Des Paramètres Attribués À Une Touche De Fonction D'entrée
Réinitialisation des paramètres Fonction Source directe attribués à une touche de • Réglage par défaut : Activée Vous pouvez utiliser la fonction source directe fonction d’entrée pour commander un composant avec la Cette opération a pour effet de réinitialiser les télécommande tout en utilisant le récepteur paramètres attribués à... -
Page 213: Fonctions Multi Operation Et System Off
Dans certains cas, même lorsque l’appareil a été programmé pour exécuter ces commandes, la mise sous tension et la mise hors tension des équipements autres que Pioneer peut ne pas s’effectuer correctement. Programmez l’appareil pour exécuter ces commandes lorsque les équipements autres que Pioneer utilisent des signaux différents pour la mise sous tension et la mise hors tension. -
Page 214: Utilisation Des Opérations Multiples
Réinitialisation des paramètres de la Vous n’avez pas besoin de programmer la mise fonction Multi operation hors tension des équipements Pioneer dans la Cette procédure permet de réinitialiser tous les séquence de mise hors tension (à l’exception paramètres de la télécommande programmés des enregistreurs DVD). -
Page 215: Suppression De Tous Les Réglages De La Télécommande
• Les touches TV CONTROL de la télécommande sont destinées à Suppression de tous les réglages commander le téléviseur affecté à la de la télécommande touche TV CTRL. Si vous avez deux Cela efface tous les codes de préréglage de la téléviseurs, affectez le téléviseur principal télécommande et toutes les touches à... - Page 216 Enregistreur Touche(s) Téléviseur BD/DVD HDD/DVR vidéo SAT/CATV (Moniteur) numérique SOURCE POWER ON/ POWER ON/ POWER ON/ POWER ON/ POWER ON/ POWER ON/ Touches numériques numériques numériques numériques numériques numériques numériques • (point) • (point) KURO LINK CLEAR ENTER ENTER CH ENTER ENTER...
- Page 217 CD/CD-R/ Téléviseur Touche(s) MD/DAT TAPE Touche(s) SACD (Projecteur) SOURCE POWER ON/ POWER ON/ POWER ON/ POWER ON/ SOURCE POWER ON MOVIE Touches numériques numériques numériques STANDARD numériques DYNAMIC • (point) >10/CLEAR CLEAR CLEAR USER1 ENTER ENTER DISK/ENTER OPEN/CLOSE ENTER USER2 (CLASS)
-
Page 218: Le Menu Mcacc Avancé
Sélectionnez ‘Advanced MCACC’ dans le Le système MCACC (Calibrage Acoustique Home Menu, puis appuyez sur ENTER. Multicanaux) avancé a été mis au point par les laboratoires Pioneer pour permettre aux HOME MENU utilisateurs de systèmes audio domestiques A/V RECEIVER 1. Advanced MCACC d’effectuer des réglages de haute précision, de... -
Page 219: Mcacc Automatique (Expert)
ATTENTION MCACC automatique (Expert) • Les tonalités de test utilisées dans la Si votre configuration nécessite des réglages configuration MCACC automatique sont plus précis que ceux proposés à la section générées à un volume élevé. Configuration optimale automatique du son (Auto MCACC) à... - Page 220 Connectez le microphone à la prise caractéristiques de l’amplitude-fréquence. ALL CH ADJ crée une courbe ‘plate’ où toutes MCACC SETUP MIC sur le panneau avant. les enceintes sont réglées individuellement Assurez-vous qu’il n’y a pas d’obstacles entre sans accorder de poids spécial à un canal. les enceintes et le microphone.
- Page 221 Attendez que la configuration MCACC • Si Reverse Phase s’affiche, les fils du cordon d’enceinte (+ et –) ont peut-être été automatique ait fini d’émettre les tonalités inversés. Vérifiez les liaisons des de test. enceintes. Un rapport de progression est affiché à l’écran –...
-
Page 222: Configuration Mcacc Manuelle
Les réglages ne seront faits qu’une seule fois Vous pouvez également choisir de visualiser les réglages en sélectionnant les paramètres (sauf si vous changez l’emplacement de vos individuels sur la page MCACC Data Check : enceintes ou si vous ajoutez de nouvelles enceintes). -
Page 223: Réglage Précis Du Niveau De Canal
• Fine Channel Level – Permet des Ajustez le niveau du canal gauche. ajustements précis de l’équilibre général Il représente le niveau d’enceinte de référence. du système d’enceintes (consultez la Mieux vaut donc régler ce niveau à plus ou section Réglage précis du niveau de canal moins 0.0 dB afin d’avoir une marge ci-dessous). -
Page 224: Ondes Stationnaires
Sélectionnez ‘Fine SP Distance’ sur le Ondes stationnaires menu Manual MCACC. • Réglage par défaut : ON /ATT 0.0dB (tous Ajustez la distance du canal gauche à les filtres) partir de la position d’écoute. Les ondes stationnaires acoustiques Sélectionnez tour à tour chaque canal et apparaissent lorsque, dans certaines ajustez la distance si besoin. -
Page 225: Réglage De L'égalisation Du Calibrage Acoustique
• Freq / Q / ATT – Ce sont les paramètres du • L’indicateur OVER! s’affiche à l’écran si filtre : Freq représente la fréquence visée et l’ajustement de la fréquence est trop strict Q, la bande passante (plus Q est élevé, et qu’il risque d’entraîner des plus la bande passante ou la portée est déformations. - Page 226 • Type A : Réverbération des hautes • Reverb View – Permet de vérifier les fréquences par rapport aux basses mesures de réverbération réalisées pour fréquences des gammes de fréquences spécifiées dans chaque canal. Basses fréquences Niveau • Advanced EQ Setup – Permet de Hautes fréquences sélectionner la période utilisée pour l’ajustement et le calibrage des...
- Page 227 Sélectionnez le réglage parmi les périodes Lorsque la mesure de la réverbération est terminée, vous pouvez sélectionner Reverb suivantes (en millisecondes) : 0-20ms, 10- View pour visualiser les résultats à l’écran. 30ms, 20-40ms, 30-50ms, 40-60ms, 50-70ms Consultez la section Graphique de l’égalisation et 60-80ms.
-
Page 228: Vérification Des Données Mcacc
• Output MCACC data – Consultez Exportation des données MCACC à la Vérification des données MCACC page 97 plus amples informations à ce Lors de la procédure de Configuration optimale sujet. automatique du son (Auto MCACC) à la page 39, celle de MCACC automatique (Expert) Appuyez sur RETURN pour revenir au à... -
Page 229: Ondes Stationnaires
Sélectionnez ‘Speaker Distance’ sur le Sélectionnez ‘Acoustic Cal EQ’ sur le menu MCACC Data Check. menu MCACC Data Check. Lorsque ‘Ch’ est surligné, utilisez / Lorsque ‘MCACC’ est surligné, utilisez / pour sélectionner le préréglage MCACC pour sélectionner le canal. que vous voulez vérifier. -
Page 230: Gestion Des Données
Connectez le périphérique USB à la prise USB sur le panneau frontal de l’appareil, puis Gestion des données sélectionnez “OK”. Ce système vous permet de stocker jusqu’à six Le message “Please wait...” s’affiche à l’écran préréglages MCACC, vous offrant ainsi la et la transmission des données de mesure vers possibilité... -
Page 231: Renommer Les Préréglages Mcacc
Renommer les préréglages MCACC Sélectionnez le préréglage MCACC dont vous allez copier les réglages ‘From’, puis Si vous utilisez plusieurs préréglages MCACC, précisez où vous souhaitez les copier (‘To’). il se peut que vous souhaitiez les renommer Assurez-vous de ne pas effacer et remplacer pour les identifier plus facilement. -
Page 232: Configuration Du Système Et Autres Réglages
Chapitre 11 : Configuration du système et autres réglages • OSD Language – Permet de changer la langue de l’écran GUI (consultez la section Réglages du récepteur depuis le Changement de la langue de l’affichage sur menu System Setup écran (OSD Language) à la page 39). La section suivante décrit les changements •... -
Page 233: Configuration Du Speaker System
Sélectionnez le réglage que vous voulez • Normal(SB/FW) – Convient à une ajuster. utilisation de type cinéma à domicile où les Si vous effectuez ces réglages pour la première enceintes avant-large appartiennent au fois, il est préférable de respecter l’ordre système d’enceintes principal (A). -
Page 234: Réglage Des Enceintes
Réglage des enceintes autres enceintes ou vers le subwoofer. Si les enceintes avant-haut ne sont pas Utilisez ce réglage pour préciser la connectées, sélectionnez NO (les canaux configuration de vos enceintes (taille, nombre avant-haut sont alors sortis sur les d’enceintes et fréquence de croisement). Il est enceintes avant). -
Page 235: Niveau Des Canaux
• SW – Les signaux LFE et les basses Déplacez manuellement les tonalités de test fréquences des canaux réglés sur SMALL d’une enceinte à l’autre et ajustez les différents sont générés par le caisson de graves niveaux de canal. lorsque YES est sélectionné. Choisissez le Sélectionnez ‘Channel Level’... -
Page 236: Distance Des Enceintes
Distance des enceintes Courbe X Pour obtenir une profondeur sonore et un La plupart des bandes sonores mixées pour le détachement parfaits de votre système, vous cinéma sont trop aiguës lorsqu’elles sont devez préciser la distance qu’il y a entre vos émises dans de grandes pièces. -
Page 237: Menu De Configuration Réseau
IP Address Menu de configuration réseau L’adresse IP à entrer doit être située dans les plages ci-dessous. Si l’adresse IP définie n’est Ce menu permet de configurer les paramètres pas située dans ces plages, vous ne pourrez réseau sur l’appareil afin d’écouter la radio pas écouter les stations de radio Internet. -
Page 238: Affichage De L'adresse Mac
Désignez l’adresse de votre serveur proxy • HDMI Setup – Pour synchroniser cet ou le nom de domaine. appareil avec d’autres équipements Pioneer prenant en charge la fonction Désignez le numéro de port de votre Control HDMI (consultez la section Menu serveur proxy. -
Page 239: Configuration Du Volume
Configuration du volume Lorsque vous avez terminé, appuyez sur RETURN. Vous pouvez spécifier le volume de l’appareil Vous revenez alors au menu Other Setup. lors de la mise sous tension / volume maximum ou un niveau de volume plus faible, Réglage du mode de la selon vos préférences. -
Page 240: Informations Complémentaires
Quelquefois, le problème provient d’un autre appareil. Contrôlez les autres appareils électriques raccordés au récepteur. Si le problème ne peut être résolu malgré les indications ci-dessous, consultez votre service après-vente Pioneer le plus proche pour faire réparer le composant. -
Page 241: Pas De Son
• Il y a un problème au niveau du bloc d’alimentation du récepteur. Le l’appareil) clignote et récepteur peut connaître un grave problème. Débranchez le récepteur et l’appareil se met hors contactez le service après-vente Pioneer. tension. L’indicateur AMP • Laissez refroidir l’appareil dans un endroit bien ventilé, puis rallumez-le. - Page 242 Symptôme Réparation possible Aucun son n’est émis par le • Vérifiez que le caisson de graves est correctement raccordé, qu’il est allumé subwoofer. et que le volume est suffisant. • Si le caisson de graves est doté d’une fonction sommeil, assurez-vous qu’elle est désactivée.
-
Page 243: Autres Problèmes Audio
Autres problèmes audio Symptôme Réparation possible Les stations radio ne peuvent Pour les émissions FM être sélectionnées • Étendez complètement l’antenne fil FM, positionnez-la pour assurer la automatiquement ou il y a meilleure réception possible et fixez-la à un mur, par exemple. beaucoup de bruit dans les •... -
Page 244: Vidéo
Symptôme Réparation possible Il semble qu’il y ait un retard • Reportez-vous à la section Configuration optimale automatique du son (Auto entre les enceintes et la sortie MCACC) à la page 39 pour reconfigurer votre système en utilisant la fonction du subwoofer. -
Page 245: Réglages
Réglages Symptôme Réparation possible La configuration Auto • Le niveau de bruit ambiant de la pièce peut être trop élevé. Maintenez le bruit MCACC présente toujours à un niveau aussi bas que possible (consultez également la section Problèmes une erreur. lors de l’utilisation de la configuration MCACC automatique à... -
Page 246: Graphique De L'égalisation Du Calibrage Professionnel
Graphique de l’égalisation du calibrage professionnel Symptôme Réparation possible La réponse de l’égalisation • Dans certains cas, le graphique n’apparaît pas plat (même si vous sélectionnez ALL CH ADJ dans la configuration MCACC automatique) à cause affichée dans la sortie graphique après le calibrage des ajustements réalisés pour compenser les caractéristiques de la pièce afin n’apparaît pas complètement... -
Page 247: Télécommande
• Vérifiez que le capteur de la télécommande n’est pas exposé à une lumière fluorescente ou intense. • Vérifiez le branchement des prises CONTROL IN (consultez la section Fonctionnement d’autres composants Pioneer avec le capteur de cette unité à la page 37). D’autres composants ne •... -
Page 248: Hdmi
HDMI Symptôme Réparation possible L’indicateur HDMI clignote • Vérifiez les points ci-dessous. en permanence. Pas d’image ni de son. • Ce récepteur est compatible HDCP. Assurez-vous que les composants que vous raccordez sont également compatibles HDCP. Si ce n’est pas le cas, raccordez-les à... -
Page 249: Information Importante Concernant La Connexion Hdmi
Symptôme Réparation possible Lorsque la fonction Control • Même lorsque la fonction Control HDMI est réglée sur ON, pour l’entrée HDMI est réglée sur ON, HDMI IN 1 l’attribution du paramètre Digital In n’est pas désactivée. Dans ce l’option HDMI Input du cas, utilisez l’entrée HDMI IN 1. -
Page 250: Interface Usb
Interface USB Symptômes Causes Solutions Les dossiers/fichiers Les dossiers/fichiers sont Stockez les dossiers/fichiers dans la FAT. enregistrés dans une actuellement stockés à un autre mémoire USB ne peuvent endroit que la FAT (File Allocation pas être lus. Table). Il y a plus de 8 niveaux dans un Un dossier peut contenir un maximum de 8 dossier. -
Page 251: Adapter Port
ADAPTER PORT Symptôme Réparation possible Le périphérique sans fil • Vérifiez qu’aucun produit émettant des ondes électromagnétiques dans la Bluetooth ne peut pas être bande 2,4 GHz (four à micro-ondes, périphérique LAN sans fil ou équipement connecté ou utilisé. Aucun sans fil Bluetooth) ne se trouve à... - Page 252 Symptômes Causes Solutions L’écran de configuration L’adresse IP de cet appareil n’a pas Vérifiez l’adresse IP de l’appareil et entrez-la de la radio Internet ne peut été entrée correctement dans le correctement dans le navigateur pas être affiché sur le navigateur.
-
Page 253: À Propos Des Appareils Ipod
À propos des appareils iPod Les technologies DTS sont expliquées ci- dessous. Consultez le site www.dtstech.com pour obtenir des informations plus détaillées. Les accessoires électroniques portant la mention « Made for iPod » ont été conçus pour fonctionner avec un iPod et sont certifiés conformes aux exigences d’Apple par le fabricant. -
Page 254: Surround Automatique, Alc Et Flux Direct Avec Différents Formats De Signal D'entrée
Surround automatique, ALC et flux direct avec différents formats de signal d’entrée Les tableaux ci-dessous indiquent ce que vous allez entendre avec différents formats de signal d’entrée, en fonction du mode à flux direct sélectionné (consultez la section Utilisation des modes Stream Direct à... -
Page 255: Liste Des Codes Préréglés
: Catégorie Téléviseur Code de Pioneer 0180 préréglage Fabricant Téléviseur Pioneer 0180, 0185, 0186, Ansonic 0010, 0018, 0027, Blue Star 0036 Continental Edison 0033 0187, 0189, 0192, 0193, 0198 0029, 0039, 0040 Boots 0026, 0114 Cosmel 0027, 0039 Arcam 0113, 0114... - Page 256 Electa 0036 Grandin 0027, 0028, 0036, KIC 0114 Multitech 0010, 0026, 0027, ELECTRO TECH 0027 0037 Kingsley 0026, 0113 0029, 0030, 0032, 0037, 0039, 0040, 0113, 0114 Gronic 0114 Elin 0026, 0034, 0037, 0039, Kneissel 0010, 0018, 0040 Murphy 0026, 0113 Grundig 0009, 0010, 0017, 0040, 0113 Kolster 0034, 0040...
- Page 257 Precision 0026, 0114 Silva 0113 Tokyo 0026, 0113 Prima 0027, 0031, 0039 Silver 0032 Tomashi 0036 Profex 0027, 0039 Singer 0023, 0029, 0041 Toshiba 0011, 0012, 0032, Profi-Tronic 0034, 0040 Sinudyne 0023, 0029, 0037, 0061, 0094, 0114 Towada 0031, 0114 Proline 0034, 0040 0040 Skantic 0031...
- Page 258 Si les commandes ne fonctionnent pas avec les codes de préréglage ci-dessous, essayez d’utiliser les codes de préréglages indiqués pour les produits BD, DVR (BDR, HDR). Pioneer 2246, 2215 Hitachi 2015, 2083, 2090 Rowa 2082 Rownsonic 2088 AEG 2093 Innovation 2002...
- Page 259 DVR (BDR, HDR) Si les commandes ne fonctionnent pas avec les codes de préréglage ci-dessous, essayez d’utiliser les codes de préréglages indiqués pour les produits DVD, BD. Pioneer 2238, 2239, 2240, Sony 2170, 2173, 2174, 2175, 2241, 2242, 2243, 2244, 2245...
- Page 260 Towika 1007, 1017 Telefunken 1001 Yoko 1004, 1005, 1007, 1017 Sunwood 1007, 1017 TVA 1004 Teletech 1017, 1018 Décodeur satellite Pioneer 6096, 6095, 6080, Blaupunkt 6053 Digiality 6131, 6114 FinnSat 6106 6176, 0196 Blue Sky 6056 Digifusion 6144, 6145 Flair Mate 6056...
- Page 261 Interstar 6072 Microtec 6056 Quelle 6105, 6131 Skyvision 6114 Intervision 6131 Mitsubishi 6052 SL 6132, 6105, 6106, 6107, 6133, Radiola 6090 Inves 6144 Morgan’s 6090, 6132, 6056, 6108 Radix 6137, 6119 SM Electronic 6109, 6056, iotronic 6120 6128, 6075 Rainbow 6076 6115 Multibroadcast 6050 ITT Nokia 6083, 6052...
- Page 262 Nokia 6082 Zehnder 6068, 6075, 6125 Gecco 6075 SKY Italia 6088 Globo 6075 Opentel 6075 Sky XL 6075 Décodeur câble Pioneer 0197, 6081 General Instrument 6152, NTL 6152, 6097 Scientific Atlanta 6101 6142 StarHub 6152 ABC 6142 Optus 6152 Supercable 6152...
- Page 263 CD-R Pioneer 5067 Philips 5054 Yamaha 5055 Lecteur de disque laser Pioneer 5062, 5063 Platine à cassette Pioneer 5070 Platine à cassette numérique Pioneer 5069 Pioneer 5068...
-
Page 264: Spécifications
Divers Spécifications Alimentation..AC 220 V à 230 V, 50 Hz/60 Hz Consommation..... . .245 W Section audio En veille . -
Page 265: Nettoyage De L'appareil
® Ce produit utilise les polices FontAvenue sous licence de NEC Corporation. FontAvenue est une marque déposée de NEC Corporation. Publication de Pioneer Corporation. © 2010 Pioneer Corporation. Tous droits réservés. - Page 266 CAUTION RISK OF ELECTRIC SHOCK DO NOT OPEN D3-4-2-1-1_A1_Ru D3-4-2-1-3_A1_Ru D3-4-2-1-7b*_A1_Ru D3-4-2-1-4*_A1_Ru D3-4-2-1-7a_A1_Ru K041_A1_Ru D3-4-2-1-7c*_A1_Ru...
- Page 267 Информация для пользователей по сбору и утилизации бывшего в эксплуатации оборудования и отработавших элементов питания Данные обозначения утверждены только для Европейского Союза. Для стран, которые не входят в состав Европейского Союза: K058a_A1_Ru STANDBY/ON D3-4-2-2-1a_A1_Ru D3-4-2-2-2a*_A1_Ru...
- Page 268 Благодарим вас за покупку этого изделия марки Pioneer. Полностью прочтите настоящие инструкции по эксплуатации, чтобы знать, как правильно обращаться с этой моделью. Прочитав инструкции, сохраните их в надежном месте для использования в будущем. Содержание 01 Перед началом работы Подключение антенн AM/FM ... . 31 Подсоединение...
- Page 269 08 Использование других функций Улучшение звучания в диапазоне FM ..50 Использование Neural Surround ..50 Задание параметров звука ....68 Непосредственное...
- Page 270 12 Дополнительная информация Эквалайзер профессиональной акустической калибровки ......93 Устранение неисправностей ... . 108 Проверка...
- Page 271 Порядок выполнения настроек на ресивере Аппарат является полноценным аудио-видео Цвета пунктов означают следующее: ресивером, оборудованным множеством Требуемый параметр настройки функций и терминалов. Он может легко использоваться после выполнения процедуры Настройка, выполняемая при необходимости подключений и настроек, описанных ниже. Перед началом работы •...
-
Page 272: Перед Началом Работы
Глава 1: Перед началом работы Проверка комплекта поставки Установка батареек Проверьте наличие перечисленных ниже принадлежностей: • Установочный микрофон (кабель: 5 м) • Пульт ДУ • Сухие батарейки размера AAA IEC R03 Батарейки, входящие в комплект устройства, (для подтверждения управления системой), необходимо... -
Page 273: Органы Управления И Индикаторы
Глава 2: Органы управления и индикаторы Передняя панель VSX-1020 AUDIO/ VIDEO MULTI- CHANNEL RECEIVER TUNE PHASE CONTROL STANDBY/ON PRESET PRESET TUNE ADVANCED iPod SPEAKERS CONTROL MULTI-ZONE ON/OFF MCACC PQLS HDMI iPhone BAND TUNER EDIT ENTER INPUT MASTER SELECTOR VOLUME PHONES LISTENING MODE iPod iPhone AUTO/ALC/DIRECT... - Page 274 TUNER EDIT – Используйте вместе с 16 Только VSX-920: Терминалы VIDEO 2 TUNE /, PRESET / и ENTER для INPUT запоминания и присваивания названия Используйте для подключения переносных устройств, таких как видеокамеры, игровые радиостанциям для последующего их видеоприставки и переносное аудио/ вызова...
-
Page 275: Дисплей
Дисплей DIGITAL PLUS TUNED RDS AUTO TrueHD WMA9Pro MULTI-ZONE PQLS STEREO DTS HD ES 96/24 HDMI S.RTRV SOUND UP MIX OVER MONO DIGITAL ANALOG TUNER VIDEO MSTR CD-R iPod HDMI [ 2 ] [ 3 ] [ 4 ] AUTO SURROUND STREAM DIRECT PROLOGIC x Neo:6 ADV.SURROUND... - Page 276 Индикаторы аналогового сигнала 19 Индикатор режима ДУ Высвечиваются для обозначения уменьшения Высвечивается для обозначения настройки уровня аналогового сигнала (стр. 75). режима ДУ ресивера. (Не отображается при установке на 1.) (стр. 77) 10 Индикаторы тюнера TUNED – Загорается при приеме программы радиовещания. STEREO –...
-
Page 277: Пульт Дистанционного Управления
Пульт дистанционного управления В этом разделе описывается работа пульта ДУ • Синяя – Другие элементы управления (см. для ресивера. стр. 45, 47, 50, 53, 55 и 83.) RECEIVER Установка в режим ожидания или включение RECEIVER MULTI SOURCE данного ресивера. OPERATION R.SETUP MULTI OPERATION –... -
Page 278: Дальность Действия Пульта Дистанционного Управления
Органы управления ресивером 10 Светодиод пульта ДУ Высвечивается при отправлении команды от Сначала нажмите для доступа к: RECEIVER пульта ДУ (стр. 77). PHASE CTRL – Включает/выключает 11 TV CTRL управление фазой (стр. 62). Установка предустановленного кода STATUS – Проверка выбранных настроек производителя... -
Page 279: Подключение Оборудования
Глава 3: Подключение оборудования Этот ресивер предлагает широкие возможности подключения, но это не так сложно, как может показаться. На этой странице описаны компоненты, которыми можно дополнить используемую систему домашнего кинотеатра. Внимание • На рисунке показан VSX-1020, однако для VSX-1025 и VSX-920 используются одинаковые подключения, если... - Page 280 ОСТОРОЖНО • Перед выполнением или изменением подключений, отключите питание и отсоедините кабель питания от электророзетки. Включение должно быть последним шагом. Внимание • Функции входа ниже устанавливаются по умолчанию для различных входных терминалов ресивера. Для переключения значений при использовании других подключений см. Меню Input Setup на стр.
-
Page 281: Выбор Количества Громкоговорителей
[B] Акустическая система 9.1 Выбор количества (Передняя крайняя) • Настройка Speaker System: громкоговорителей Normal(SB/FW) Это устройство позволит вам настраивать различные акустические системы в соответствии с числом громкоговорителей, которое у вас есть. • Обязательно подключите громкоговорители к передним левому и правому каналам (L и R). •... -
Page 282: Другие Подключения
[D] Подключение 5.1-канальной Внимание акустической системы и передних • Настройка Speaker System должна быть двухканальных усилителей выполнена при использовании любых (Высококачественное объемное подключений, показанных выше, за звучание) исключением [A] (см. Speaker system setting • Настройка Speaker System: Front Bi- (Настройка системы громкоговорителей) на... -
Page 283: Размещение Громкоговорителей
Размещение громкоговорителей • Для получения оптимального стереоэффекта расположите фронтальные Порядок замены громкоговорителей, которые громкоговорители на расстоянии 2–3 вы хотите подключить, см. на схеме ниже. метров друг от друга и на равном удалении от телевизора. • В случае расположения громкоговорителей около ЭЛТ- телевизора, используйте... -
Page 284: Подключение Громкоговорителей
Разъемы громкоговорителей группы B: Подключение Скрутите оголенные жилы провода. громкоговорителей Откройте защитные выступы и Подключение каждого громкоговорителя к вставьте оголенный провод. ресиверу предусматривает подключение к Отпустите защитные выступы. положительному (+) и отрицательному (–) контактам. Убедитесь в том, что они совпадают с... -
Page 285: Установка Акустической Системы
Установка акустической системы Как минимум необходимы только передние громкоговорители (правый и левый). Учтите, что боковые громкоговорители объемного звучания всегда нужно подключать в паре, однако задний громкоговоритель объемного звучания может быть подключен отдельно (к терминалу левого заднего громкоговорителя объемного звучания). Передние верхние терминалы можно также использовать для передних... -
Page 286: Двухканальное Усиление Громкоговорителей
Двухканальное усиление громкоговорителей Передний левый Передний правый Центральный Низкочастотный High High громкоговоритель Громкоговоритель, Громкоговоритель, совместимый с совместимый с двухканальным двухканальным усилением усилением HDMI COAXIAL OPTICAL BD IN ASSIGNABLE ( 10/100 ) ASSIGNABLE ASSIGNABLE ADAPTER PORT ( OUTPUT 5 V 100 mA MAX ) AC IN ( DVD ) ( CD ) -
Page 287: Выбор Системы Громкоговорителей
Настройка громкоговорителей • Также, при выполнении двухпроводного подключения, учитывайте меры системы В предосторожности для двухканального Можно прослушивать стереофоническое усиления, показанные слева. воспроизведение в другой комнате. Подключите пару передних верхних Выбор системы громкоговорителей терминалам передних верхних/крайних громкоговорителей громкоговорителей. Передние верхние терминалы можно См. -
Page 288: Об Аудиоподключении
Об аудиоподключении О преобразователе видеосигнала На данном ресивере имеется несколько типов аудиовходных и выходных терминалов. При Преобразователь видеосигнала обеспечивает выборе режима AUTO для входного сигнала, вывод всех видеоисточников через все гнезда ресивер выбирает первый доступный сигнал в MONITOR OUT. HDMI - единственное следующем... -
Page 289: Подключение Телевизора И Компонентов Воспроизведения
Подключение телевизора и компонентов воспроизведения Подключение с помощью HDMI При наличии компонента с интерфейсом HDMI или DVI (с HDCP) (BD: проигрывателя Blu-ray дисков, и др.), его можно подключить к данному ресиверу с помощью имеющегося в продаже кабеля HDMI. Если телевизор и компоненты воспроизведения поддерживают функцию Управление по HDMI, можно... - Page 290 – Dolby Digital, Dolby Digital Plus, DTS, О HDMI аудиосигналы с высокой битовой При помощи подключения HDMI передаются скоростью (Dolby TrueHD, DTS-HD Master несжатые цифровые видеосигналы, а также Audio, DTS-HD High Resolution Audio), практически любые виды цифрового звука, с DVD-Audio, CD, SACD (сигнал DSD), которыми...
-
Page 291: Подключение Проигрывателя Dvd Без Выхода Hdmi
Подключение проигрывателя DVD без выхода HDMI На данном рисунке показаны подключения телевизора (с входом HDMI) и проигрывателя DVD (или другого компонента воспроизведения не имеющего выхода HDMI) к ресиверу. Проигрыватель DVD, и др. Выберите один Выберите один COMPONENT VIDEO OUT VIDEO OUT AUDIO OUT DIGITAL OUT ANALOG... -
Page 292: Подключение Телевизора Без Входа Hdmi
Подключение телевизора без входа HDMI На данном рисунке показаны подключения телевизора (без входа HDMI) и проигрывателя DVD (или другого компонента воспроизведения) к ресиверу. • При использовании данных подключений, картинка не выводится на телевизор даже при подключении проигрывателя DVD через кабель HDMI. Подключите видеотерминал проигрывателя... -
Page 293: Подключение Спутникового/Кабельного Ресивера Или Другой Приставки
Подключение спутникового/ Подключение HDD/DVD- кабельного ресивера или другой рекордера, видеомагнитофона и приставки других видеоисточников Спутниковые и кабельные ресиверы, а также Данный ресивер оборудован двумя наборами цифровые радио ресиверы являются аудио/видеовходов и выходов, пригодных для примерами так называемых «приставок». подключения аналоговых или цифровых видеоустройств, включая... -
Page 294: Подключение Других Аудиокомпонентов
• Если подключается рекордер/магнитофон, соедините аналоговые аудиовыходы с Подключение других аналоговыми аудиовходами рекордера/ аудиокомпонентов магнитофона. Данный ресивер оборудован цифровыми и аналоговыми входами, позволяющими О декодере WMA9 Pro подключить аудиокомпоненты для Данный аппарат имеет встроенный декодер воспроизведения. Windows Media™ Audio 9 Professional (WMA9 Pro), поэтому... -
Page 295: Подключение Антенн Am/Fm
Установите антенну AM на плоскую поверхность в направлении наилучшего Подключение антенн AM/FM приема. Подключите рамочную антенну АМ и проволочную антенну FM, как показано ниже. Подключите проволочную антенну FM Для улучшения приема и качества звука к разъему антенны FM. подключите внешние антенны (см. раздел Чтобы... -
Page 296: Настройка Multi-Zone
Настройка основной MULTI-ZONE (ZONE 2) Настройка MULTI-ZONE Подключите отдельный усилитель к Данный ресивер может обслуживать до двух гнездам AUDIO ZONE 2 OUT и независимых зон в разных комнатах, если телевизионный монитор к гнезду VIDEO правильно выполнены подключения MULTI- ZONE 2 OUT на данном ресивере. ZONE. -
Page 297: Bluetooth
Это может привести к повреждению или неисправности контакта. Примечание 1 • Устройство с беспроводным интерфейсом Bluetooth должно поддерживать профили A2DP. • Компания Pioneer не гарантирует правильное подключение и работу этого устройства со всеми устройствами, в которых используется беспроводная технология Bluetooth. -
Page 298: Подключение К Сети Через Интерфейс Lan
Подключение к сети через Подключение компонента, интерфейс LAN оборудованного терминалом HDMI, к входу на передней панели Подключив этот ресивер к сети через терминал LAN, вы сможете слушать Интернет- (Только VSX-1020/VSX-1025) радиостанции. На передней панели имеется входной терминал HDMI. Просто подключив оборудованную терминалом... -
Page 299: Панели
VSX-1020/VSX-1025: Подключение к видеоразъему на передней панели CONTROL ON / OFF MASTER VOLUME (Только VSX-920) К передним видеоразъемам можно получить VIDEO CAMERA доступ через регулятор INPUT SELECTOR iPod iPhone MCACC HDMI 5 SETUP MIC (передняя панель) или кнопки INPUT SELECT (пульт... -
Page 300: Подключение Устройства Usb
программного обеспечения, пожалуйста, iPhone MCACC HDMI 5 SETUP MIC свяжитесь со Cлужбой техподдержки Pioneer, указанной в гарантийном талоне. Подробнее см. документацию к приложению VSX-1020/VSX-1025 Advanced MCACC PC Display. • Подробнее о подключении и работе устройства USB см. Выходные данные... -
Page 301: Подключение Ик-Приемника
руководство к ИК-приемнику. использовать дополнительный ИК-приемник • Если нужно подключить компонент (например, блок Niles или Xantech), а не датчик Pioneer к ИК-приемнику, см. Управление на передней панели ресивера. другими компонентами Pioneer от Подключите датчик ИК-ресивера к сенсора ДУ данного аппарата ниже для... -
Page 302: Подключение Ресивера К Электророзетке
Подключите гнездо CONTROL OUT такого компонента к гнезду CONTROL IN Подключение ресивера к другого компонента Pioneer. электророзетке Используйте для подключения кабель с Включайте вилку в сеть только после монофоническими мини-джек разъемами на подключения к ресиверу всех устройств обоих концах. (включая громкоговорители). -
Page 303: Основная Настройка
Глава 4: Основная настройка Переключение языка экранного Автоматическое выполнение меню (OSD Language) оптимальной звуковой настройки (Auto MCACC) Можно переключать язык, используемый для экрана графического интерфейса пользователя Система автоматической настройки (ГИП). многоканальной акустической калибровки • В качестве примера в данных инструкциях (MCACC) измеряет... - Page 304 Экран Full Auto MCACC отображается при ® подключении микрофона. THX является торговой маркой THX Ltd., которая может быть зарегистрирована 1a.Full Auto MCACC некоторыми инстанциями. Все права A/V RECEIVER : Normal ( SB/FH ) Speaker System защищены. EQ Type : SYMMETRY MCACC : M1.MEMORY 1 THX Speaker...
- Page 305 Следуйте инструкциям, Конфигурация, показанная на экране, должна соответствовать фактическому набору отображаемым на экране. громкоговорителей. Убедитесь, что микрофон подключен, а при использовании низкочастотного • При отображении сообщения ERR (или громкоговорителя – что он включен и если отображается неверная конфигурация установлен подходящий уровень громкости. громкоговорителей), возможно, существует...
-
Page 306: Проблемы При Использовании Автоматической Настройки Mcacc
Обязательно отключите микрофон от данного Нажмите на пульте ДУ, RECEIVER ресивера по окончанию автоматической после чего нажмите HOME MENU. настройки MCACC. На телевизоре отображается экран Параметры, настроенные с помощью графического интерфейса пользователя (ГИП). автоматической настройки MCACC, должны Для перехода между меню и выделенными обеспечивать... -
Page 307: Стандартные И Возможные Настройки Функций Входа
Стандартные и возможные настройки • Если компонент подключен через компонентный видеокабель к входному функций входа терминалу, за исключением терминала по Терминалы на ресивере в принципе умолчанию, требуется указать ресиверу, к соответствуют названиям функций входа. Если какому входному терминалу подключен компоненты подключены иным образом, компонент, или... -
Page 308: Основные Операции Воспроизведения
Глава 5: Основные операции воспроизведения • Для получения информации о различных способах прослушивания источников см. Воспроизведение источника также Прослушивание системы на стр. 57. В данном разделе приведены основные На дисплее передней панели можно проверить, инструкции по воспроизведению источника правильно ли выполняется многоканальное (например, диска... -
Page 309: Воспроизведение Источника Через Подключение Hdmi
• Такие функции, как эквалайзер не могут управляться с ресивера, поэтому перед подключением рекомендуется отключать эквалайзер. • Pioneer при любых обстоятельствах не несет ответственности за прямые и косвенные убытки, возникшие вследствие неудобств и утраты записанного материала, возникшей из-за неисправности iPod. - Page 310 Поиск материала для воспроизведения Переключение управлением iPod После подключения iPod к данному ресиверу, Можно переключать управление iPod на iPod и можно пролистать песни, сохраненные на iPod ресивер. по спискам воспроизведения, именам Нажмите iPod CTRL для переключения исполнителей, названиям альбомов, названиям органов...
-
Page 311: Воспроизведение Устройства Usb
16/32. Невозможно подключить данный аппарат к персональному компьютеру для воспроизведения с устройства USB. • Компания Pioneer не может гарантировать совместимость (управление и/или мощность шины) со всеми запоминающими устройствами USB и не несет ответственности за потерю данных, возможную при подключении к... -
Page 312: Воспроизведение Файлов Фотографий, Сохраненных На Устройстве Памяти Usb
Основные органы управления Основные органы управления воспроизведением воспроизведением Кнопки пульта ДУ этого ресивера можно Кнопки Назначение использовать для основного воспроизведения ENTER, Запуск отображения фотографий или файлов, записанных на картах памяти USB. запуск показа слайдов. • Нажмите iPod USB для переключения RETURN, Остановка... -
Page 313: О Воспроизводимых Форматах Файлов
О воспроизводимых форматах файлов Функция USB данного ресивера поддерживает следующие форматы файлов. Помните, что некоторые форматы файлов недоступны для воспроизведения, хотя они отмечены как воспроизводимые форматы файлов. Музыкальные файлы Категория Расширение Поток .mp3 MPEG-1, 2, 2.5 Audio Частота дискретизации 8 кГц до 48 кГц Layer-3 Разрядность... -
Page 314: Прослушивание Радиопередач
Использование Neural Surround Прослушивание радиопередач Данная функция использует технологии Neural Surround™ для достижения оптимального В приведенных ниже пунктах описывается объемного звучания радиопередачи FM. процедура настройки на радиостанцию • Во время прослушивания радиопередачи диапазона FM и AM с использованием FM, нажмите AUTO/ALC/DIRECT для функций... -
Page 315: Присвоение Имен Предустановленным Радиостанциям
Прослушивание Нажмите T.EDIT (TUNER EDIT). На дисплее отобразится индикация PRESET запрограммированных радиостанций MEMORY, а затем начнет мигать класс памяти. Для этого в ресивере должно быть сохранено Нажмите CLASS для выбора одного из несколько запрограммированных станций. семи классов, затем нажмите PRESET Если... - Page 316 Отображение информации RDS SOCIAL – общественная COUNTRY – музыка Используйте кнопку DISP для отображения жизнь «кантри» RELIGION – программы о NATION M – популярная разных типов информации RDS. религии музыка не на английском • Нажмите кнопку DISP для получения PHONE IN – программы, языке...
-
Page 317: Связи
Воспроизведение музыки по АДАПТЕР Bluetooth® для беспроводной связи Когда к аппарату подключен беспроводной прослушивания музыки без АДАПТЕР Bluetooth (Pioneer, Модель AS- проводов BT100), для прослушивания музыки по беспроводной связи можно использовать устройство с беспроводным интерфейсом Bluetooth (сотовый телефон, цифровой музыкальный плейер и т.д.). Также, с... -
Page 318: Прослушивание Музыкального Содержимого Устройства С Беспроводным Интерфейсом Bluetooth В Вашей Системе
беспроводным интерфейсом Bluetooth. зарегистрированным товарным знаком и Когда подключено устройство с беспроводным принадлежит компании Bluetooth SIG, Inc.; интерфейсом Bluetooth: использование корпорацией Pioneer этих На дисплее ресивера отображается товарных знаков разрешено соответствующей лицензией. Прочие товарные знаки и торговые CONNECTED. наименования принадлежат соответствующим... -
Page 319: Прослушивание Интернет-Радиостанций
С помощью / выберите Интернет- радиостанцию для воспроизведения и Прослушивание Интернет- затем нажмите ENTER. радиостанций Нажимайте / для прокрутки списка вверх и Интернет-радио - услуга аудиотрансляции, вниз и выберите нужный параметр. При передающаяся через Интернет. Существует нажатии ENTER запускается воспроизведение множество... - Page 320 С помощью / выберите меню При подключении ресивера отобразится следующий экран программирования. списка Интернет-радиостанций для редактирования и затем нажмите ENTER. Top Menu Pioneer Internet Radio Setting С помощью / выберите «Edit» Title J-POP Update Connection OK http://www.xxxxxxx.net:9500 Title (Редактировать). Update...
-
Page 321: Прослушивание Системы
Глава 6: Прослушивание системы • При прослушивании радиопередач FM, Внимание функция Neural Surround выбирается • Режимы звучания и многие функции, автоматически (подробнее, см. Использование Neural Surround на стр. 50). описанные в этом разделе, могут быть недоступны при некоторых значениях • При прослушивании входа ADAPTER источника, настроек... - Page 322 • Во время прослушивания источника, • WIDE SURROUND MUSIC – Вывод нажмите , затем нажмите звучания, содержащего до 7.1-каналов RECEIVER STANDARD. (передняя крайняя), наилучшим образом Если это необходимо, повторно нажмите подходит для музыки данную кнопку для выбора режима • Neo:6 CINEMA – Вывод звучания, прослушивания.
-
Page 323: Использование Эффектов Дополнительного Объемного Звучания
• Прямое декодирование – Воспроизводит • ROCK/POP – Создает звучание «живого» без вышеуказанных эффектов. рок-концерта • UNPLUGGED – Подходит для Использование эффектов акустической музыки дополнительного объемного звучания • EXT.STEREO – Обеспечивает Эффекты дополнительного объемного многоканальное звучание звучания можно использовать для получения стереофонического... -
Page 324: Прослушивание В Стереофоническом
• F.S.SURR WIDE – Подробнее см. раздел Использование функции фронтального Использование функции Stream расширенного объемного звучания на Direct (Прямое воспроизведение) стр. 60. Используйте режим Stream Direct (Прямое • SOUND RETRIEVER AIR – воспроизведение), если необходимо Предназначен для прослушивания с воспроизведение источника, максимально устройства... -
Page 325: Выбор Предустановок Mcacc
Выбор предустановок MCACC Выбор входного сигнала • Значение по умолчанию: MEMORY 1 На данном ресивере можно переключать входные сигналы для различных входов, как Если система настроена на различные места это описано ниже. слушателей , можно изменить настройки в зависимости от прослушиваемого источника и •... -
Page 326: Улучшение Качества Звучания С Помощью Функции Phase Control (Корректировка Фазы)
Улучшение качества звучания с помощью функции Phase Control (Корректировка фазы) В функции Phase Control данного ресивера применяются измерения коррекции фазы, что обеспечивает одновременное достижение звуковыми сигналами источника звука места слушателя, предотвращая нежелательные искажения и/или оттенки звучания. Технология Phase Control обеспечивает когерентность... -
Page 327: Функция Управление По Hdmi
операции возможны с совместимыми с настройках, и др., смотрите также функцией Управление по HDMI телевизором инструкции по эксплуатации к каждому Pioneer или проигрывателем дисков Blu-ray или компоненту. с компонентом иной марки, который поддерживает функции Управление по HDMI, когда компонент подключен к ресиверу... -
Page 328: Hdmi Setup
HDMI, функция Управление по HDMI • ON – Включает функцию Управление по может быть использована только не более, HDMI. При отключении питания данного чем с тремя проигрывателями дисков DVD аппарата и при запуске воспроизведения или Blu-ray, или не более, чем с тремя поддерживаемого... -
Page 329: Перед Использованием Синхронизации
• С экрана меню телевизора, совместимого с HDMI. функцией Управление по HDMI, Нижеуказанные операции можно настройте аудио на проигрывание через использовать в телевизорах Pioneer, этот ресивер, и ресивер переключится в совместимых с функцией Управление по режим синхронизированного управления. HDMI. • В режиме синхронизированного... -
Page 330: О Подключении К Изделию Другого Производителя, Поддерживающего Функцию Управление По Hdmi
1 • Если выбран режим прослушивания, за исключением AUTO SURROUND, ALC, DIRECT, PURE DIRECT или STEREO при включенном эффекте PQLS, то эффект PQLS отключается. • Когда данный ресивер подключен через кабель HDMI к проигрывателю Pioneer, совместимому с функцией PQLS, через подключение HDMI, и воспроизводится CD или выполняется повторная аутентификация HDMI (мигает... -
Page 331: Меры Предосторожности По Функции Управление По Hdmi
Меры предосторожности по функции Управление по HDMI • Подключите телевизор напрямую к данному ресиверу. Разрыв прямого соединения с другими усилителями или преобразователем аудио-видео-сигнала (например, с адаптером HDMI) может вызвать ошибки в работе. • Подключайте только те компоненты (проигрыватель Blu-ray дисков, и др.), которые... -
Page 332: Использование Других Функций
Глава 8: Использование других функций Задание параметров звука Нажмите , затем нажмите Существует несколько дополнительных RECEIVER настроек звучания, которые можно установить AUDIO PARAMETER. с помощью меню AUDIO PARAMETER. Используйте / для выбора Настройки по умолчанию, если не указано, настроек, которые вы хотите указаны... - Page 333 Настройка Назначение Параметр(ы) TREBLEc Настройка количества верхних частот. от –6 дo +6 (дБ) по умолчанию: 0 (дБ) S.RTRV При использовании функции восстановления звучания, используется обработка DSP для компенсации потери аудиоданных (Восстановление в процессе сжатия, улучшая ощущение плотности и модуляции звучания) звука.
- Page 334 Настройка Назначение Параметр(ы) Обеспечивает лучшее смешивание звучания передних 0 дo 7 C. WIDTH громкоговорителей, отделяя центральный канал от передних по умолчанию: 3 (Центр - ширина) правого и левого громкоговорителей, делая звучание более (Эта функция широким (более высокие настройки) или более сфокусированным доступна...
-
Page 335: Настройка Видеоопций
h.• Настройка HDMI Audio не может переключаться во время выполнения операций в режиме синхронизированного управления. • Для воспроизведения входных аудио и видеосигналов HDMI ресивера от телевизора, если ресивер установлен в режим ожидания, должен быть включен режим синхронизированного управления. См. раздел О синхронизированных операциях... - Page 336 Настройка Назначение Параметр(ы) Указывает аспектное соотношение при приеме аналоговых THROUGH (Аспект) видеосигналов и их выводе через выход HDMI. Просматривая NORMAL каждую настройку на дисплее, выполните нужные настройки (если изображение не совпадает с типом монитора, отображается срезка или черные полосы). AUTO d,e,f Данная...
-
Page 337: Переключение Терминалов Громкоговорителей
• SP (выкл.) – Звук через громкоговорители не выводится. Переключение терминалов громкоговорителей Если вы выбираете Speaker B на Speaker Использование элементов system setting (Настройка системы управления MULTI-ZONE громкоговорителей) на стр. 101, вы можете переключаться между громкоговорителями с В следующих шагах, для настройки уровня помощью... -
Page 338: Выполнение Аудио- Или Видеозаписи
• Только модель VSX-920: Функция iPod/USB и INTERNET RADIO не может выбираться Выполнение аудио- или для функции MULTI-ZONE. видеозаписи Когда Speaker System установлена на Аудио- или видеозапись можно осуществить на ZONE 2, используйте регулятор MASTER рекордер/магнитофон с помощью встроенного VOLUME для настройки громкости в тюнера, либо... -
Page 339: Уменьшение Уровня Аналогового Сигнала
Если вы не знаете, как это делается, см. инструкции, прилагаемые к записывающему Затемнение дисплея устройству. На большинстве Для дисплея передней панели можно выбрать видеомагнитофонов уровень записи звука один из четырех уровней яркости. Учтите, что устанавливается автоматически. Если вы не при выборе источников яркость дисплея на уверены... -
Page 340: Перезагрузка Системы (Сброс Настроек Ресивера)
Настройка По умолчанию Перезагрузка системы (сброс Control ON (ВКЛ.) настроек ресивера) Control Mode Выполните следующую процедуру для сброса DIsplay Power Off всех настроек ресивера до значений по умолчанию, установленных на заводе. Power On Level LAST Используйте для этого кнопки и регуляторы на Volume Limit OFF (ВЫКЛ.) передней... -
Page 341: Управление Остальными Частями Системы
Глава 9: Управление остальными частями системы Однако в некоторых случаях после установки правильного предустановленного кода можно Управление несколькими будет управлять только определенными ресиверами функциями. Возможно также, что коды производителей, содержащиеся в пульте ДУ, До четырех ресиверов может работать не будут работать для используемой модели. раздельно... -
Page 342: Непосредственный Ввод Кодов Компонентов
настройки, нажмите R.SETUP. Нажмите кнопку выбора входа для компонента, которым необходимо управлять. Светодиод мигает один раз и горит непрерывно. Примечание 1 В пульте ДУ может храниться до 120 предустановленных кодов с других компонентов (проверка осуществлялась только с использованием кодов в формате Pioneer). - Page 343 Расположите оба пульта ДУ напротив друг друга, а затем нажмите на пульте ДУ Стирание одной из настроек ресивера кнопку, действие которой надо кнопки пульта ДУ передать. Эта функция позволяет стирание Светодиод мигает один раз и горит запрограммированных кнопок и непрерывно. восстановление...
-
Page 344: Сброс Настроек Одной Из Кнопок Выбора Входа
Сброс настроек одной из кнопок Функция Direct выбора входа • Значение по умолчанию: Вкл Функция прямого управления позволяет Эта процедура сбрасывает назначение входа, одновременно управлять одним компонентом предустановленное на кнопке выбора входа через пульт ДУ и воспроизводить на ресивере пульта ДУ, восстанавливая настройки по материал... -
Page 345: Групповые Операции (Multi Operation) И Выключение Системы (System Off)
питания. В некоторых случаях, даже если этот ресивер программируется для выполнения этих команд, питание для устройств других марок, кроме Pioneer, может включаться и выключаться неправильно. Запрограммируйте ресивер для выполнения этих команд, если устройство другой марки, кроме Pioneer, использует отдельные сигналы для включения/выключения питания. -
Page 346: Использование Групповых Операций
• Программировать включение или Будет выполнена запрограммированная выключение ресивера не нужно. Это последовательность команд, а затем все делается автоматически. компоненты Pioneer, и в заключение ресивер, будут выключены (переключение всех зон Для компонентов Pioneer, вам не нужно становится выкл). программировать последовательность... -
Page 347: Сброс Параметров Пульта Дистанционного Управления
RECEIVER MULTI SOURCE Сброс параметров пульта OPERATION дистанционного управления R.SETUP DVR/BDR HDMI Эта операция удаляет все предустановленные NET RADIO ADAPTER коды производителей и запрограммированные кнопки на пульте ДУ. iPod USB TUNER VIDEO TV CTRL Нажмите и удерживайте R.SETUP, RECEIVER INPUT SELECT ZONE 2 нажмите... - Page 348 Телевизор Кнопки Телевизор BD/DVD HDD/DVR Bидеомагнитофон SAT/CATV (монитор) SOURCE POWER ON/ POWER ON/ POWER ON/ POWER ON/ POWER ON/ POWER ON/ Номерные число число число число число число кнопки • (точка) • (точка) KURO LINK CLEAR ENTER ENTER CH ENTER ENTER ENTER...
- Page 349 CD/CD-R/ Телевизор Кнопки MD/DAT TAPE Кнопки SACD (Проектор) SOURCE POWER ON/ POWER ON/ POWER ON/ POWER ON/ SOURCE POWER ON MOVIE Номерные число число число STANDARD кнопки DYNAMIC в • (точка) >10/CLEAR CLEAR CLEAR USER1 в ENTER ENTER DISK/ENTER OPEN/CLOSE ENTER USER2...
-
Page 350: Меню Advanced Mcacc
1. Advanced MCACC 2. MCACC Data Check ACoustic Calibration) была разработана в 3. Data Management 4. System Setup лабораториях Pioneer с целью создания возможности для домашних пользователей легко и с высокой точностью выполнять регулировки на такомже уровне, как и в студии. Exit Return Акустические... -
Page 351: Автоматическая Настройка Mcacc (Expert)
ОСТОРОЖНО Автоматическая настройка • Тестовые сигналы, издаваемые системой MCACC (Expert) автоматической настройки MCACC, имеют Если настройка требует более высокой высокую громкость. точности, чем описано в Автоматическое Выберите «Auto MCACC» в Advanced выполнение оптимальной звуковой настройки MCACC, затем нажмите ENTER. (Auto MCACC) на стр. 39, изменить настройку Если... - Page 352 каналов. FRONT ALIGN настраивает все Подключите микрофон в гнездо громкоговорители в соответствии с MCACC SETUP MIC на передней панели. настройками передних громкоговорителей Проверьте, нет ли препятствий между громкоговорителями и микрофоном. (выравнивание для переднего левого и правого каналов не применяется). • THX Speaker (доступна только при CONTROL ON / OFF MASTER...
- Page 353 Дождитесь, когда система • Если отображается Reverse Phase, это автоматической настройки MCACC значит, что провода громкоговорителя перестанет издавать тестовые звуковые могли быть подключены наоборот (+ и –). сигналы. Проверьте подключения Когда ресивер издает тестовые звуковые громкоговорителей. сигналы, чтобы определить какие –...
-
Page 354: Ручная Настройка Mcacc
Параметры автоматической настройки MCACC должны обеспечивать превосходное Ручная настройка MCACC объемное звучание системы, но эти параметры Настройки в меню Manual MCACC можно также можно отрегулировать вручную с использовать для более точной регулировки помощью меню настройки Manual MCACC после подробного ознакомления с работой (ниже) или... -
Page 355: Fine Channel Level
Выберите «Manual MCACC» в меню Выберите «Fine Channel Level» в Advanced MCACC. меню Manual MCACC. См. Настройка параметров ресивера в меню Громкость увеличится до контрольного уровня Advanced MCACC на стр. 86, если вы уже не 0,0 дБ. находитесь в данном пункте меню. Отрегулируйте... -
Page 356: Standing Wave
Standing Wave Отрегулируйте расстояние до левого канала с места слушателя. • Значение по умолчанию: ON /ATT 0.0dB (все фильтры) Выберите каждый канал по порядку и Акустическая стоячая волна возникает, когда отрегулируйте расстояния при определенных условиях звуковые волны соответствующим образом. акустической системы взаимно резонируют со Используйте... -
Page 357: Регулировка Эквалайзера Акустической Калибровки
• Freq / Q / ATT – Параметры фильтра, где • Индикатор OVER! появится на дисплее, Freq обозначает конечную частоту, Q – если настройка частоты слишком резка, она частотный диапазон (чем выше Q, тем уже может вызвать искажения. Если это частотный... - Page 358 • Тип A: Реверберационность высоких • Reverb View – Здесь можно проверить против низких частот результаты измерения реверберации в указанной полосе частот для каждого Низкие частоты Уровень канала. Высокие частоты • Advanced EQ Setup – Этот вариант Обычный диапазон калибровки позволяет...
- Page 359 По окончании измерения реверберационных Выберите для времени отклика один из характеристик, можно выбрать пункт Reverb следующих диапазонов (в миллисекундах): View и просмотреть результаты измерения на 0-20ms, 10-30ms, 20-40ms, 30-50ms, 40- 60ms, 50-70ms и 60-80ms. Это значение экране. По информации о неисправностях и мерах...
-
Page 360: Проверка Данных Mcacc
• Output MCACC data – Подробнее см. раздел Выходные данные MCACC на Проверка данных MCACC стр. 97. Во время процедуры Автоматическое выполнение оптимальной звуковой настройки Нажмите RETURN для возврата в (Auto MCACC) на стр. 39, процедуры меню MCACC Data Check, повторяя Автоматическая... -
Page 361: Standing Wave
Нажмите и выделите «MCACC», При выделении «MCACC», используйте / для выбора затем с помощью / выберите предустановки MCACC, которую нужно предустановку MCACC, которую нужно проверить. проверить. Отображается расстояние от различных каналов, настроенное на выбранной Выходные данные MCACC предустановке MCACC. «---» отображается для Перед... -
Page 362: Data Management
После завершения нажмите кнопку • MCACC Memory Copy – Копирование RETURN. параметров из одной предустановки Вы вернетесь в меню MCACC Data Check. MCACC в другую (см. Копирование данных При необходимости, продолжайте выполнять предустановок MCACC ниже). другие операции в меню MCACC Data Check. •... -
Page 363: Сброс Предустановок Mcacc
Выберите настройку, которую требуется скопировать. • All Data – Копирует все настройки в выбранной предустановленной памяти MCACC. • Level & Distance – Копирует только настройки уровня канала и расстояния громкоговорителей в выбранной предустановленной памяти MCACC. Выберите предустановку MCACC, настройки из которой будут копироваться «From», затем... -
Page 364: Меню System Setup (Настройка Системы) И Other Setup (Другие Настройки)
Глава 11: Меню System Setup (Настройка системы) и Other Setup (Другие настройки) • Input Setup – Назначает номера входов для компонентов подключенных к Настройка параметров ресивера цифровому, HDMI и компонентному в меню System Setup видеовходам (см. Меню Input Setup на стр. -
Page 365: Speaker System Setting (Настройка Системы Громкоговорителей)
Выберите «Manual SP Setup», затем Выберите настройку системы нажмите ENTER. громкоговорителей. • Normal(SB/FH) – Выберите для обычного См. Настройка параметров ресивера в меню System Setup на стр. 100, если вы уже не домашнего кинотеатра использование находитесь на данном экране. передних верхних громкоговорителей в основной... -
Page 366: Speaker Setting
При отображении «Setting Change?», частот на другие громкоговорители или низкочастотный громкоговоритель. Если выберите Yes. центральный громкоговоритель не Если выбран No, настройка не изменяется. подключен, выберите NO (сигнал Вы вернетесь в меню Manual SP Setup. центрального канала направляется на передние громкоговорители). •... -
Page 367: Channel Level (Уровень Канала)
Channel Level (Уровень канала) громкоговорители объемного звучания эффективно воспроизводят низкие Настройки уровня канала позволяют частоты. Выберите SMALLx2 или отрегулировать общий баланс акустической SMALLx1 для передачи низких частот на системы и являются важным фактором при другие громкоговорители или настройке системы домашнего театра. низкочастотный... -
Page 368: Speaker Distance (Расстояние До Громкоговорителей)
Выберите «X-Curve» в меню Manual Совет SP Setup. • Можно изменить уровни каналов, нажав Выберите нужную настройку X-Curve. , затем нажав CH LEVEL, и RECEIVER Используйте / для регулировки затем используя / на пульте ДУ. настройки. X-Curve выражается в убывании наклона... -
Page 369: Настройка Ip Address/Proxy
• Information – Проверяет MAC-адрес этого Primary DNS Server/Secondary DNS ресивера (стр. 106). Server В случае, если имеется только один DNS Настройка IP Address/Proxy сервер, предоставленный провайдером Интернет услуги на бумаге, введите «Primary Если к терминалу LAN данного ресивера DNS Server». В случае, если имеется более подключен... -
Page 370: Проверка Mac-Адреса
образом: максимального уровня громкости. Уровень • HDMI Setup – Синхронизирует этот громкости не может превышать указанный ресивер с вашим компонентом Pioneer, здесь уровень, даже при управлении кнопкой совместимым с функцией Управление по MASTER VOLUME (или регулятором на HDMI (см. HDMI Setup на стр. 64). -
Page 371: Remote Control Mode Setup
• FULL (по умолчанию) – Отсутствует звук. • –40.0dB/–20.0dB – Громкость уменьшится до уровня, указанного здесь. После завершения нажмите кнопку RETURN. Вы вернетесь в меню Other Setup. Remote Control Mode Setup • Значение по умолчанию: 1 Данная настройка устанавливает режим ДУ данного... -
Page 372: Дополнительная Информация
задней панелью или другим комплектом проводов. Если да, отсоедините кабели индикатор iPod iPhone. громкоговорителей, убедившись в отсутствии оголенных проводов. • Возможны серьезные неполадки ресивера. Отключите электропитание и обратитесь в сервисный центр, уполномоченный компанией Pioneer. При громком • Уменьшите громкость. воспроизведении питание... -
Page 373: Отсутствует Звук
• Подождите как минимум 1 минуту, затем снова попытайтесь включить питание. отключается. Внезапно питание ресивера • Неисправен блок питания. Отключите ресивер от электророзетки и обратитесь в отключается или мигает независимую сервисную компанию, уполномоченную компанией Pioneer. PQLS. Отсутствует звук Неполадка Устранение... - Page 374 Неполадка Устранение Отсутствует звук из • Проверьте правильность подключения низкочастотного громкоговорителя, низкочастотного включен ли он, и установлена ли громкость звука. громкоговорителя. • Если используемый низкочастотный громкоговоритель имеет функцию отключения, убедитесь в том, что она отключена. • Убедитесь в том, что настройка Subwoofer установлена на YES или PLUS см.
-
Page 375: Другие Проблемы Со Звуком
Другие проблемы со звуком Неполадка Устранение Радиостанции не выбираются Для радиостанций в диапазоне FM автоматически или в • Полностью растяните проволочную антенну FM, отрегулируйте положение для радиопередачах наблюдаются лучшего приема и прикрепите ее к стене. сильные помехи. • Для улучшения приема используйте внешнюю антенну (см. стр. 31). Для... -
Page 376: Видео
Неполадка Устранение Настройка громкости Максимально возможная • Проверьте, установлен ли Volume Limit на OFF (см. на громкость (указанная на стр. 106). дисплее передней панели) • Настройка уровня канала может превышать 0dB. ниже максимального значения +12dB. Видео Неполадка Устранение После выбора входа •... -
Page 377: Настройки
Настройки Неполадка Устранение При автоматической • Уровень фоновых шумов может быть слишком высок. Сохраняйте уровень Проблемы настройке MCACC постоянно шумов в помещении на минимальном возможном уровне (см. также появляется сообщение об при использовании автоматической настройки MCACC на стр. 42). Если ошибке. -
Page 378: Графический Вывод Данных Эквалайзера Профессиональной Калибровки
Графический вывод данных эквалайзера профессиональной калибровки Неполадка Устранение Отклик эквалайзера, • Есть случаи, когда диаграмма не отображается ровно (даже при выборе ALL CH отображенный в графическом ADJ в автоматической настройке MCACC) из-за настроек, компенсирующих виде после калибровки, не характеристики комнаты, для достижения оптимального звучания. кажется... -
Page 379: Пульт Дистанционного Управления
• Убедитесь в том, что на сенсор ДУ на попадает флуоресцентный или другой интенсивный свет. Управление другими • Проверьте подключения гнезда CONTROL IN (см. компонентами Pioneer от сенсора ДУ данного аппарата на стр. 37). Невозможно управление • Если батарейка села, предустановленные коды могли быть удалены. Введите... -
Page 380: Hdmi
HDMI Неполадка Устранение Индикатор HDMI постоянно • Проверьте все пункты, перечисленные ниже. мигает. Изображение или звук • Этот ресивер совместим с HDCP. Убедитесь, что подключаемые компоненты отсутствует. также HDCP-совместимы. Если нет, подключите их с помощью разъемов компонентного или композитного видео. •... -
Page 381: Важные Сведения О Подключении Hdmi
Неполадка Устранение Синхронная работа • Проверьте подключения HDMI. невозможна с использованием • Мог быть поврежден кабель. функции Управление по HDMI Setup • Выберите ON для настройки функции Управление по HDMI (см. HDMI. на стр. 64). HDMI Setup • Выберите ALL для настройки Control Mode (см. на... -
Page 382: Интерфейс Usb
Интерфейс USB Симптомы Причины Способы устранения Не отображаются папки/ Папки/файлы в данный момент Сохраните папки/файлы на участке FAT. файлы, сохраненные на сохранены на участке, кроме участка устройстве памяти USB. FAT (File Allocation Table). Количество уровней папок Ограничьте максимальное количество превышает 8. уровней... -
Page 383: Adapter Port
ADAPTER PORT Неполадка Устранение Устройство с беспроводным • Проверьте, нет ли рядом с аппаратом источников электромагнитного излучения Bluetooth в диапазоне 2,4 ГГц (микроволновые печи, устройства с поддержкой интерфейсом не Bluetooth беспроводной локальной сети или с интерфейсом ). Если рядом с подключается... - Page 384 Симптомы Причины Способы устранения Экран настроек Интернет- IP-адрес этого ресивера был введен Проверьте IP-адрес ресивера и введите его радио невозможно неправильно в браузер. правильно в браузере (стр. 105). отобразить в Интернет- JavaScript выключен в Интернет- Включите JavaScript. браузере компьютера. браузере. Браузер...
-
Page 385: Об Ipod
Об iPod Ниже описываются технологии DTS. Более подробную информацию можно получить по адресу www.dtstech.com. «Made for iPod» означает, что электронный прибор был разработан для подключения определенно к iPod и был сертифицирован разработчиком на соответствие стандарту технических характеристик Apple. «Works with iPhone» означает, что электронный прибор... -
Page 386: Auto Surround, Alc И Stream Direct С Различными Форматами Входного Сигнала
Auto Surround, ALC и Stream Direct с различными форматами входного сигнала На следующей схеме показано, что будет слышно при использовании различных форматов входных сигналов в зависимости от режима Stream Direct (см. Использование функции Stream Direct (Прямое воспроизведение) на стр. 60). Стереофонические... -
Page 387: Список Предустановленных Кодов
Категория Телевизор Предустанов- Pioneer 0180 ленный код Производитель Телевизор Pioneer 0180, 0185, 0186, Aristona 0034, 0037, 0040 Britannia 0026, 0113, 0114 Daewoo 0013, 0026, 0027, 0187, 0189, 0192, 0193, 0198 0034, 0039, 0040, 0054, 0064, Arthur Martin 0041 Bruns 0023... - Page 388 Eurofeel 0114, 0025 HCM 0025, 0026, 0027, 0036, Lenoir 0026, 0027, 0039 New World 0028 Euroline 0037 0039, 0040, 0114 Leyco 0025, 0034, 0037, 0040 Nicamagic 0026, 0113 Hema 0039, 0114 Euroman 0010, 0025, 0026, LG 0010, 0021, 0026, 0027, Nikkai 0025, 0026, 0028, 0034, Higashi 0113 0034, 0040, 0113, 0114...
- Page 389 Quelle 0025, 0026, 0034, 0037, Sony 0001, 0003, 0027, 0032, Vexa 0027, 0037, 0039, 0040 0040, 0114 0046, 0053, 0057, 0070, 0073, Victor 0032, 0034 0082, 0086, 0096, 0110, 0112 Questa 0032 VIDEOLOGIC 0113 Sound & Vision 0028, 0029 Videologique 0026, 0028, Radialva 0040 Soundwave 0034, 0037, 0040 0113, 0114...
- Page 390 Если операции невозможны с использованием предварительно установленных кодов ниже, операции можно выполнять с помощью предварительно установленных кодов для BD, DVR (BDR, HDR). Pioneer 2246, 2215 Haaz 2085, 2086 RedStar 2091, 2093, 2095 HiMAX 2090 Reoc 2086 AEG 2093 Hitachi 2015, 2083, 2090...
- Page 391 2197, 2198 DVR (BDR, HDR) Если операции невозможны с использованием предварительно установленных кодов ниже, операции можно выполнять с помощью предварительно установленных кодов для DVD, BD. Pioneer 2238, 2239, 2240, Sony 2170, 2173, 2174, 2175, 2241, 2242, 2243, 2244, 2245 2178...
- Page 392 Sony 1011 Toshiba 1001, 1006, 1014 Teac 1018 Yoko 1004, 1005, 1007, 1017 Standard 1003, 1018 Towada 1007, 1017 Приставка спутникового телевидения Pioneer 6096, 6095, 6080, Big Sat 6062 Deltasat 6068 Fenner 6056 6176, 0196 Black Diamond 6093 Denver 6121...
- Page 393 ID Digital 6117 Metz 6053 Primacom 6143 Skymaster 6109, 6056, 6068, ILLUSION sat 6123 Micro 6112, 6131, 6076, 6056, Primestar 6178 6114, 6115, 6060, 6059, 6079 Skymax 6090, 6120 Imperial 6098, 6092, 6099, 6107 Pro Basic 6096, 6060 Micro Elektronic 6056 Skypex 6106 6114, 6108 Proline 6093...
- Page 394 Nokia 6082 Zehnder 6068, 6075, 6125 Gecco 6075 SKY Italia 6088 Globo 6075 Opentel 6075 Sky XL 6075 Приставка кабельного телевидения Pioneer 0197, 6081 General Instrument 6152, NTL 6152, 6097 Scientific Atlanta 6101 6142 StarHub 6152 ABC 6142 Optus 6152...
- Page 395 Pioneer 5065, 5066 Hitachi 5042 Philips 5022, 5032, 5044 TEAC 5015, 5016, 5034, 5035, 5037 Kenwood 5020, 5021, 5031 RCA 5013, 5029 AKAI 5043 Technics 5041 Luxman 5049 Roadstar 5052 Asuka 5045 Victor 5014 Marantz 5033 Sharp 5051 Denon 5019...
-
Page 396: Спецификации
Встроенная секция управления Спецификации Терминал управления (SR) ....Ø 3,5 мини-джек (MONO) Терминал управления (IR) Аудио секция ....Ø 3,5 мини-джек (MONO) Номинальная... -
Page 397: Чистка Устройства
бензин, инсектицидные аэрозоли или другие химические вещества, так как они могут повредить поверхность. Это изделие снабжено комплектом шрифта ® FontAvenue , который лицезируется NEC Corporation. FontAvenue - это зарегистрированный торговый знак NEC Corporation. Издано Pioneer Corporation. © Pioneer Corporation, 2010. Все права защищены. - Page 400 253 Alexandra Road, #04-01, Singapore 159936 TEL: 65-6472-7555 PIONEER ELECTRONICS AUSTRALIA PTY. LTD. 178-184 Boundary Road, Braeside, Victoria 3195, Australia, TEL: (03) 9586-6300 PIONEER ELECTRONICS DE MEXICO S.A. DE C.V. Blvd.Manuel Avila Camacho 138 10 piso Col.Lomas de Chapultepec, Mexico, D.F. 11000 TEL: 55-9178-4270 K002_B2_Ru Published by Pioneer Corporation.