Table of Contents
Advertisement
Advertisement
Table of Contents

Related Manuals for Pfaff passport 2.0


Summary of Contents for Pfaff passport 2.0
- Page 1 Owner’s manual...
-
Page 2: Important Safety Instructions
This household sewing machine is designed to comply with IEC/EN 60335-2-28 and UL1594. IMPORTANT SAFETY INSTRUCTIONS When using an electrical appliance, basic safety precautions should always be followed, including the following: Read all instructions before using this household sewing machine. DANGER –... -
Page 3: Table Of Contents
Congratulations! passport™ 2.0 dimension of sewing! Table of contents Introduction Sewing Machine overview ..............4 Select a stitch ..............21 Accessories ................5 Stitch adjustments ............21 Sewing techniques ............22 Presser feet ................6 Stitch overview ..............7 Three-step zigzag stitch ..........22 ...............22 Preparations ...............23 Unpacking ................ -
Page 4: Introduction
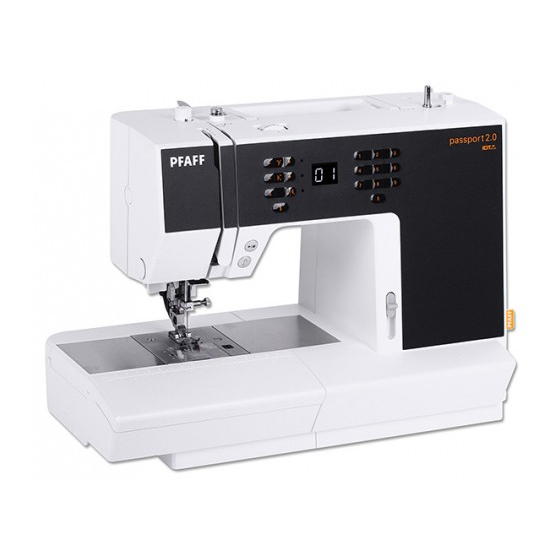
Introduction Machine overview Front side Threading slots 11. Needle screw Thread cutter 12. Needle thread guide 13. Presser foot bar and presser foot holder 14. Presser foot 15. Free arm Needle bar 19. Handwheel Lower thread guide 10. Presser foot lift... -
Page 5: Accessories
Top parts 21. Presser foot pressure dial 22. Thread guides 24. Hole for auxiliary spool pin bobbin spindle 27 28 29 29. Thread tension dial Rear side 30. Main switch, connectors for power cord and foot control 31. Handle 32. Presser foot lift 33. -
Page 6: Presser Feet
Presser feet Standard presser foot 0A with IDT™ system (shown as in the display, attached on the machine upon delivery) This foot is used mainly for straight stitching and zigzag stitching with a stitch length longer than 1.0 mm. Fancy stitch foot 1A with IDT™ system (shown as in the display) Fancy stitch foot 2A (shown as in the display) -
Page 7: Stitch Overview
Stitch overview Utility stitches = Engage IDT™ system Stitch No. Name Description Note: This stitch makes a stronger tie-off than stitch 21. Reinforced seam. Topstitching. stitch Zigzag stitch Z-zigzag stitch Three-step zigzag stitch Honeycomb stitch thread in the bobbin. Crosshem stitch Elastic blindhem stitch Rounded buttonhole with lengthwise tack... - Page 8 Quilt stitches Stitch Stitch = Engage IDT™ system Needle art stitches Stitch = Engage IDT™ system Satin stitches Stitch Decorative stitches Stitch...
-
Page 10: Preparations
Unpacking packaging and lift off the machine carrying case. plastic bag. Note: Your PFAFF® passport™ 2.0 sewing machine is Connect to the power supply cord and the foot control. the power cord when the machine is not in use. For this sewing machine, foot control model C-9002 must be used. -
Page 11: Free Arm
Free arm To use the free arm, slide off the accessory tray. When attached, a hook keeps the accessory tray by sliding it to the left. Leveling the machine base plate To make sure your machine stands steadily on by hand. Turn clockwise to lower and counter- clockwise to raise the base plate. -
Page 12: Threading The Machine
Vertical position on the large spool cap and place a felt pad under reeling off too fast. Auxiliary spool pin The auxiliary spool pin is used when winding a bobbin thread from a second spool of thread or for a second spool when sewing with a twin needle. Insert the auxiliary spool pin into the hole at the and place a felt pad under the thread spool. -
Page 13: Needle Threader
Needle threader The needle threader allows you to thread the needle automatically. The needle must be in its highest position to use the built-in needle threader. Press the needle up/down button to make sure the needle is fully raised. We also recommend lowering the presser foot. Use the handle to pull the needle threader all through the needle eye. -
Page 14: Bobbin Winding
Bobbin winding Place the thread spool on the spool pin in against the spool. front to back. Pull the thread clockwise around the inside to the outside. Place an empty bobbin on the bobbin spindle. Press the foot control to wind the bobbin. When the bobbin is full, release the foot... -
Page 15: Inserting The Bobbin
Inserting the bobbin Make sure that the needle is fully raised and the Insert the bobbin in the bobbin case with the thread running in a counterclockwise direction. draw the thread at the arrow markings into the Pull the thread at the arrow markings into the IDT™... -
Page 16: Presser Foot Pressure
Presser foot pressure The presser foot pressure has been pre-set to the the result. turning the dial counterclockwise. the dial clockwise. Thread tension To set the thread tension, turn the dial on top of the For the best stitch appearance and durability, make between the two layers of fabric. -
Page 17: Needles
Needles The sewing machine needle plays an important The needle package included with your machine Universal needle (A) Stretch needle (B) leathers. Marked with a yellow band. Embroidery needle (C) damage to thread and materials. Use with metallic and other specialty threads for embroidery and Denim needle (D) band. -
Page 18: Changing The Needle
Changing the needle Use the hole in the multi-purpose tool to hold the needle. if necessary. Insert the new needle, using the multi-purpose tool. Push the new needle upwards with the further. Tighten the needle screw as tight as it will go. Lowering feed dogs switch to the right if you wish to raise the feed dogs. -
Page 19: Buttons
Buttons Reverse (1) sewing the desired length of stitching, press the button pressed. will complete the current stitch, tie-off and stop automatically. starting to sew. 15-20. stitch. Needle up/down (6) Start/stop (2) Press this button to start or stop the machine The setting of the needle stop position is changed without using the foot control. -
Page 20: Warning Messages/Sound
Warning messages/sound Main motor overloaded recommended solution. When the problem has Note: When sewing, if the thread gets jammed inside Bobbin winding position If you press any button, a beep will inform you to push the bobbin winder spindle to the left, sewing position. -
Page 21: Sewing
Sewing When the machine is turned on, straight stitch 01 is selected by default. Select a stitch Press a combination of the 0 to 9 buttons to select the stitch represented by that number. Stitch adjustments selected stitch. The setting changes only affect the selected stitch, and will be reset to default when another stitch is selected. -
Page 22: Sewing Techniques
Sewing techniques Three-step zigzag stitch Make sure the needle pierces the fabric on the left to allow seams to stretch when sewing knit fabrics. Buttonholes for different kinds of fabric and garments. Look descriptions of each buttonhole. The fabric should be interfaced and/or stabilized where buttonholes are to be sewn. -
Page 23: Sew On A Button
Corded buttonhole (Stretch fabrics) When sewing buttonholes in stretch fabrics we recommend cording the buttonhole to increase the stability and to keep the buttonhole from stretching out. at the front of the foot. Cross the cord in front of the needle and thread cord ends into a large needle, pull to the wrong side and knot ends before cutting excess. -
Page 24: Darning And Mending
Darning and mending color as close to your garment as possible. Place fabric or stabilizer in position under the hole or tear in your garment. complete the stitch. sewing. To set a different length of the darning stitch, select the stitch again and continue with steps 3 Sewing hems in heavy fabric balance the height of the presser foot as you sew. -
Page 25: Quilting
Quilting of fabric with a layer of batting sandwiched between. Stitch-in-the-Ditch IDT™ system. with safety pins, starting from the center of your IDT™ system presser foot #820 925- 096. Crazy quilt stitching The stitches can be sewn in a coordinating or stitch and pull the bobbin thread to the top of another to lock the threads. -
Page 26: Sewing In Zippers
Blindhem The blindhem stitch, number 09, is used to make decorating. Use foot number 3 with IDT™ system. Finish the edge of the hem. Fold and press the hem allowance to the wrong side. Fold the hem back on itself so approximately beyond the fold. -
Page 27: Maintenance
Maintenance Cleaning the machine To keep your sewing machine operating well, clean Wipe the exterior surface of your machine with a Cleaning the bobbin area turn off the machine. stitch plate. Lift up the stitch plate. Clean the feed dogs and the bobbin area with the brush found with the accessories. -
Page 28: Troubleshooting
Troubleshooting Problem/cause Remedy General problems Make sure that the feed dogs are not lowered. Insert needle correctly, see page 18. Check that all plugs are securely plugged into the machine and into the wall socket. The sewing machine function buttons do not The sockets and function buttons on the machine The machine skips stitches Insert needle correctly, see page 18. - Page 29 Bobbin thread breaks Check the bobbin thread. Change the stitch plate. Clean lint from bobbin area. Wind a new bobbin. The seam has uneven stitches Check needle thread tension and the threading. Change the thread. Check bobbin winding. Insert a proper needle correctly, see page 18. The machine does not feed or feeds irregularly Check how the machine is threaded.
-
Page 31: Intellectual Property
and the assortment of accessories without prior notice, or of the user and the product. Intellectual property Please note that on disposal, this product must be safely relating to electrical/electronic products. If in doubt please contact your retailer for guidance. CE - Authorised Representative SVP Worldwide... - Page 32 www.pfaff.com...