Table of Contents
Advertisement
Advertisement
Table of Contents

Related Manuals for Plustek OpticSlim 2600


Summary of Contents for Plustek OpticSlim 2600
- Page 1 Installation Usage & Maintenance...
- Page 2 Trademarks © 2013 Plustek Inc. All rights are reserved. No portion of this document may be reproduced without permission. All trademarks and brand names mentioned in this publication are property of their respective owners. Liability While all efforts have been made to ensure the accuracy of all contents in this...
-
Page 3: Table Of Contents
Table of Contents ....................1 NTRODUCTION How to Use This Guide....................1 Conventions of This Guide ..................1 A Note about Icons ....................... 2 Safety Precautions...................... 2 Minimum System Requirements ................. 3 Box Contents ......................3 Scanner Overview ...................... 4 I. -
Page 4: Introduction
Introduction Welcome to the world of Plustek scanners – the ultimate in computer imaging. Your new scanner will improve the professionalism of your day-to-day computing tasks by allowing you to input images and electronic text into your computer system. Like all of our products, your new scanner is thoroughly tested and backed by our reputation for unsurpassed dependability and customer satisfaction. -
Page 5: A Note About Icons
This guide uses the following icons to point out information that deserves special attention. Warning: A procedure that must be followed carefully to prevent injury, or accidents. Warning Attention: Instructions that are important to remember and may prevent mistakes. Attention Information: Optional tips for your reference. -
Page 6: Minimum System Requirements
Minimum System Requirements PC with Intel Pentium® II 233 MHz processor or compatible 64 MB RAM Available USB 2.0 port CD-ROM Drive or DVD-ROM Drive 400 MB Free Hard Disk Space Video card that supports 16-bit color or greater Operating System: Windows 2000 / XP / Vista / 7 / 8 Systems with Pentium III 500 MHz or higher processor (or its compatible), 128 MB RAM, available USB 2.0 port and 800MB free hard disk... -
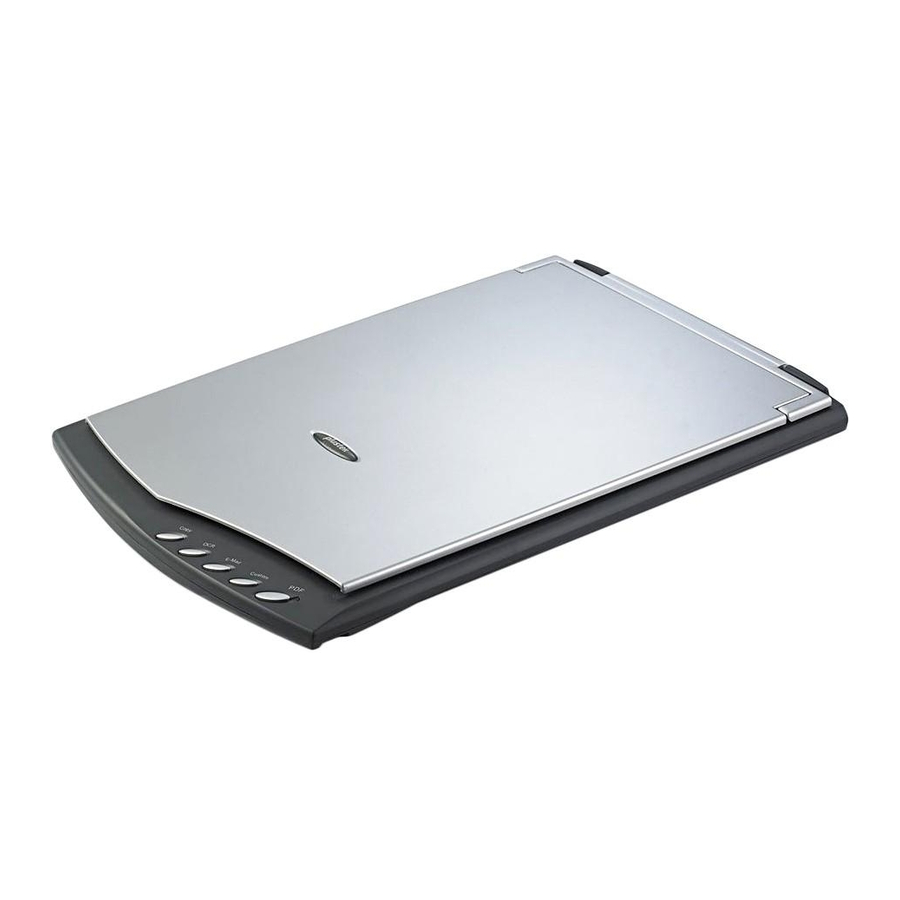
Page 7: Scanner Overview
Scanner Overview 1. Scanner Buttons: You may press the button to perform a predefined scanning task. 2. Power LED: It indicates the scanner status. Light Status The scanner is turned on, ready to scan images. The scanner is off. 3. USB Port: It connects the scanner to a USB port on your computer by the included USB cable. -
Page 8: Chapter I. Installing The Scanner
Chapter I. Installing the Scanner Before installing your scanner, please verify that you have all of the proper components. A list of the package contents is provided in the Box Contents section of this guide. Software Installation Requirements Your scanner comes with the OCR software (ABBYY FineReader Sprint), the scanner’s driver and the DocAction software. -
Page 9: Installing And Setting Up The Scanner
Installing and Setting up the Scanner Please follow the step-by-step procedures described below to install the Plustek scanner. Please make sure the scanner is turned OFF. Attention 1. Plug the square end of the included USB cable to the USB port of the scanner. - Page 10 2. For Windows 2000: a. Click the Next button when the “Add New Hardware Wizard” window is displayed. b. Select Search for the Best Driver for Your Device [Recommended] and click the Next button. c. The next window will ask you where to search to find the drive. Select CD- ROM drive, and deselect Floppy disk drives if it is checked.
- Page 11 5. For Windows 7: When the Setup/Application CD is for several scanner models a. Insert the Setup/Application CD-ROM, included with your scanner, into your CD-ROM drive. Click Run install.exe in the AutoPlay window. b. Click on the Yes button if the User Account Control dialog pops up. Follow the instructions in the pop-up installation message.
-
Page 12: Step 3. Testing The Scanner
Save the Setup/Application CD in case you need to reinstall the driver and software in the future. Attention The following describes how you can check if the scanner is properly functioning with your computer and the scanning software. Before testing your scanner, double check to make sure that all connections are securely fastened. -
Page 13: Software Setup Troubleshooting
Software Setup Troubleshooting Carefully review the steps outlined in this guide and the Quick Guide that accompanied your scanner. If you are still having problems, please check that: You have 800MB of free space on your hard disk drive. The scanner is plugged in and has power. You are using the USB cable supplied with the scanner. -
Page 14: Chapter Ii. Usage And Maintenance
Chapter II. Usage and Maintenance Operating the Scanner Your scanner needs to be driven by some type of software program. Since all documents or images (whether text or pictures) that are acquired from the scanner are treated by your computer as images, most scanning will probably be done from an image-editing program where you can view, edit, save and output the scanned images. -
Page 15: Preparation
Preparation 1. Open the document cover and place your document on the scanner glass. Align the document with the mark on the scanner. 2. Gently close the document cover. Scan the Image(s) There are 3 different ways to operate the scanner: 1. -
Page 16: Scanning Via Twain Interface
The TWAIN program is a very important piece of software that comes with your scanner. This program acts as an interface between the scanner hardware and the image-editing software you are using to view and edit images. The TWAIN program allows you to adjust a number of settings to define the quality of the scanned image. -
Page 17: Configure Button Settings
Configure Button Settings Before performing your first scan via scanner buttons, you are recommended to configure the button settings to your needs and preferences first. There are two ways to configure or view the button settings of DocAction: Double-click the icon in the Windows system tray. -
Page 18: Scanner Connection
Scanner Connection The first step to take when troubleshooting connection problems with your scanner is to check all physical connections. The icon , located on the Windows system tray, indicates if the scanner software is properly launched and the scanner and computer are communicating with each other. -
Page 19: Usage & Maintenance Tips
Usage & Maintenance Tips To keep your scanner working smoothly, take a moment to review the following usage & maintenance tips. Attention Avoid using the scanner in a dusty environment. Dust particles and other foreign objects may damage the unit. Do not subject the scanner to excessive vibration. -
Page 20: Appendix A: Specifications
Appendix A: Specifications OpticSlim 2600 Image Sensor Optical Resolution 1200 dpi Hardware Resolution 1200 x 1200 dpi Color: 48-bit input, 24-bit output Scan Modes Grayscale: 16-bit input, 8-bit output B/W: 1-bit Scanning Speed 20.1 sec (Grayscale mode, 300 dpi) Max : 216 x 297 mm (8.5" x 11.69", A4/ Letter Size) Scanning Area (W x L) Min : 12.7 mm x 12.7 mm ( 0.5"... -
Page 21: Appendix B: Customer Service And Warranty
If you encounter problems with your scanner, please review the installation instructions and troubleshooting suggestions contained in this guide. Visit our website www.plustek.com for more customer service information. For further assistance call our customer support phone number listed on the website. One... -
Page 22: Statement Of Limited Warranty
If you have any maintenance inquiry, please ask local distributors and suppliers to get the contact information of nearest maintenance center in order to extend the product usage life time. If you want to maintain and clearance the product, please ask local distributors and suppliers to get the right information of nearest stores. -
Page 23: Fcc Radio Frequency Statement
Under no circumstances are we liable for any of the following: 1. Third party claims against you for losses or damages. 2. Loss of, or damage to, your records or data; or 3. Economic consequential damages (including lost profits or savings) or incidental damages, even if we are informed of their possibility.