
Related Manuals for Samsung NX Series


Summary of Contents for Samsung NX Series
-
Page 1: Operating Manual
«•¡ˆ 1999.9.15 12:33 PM ∆‰¿Ã¡ˆ2 NX-SERIES Operating Manual ¶c NX-24E/ 24B ¶c NX-12E/ 12B ¶c NX-6B ¶c NX-AOM... - Page 2 This manual may be altered without prior notices as the circumstances so require, but as the registered literature of Samsung Electronics Co. LTD., no part of the literature may be reproduced in any manner or distributed to any party without prior consent of the company.
-
Page 4: Table Of Contents
∫ªπÆ 1999.9.15 12:32 PM ∆‰¿Ã¡ˆ3 CONTENTS TABLE OF CONTENTS GENERAL INFORMATION About This Book ................ 3 Keyset Layout ................4 Precautions ................8 Tone and Ring Signal ..............9 OUTSIDE CALLS Making an outside call ............... 10 Answering an outside call ............11 INTERCOM CALLING Calling other Stations .............. - Page 5 ∫ªπÆ 1999.9.15 12:32 PM ∆‰¿Ã¡ˆ4 CONTENTS CONVENIENCE FEATURES Speakerphone ................27 Mute ..................27 Do Not Disturb ................28 Group Listening ................. 28 Alarm Setting ................28 Call Forward ................29 Background Music ..............31 Vacant Messages ..............31 Station Locking ................32 Group In/Out ................
-
Page 6: General Information
GENERAL INFORMATION About This Book Your keyset is the most visible part of the SAMSUNG New-Analog Key system. No matter what model keyset you are using, with or without a display, telephone calls are handled in the same way. The NX-24E keyset has a few additional conveniences that are not available to NX- 24B, NX-12E, NX-12B and NX-6B keyset users. -
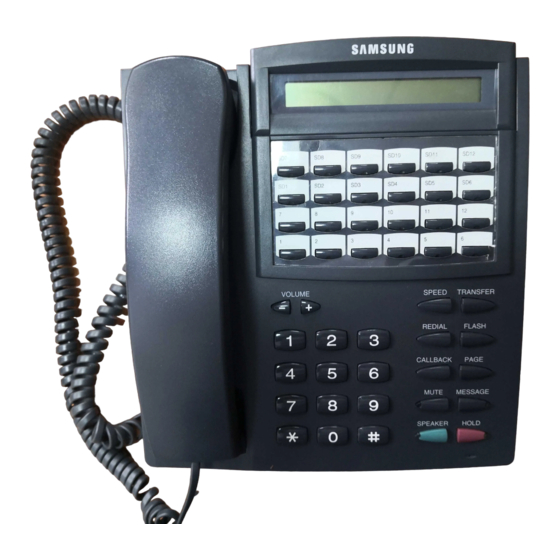
Page 7: Keyset Layout
∫ ª π Æ 1999.9.15 12:32 PM ∆‰¿Ã¡ˆ6 GENERAL INFORMATION Keyset Layout NX-24E, NX-24B Liquid Crystal Display (LCD) (NX-24E only) It shows date, time, umber dialed and other useful call 12 Programmable Buttons information. with RED Light Used to call stations directly, to indicate busy conditions of ther stations, for one touch dialing and many other system features. - Page 8 ∫ ª π Æ 1999.9.15 12:32 PM ∆‰¿Ã¡ˆ7 GENERAL INFORMATION NX-12E, NX-12B Liquid Crystal Display (LCD) (NX-12E only) It shows date, time, number dialed and other useful call 6 Programmable Buttons information. with RED Light Used to call stations directly, to indicate busy conditions of other stations, for one touch dialing and many other system features.
- Page 9 ∫ ª π Æ 1999.9.15 12:32 PM ∆‰¿Ã¡ˆ8 GENERAL INFORMATION NX-6B Volume Control Buttons Used to set independent levels for handset, speaker, background music, ring and page volumes. 6 Programmable Buttons with RED Light Used to call stations directly, to indicate busy conditions of other stations, for one touch dialing and many other system features.
- Page 10 ∫ ª π Æ 1999.9.15 12:32 PM ∆‰¿Ã¡ˆ9 GENERAL INFORMATION NX-AOM 24 Programmable Buttons with RED Light Used to call stations directly to indicate busy conditions of other stations, for one touch dialing and many other system features.
-
Page 11: Precautions
∫ªπÆ 1999.9.15 12:32 PM ∆‰¿Ã¡ˆ10 GENERAL INFORMATION Precautions Do not use or store in areas with high levels of dirt, dust, or corrosive gas. These places will shorten your unit's useful life. Keep the unit away from hot areas. High temperature can shorten the life of electronic devices, damage batteries, and can even distort or melt certain plastics. -
Page 12: Tone And Ring Signal
∫ªπÆ 1999.9.15 12:32 PM ∆‰¿Ã¡ˆ11 GENERAL INFORMATION Tone and Ring Signal °‹ DIAL TONE indicates you can begin dialing. CONTINUOUS RING BACK TONE indicates the station you dialed is ringing. °‹ 400 ON / 200 OFF / 400 ON / 3000 OFF BUSY TONE indicates the station you dialed is busy. -
Page 13: Outside Calls
∫ªπÆ 1999.9.15 12:32 PM ∆‰¿Ã¡ˆ12 OUTSIDE CALLS Making an Outside Call To Select A Specific Outside Line Keyphone 1. Check the line status indicator, and press an idle outside line button. °§ You will receive dial tone through the speaker. Or, lift the handset and diall the outside line access number. -
Page 14: Answering An Outside Call
∫ªπÆ 1999.9.15 12:32 PM ∆‰¿Ã¡ˆ13 INTERCOM CALLING Answering an Outside Call Keyphone 1. Lift the handset. Or press [SPEAKER]. NOTE: Use either handset or speakerphone. Standard phone 1. Lift the handset. You may answer calls ringing at another station by pressing the rapidly flashing outside line button. -
Page 15: Calling The Operator Group
∫ªπÆ 1999.9.15 12:32 PM ∆‰¿Ã¡ˆ14 INTERCOM CALLING Standard phone 1. Lift the handset and dial the desired station number. 2. To end the call, replace the handset. Calling the Operator Group Keyphone Lift the handset or press [SPEAKER]. Dial [0] to call your system operator group. * Dial 0 is replaced to dial 9 for other countries, South Africa etc. -
Page 16: Call Processing
∫ªπÆ 1999.9.15 12:32 PM ∆‰¿Ã¡ˆ15 CALL PROCESSING 2. Press [2] to set Auto-Answer Mode. 3. Press [TRANSFER] to save and exit. To Set Voice-Announce Mode 1. With the handset on-hook, press [TRANSFER] and dial [1][0] to enter program mode. 2. Press [3] to set Voice-Announce Mode. 3. -
Page 17: Exclusive Hold
∫ªπÆ 1999.9.15 12:32 PM ∆‰¿Ã¡ˆ16 CALL PROCESSING 4. To retrieve the call placed on hold, press [1][1]. °§If you know the outside line number placed on hold, you can dial [1][0] and the outside number to retrieve the call. NOTE: If the held line is not released within a predetermined time, the system rings you back so that you do not forget about the call. -
Page 18: Transferring Calls
∫ªπÆ 1999.9.15 12:32 PM ∆‰¿Ã¡ˆ17 CALL PROCESSING Transferring Calls This feature allows you to transfer a call to another station or group. Any outside or intercom call may be transferred, regardless of whether you initiated or received the call. When you transfer a call, you may wait on the line and announce the call, or you may hang up when you hear the ringback tone. -
Page 19: Camp-On Transfer
∫ªπÆ 1999.9.15 12:32 PM ∆‰¿Ã¡ˆ18 CALL PROCESSING Camp-On Transfer When you transfer outside call to another station and the station is busy, you can set the outside call to camp-on the busy station. 1. When transferring, if you receive a busy signal, hang up the phone. °§The call is automatically put on hold at the busy station. -
Page 20: Conference Calls
∫ªπÆ 1999.9.15 12:32 PM ∆‰¿Ã¡ˆ19 CALL PROCESSING 4. Announce to the paged station that they have a call. 5. Replace the handset. 6. Paged person answers the call by pressing the outside line number that was announced. Conference Calls You may conference up to five parties in any combination of outside lines and internal stations, in any order. -
Page 21: Unsupervised Conference
∫ªπÆ 1999.9.15 12:32 PM ∆‰¿Ã¡ˆ20 CALL PROCESSING Standard phone 1. When you hear a transfer tone, hookflash To Release a Specific Party From a Conference Keyphone 1. While engaged in a conference, press [TRANSFER]. Or, press [CNF] button, if programmed. 2. -
Page 22: Call Pick-Up
∫ªπÆ 1999.9.15 12:32 PM ∆‰¿Ã¡ˆ21 CALL PROCESSING Call Pick-Up You may pick-up (answer) calls ringing at another station. Keyphone & Standard phone 1. Lift the handset. 2. P r e s s [1][0] and dial the desired outside number or station number. Or, you can pick up a call ringing in your pick up group by pressing [ ]. -
Page 23: Sending A Flash
∫ªπÆ 1999.9.15 12:32 PM ∆‰¿Ã¡ˆ22 DIALING FEATURES 4. Lift the handset. For an outside line, you will be connected to a dial tone. Dial the outside telephone number. Sending a Flash When your system is behind a PBX, you can signal the PBX system with the flash feature in order to access a special operation, dial a second party, or transfer a call while talking on an outside line. -
Page 24: Saved Number Redial
∫ªπÆ 1999.9.15 12:32 PM ∆‰¿Ã¡ˆ23 DIALING FEATURES The last dialed number is automatically dialed. °§If you press [REDIAL] with the handset on hook, the call will be made through the speakerphone. Standard phone 1. Lift the handset. 2. Press [1][9]. NOTE: Redial will automatically select the outside line you originally used to place the call. -
Page 25: Automatic Redial
∫ªπÆ 1999.9.15 12:32 PM ∆‰¿Ã¡ˆ24 DIALING FEATURES Standard phone 1. Lift the handset. 2. Dial [1][7]. Automatic Redial Keyphone 1. When placing an outside call and you receive a busy signal, press [ARD] before hanging up if the button is programmed. 2. -
Page 26: Chain Dialing
∫ªπÆ 1999.9.15 12:32 PM ∆‰¿Ã¡ˆ25 DIALING FEATURES Standard phone 1. Lift the handset. 2. Dial [1][6] and the 2-digit speed dial location. To Program A Personal Speed-Dial Number Keyphone 1. Refer to user programming. Standard phone 1. Lift the handset. 2. -
Page 27: Paging & Messaging
∫ªπÆ 1999.9.15 12:32 PM ∆‰¿Ã¡ˆ26 PAGING & MESSAGING & & Paging This feature allows you to page through speaker-equipped keyphones or the external paging speaker. The announcement system is often installed as several different paging zones, so that a page may be restricted to certain areas or a general page to all zones can be made. -
Page 28: Leaving A Message
∫ªπÆ 1999.9.15 12:32 PM ∆‰¿Ã¡ˆ27 PAGING & MESSAGING Meet Me Page Keyphone 1. Lift the handset. 2. Press [PAGE] and dial [ ]. 3. After an ALL page, press [MPG], if programmed, and wait until other person answers the Meet Me Page. Standard phone 1. -
Page 29: To Leave A Message
∫ªπÆ 1999.9.15 12:32 PM ∆‰¿Ã¡ˆ28 PAGING & MESSAGING To Leave A Message Keyphone 1. While the called station is ringing, press [ M E S S A G E ] before hanging up. 2. Replace the handset. Standard phone 1. While the called station is ringing, hookflash. 2. -
Page 30: Convenience Features
∫ªπÆ 1999.9.15 12:32 PM ∆‰¿Ã¡ˆ29 CONVENIENCE FEATURES 2. Press the blinking [MESSAGE] button. °§The station that left you a message will be called automatically. Standard phone 1. Lift the handset. 2. Dial [4][3]. To Review Messages (Display keyset only) Keyphone 1. -
Page 31: Do Not Disturb
∫ªπÆ 1999.9.15 12:32 PM ∆‰¿Ã¡ˆ30 CONVENIENCE FEATURES Keyphone 1. While talking over the phone, press [MUTE]. 2. To resume the conversation, press [MUTE]. Do Not Disturb When you do not want to be disturbed by incoming calls or pages, this feature allows you to block incoming calls temporarily. -
Page 32: Call Forward
∫ªπÆ 1999.9.15 12:32 PM ∆‰¿Ã¡ˆ31 CONVENIENCE FEATURES To Set an Alarm 1. Lift the handset. 2. Dial [5][8] and enter the time as HHMM (hours and minutes), using a 24 hour time format. 3. Replace the handset. To Cancel an Alarm 1. - Page 33 ∫ªπÆ 1999.9.15 12:32 PM ∆‰¿Ã¡ˆ32 CONVENIENCE FEATURES 2. Dial [6][1] and then [1] to set All Call Forward. 3. Dial the station or station group number that should receive your calls. 4. Replace the handset. NOTE: To cancel All Call Forward, dial [6][1] and [0]. Setting Forward Busy Keyphone &...
-
Page 34: Background Music
∫ªπÆ 1999.9.15 12:32 PM ∆‰¿Ã¡ˆ33 CONVENIENCE FEATURES Dial number. °§After storing the outside number in the Speed-Dial number list, you must program the [FWE] button and extender using MMC 16. Refer to User Programming Section. Background Music When a music source is supplied, you may listen to it through the speaker in your phone. -
Page 35: Station Locking
∫ªπÆ 1999.9.15 12:32 PM ∆‰¿Ã¡ˆ34 CONVENIENCE FEATURES Standard phone 1. Lift the handset. 2. Dial [4][8] and [0][0]. 3. Replace the handset. Station Locking You can lock or unlock your station to prevent anyone from using the phone. Refer to MMC 00 in USER PROGRAMMING. Group In/Out Any station assigned to a station group can remove itself and then reenter the group at any time. -
Page 36: Answering The Door Phone
∫ªπÆ 1999.9.15 12:32 PM ∆‰¿Ã¡ˆ35 CONVENIENCE FEATURES When the Boss station is in the DND mode, all of its calls will ring at the Secretary station. To Call the Boss Keyphone 1. Press [ E X C ], if programmed, and dial [1 or 2] to call Boss1 or B o s s 2 . To Call the Secretary Keyphone 1. -
Page 37: Ringing Line Preference
∫ªπÆ 1999.9.15 12:32 PM ∆‰¿Ã¡ˆ36 CONVENIENCE FEATURES Call accounting is accomplished using C.O. lines that report metering pulses. The unit cost and the number of metering pulses are reported in the SMDR output. Keyphone 1. During any C.O. call, press [ACC], if programmed. 2. -
Page 38: Special Features
∫ªπÆ 1999.9.15 12:32 PM ∆‰¿Ã¡ˆ37 SPECIAL FEATURES NOTE: When the automatic timing feature is selected, the system will begin timing outgoing calls automatically. The duration of each call is counted in seconds. Refer to MMC 12 of USER PROGRAMMING. [TMR] button is set up by system programming. Barge-In(Override) When specially programmed, you may Barge-in on a busy station. -
Page 39: Night Service
∫ªπÆ 1999.9.15 12:32 PM ∆‰¿Ã¡ˆ38 SPECIAL FEATURES wise be restricted from that station. Keyphone & Standard phone 1. Lift the handset. 2. Dial [5][9]. 3. Dial your station number and passcode. 4. After hearing the confirmation tone, make the outside call. Night Service Your system is designed to have an alternate mode of operation generally designated as Night Service. -
Page 40: Using Add-On-Module
∫ªπÆ 1999.9.15 12:32 PM ∆‰¿Ã¡ˆ39 SPECIAL FEATURES number or trunk group number and the station number and station passcode. After hearing the dial tone, make the outside call. Using Add-On Module NX-series' unique Add-On Module (AOM) adds to the capability of any station. -
Page 41: User Programming
∫ªπÆ 1999.9.15 12:32 PM ∆‰¿Ã¡ˆ40 USER PROGRAMMING USER PROGRAMMING This section provides feature programming procedures to be used by experienced display keyset users. The following programming procedures should be done while the keyset is ON-HOOK. For more detailed programming data, refer to the TECHNICAL MANUAL. -
Page 42: Function Keys
∫ ª π Æ 1999.9.15 12:32 PM ∆‰¿Ã¡ˆ41 USER PROGRAMMING PROGRAM KEYS 1 X 16 LCD Display Programmable Buttons KEYPAD Used to Enter data FUNCTION KEYS VOLUME (-) or (+) : Used to scroll through stations or trunks. MUTE or MESSAGE: Usually used to select data. TRANSFER : Used to enter programming mode. -
Page 43: Mmc 00 Station Lock
∫ ª π Æ 1999.9.15 12:32 PM ∆‰¿Ã¡ˆ42 USER PROGRAMMING 00 Station Lock If you want to prohibit another user from using your station, you can lock or unlock your station with this MMC. 1 to set LOCKED1 station 2 to set LOCKED2 passcode (4 digits) 0 to unlock... -
Page 44: Mmc 12 Station On/Off
∫ ª π Æ 1999.9.15 12:32 PM ∆‰¿Ã¡ˆ43 USER PROGRAMMING To chage No Answer Time No Answer Time(3 digits) Using [VOLUME], select a No Answer Time. 12 Station ON/OFF Use to set the keyset features listed below. 0 for OFF 1 for ON Using [VOLUME], select a keyset feature:... -
Page 45: Mmc 15 Date Display
∫ ª π Æ 1999.9.15 12:32 PM ∆‰¿Ã¡ˆ44 USER PROGRAMMING 15 Date Display This is used to change date display format (24hr/12hr, WESTERN/EASTERN format) 1: 24 WESTERN (ex. 2: 12 WESTERN (ex. 3: 24 EASTERN (ex. 4: 12 EASTERN (ex. 16 Key Extender This MMC views the programmable keys assigned to your station, and allows assignment... - Page 46 «•¡ˆ 1999.9.15 12:33 PM ∆‰¿Ã¡ˆ1 CODE: GA68-60657A Edition : 03 DN April 1999 Printed In Korea...