Kenwood DNX7230DAB Quick Start Manual
Hide thumbs
Also See for DNX7230DAB:
- Manual (36 pages) ,
- Instruction manual (38 pages) ,
- Instruction manual (125 pages)

Related Manuals for Kenwood DNX7230DAB


Summary of Contents for Kenwood DNX7230DAB
- Page 1 DNX7230DAB DNX5230BT DNX5230DAB DNX4230DAB DNX4230BT GPS NAVIGATION SYSTEM Quick Start Guide © 2012 JVC KENWOOD Corporation B59-2179-00/02 (E)
-
Page 2: Table Of Contents
How to Make a Phone Call reason, they may be different from the actual panels. Installation Procedure • In this manual, each model name is Before Installation __________________ 25 abbreviated as follows. Installation Procedure _______________ 26 DNX7230DAB: DNX5230DAB, DNX5230BT: Removing Procedure ________________ 28 DNX4230DAB, DNX4230BT: Connection ________________________ 30 If above icons are showed, read the article About this Unit _____________________ 33 applicable to the unit you use. • In operation procedures, bracket shape indicates the key or button you should control. -
Page 3: Precautions
DNX7230DAB/DNX5230DAB/DNX5230BT/DNX4230DAB/DNX4230BT unlikely event that a child swallows the battery, recautions immediately consult a physician. Protecting the monitor 2WARNING To protect the monitor from damage, do not operate the monitor using a ballpoint pen or To prevent injury or fire, take similar tool with the sharp tip. the following precautions: Lens fogging • To prevent a short circuit, never put or leave When you turn on the car heater in cold any metallic objects (such as coins or metal weather, dew or condensation may form on tools) inside the unit. the lens in the disc player of the unit. Called • Do not watch or fix your eyes on the unit’s lens fogging, this condensation on the lens display when you are driving for any extended may not allow discs to play. In such a situation, period. remove the disc and wait for the condensation • If you experience problems during installation, to evaporate. If the unit still does not operate consult your Kenwood dealer. normally after a while, consult your Kenwood dealer. Precautions on using this unit Precautions on handling discs • When you purchase optional accessories, check... -
Page 4: Cleaning The Unit
Quick Start Guide Acquiring GPS signal How to Reset Your Unit The first time you turn on this unit, you must If the unit or the connected unit fails wait while the system acquires satellite signals to operate properly, reset the unit. for the first time. This process could take up to several minutes. Make sure your vehicle is outdoors in an open area away from tall Press the <Reset> button. buildings and trees for fastest acquisition. The unit returns to factory settings. After the system acquires satellites for the first time, it will acquire satellites quickly each time thereafter. -
Page 5: Safety Precautions And Important Information
DNX7230DAB/DNX5230DAB/DNX5230BT/DNX4230DAB/DNX4230BT afety Precautions and Important Information Read this information carefully before starting to 2CAUTIONS operate the Kenwood Car Navigation System and follow the instructions in this manual. Neither Failure to avoid the following potentially Kenwood nor Garmin shall be liable for problems hazardous situations may result in injury or or accidents resulting from failure to observe the property damage. instructions in this manual. The navigation system is designed to provide you with route suggestions. It does not reflect road closures or road conditions, weather conditions, 2WARNINGS or other factors that may affect safety or timing while driving. Failure to avoid the following potentially... -
Page 6: First Step
Quick Start Guide irst Step Touch the corresponding key and set the value. Power on the unit and perform some setup steps before using. Press the <MENU> button. Language Select the language used for the control screen and setting items. Default is “British English (en)”. (Instruction Manual P.79) After setting, touch [Enter]. Angle Adjust the position of the monitor. Default is “0”. (Instruction Manual P.82) After setting, touch [ iPod AV Interface Use Set the terminal which your iPod is connected to. Default is “iPod”. (Instruction Manual P.88) Color... - Page 7 DNX7230DAB/DNX5230DAB/DNX5230BT/DNX4230DAB/DNX4230BT Touch [Finish]. NOTE • For details on operations of each setting, refer to the Instruction Manual.
-
Page 8: Basic Operations
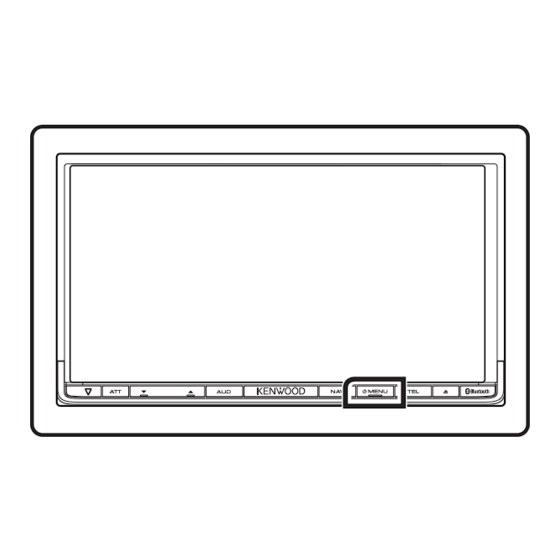
Quick Start Guide asic Operations Functions of the Buttons on the Front Panel DNX7230DAB 7 8 9 How to insert an SD Card 1) Press < > button for 1 second. Labelled The panel fully opens. side 2) Hold the SD card as the illustration in the right and insert it into the slot until it clicks. - Page 9 DNX7230DAB/DNX5230DAB/DNX5230BT/DNX4230DAB/DNX4230BT Number Name Motion fi (Reset) • If the unit or the connected unit fails to operate properly, the unit returns to factory settings when this button is pressed (Instruction Manual P.109). • If the Security Indicator (SI) function is turned on, this indicator flashes when the vehicle ignition is off (Instruction Manual P.80). • Switches attenuation of the volume on/off. • Pressing for 1 second turns the screen off. ∞, 5 (Vol) Adjusts volume. • Displays Graphic Equalizer screen (Instruction Manual P.95).* • Pressing for 1 second switches camera view display on/off. • Displays the navigation screen. • Pressing for 1 second switches AV out sources. MENU • Displays the Top Menu screen (Instruction Manual P.19). • Pressing for 1 second turns the power off. • When the power off, turns the power on. • Displays the Hands Free screen (Instruction Manual P.64). • Pressing for 1 second displays the Voice Recognition screen. (Instruction Manual P.72) 0 (Eject) • Ejects the disc. • When the panel is opened, pressing closes the panel and pressing for 1 second ejects the disc forcibly. • When the panel is closed, pressing for 1 second fully opens the panel to the location of the SD card slot.
- Page 10 Quick Start Guide DNX5230DAB/DNX5230BT How to insert a microSD Card 1) Slide the Release key upward to detach the part of the front panel. 2) Hold the microSD card with the label side facing left and the notched section up, and insert it into the slot until it clicks.
- Page 11 DNX7230DAB/DNX5230DAB/DNX5230BT/DNX4230DAB/DNX4230BT Number Name Motion Disc insert A slot to insert a disc media. slot 0 (Eject) • Ejects the disc. • Pressing for 1 second ejects the disc forcibly. fi (Reset) • If the unit or the connected unit fails to operate properly, the unit returns to factory settings when this button is pressed (Instruction Manual P.109). • If the Security Indicator (SI) function is turned on, this indicator flashes when the vehicle ignition is off (Instruction Manual P.80). Release key Detaches the part of front panel. MENU • Displays the Top Menu screen (Instruction Manual P.19). • Pressing for 1 second turns the power off. • When the power off, turns the power on. • Displays the navigation screen. • Pressing for 1 second switches AV out sources. ∞, 5 • Adjusts volume. • Displays the Hands Free screen (Instruction Manual P.64). • Pressing for 1 second displays the Voice Recognition screen. (Instruction Manual P.72) Input jack An input jack for external device. microSD A slot to insert an SD card. The card is used for upgrading the map. For...
- Page 12 Quick Start Guide DNX4230DAB/DNX4230BT How to insert a microSD Card 1) Open the microSD card slot cover as the illustration in the right. 2) Hold the microSD card with the label facing up and the notched section right, and insert it into the slot until it clicks.
- Page 13 DNX7230DAB/DNX5230DAB/DNX5230BT/DNX4230DAB/DNX4230BT Number Name Motion Disc insert A slot to insert a disc media. slot 0 (Eject) • Ejects the disc. • Pressing for 1 second ejects the disc forcibly. fi (Reset) • If the unit or the connected unit fails to operate properly, the unit returns to factory settings when this button is pressed (Instruction Manual P.109). • If the Security Indicator (SI) function is turned on, this indicator flashes when the vehicle ignition is off (Instruction Manual P.80). Remote Receives the remote control signal. Sensor MENU • Displays the Top Menu screen (Instruction Manual P.19). • Pressing for 1 second turns the power off. • When the power off, turns the power on. • Displays the navigation screen. • Pressing for 1 second switches AV out sources. Volume Knob • Turning adjusts volume up or down. • Pressing switches attenuation of the volume on/off. • Pressing for 1 second displays Tone Control screen (Instruction Manual P.96).* • Displays the Hands Free screen (Instruction Manual P.64). • Pressing for 1 second displays the Voice Recognition screen. (Instruction Manual P.72)
-
Page 14: Common Operations
Quick Start Guide Common Operations General There are some functions which can [Menu] be operated from most screens. Returns to the Top Menu screen. Touching for at least 1 second displays the Screen Control screen. (Even when an image is dispalyed, touching for at least 1 second displays the Screen Control screen.) (RETURN) Returns to previous screen. (common menu key) Touch to display the common menu. The contents of the menu are as follows. : Displays the EXT SW Control screen. : D isplays the SETUP Menu screen. : D isplays the Audio Control Menu screen. : D isplays the control screen of current source. Icon feature differs depending on the source. -
Page 15: Detaching The Front Panel
DNX7230DAB/DNX5230DAB/DNX5230BT/DNX4230DAB/DNX4230BT Detaching The Front Panel You can detach the front panel to prevent theft. Press the <0> button for 1 second to Slide the Release key upward to open the front panel. detach the part of the front panel. Then, detach the panel as the diagrams below. -
Page 16: The Navigation System
GPS satellite strength. Finds a destination. Views the map. Uses the Apps such as ecoRoute and Help. Adjusts the settings. NOTE • You can get additional information about using the navigation system from Help. To display Help, touch [Apps] and then touch [Help]. • For more information about your navigation system, download the latest version of the Owner’s Manual from manual.kenwood.com/edition/im366. Enter your destination and start the guidance. ● Finding points of interest NOTE 1) Touch [Where To?]. • To enter letters contained in the name, 2) Select a category and a touch the Search bar and enter the letters. subcategory. 3) Select a destination. - Page 17 Garmin and JVC KENWOOD will not be responsible for any traffic fines or citations that you may receive for failing to follow all applicable traffic laws and signs.
-
Page 18: Other Features
NOTICE • Traffic service is not available in some areas or countries. • Garmin and JVC KENWOOD are not responsible for the accuracy or timeliness of the traffic information. With an FM traffic receiver, the navigation system can receive and use traffic information. -
Page 19: How To Play Music
DNX7230DAB/DNX5230DAB/DNX5230BT/DNX4230DAB/DNX4230BT ow to Play Music You can play audio files from music CD, disc media, USB storage device and iPod. NOTE • For details on playable file format, media format, iPod model, etc., refer to the Instruction Manual. Connect the media you want to play as shown below. Disc 1) Press the <0> button to open the front panel. -
Page 20: Search The Track/File You Want To Listen To
Quick Start Guide Control the music you are listening to on the source control screen. The following symbols indicate the keys on the screen. The functions of the keys are the same despite the difference of the source you are listening to. Touch [ Basic operations from this screen Plays or pauses:... -
Page 21: How To Play Movie/Picture
DNX7230DAB/DNX5230DAB/DNX5230BT/DNX4230DAB/DNX4230BT ow to Play Movie/Picture You can play DVD video, Video CD (VCD), movie files from disc media, iPod and picture files from USB storage device. NOTE • For details on playable file format, device format, etc., refer to the Instruction Manual. Connect the media you want to play. For the method of connecting, see How to Play Music (P.19). -
Page 22: How To Listen To The Radio
Quick Start Guide ow to Listen to the Radio Touch [Menu] on any screen. Top Menu screen appears. Touch [TUNER]. The unit switches to the radio source. Operate on the source control screen. ● Station search 1) Touch [ Sub function menu appears. 2) Touch [AM] or [FM] to select the band. -
Page 23: How To Make A Phone Call
DNX7230DAB/DNX5230DAB/DNX5230BT/DNX4230DAB/DNX4230BT ow to Make a Phone Call You can use your Bluetooth cell-phone when paired to this unit. Register your cell-phone to the unit. Follow as the procedures shown below. For detailed operation, see Registering the Bluetooth Unit (P.65) in the Instruction Manual. -
Page 24: Make Or Receive A Phone Call
Quick Start Guide Make or receive a phone call. See the table below for each operation method. Call by entering a phone number 1 Enter a phone number with number keys. 2 Touch [ Call using call records ] (incoming calls), [ ] (missed calls), or [ ] (outgoing calls). 1 Touch [ 2 Select the phone number from the list. 3 Touch [ Call using the phonebook 1 Touch [ 2 Select the name from the list. -
Page 25: Installation Procedure
DNX7230DAB/DNX5230DAB/DNX5230BT/DNX4230DAB/DNX4230BT • If the fuse blows, first make sure the wires aren’t nstallation Procedure touching to cause a short circuit, then replace the old fuse with one with the same rating. • Insulate unconnected wires with vinyl tape or other similar material. To prevent a short circuit, Before Installation do not remove the caps on the ends of the unconnected wires or the terminals. Before installation of this unit, please • Connect the speaker wires correctly to the terminals to which they correspond. The unit note the following precautions. may be damaged or fail to work if you share the wires or ground them to any metal part WARNINGS in the car. • If you connect the ignition wire (red) • When only two speakers are being connected and the battery wire (yellow) to the car... -
Page 26: Installation Procedure
Quick Start Guide Unit Installation Procedure 1 To prevent a short circuit, remove Supplied accessories the key from the ignition and disconnect the terminal of the First of all, make sure that all battery. accessories are supplied with the 2 Make the proper input and unit. -
Page 27: Attaching The Front Panel
DNX7230DAB/DNX5230DAB/DNX5230BT/DNX4230DAB/DNX4230BT Attaching the front panel GPS antenna GPS antenna is installed inside of Hold the front panel securely so as the car. It should be installed as not to drop it accidentally. Fit the horizontally as possible to allow easy panel onto the attaching plate until it reception of the GPS satellite signals. -
Page 28: Removing Procedure
Quick Start Guide Microphone unit Removing Procedure 1) Check the installation position of Removing the trim plate the microphone (accessory 8). 2) Clean the installation surface. 1) Engage the catch pins on the 3) Install the microphone. extraction key (accessory 4) 4) Wire the microphone cable up to and remove the two locks on the the unit with it secured at several... -
Page 29: Removing The Unit
DNX7230DAB/DNX5230DAB/DNX5230BT/DNX4230DAB/DNX4230BT Removing the unit 1) Remove the trim plate by referring to step 1 in “Removing the trim plate”. 2) Insert the two extraction key (accessory4) deeply into the slots on each side, as shown. 3) Lower the extraction key toward... -
Page 30: Connection
Quick Start Guide Connection System connection Accessory 8 Accessory 8 Accessory 6 Accessory 6 AV Audio output AV Audio output Accessory 3 Connect to the vehicle’s Audio/Visual Accessory 2 parking brake detection Input switch harness. Visual Output Light Green (Parking sensor wire) PRK SW Rear view camera input... -
Page 31: Connecting Wires To Terminals
DNX7230DAB/DNX5230DAB/DNX5230BT/DNX4230DAB/DNX4230BT Connecting wires to terminals Fuse (10A) Fuse (10A) A: Black (Ground wire) B: Yellow (Battery wire) Accessory 1 C: Red (Ignition wire) Pin Numbers Cable Color Functions for ISO Connectors External Power Connector Yellow Battery Blue/White Power Control Orange/White Dimmer If no connections are made, do not let the Ignition (ACC) wire come out from the tab. -
Page 32: Optional Accessory Connection
Quick Start Guide Optional accessory connection DAB antenna CX-DAB1 (Optional accessory) External I/F 5V = 1A 5V = 1A USB terminal USB terminal (0.8 m) (0.8 m) iPod (commercially available) USB terminal USB device (0.8m) (commercially available) USB maximum power supply current : DC 5 V KCA-iP202... -
Page 33: About This Unit
DNX7230DAB/DNX5230DAB/DNX5230BT/DNX4230DAB/DNX4230BT information on how to complete your registration. About this Unit • DivX®, DivX Certified® and associated logos are trademarks of Rovi Corporation or its subsidiaries and ■ Copyrights are used under license. • The Bluetooth word mark and logos are owned by the Bluetooth SIG, Inc. and any use of such marks • Requirements Aha™: by JVC KENWOOD Corporation is under license. Requirements for listening to Aha™ are as follows: Other trademarks and trade names are those of their • Download the Aha application from the iTunes App respective owners. Store or Android Marketplace. • The “AAC” logo is a trademark of Dolby Laboratories. • In the application on your device, log in and create a • “Made for iPod” and “Made for iPhone” mean that an free account with Aha. electronic accessory has been designed to connect • Internet connection by 3G, EDGE, or WiFi. specifically to iPod or iPhone, respectively, and has iPhone or iPod touch been certified by the developer to meet Apple • Use an Apple iPhone or iPod touch running iOS4... -
Page 34: Laser Product
Quick Start Guide ■ The marking of products using lasers CLASS 1 LASER PRODUCT The label is attached to the chassis/case and says that the component uses laser beams that have been classified as Class 1. It means that the unit is utilizing laser beams that are of a weaker class. There is no danger of hazardous radiation outside the unit. ■ Information on Disposal of Old Electrical and Electronic Equipment and Batteries (applicable for EU countries that have adopted separate waste collection systems) Products and batteries with the symbol (crossed-out wheeled bin) cannot be disposed as household waste. - Page 35 DNX7230DAB/DNX5230DAB/DNX5230BT/DNX4230DAB/DNX4230BT Declaration of Conformity with regard to the EMC Directive 2004/108/EC Declaration of Conformity with regard to the R&TTE Directive 1999/5/EC Manufacturer: JVC KENWOOD Corporation 3-12, Moriyacho, Kanagawa-ku, Yokohama-shi, Kanagawa 221-0022, JAPAN EU Representative’s: KENWOOD Electronics Europe BV Amsterdamseweg 37, 1422 AC UITHOORN, The Netherlands English Svenska Hereby, JVC KENWOOD declares that this unit DNX7230DAB, Härmed intygar JVC KENWOOD att denna DNX7230DAB, DNX5230DAB, DNX5230BT, DNX4230DAB, DNX4230BT is in DNX5230DAB, DNX5230BT, DNX4230DAB, DNX4230BT stär l compliance with the essential requirements and other relevant överensstämelse med de väsentliga egenskapskrav och övriga provisions of Directive 1999/5/EC. relevanta bestämmelser som framgår av direktiv 1999/5/EG. Français Suomi Par la présente JVC KENWOOD déclare que l’appareil DNX7230DAB,...