Advertisement
Quick Links
_®
OWNER"S
MANUAL
Operating and Servicing
Instructions
• Please read these
instructions carefully before
using your Breeze '_Can Vac.
• Let us help you put your
cleaner together or answer
any questions, call:
1-800-321-1134(USA)
1-800-661-6200(Canada)
website:www.dirtdevil.com
For quick reference, please recordyourvacuum
informationbelow.
Model #:
IVlfg.Code:
(Mfg. code located on the lower backside of cleaner)
@2000 All rights reserved
#1-1
13028-000
12/00
Advertisement

Related Manuals for Dirt Devil Breeze 082500


Summary of Contents for Dirt Devil Breeze 082500
- Page 1 OWNER"S MANUAL Operating and Servicing Instructions _® • Please read these instructions carefully before using your Breeze '_Can Vac. • Let us help you put your cleaner together or answer any questions, call: 1-800-321-1134(USA) 1-800-661-6200(Canada) website:www.dirtdevil.com For quick reference, please recordyourvacuum informationbelow.
-
Page 2: Limited Warranty
Thank you for your support of Dirt Devil _ products. Visit our website at www.dirtdevil.com TABLE OF CONTENTS Safety Instructions ............. Page 3 Feature Descriptions ............Page 4 Cord W rap and Quick Release .......... - Page 3 CONSUMER iNFORMATION *THIS VACUUM IS INTENDEDFORHOUSEHOLD USEONLY. IMPORTANTSAFETYINSTRUCTIONS When you use an appliance, basic precautions should always be followed, including the following: • READALL INSTRUCTIONSBEFORE USINGTHIS APPLIANCE • ALWAYSFOLLOW THESESAFETYINSTRUCTIONS • DO NOT LEAVECLEANERUNATTENDED • WARNING FULLYASSEMBLECLEANERBEFORE OPERATING WARNING: TO REDUCE THE RISK OF FIRE, ELECTRIC SHOCKOR INJURY: •...
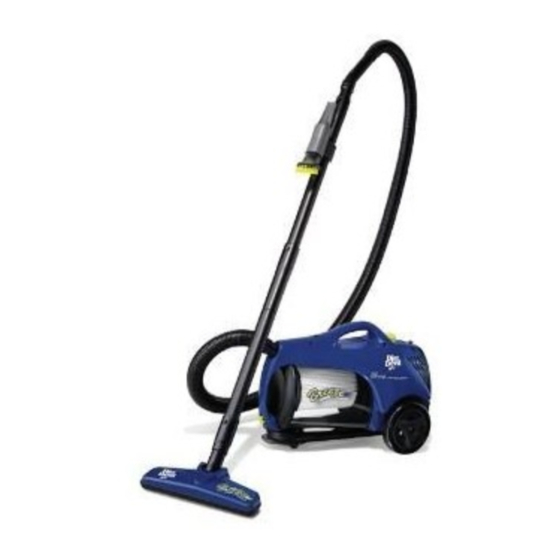
- Page 4 Perma Filter with CleanStream Shoulder Strap See Thru Dirt Container Easy Glide Wheels Exhaust Filter Rolling Caster Wheel Hose On/Off Switch 10" Floor Nozzle Carry Handle 11" Carpet Nozzle Handle Grip 2 Extension Wands Dusting Brush Tool Clip Crevice Tool *Attachments vary per model CORD WRAP AND QUICK...
- Page 5 HOW TO ASSEMBLE: HOSE INSTALLATION AND REMOVAL WARNING: TO REDUCE THE RISK OF INJURY -UNPLUG CLEANER BEFORE REMOVING OR iNSTALLING HOSE. Hold hose and match tabs to align with slot inlets of canister (Diagram t). Insert hose. Tum clockwise until hose locks into place (Diagram 2).
- Page 6 CLEANING DiRT CONTAINER & FILTER WARNING: TO REDUCE THE RtSK OF INJURY FROM MOVING PARTS - UNPLUG CLEANER BEFORE SERVICING. REMOVE & EMPTY DIRT CONTAINER: BEST RESULTS EMPTY DIRT CONTAINER AFTER EACH USE. WARNING: DO NOT USE DIRT CONTAINER HANDLE TO CARRY CLEANER. Sit canister in an upright position.
- Page 7 "k • " ,-;_-.>- BELT OR BRUSH ROLL REMOVAL AND REPLACEMENT WARNING: TO REDUCE THE RISK OF INJURY FROM MOVING PARTS - UNPLUG BEFORE SERVICING. To remove nozzle guard: tum power nozzle over and insert finger into openings near an arrow as shown (Diagram I). Squeez e clip and pult nozzle guard toward you.
-
Page 8: Customer Service
WARNING: TO REDUCE RISK OF PERSONAL INJURY - UNPLUG CLEANER BEFORE SERVICING Problem Possible Reasons Possible Solutions cleaner won't run I. Power cord not firmly plugged into outlet. 1. Plug unit in firmly. 2. Cord not connected to cleaner (*Power Nozzle). 2.