
Related Manuals for Samsung SGH-T599


Summary of Contents for Samsung SGH-T599
- Page 1 P O R T A B L E Q U A D - B A N D M O B I L E P H O N E User Manual Please read this manual before operating your phone and keep it for future reference.
-
Page 2: Intellectual Property
Intellectual Property All Intellectual Property, as defined below, owned by or which is otherwise the property of Samsung or its respective suppliers relating to the SAMSUNG Phone, including but not limited to, accessories, parts, or software relating there to (the “Phone System”), is proprietary to Samsung and protected under federal laws, state laws, and international treaty provisions. - Page 3 THERETO. NOTHING CONTAINED IN THE INSTRUCTION MANUAL SHALL BE CONSTRUED TO CREATE AN EXPRESS OR IMPLIED WARRANTY OF ANY KIND WHATSOEVER WITH RESPECT TO THE PRODUCT. IN ADDITION, SAMSUNG SHALL NOT BE LIABLE FOR ANY DAMAGES OF ANY KIND RESULTING FROM THE PURCHASE OR USE OF THE PRODUCT OR ARISING FROM THE BREACH OF THE EXPRESS WARRANTY, INCLUDING INCIDENTAL, SPECIAL OR CONSEQUENTIAL DAMAGES, OR LOSS OF ANTICIPATED PROFITS OR BENEFITS.
- Page 4 © 2012 Samsung Telecommunications America, LLC. Samsung is a registered trademark of Samsung Electronics Co., Ltd. Do you have questions about your Samsung Mobile Device? For 24 hour information and assistance, we offer a new FAQ/ARS System (Automated Response System) at: www.samsung.com/us/support...
- Page 5 Dynamic Noise Suppression from Audience Your phone is equipped with an advanced voice processing chip that delivers clear mobile calls by suppressing background noise, intermittent sounds (like a siren or nearby conversation), and echoes, allowing you to hear and be heard nearly anywhere. How Does It Work? Based on the intelligence of the human hearing system, the technology: •...
-
Page 6: Table Of Contents
Storage Location ..... 21 Creating a Samsung Account ... . . 21 Using the SD Card . - Page 7 Section 4: Call Functions and Using the Samsung Keyboard ... . . 85 Samsung Keyboard Settings ....88 Contacts List ..........
- Page 8 The Gallery ......156 Section 7: Messages .......114 Using the Video Player ....157 Types of Messages .
- Page 9 Lookout Security ..... 184 Samsung Apps ..... . . 199 Maps .
- Page 10 Voice Search ......203 Sound Settings ..... . .249 VPN Client .
- Page 11 Battery Use and Safety ....291 Samsung Mobile Products and Recycling . . . 293 UL Certified Travel Charger ... . . 294 Display / Touch-Screen .
-
Page 12: Section 1: Getting Started
Section 1: Getting Started This section explains how to get started with your device by Unless otherwise specified, all instructions in this manual installing and charging the battery, installing the SIM card assume you are starting from the Home screen and using the and optional memory card, and setting up your voice mail. -
Page 13: Battery Cover
Special Text Example: From the Home screen, press (Menu) Settings Throughout this manual, you’ll find text that is set apart from Bluetooth. the rest. These are intended to point out important Battery Cover information, share quick methods for activating features, to define terms, and more. -
Page 14: Sim Card Overview
SIM Card Overview Important! Before removing or replacing the SIM card, make sure the device is switched off. To turn the phone off, hold down the key until the Device options screen displays, then tap Power off. The SIM card is loaded with your subscription details such as your telephone number, PIN, available optional services, and many other features. -
Page 15: Installing And Removing The Sim Card
Installing and Removing the SIM card To remove the SIM card: 1. Remove the battery cover. To install the SIM card: 2. Carefully place your fingernail into the end of the SIM 1. Carefully slide the SIM card into the SIM card socket slot and push the card slightly out. -
Page 16: Battery
Battery Removing the Battery Before using your device for the first time, install the battery Grip the battery at the top end (3) and lift it up and out and charge it fully. of the battery compartment (4). Important! Before removing or replacing the battery, make Installing Battery sure the device is switched off. -
Page 17: Installing The Microsd Memory Card
Installing the microSD Memory Card Important! Be sure to align the gold contact pins on the card Your phone supports an optional (external) microSD™ or with the phone’s contact pins. microSDHC™ memory card for storage of media such as music, pictures, video and other files. The SD card is designed for use with this mobile phone and other devices. -
Page 18: Charging The Battery
Use only approved batteries and wall charger. If both the wall charger is connected and chargers. Ask your local Samsung dealer for further details. the battery is not installed, the handset will power cycle Before using your device for the first time, you must fully continuously and prevent proper operation. - Page 19 2. Insert the USB cable into the device’s Charger/ Accessory jack. 3. Plug the charging head into a standard AC power outlet. The device turns on with the screen locked and indicates both its charge state and percent of charge. Warning! While the device is charging, if the touch screen does not function due to an unstable power supply unplug the USB power adapter from the power outlet...
-
Page 20: Extending Your Battery Life
Press and then tap Settings Display Important! If your handset has a touch screen display, please Display battery percentage. note that a touch screen responds best to a light For more information, refer to “Display Settings” on touch from the pad of your finger or a non-metallic page 251. -
Page 21: Initial Device Configuration
Change your Live Wallpaper to a non-animated Wallpaper continue. gallery or Gallery image. 4. If you have previously created a Samsung account, tap Sign in. – or – If this is your first time, tap Create new account. Follow the on-screen setup instructions. - Page 22 5. At the Got Google? screen, choose either Yes to log into 8. If prompted with the Swype configuration screen, tap your existing Google account or No to continue. Continue and select either Skip (to continue without • If you selected Yes, on the Sign in screen, enter your current setup) or Register to proceed.
-
Page 23: Switching The Device On Or Off
Switching the Device On or Off Note: This software collects only diagnostic data from your Once the device has been configured, you will not be device so that T-Mobile technicians can better prompted with setup screens again. troubleshoot issues with your device. 1. -
Page 24: Locking And Unlocking The Device
Locking and Unlocking the Device Note: You can choose to configure lock settings to prevent By default, the device screen locks when the backlight turns unauthorized use of your device. For more information, off. refer to “Setting up SIM Card Lock” on page 264. Place your finger on the screen and swipe the glass in Creating a New Google Account any of the directions shown unlock the device. -
Page 25: Signing Into Your Google Account
Signing into Your Google Account Note: If you already have a Google account, you only need to 1. Launch an application that requires a Google account sign in. (such as Play Store or Gmail). 2. Click Existing. To create a new Google Account from the Web: 1. -
Page 26: Confirming The Default Image And Video Storage Location
Settings Add account Samsung account. 1. From the Home screen, tap (Camera). 2. If you have previously created a Samsung account, tap 2. From the viewfinder screen, tap (Settings) and Sign in. scroll down to the Storage entry. -
Page 27: Voice Mail
Note: Voicemail setup may be different depending on your Activate account. network. 8. Confirm the Samsung account icon no longer appears in the Notifications area at the top of the screen. Note: Without confirming your email address and following the... -
Page 28: Visual Voicemail
Accessing Your Voice Mail From Another Phone 1. From the Home screen, tap and then touch and hold the key until the device dials voice mail. 1. Dial your wireless phone number. You may be prompted to enter a password. 2. -
Page 29: Task Manager
Task Manager To check Visual Voicemail messages: 1. From the Home screen, tap (Apps) Your device can run applications simultaneously, with some Visual Voicemail ( applications running in the background. 2. Tap the voicemail message you want to play. Sometimes your device might seem to slow down over time, 3. -
Page 30: Google Search
Google Search • Downloaded displays any installed packages or applications from the Play Store that are taking up memory space. Tap Provides an on-screen Internet search engine Uninstall to remove them from your phone. powered by Google™. • RAM, which displays the amount of current RAM (Random To launch Google Search: Access Memory) currently being used and allow you to Clear 1. -
Page 31: Section 2: Understanding Your Device
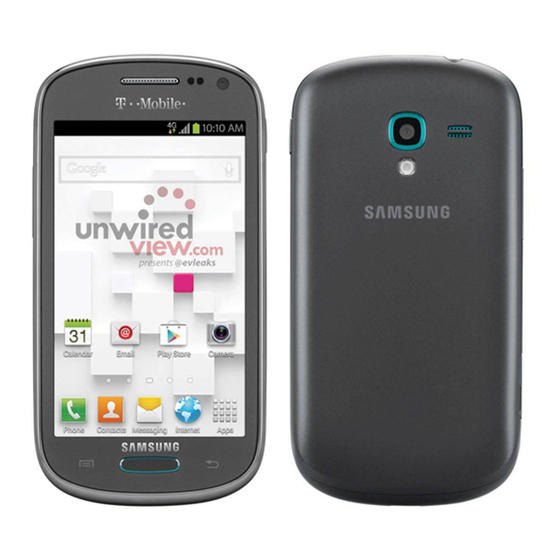
Section 2: Understanding Your Device • This section outlines key features of your device. It also 5 Megapixel Camera and Camcorder with autofocus and digital describes the device’s keys, screen and the icons that zoom display when the device is in use. •... -
Page 32: Front View
Calling via the use of an updated SIM card The following illustrations show the main elements of your • Access to thousands of Movies and TV Shows with the Samsung device: The following list correlates to the illustrations. Media Hub •... - Page 33 1. Headset jack allows you to connect a hands-free 7. USB Power/Accessory connector allows you to connect headset so you can listen to music. a power cable or optional accessories such as a USB/ data cable. 2. Volume key allows you to adjust the ringer volume in 8.
-
Page 34: Back View
Back View Device Display The following illustration shows the external elements of your Your display provides information about the device’s status, device: and is the interface to manage features. It indicates your connection status, signal strength, battery status and time. Icons display at the top of the device when an incoming call or message is received and also alerts you at a specified time when an alarm was set. -
Page 35: Status Bar
Status Bar Displays when a call is in progress. Displayed in the Status bar when the current call is The Status Bar shows information about the connection minimized. status, signal strength, battery level, and time, and displays notifications about incoming messages, calls and other Displays when a call is on hold. - Page 36 Displays your current battery charge level. Icon Displays when connected to the 3G network. shown is fully charged. 3G indicator is only seen when roaming. Displays when the current battery is 100 Displays when your phone is communicating percent charged and the Display battery with the 3G network.
- Page 37 Displays in the notifications window when there Displays when the device is in Silent mode. is a new Email message. All sounds are silenced, and Silent mode is set to Mute. Displays in the notifications window when there is a new Gmail message. Displays when data synchronization and application sync is active and synchronization Displays when a new Google+ notification has...
- Page 38 Displays when the USB Tethering mode is Displays in the notifications window when action active and communicating. is required within the Samsung account For more information, refer to “Mobile HotSpot” on application. page 225. Displays in the notifications window when...
- Page 39 Displays in the notifications window when there are Displays when storage within either the internal too many on-screen notification icons to display. location or the external SD card has reached its Tap to show more notifications. capacity. It is recommended you either move files off or delete them to make additional room.
-
Page 40: Notification Bar
Notification Bar Clearing Notifications In a single motion, touch and drag the Status bar down to The Notification area indicates new message events (data the bottom of the screen to reveal the Notification screen. sync status, new messages, calendar events, call status, etc). -
Page 41: Function Keys
Function Keys Home Screen Your device comes equipped with four main function keys The Home screen is the starting point for using the that can be used on any screen: Home, Menu, and Back. applications on your device. There are initially seven Home Key available panels, each populated with default shortcuts or applications. - Page 42 • Notification area displays those icons associated with end-user Note: Both the status bar and primary shortcuts are visible notifications such as: email messages, calls (missed, call in across all screens. progress), new voicemail, upcoming event, USB connection, emails, and Text/MMS messages. •...
- Page 43 Home Screen Menu Settings • Primary Shortcuts: are four shortcuts present throughout all of the available screens and can be used to both navigate within the When on the Home screen, press and then select any device or launch any of the following functions: of the following menu options: –...
-
Page 44: Applications
Applications • View type: allows you to customize the way the Application menu listing is shown. For more information, refer to “Adding The Application menu provides quick access to the most and Removing Primary Shortcuts” on page 45. frequently used applications. Applications display on each of the four panels on the Applications screens. -
Page 45: Screen Navigation
Screen Navigation • Flick: Move your finger in lighter, quicker strokes than swiping. This finger gesture is always used in a vertical motion, such as Using the touch screen display and the keys, you can when flicking through contacts or a message list. navigate the features of your device and enter characters. -
Page 46: Using Gestures
Using Gestures Note: These screens can be re-arranged in any desired order. By activating the various gesture features within the Motion For more information, refer to “Customizing the menu (page 276), you can access a variety of time saving Screens” on page 44. functions. -
Page 47: Menu Navigation
• Tutorial: provides access to advanced gesture settings and 3. Tap any of the on-screen icons to launch the tutorials such as: associated application. Using Sub-Menus • Learn about motions: tap an on-screen entry to display a brief tutorial on the use of the selected function. Sub-menus are available from within most screen and applications. -
Page 48: Using Context Menus
Using Context Menus Accessing Recently-Used Applications 1. Press and hold to open the recently-used Context menus (also called pop-up menus) contain options that apply to a specific item on the screen. They function applications window. similarly to menu options that appear when you right click Note: This recent applications screen also provides access to your mouse on your desktop computer. -
Page 49: Customizing The Screens
Customizing the Screens Adding and Deleting Screens Your phone comes with seven screens. You can delete these You can customize the Home screens (panels) to display the screens and then add them back later. Widgets, Shortcuts, Folders, or Wallpapers. For example, one screen could contain the Music Player shortcut and other Note: These screens can be deleted and re-arranged. -
Page 50: Adding And Removing Primary Shortcuts
Rearranging the Screens Adding and Removing Primary Shortcuts 1. From the Home screen, press and then tap The device comes with four Primary shortcuts: Phone, Edit page. Contacts, Messaging, and Applications/Home. 2. Touch and hold a screen and then drag it into its new As long as the Application menu is displayed in a Customizable grid, you can replace these shortcuts with other location. - Page 51 Adjusting the Home Screen Mode To insert a new primary shortcut: 1. Press and then tap (Apps). This application allows you to change the Home screen mode and choose between Basic mode and Easy mode. 2. Locate your desired application, then touch and hold •...
- Page 52 Sharing Application Information Managing Shortcuts The device’s Applications menu now comes with a feature Note: To move a shortcut from one screen to another, you that allows you to share information about your selected must carefully touch and hold the shortcut and slowly applications with external users.
-
Page 53: Adding And Removing Widgets
Adding and Removing Widgets 6. While still holding the on-screen icon, position it on the current screen. Once complete, release the screen to Widgets are self-contained applications that can be placed lock the shortcut into its new position. on any screen. Unlike shortcuts, widgets appear as applications. - Page 54 To place a widget onto a different screen: Renaming a folder 1. Touch and hold the widget until it becomes 1. Tap the desired folder you want to rename. This opens transparent. its contents on an on-screen popup window. 2. Slowly drag it past the edge of the screen until the 2.
-
Page 55: Managing Wallpapers
Managing Wallpapers Note: Wallpapers supports the following image types: JPEG, Wallpapers consist of either Gallery images (user taken), Live PNG, GIF, BMP, and WBMP. wallpapers (animated backgrounds), or Wallpaper gallery (default phone wallpapers). To change Wallpapers from Settings Menu: 1. From the Home screen, press and then tap Note: Selecting animated Live wallpapers will require Settings... - Page 56 To change the current Lock screen wallpaper: 1. Navigate to any screen, touch and hold an empty area of the screen, and tap Set wallpaper Lock screen. – or – From the Home screen, press and then tap Settings Display Wallpaper Lock screen.
-
Page 57: Section 3: Memory Card
Section 3: Memory Card SD card Overview Your device lets you use a microSD (SD) or microSDHC card (also referred to as a memory card) to expand available After mounting an SD card in the device you can use your memory space. -
Page 58: Mounting The Sd Card
Communicating with the SD card Important! DO NOT remove a microSD card while the device is 1. Insert the SD card into the external, SD card slot. accessing or transferring files. Doing so will result For more information, refer to “Installing the microSD in loss or damage of data. - Page 59 SD card Memory Status 5. Confirm the new mounted drive appears as a new drive on your computer. As soon as the connection is To view the memory allocation for your external SD card: established a drive letter is assigned to the device’s From the Home screen, press and then tap storage device.
-
Page 60: Factory Data Reset
Factory Data Reset From this menu you can reset your phone and sound settings to the factory default settings. 1. From the Home screen, press and then tap Settings Backup and reset. 2. Tap Factory data reset. This action erases all data from your device except current system software and bundled applications, or SD card files such as music or photos. -
Page 61: Section 4: Call Functions And Contacts List
Section 4: Call Functions and Contacts List Making a Call This section describes features and functionality associated with making or answering calls, and the Contacts list, which You can store phone numbers that are regularly used to the is used to store contact information. SIM card or to the phone’s memory. -
Page 62: Ending A Call
Quick Dialing a Number from the Contacts List Running a Call in the Background 1. From the Home screen, tap (Contacts). If you exit the current call screen and return to the Home screen, you are visually notified that you are still on an active 2. -
Page 63: Making Emergency Calls
Making Emergency Calls Ending a Call from the Status Bar 1. From an active call, you can launch a separate If you do not have a SIM card installed the first time you turn application or return to the Home screen. The current on the phone, the Insert SIM card to make calls message call is kept active in the background. -
Page 64: Dialing Options
Making an Emergency call with a SIM card installed 5. At the Emergency Callback screen: The Emergency calling mode makes redialing an emergency • Tap to callback 911 with a single tap. number a 1-tap process. Before you can resume normal •... -
Page 65: Answering A Call
Answering a Call To view additional dialing options: After entering a number, tap When somebody calls you, the phone rings and displays the • Send message to send the current caller a text message while incoming call image. The caller's phone number, picture, or name if stored in Contacts List, displays. -
Page 66: Managing Reject Calls
3. In a single motion touch and slide the Auto reject mode slider to the right to turn it on. The slider color indicates Touch and drag the activation status of the Auto reject mode. upward to reject • OFF: disables the automatic rejection feature. You must then with a message manually reject incoming phone calls. -
Page 67: International Calls
International Calls Adding numbers to the rejection list Entries can be added to the list via either the Contacts menu 1. From the Home screen, tap and then touch and or via the Auto reject list menu. The Contacts menu option hold until the device shows “+”... -
Page 68: Pause Dialing
Pause Dialing Wait Dialing You can dial or save phone numbers with pauses for use with Inserting a Wait into your dialing sequence means that the automated systems, such as voicemail or financial phone phone waits until it hears a dial tone before proceeding with numbers. -
Page 69: Speed Dialing
Speed Dialing Changing a Speed Dial Entry Order Once you have stored phone numbers from your Contacts 1. From the Home screen, tap List, you can set up to 99 speed dial entries (2-100) and then 2. Press and then tap Speed dial setting. dial them easily whenever you want, simply by touching the associated numeric key. -
Page 70: Using S Voice
1. From the Home screen, tap (Apps) complete the deletion) or Cancel (to exit). (S Voice). 2. Review the Samsung Agreement and tap Confirm to 4. Press to return to the previous screen. continue. Making a Call Using Speed Dial 3. -
Page 71: Wi-Fi Calling
Wi-Fi Calling 6. Tap (Speak) if the device does not hear you or to give it a command. Wi-Fi Calling is a free feature for T-Mobile customers using Example 1: this device with an updated SIM card. Wi-Fi Calling is an •... - Page 72 Note: This feature is active by default. If you are in an active Note: To avoid international data roaming fees when using Wi-Fi call and go out of range of your Wi-Fi, the call will Wi-Fi calling when outside the United States, the Data be dropped.
- Page 73 Activating Wi-Fi Calling 6. Tap Connection Preferences and select a preference for use of the Wi-Fi Calling feature: 1. Ensure that the Wi-Fi connected icon displays on the • Wi-Fi Preferred: Wi-Fi network is preferred over cellular status bar. network when making calls. Calling requires you to stay in the •...
- Page 74 Launching Wi-Fi Calling Displays on the There is an error in the use or screen status bar. 911 registration of the Wi-Fi Note: Verify you are currently connected to a Wireless Access Calling feature. Point. 3. Use the phone Keypad, Logs, or Contacts list to make a 1.
-
Page 75: In Call Options
In Call Options Adjusting the Call Volume During a call, use the Volume keys on the left side of the Your phone provides a number of features that are available phone, to adjust the earpiece volume. for use during a call. Press the Up volume key to increase the volume level and the Down volume key to decrease the level. -
Page 76: Placing A Call On Hold
Placing a Call on Hold Turning the Speakerphone on and off You can place the current call on hold whenever you want. If While on a call, you can use your Speakerphone by following your network supports this service, you can also make these steps: another call while a call is in progress. - Page 77 Switching to Bluetooth Headset Creating a Message During a Call 1. Pair the target Bluetooth headset prior to your call. During a call you can create a message. 1. Press and then tap Message (Compose). 2. While on a call, switch to the Bluetooth headset instead of speaker by tapping (Headset off).
-
Page 78: Multi-Party Calls
Multi-Party calls Having a Private Conversation With One Participant Making a Multi-Party Call When you have two participants in a multi-party session, it might be necessary to place one of those participants on A multi-party call is a network service that allows multiple hold so that a private conversation can be held with a single people to participate in a multi-party or conference call. -
Page 79: Dropping One Participant
Call Waiting 4. To return to the multi-party call, tap the Merge icon. All of the multi-party call participants can now hear each You can answer an incoming call while you have a call in other. progress, if this service is supported by the network and you Dropping One Participant have previously set the Call waiting option to Activate. -
Page 80: Logs Tab
Accessing the Logs Tab Important! The currently active call is displayed with a green 1. From the Home screen, tap (Logs tab). background. Logs Logs 2. Tap an entry to view available options. 4. Tap Swap again to switch back. Note: The Logs tab only records calls that occur while the Logs Tab phone is turned on. - Page 81 Accessing Call log from The Notifications Area Call logs - Caller Overview • 1. Locate from the Notifications area of the Status Tap a contact entry name or number to reveal the Call options bar. screen: • Create contact to save the number if it is not already in your 2.
-
Page 82: Viewing Missed Calls From Lock Screen
Viewing Missed Calls from Lock Screen • Add to reject list press to add the current phone number to an automatic rejection list. Similar to a block list, the When you are unable to answer a call for any reason and selected caller will be blocked from making an incoming calls your screen is locked, the number of missed calls are to your phone. -
Page 83: Section 5: Entering Text
Google voice typing: provides a voice to text interface. 2. Tap (Choose input method) and select an • Samsung keyboard: an on-screen QWERTY keyboard that available input method. can be used in both portrait and landscape orientation. • Swype (default): is enabled so as you can enter text as you swipe across the on-screen keyboard. -
Page 84: Entering Text Using Swype
Gesture usage. Enabling and Configuring SWYPE 4. Tap Preferences to alter these settings: If you configure another text input method (Samsung keypad) • Vibrate on keypress: activates a vibration sensation as you you must re-enable SWYPE before using the SWYPE enter text using the keypad. - Page 85 • Show complete trace: once enabled, sets wether or not to 6. Tap Swype Connect to activate social media display the complete Swype path. personalization and configure data settings. • Register now: allows you register for the Swype Connect • Pop-up on keypress: once enabled, displays a character service which allows you to backup your Swype dictionary and above an on-screen key while typing.
-
Page 86: Swype Text Entry Tips
Swype Text Entry Tips 7. Tap Personalization to access and manage your personal dictionary. Log into the available accounts to You can access the SwypeTips application and watch a video add help personalize your personal dictionary with or tutorial on using Swype. You can also use the following commonly used words or names from your available Swype text entry tips. -
Page 87: Selecting A Text Input Mode In Swype
Selecting a Text Input Mode in Swype Swype Keyboard Overview • Recipients: a field where you can enter the recipients of the 1. From a screen where you can enter text, tap the text current message. You can choose from Groups, Favorites, input field to reveal the on-screen keyboard. - Page 88 Using 123ABC Mode in SWYPE In 123ABC mode, you can enter only letters and a few common punctuation marks from the on-screen keyboard. Recipients The text mode key shows 1. From a screen where you can enter text, tap the text Text input field input field to reveal the on-screen keyboard.
- Page 89 Entering Numbers and Symbols in SWYPE All lowercase By using the on-screen keyboard in portrait mode, some Displays when the next character is entered in symbols are not available (such as Emoticons or Smileys). lowercase. Pressing this while in 123SYM mode, In SYM mode using Swype, you can only enter symbols and reveals additional numeric-symbols keys.
-
Page 90: Using The Samsung Keyboard
Using the Samsung Keyboard 2. The virtual keyboard is then assigned to the Samsung keyboard configuration for all subsequent text input. This QWERTY keypad can be used to enter text in either a Portrait or landscape orientation. The only difference... -
Page 91: Entering Text Using Different Input Options
Changing the Text Input Mode in Keyboard 1. From a screen where you can enter text, tap the text Although the default text input method with the Samsung keyboard is to use the on-screen keys you have other input field to reveal the on-screen keyboard. - Page 92 Using ABC Mode in Samsung Keyboard All lowercase 1. From a screen where you can enter text, tap the text Displays when the next character is entered in input field to reveal the on-screen keyboard. lowercase. 2. Tap to configure the keyboard for ABC mode.
-
Page 93: Samsung Keyboard Settings
Settings Language and input (adjacent to displays the Samsung keyboard field). 1. From a screen where you can enter text, tap the text – or – input field to reveal the on-screen keyboard. Rotate the From within an active text entry screen, touch and hold... -
Page 94: Using Predictive Text
(Input Methods) and select Settings, then tap – Character preview provides an automatic preview of the to reveal the Samsung keyboard settings screen. current character selection within the text string. This is helpful 2. In a single motion touch and slide the Predictive text when multiple characters are available within one key. -
Page 95: Using The Google Voice Typing
Using the Google Voice Typing • Learn from Facebook allows you to log into your current Facebook account and add used text to your personal This feature uses Google voice recognition to convert your dictionary. spoken words into on-screen text. •... -
Page 96: Using Google Voice Typing
Configure Google Voice Typing Using Google Voice Typing 1. From the Home screen, press and then tap 1. From a screen where you can enter text, in a single Settings Language and input. motion, touch and drag the Status bar down to the –... -
Page 97: Section 6: Contacts
You can create either a Phone, SIM, Google, Settings Add account. Microsoft Exchange ActiveSync, or Samsung account contact. – or – Note: Before you can save a contact to the Phone, Contact From the Home screen, tap (Apps) settings must be set to Save new contacts to Phone. - Page 98 • Add new account lets you create a new account type. Choose 5. Tap the image icon and select a photo for this contact. from Microsoft Exchange ActiveSync, Samsung account, or Selections are: Image, Take picture, or Tagged picture. Google.
- Page 99 • Use your finger to slide the page up or down to see additional Note: The label entries below can change and are dependant fields and categories. on the selected destination type (ex: the Other and 9. Tap Save to complete and store the new entry. Custom might not appear with an Exchange ActiveSync –...
-
Page 100: Finding A Contact
5. Tap the Name field and enter a name for this contact Note: For further details about how to enter characters, see using the displayed keypad. “Text Input Methods” on page 78 • Tap to access additional name entries such as: Name Finding a Contact prefix, First name, Middle name, Last name, and Name suffix. -
Page 101: Editing Contact Information
Editing Contact Information In a single motion, touch and hold the letter tab area (on the right) until on-screen letters appear, then scroll 1. From the Home screen, tap through the list. You are then taken to that section of 2. -
Page 102: Adding A Number To An Existing Contact
3. Edit the contact information then: 4. Enter additional information such as: Groups, Ringtone, • Tap Save to complete and store the new entry or Message alert or tap Vibration pattern to input additional category information. • Tap Cancel to delete the current entry. Adding a Number to an Existing Contact •... -
Page 103: Deleting Contacts
Adding a Pause or Wait to an Existing Contact 4. Scroll through the available list of existing entries and select the desired target. 1. From the Home screen, tap 2. Tap a contact name from the list and tap (Edit). Note: This new phone number is then added as a new number 3. -
Page 104: Contact List Options
Messaging, or Wi-Fi Direct. • Send message: allows you to send a text or picture message. • Merge with Samsung: allows you to merge all of your current • Contacts to display: allows you to choose All contacts, Phone, Contact entries with your active Samsung account. If several of... -
Page 105: Contact Menu Options
• Print contact info: allows you to print selected information on • Join contact: allows you to link the current contact to another a compatible Samsung printer. current contact. Similar to a “see also” feature. If you can’t remember a contact’s information, linking entries can help you find the person you are looking for. -
Page 106: Contact Entry Options
Contact Entry Options Joining Contact Information 1. From the Home screen, Most people now maintain multiple email accounts, social networking logins, and other similar account information. For example, a Facebook account login name might differ from a 2. Tap an entry to reveal corporate email account login because they are maintained the Contact entry’s separately and for different groups of people. - Page 107 Next time you synchronize your phone with your accounts, Important! It is the second contact image that is displayed for any updates contacts make to email account names, email both, but the first contact’s name that is used. addresses, etc. automatically update in your contacts list. For example: If Amy (original entry) is joined with 1.
-
Page 108: Marking A Contact As Default
Unjoining a Contact Marking a Contact as Default 1. From the Home screen, tap When you use applications such as the Voice Dialer or other messaging type applications, the application needs to know 2. Tap a contact name (the account name from which you which information is primary (default) in a contact entry list. -
Page 109: Sending A Namecard
Sending All Current Namecards Note: If there are multiple phone numbers assigned to an Rather than selecting once Contact entry at a time, you can entry, assigning one as the default will automatically dial send all of your current entries at once. that number when the contact is selected for dialing. -
Page 110: Copying Contact Information
Sending a namecard using Bluetooth Copying Contact Information Copying Contact Information to the SIM Card You must create a Contact prior to sending a namecard to a recipient. For more information, refer to “Creating a Contact” The default storage location for saving phone numbers to on page 92. -
Page 111: Synchronizing Contacts
Synchronizing Contacts Copying Contact Information to the microSD Card Syncing data from your managed accounts allows you to add This procedure allows you to copy entry information saved and manage a new or existing contact from your online or on the phone’s memory, onto the SIM card. remote accounts to your phone. -
Page 112: Display Options
• Phone lists those Contacts currently found only on your Phone. • SIM lists those Contacts currently found only on your SIM card. • Samsung account lists those Contacts currently found and sync’d within the Samsung account. • Google lists those Contacts currently found within the Google account. -
Page 113: Adding More Contacts Via Accounts And Sync
Settings and then navigate to the Accounts area. to synchronize with your Contact list. Selections are: 2. Tap Add account Facebook. Samsung account, Email, Facebook, Google, LDAP or Microsoft Exchange ActiveSync. 3. You are prompted to download the Facebook application from the Play Store. -
Page 114: Additional Contact Options
4. Log into your Facebook account: 3. Choose the parameters to sync (ex: Sync Calendar, • Enter your account’s access Email and Password information Sync Contacts, or Sync Gallery) and tap Sync now. and tap Log in. Note: From the main Accounts and sync page you can also tap 5. -
Page 115: Contact List Settings
6. Compose the email and tap Send. • Contact sharing settings allows you configure how your Export/Import Contacts entries are sent: individually or as a single file containing all available entries. For more information, refer to “Copying Contact Information” Tap Settings to select a share setting. on page 105. -
Page 116: Groups
Groups Note: Some externally maintained group types (such as This feature allows you to add a new or existing contact to a Google) can only be managed or updated remotely call group. This group can be one of the already present online vs via the device. -
Page 117: Editing A Caller Group
Sending a Message to a Group 5. Tap Done.The contacts are removed from the group. Editing a Caller Group 1. From the Home screen, tap Groups Groups To edit a Group entry, there must be at least one member as 2. -
Page 118: The Favorites Tab
The Favorites Tab The Favorites tab is a list of the phone numbers that have been designated as favorite contacts. For more information, refer to “Logs Tab” on page 75. 1. From the Home screen, tap 2. Tap (Favorites tab). Favorites Favorites Adding a contact to your favorites list:... -
Page 119: Section 7: Messages
Section 7: Messages Message Icons on the Status Bar This section describes how to send or receive different types of messages. It also explains the features and functionality Icons are displayed on the Status Bar at the top of the display associated with messaging. -
Page 120: Creating And Sending Messages
Creating and Sending Messages 5. Add more recipients by tapping either the Enter recipient field or and selecting recipients. 1. From the Home screen, tap (Messaging) 6. Tap the Enter message field and use the on-screen (Compose). keypad to enter a message. For more information, refer 2. -
Page 121: Message Options
Message Options Quick Messaging a Number from the Contacts List Options before composing a message 1. From the Home screen, tap (Contacts). 1. From the Home screen, tap (Messaging) 2. Locate an entry from the Contacts list. 2. Before composing a message, press from the 3. - Page 122 Options while composing a message • Locked messages: displays the locked messages folder and its contents. 1. From the Home screen, tap (Messaging) • Spam messages: displays the spam messages folder and its 2. From within an open message, press to display contents.
-
Page 123: Adding Attachments To A Message
Adding attachments to a message • Duration (5 secs) (only in MMS): allows you to change the duration of the image slideshow. To add an attachment to your message, tap (Attach) • Layout (bottom) (only in MMS): allows you to change the and select one of the following options: •... -
Page 124: Viewing Newly Received Messages
• Calendar: allows you to add an event from your calendar. The information is added to your message. Viewing Newly Received Messages • Location: allows you to attach a thumbnail of a map showing your location. When you receive a message, your phone notifies you by •... -
Page 125: Message Threads
Message Threads 3. Compose your reply. Your texts are colored Blue and your caller’s replies are Sent and received text and Current Recipient My Text Yellow. picture messages are grouped into message 4. Tap (Send) to deliver your reply. threads. Threaded –... -
Page 126: Deleting Messages
Deleting Messages To access additional Bubble options: Deleting a single message thread Touch and hold the message bubble within an active message conversation to display the following options: 1. From the Home screen, tap • Delete message: deletes the currently selected message 2. -
Page 127: Message Search
Message Search Deleting a single message bubble 1. From the Home screen, tap You can search through your messages by using the 2. Open a message to reveal the message string. Message Search feature. 1. From the Home screen, tap 3. -
Page 128: Messaging Settings
Messaging Settings Text message (SMS) settings • Delivery reports: when this option is activated, the network To configure the settings for text messages, multimedia informs you whether or not your message was delivered. messages, Voice mails, and Push messages. • Manage SIM card messages: allows you to manage the 1. -
Page 129: Notification Settings
• Creation mode: allows you to select the creation mode: Free, • Vibrate: allows you to enable/disable the vibration mode Restricted, or Warning. associated with message alerts. – Restricted: you can only create and submit messages with • Message alert repetition: allows you to set the interval for new content belonging to the Core MM Content Domain. -
Page 130: Signature Settings
Emergency Alert Configuration Signature settings • Add signature: when enabled, this feature allows you to create This device is designed to receive wireless emergency alerts a signature at the end of your outgoing text messages. from the Commercial Mobile Alerting System (CMAS); which •... -
Page 131: Assigning Messages As Spam
Assigning Messages as Spam Important! Alerts issued by the President can not be disabled. You can now assign either a phone number as spam or use a key term or phrase. Any message assigned as spam is To disable Extreme, Severe, and AMBER Alerts: automatically placed with your Spam messages folder. - Page 132 5. Tap the Number field to manually enter phone number. • Register phrase as spam: allows you to assign a specific text – or – phrase as belonging to a spam message. Ex: Dear friend. 5. Enter a term or word into the field. to select from either your existing Logs or Contacts.
-
Page 133: Accessing Your Spam Folder
If an incoming message is designated in coming from an To create your own text template: unknown sender, it is automatically assigned as spam and is 1. From the Home screen, tap now located in your Spam folder. 2. From the Messaging list, press and then tap Accessing Your Spam Folder Text templates. -
Page 134: Email
Email • Microsoft Exchange ActiveSync - This protocol is frequently used with a large corporate email server system and provides Email (or Internet Email) enables you to review and create access to email, contact, and calendar synchronization. email using several email services. You can also receive text Creating an Internet Email Account message alerts when you receive an important email. - Page 135 • Password: typically your network access password • The unique account name is used to differentiate this account (case-sensitive). from other email accounts accessed by your device. 3. Tap Show password to display the password as you 7. Tap Done to store the new account. enter it in the associated field.
-
Page 136: Composing Email
Refreshing Email messages 7. Tap the email text field and compose your email message. 1. From the Home screen, tap (Email). • To add an attachment (such as image, video, audio, etc..), 2. Select an email account. Attach (from the top of the screen) and make a •... - Page 137 • Your name: displays the name used in the From field of your • Sync Email: enables automatic email synching between your outgoing email messages. device and the remote server. • Signature: Lets you attach a customized signature to the •...
-
Page 138: Microsoft Exchange Email (Outlook)
Setting Up a Microsoft Exchange Email account • Vibrate: Activates a vibration when a new email message is received. 1. From the Home screen, tap (Email). • Incoming settings: Lets you specify incoming email settings, 2. If you already have other email account setup: such as User name, Password, IMAP server, Security type, •... - Page 139 6. Tap Microsoft Exchange ActiveSync (from the add new • Exchange Server: your exchange server remote email email account screen). address. Typically starts with mail.XXX.com. Obtain this information from your company network administrator. Note: If prompted with an on-screen notification that the connection that the “Setup could not finish”, tap Edit Important! Do not accept the default entry as this is a guess details to continue with a manual update of necessary...
-
Page 140: Refreshing Exchange Email
10. With the new server information entered, tap Next. 15. Identify your new work email account with a unique name (Ex: Work), then tap Done. 11. Read the on-screen Activation and, when prompted, Opening an Exchange Email tap OK. The device then verifies your incoming server settings. -
Page 141: Deleting An Exchange Email Message
Composing Exchange Email Note: If you attach an image to your email, you have the option 1. From the Home screen, tap (Email). to resize it prior to delivery. Choose from: Original, Large 2. Press and then tap Accounts. (70%), Medium (30%), or Small (10%). Once chosen, 3. -
Page 142: Configuring Microsoft Exchange Email Settings
Configuring Microsoft Exchange Email Settings • Always Cc/Bcc myself allows you to include your own email address in either the CC, Bcc, or None fields. Lets you always 1. From the Home screen, press and then tap receive a copy of outgoing emails. Settings and then navigate to the Accounts area. - Page 143 – • Sync schedule allows you to configure your email sync Security policy list: lists the current email’s security policy. schedule. These policies could restrict some functions from corporate servers. • Folder sync settings allows you to configure the sync settings for various folders such as Inbox, Drafts, Outbox, etc..
-
Page 144: Using Google Mail
• Sync Email synchronizes emails between your device and the 2. Tap New if you do not have a Google account. remote exchange server. – or – • Sync Contacts synchronizes the contacts between your device Tap Existing if you have a Google account. and the remote exchange server. -
Page 145: Viewing A Gmail Message
Composing a Gmail Message Viewing a Gmail Message 1. From the Gmail Inbox, tap a message to view the 1. From the Home screen, tap (Gmail). following options located at the bottom of the screen: 2. From the Gmail Inbox, tap (Compose) at the •... -
Page 146: Google Talk
Google Talk • Send feedback: sends feedback to Google. • Help: launches the browser and displays Google Mobile Help Google Talk™ is a free Windows and web-based application information. for instant messaging offered by Google. Conversation logs Creating an Additional Gmail Account are automatically saved to a Chats area in your Gmail account. -
Page 147: Google
Google + Messenger Google+ makes messaging and sharing with your friends a Messenger allows you to bring groups of friends together into lot easier. You can set up Circles of friends, visit the Stream a simple group conversation. When you get a new to get updates from your Circles, use Messenger for fast conversation in Messenger, Google+ sends an update to your messaging with everyone in your Circles, or use Instant... - Page 148 7. At the Messenger screen, tap to start a new message. 8. In the upper text field, enter a name, email address, or circle. 9. In the bottom message field, enter a message then tap 10. From the Messenger screen, tap Learn more for more detailed information.
-
Page 149: Section 8: Multimedia
Section 8: Multimedia Assigning the Default Storage This section explains how to use the multimedia features of Location your phone, including the Camera/Camcorder, Music Player, and how to manage your photos, images and sounds. You can take photographs and shoot video by using the built- Important! Too many users can overlook this location until in camera functionality. -
Page 150: Using The Camera
Using the Camera 5. Press (Camera key) until the shutter sounds. (The Taking Photos picture is automatically stored within your designated storage location (page 144). If no microSD is installed, Taking pictures with your device’s built-in camera is as all pictures are stored on the Phone.) For more simple as choosing a subject, pointing the camera, then information, refer to “Camera Options”... -
Page 151: Camera Options
Camera Options Shooting mode: allows you to set the shooting mode to Options are represented by icons across both sides of the one of the following: screen. • Single shot: takes a single photo and view it The following shortcuts are available for the camera: before returning to the shooting mode. - Page 152 Effects: allows you to change the color tone or Settings (continued): apply special effects to the photo. Options include: Scene mode: allows you to set the Scene to help take No effect, Black and white, Sepia, and Negative. the best pictures possible. Options include None, Portrait, Landscape, Sports, Party/Indoor, Settings: Beach/Snow, Sunset, Dawn, Autumn color, Text,...
- Page 153 Settings (continued): Settings (continued): White balance: allows you to set this option to one of Storage: allows you to configure the default storage the following choices: Auto, Daylight, Cloudy, location for images or videos as either Phone or Incandescent, or Fluorescent. Memory card (if inserted).
- Page 154 • Slideshow : appears in Landscape mode, allows you to Storage location/Connection Status: indicates the see your photos in a slideshow. device is connected to an adapter and the current • Delete : appears in Landscape mode, allows you to storage location for images (Phone or Memory card) delete the current picture.
-
Page 155: Camera Gallery Options
2. Select a folder location (ex: Camera) and tap an image – Print: allows you to print the current image on a compatible to open it. Samsung printer. – or – – Rename: allows you to rename the current file. - Page 156 Slideshow: appears in Portrait mode, allows you to see your – Print: allows you to print the current image on a compatible videos in a slideshow. Samsung printer. – Delete: appears in Portrait mode, allows you to delete the –...
-
Page 157: Assigning An Image As A Contact Photo
Assigning an Image as a Contact Photo • Home and lock screens assigns the current image to both the Home screen and Lock screens. 1. From the Home screen, tap (Apps) (Gallery). 5. Touch and drag the crop box anywhere on the picture. Touch and drag the sides of the crop box to zoom in or 2. -
Page 158: Using The Camcorder
Using the Camcorder 4. Tap the Video key ( ) to begin shooting video. The red light will blink while recording. In addition to taking photos, the camera also doubles as a camcorder that also allows you to record, view, and send 5. -
Page 159: Camcorder Options
Camcorder Options Settings: You can change options using your keypad in capture mode. Edit shortcuts: allows you to set shortcut icons for The following short cuts are available: the settings that you use the most. Self-recording: allows you to set the front camera Self portrait: allows you to activate the front facing so you can take videos of yourself or video chat. - Page 160 Settings (continued): Camcorder button: shoots or stops video recording when pressed in Camcorder mode. Resolution: allows you to set the image size to either: 1280x720, 720x480, 640x480, or 320x240. Camera / Camcorder Mode: allows you to take a photo White balance: allows you to set this option to one of the in various modes.
-
Page 161: The Gallery
Accessing Videos 3. Press for additional options such as: – Slideshow: appears in Portrait mode, allows you to see your When you shoot a video, the file is saved in the Camera videos in a slideshow. folder. You can view your videos immediately or view them anytime in the Camera folder. -
Page 162: Using The Video Player
Opening the Gallery Using the Video Player From the Home screen, tap (Apps) The Video Player application plays video files stored on the SD card. (Gallery). For more information, refer to “Camera 1. From the Home screen, tap (Apps) Gallery Options” on page 150. (Video Player). -
Page 163: Media Hub
Creating a New Media Hub Account Before you can rent or buy media, you must first create an Samsung Media Hub is your one stop for the hottest movie account. Enter the required information. and TV content. With hundreds of titles available, entertaining your family on the go was never easier. -
Page 164: Using Media Hub
Using Media Hub 5. Choose a payment method and then follow the on-screen instructions. The media stores to the My 1. From the Home screen, tap (Apps) Media folder. (Media Hub). Media Hub Notices 2. At the Media Hub screen, scroll through What’s New. •... -
Page 165: Play Movies & Tv
Play Movies & TV • Media Content is downloaded and saved onto the SD card. • Your Media Content may pause/stop or not download in networks This application allows you to connect to the Play Store, where there is a weak signal. download a movie and then watch it instantly. -
Page 166: Play Music
Play Music 3. Tap an on-screen account to add it or select Add account to use a new account. Also known as Google Music, allows you to browse, shop, 4. At the free songs screen, select either Get free songs or and playback songs purchased from the Play Store. -
Page 167: Searching For Music In Your Library
Changing Library View Searching for Music in Your Library 1. From the Home screen, tap (Apps) You can change the way you view the contents of your library. (Play Music). 1. From the Home screen, tap (Apps) 2. Tap (Search) to search through your available (Play Music). -
Page 168: Playing Music
Playing Music • Choose on-device music: In addition to playing the music that you add to your online library, you can play music stored on 1. From the Home screen, tap (Apps) your device’s internal storage. Then you can listen to music (Play Music). -
Page 169: Tab Options
Displaying the Now Playing Screen Tab Options If you navigate away from the Now playing screen, to return There are various options available from the various tabs: to the Now playing screen from other Music screens: 1. From the Home screen, tap (Apps) (Play Music). - Page 170 Options While Playing a Song The Now playing screen contains several buttons that you can tap to control the playback of songs, albums, and When you play a song, the Now playing screen displays. playlists: There are various options and controls available while a song is playing: Tap to go back to the previous song.
-
Page 171: Playing A Playlist
Adding Songs to Playlists Tap to repeat the current song, 1. From the Home screen, tap (Apps) repeat all songs, or disable repeat mode. Also visible when is tapped. (Play Music). 2. Tap an album or song list and play a song. 3. -
Page 172: Music Player
Deleting a Playlist 4. Use any of the following Music Player controls: 1. From the Home screen, tap (Apps) Pause the song. (Play Music). Start the song after pausing. 2. Display the PLAYLISTS library view. Press and hold to rewind the song. Tap to go to 3. -
Page 173: Music Player Options
Making a Song a Phone Ringtone • Add to playlist: allows you to add the current music file to a selected playlist. 1. From the Home screen, tap (Apps) • Set as: sets this song as a Phone ringtone, Caller ringtone, or (Music Player). -
Page 174: Using Playlists
Using Playlists 3. Select one of the following settings: • SoundAlive: set a type of equalization such as Normal, Pop, Playlists are used to assign music files into groups for Rock, Dance, Jazz, Classic, etc. playback. These Playlists can be created using the Music •... -
Page 175: Editing A Playlist
Editing a Playlist Note: If a playlist is empty, add a song by touching a holding a Besides adding and removing music files in a playlist, you song name from the main screen to open the context can also share, delete, or rename the playlist. menu. -
Page 176: Transferring Music Files
Transferring Music Files Music Hub Music files can be downloaded to the phone using one of two Samsung Music Hub makes your device a personal music methods: manager. It lets you access, buy, and download millions of music tracks. Access top albums, top tracks, featured 1. - Page 177 Making a Purchase 4. Choose from any of the following options: MP3s, Ringtones, CallerTunes, Shazam, TuneIn, Radio, You can use Music Hub to buy albums or individual tracks. Slacker, or My Stuff. You can also build your own album from various tracks. •...
-
Page 178: T-Mobile Tv
T-Mobile TV 4. Tap Start Trial to begin a free 30-day trial of the service. T-Mobile TV is an application that allows you to get live TV – or – and Video on Demand. 1. From the Home screen, tap (Apps) Tap Continue to keep viewing the free content or (T-Mobile TV). -
Page 179: Section 9: Applications And Development
Section 9: Applications and Development Applications This section contains a description of each application that is available in the Applications Menu, its function, and how to The Applications list provides quick access to all the navigate through that particular application. If the application available applications on the phone. -
Page 180: Calculator
Calculator Calendar Using this feature allows you to use your device as a With the Calendar feature, you can consult the calendar by calculator. The calculator provides the basic arithmetic day, week, or month, create events, and set an alarm to act functions;... -
Page 181: Creating A Calendar Event
Creating a Calendar Event 2. Tap (Create event) to create a new Calendar event. 1. From the Home screen, tap (Apps) – or – (Calendar). Tap Today to display the current date indicated by a 2. Tap to access the various calendar tabs. blue box, then press and select one of the 3. -
Page 182: Callertunes
6. Tap Hide declined events to activate this option. A check 15. Tap Quick responses to edit your default quick mark indicates selection. responses for outbound emails. These are default responses similar to those used by text templates. 7. Tap Lock time zone (to lock event time based on your current user-selected time zone). -
Page 183: Camera
Camera Chrome Use your 5.0 megapixel camera feature to produce photos in a The Google Chrome app allows you to use the Google JPEG format. The Camcorder shoots High Definition video in an Chrome Web browser on your device. MP4 format. 1. -
Page 184: Clock
Clock 6. Tap More to configure additional alarm settings such as volume slider, Alarm tone, Location alarm, Snooze, Here you can set an Alarm, configure and view the World Smart alarm, and assign a name. clock, use a Stopwatch, set a Timer, or use a Desk Clock. The applications display in a tabular format and quickly To configure additional alarm settings: accessed with the touch of a finger. - Page 185 Turning Off an Alarm • Interval indicates the length of time the alarm will remain silent between alarm notifications (snooze time). To stop an alarm when it sounds, touch and slide • Repeat indicates the numbers of snooze sessions that are to any direction.
-
Page 186: Setting A Timer
Setting a Timer To assign DST settings: 1. Locate a desired city from the World Clock list. 1. From the Home screen, tap (Apps) 2. Touch and hold a city and select DST settings. (Clock) Timer tab. 3. Select a DST setting (Automatic, Off, or 1 hour). 2. -
Page 187: Contacts
Contacts Email The default storage location for saving phone numbers to Email enables you to review and create email using most your Contacts List is your phone’s built-in memory. email services. The device alerts you when you receive an email message. From the Home screen, tap (Apps) From the Home screen, tap... -
Page 188: Gallery
Gallery Google The Gallery is where you view photos and play back videos. Use Google Search to search the Web. For photos, you can also perform basic editing tasks, view a From the Home screen, tap (Apps) slideshow, set photos as wallpaper or caller image, and (Search) and enter the search text. -
Page 189: Internet
Internet 3. Locate and tap one of the listed places (Restaurants, Cafes, Bars, Attractions, [user added searches], Open the browser to start surfing the Web. The browser is fully RECOMMENDATIONS, or IN THIS AREA a list of places optimized and comes with advanced functionality to enhance the within this category displays. -
Page 190: Maps
Maps Enabling a Location source Before you use Google Maps and find your location or search Google Maps allow you to track your current location, view for places of interest, you must enable a location source. To real-time traffic issues, and view detailed destination enable the location source you must enable the wireless directions. -
Page 191: Opening Maps
• Layers: allows you to switch map views: Tip: Enabling this feature allows you to locate places of – Traffic: (available only in selected areas) Real-time traffic interest at the street-level. However, this also requires a conditions are displayed over roads as color-coded lines. Each clear view of the sky and uses more battery power. -
Page 192: Media Hub
– 4. Press and select one of the following options: About: displays general information about Google maps such • Clear Map: allows you to remove all markings and layers from as Version, Platform, Locale, Total data sent, Total data received, the map. -
Page 193: Memo
Memo • Share via: allows you to send one or several of your memos at one time. Select a memo and tap send to deliver it via: This feature allows you to create a memo. Text only, Text only (.vnt), or S Note file (.snb). 1. -
Page 194: Messenger
Messenger MobileLife Widget Messenger allows you to bring groups of friends together into Personalizes the best of both the Web and T-Mobile services a simple group conversation. When you get a new for you. Get the latest news, weather, entertainment and conversation in Messenger, Google+ sends an update to your sports updates several times a day along with special offers. -
Page 195: Music Hub
Music Hub My Files Samsung Music Hub makes your device a personal music This application allows you to manage your sounds, images, manager. It lets you access, buy, and download millions of videos, bluetooth files, Android files, and other memory card music tracks. -
Page 196: Navigation
Opening and Navigating within Files Navigation DCIM is the default location for pictures or video taken by the Google Maps Navigation (Beta) is an internet-connected device. These files are actually stored in the DCIM folder turn-by-turn, GPS navigation system with voice guidance. location. -
Page 197: Navigation Options
Enabling GPS Location • Speak destination: allows you to use the voice recognition feature to search for matching locations in your area. 1. From the Home screen, press and then tap Settings Location services. • Type destination: allows you to manually enter a destination address (via the on-screen keypad). -
Page 198: Phone
• • Satellite: Maps uses the same satellite data as Google Earth. Settings: provides access to both Power settings (Screen Satellite images are not real-time. Google Earth acquires the dimming) and Information (Terms, privacy & notices). best imagery available, most of which is approximately one to •... -
Page 199: Play Books
Play Books Play Magazines Formerly known as Google Books, this application allows you With Google Play Magazines, you can subscribe to your to read over 3 million ebooks on the go. favorite magazines and have them available to read on your device at any time or any place. -
Page 200: Play Movies & Tv
Play Movies & TV Play Store This application allows you to connect to the Play Store, Formerly known as the “Android Market”, this application download a movie and then watch it instantly. provides access to downloadable applications and games to install on your phone. -
Page 201: Downloading A New Google Application
Downloading a New Google Important! If the selected application requires access to data Application or control of a function on your device, the Play To download a new application, you will need to use your Store displays the information the application will Google account to sign in to the Play Store. -
Page 202: Launching An Installed Google Application
Android Development 7. On the main Play Store screen, press and then tap My Apps, tap an installed application in the list, and This device can be used for Android application then tap Open. development. You can write applications in the SDK and install them on this device, then run the applications using Tip: The newly downloaded applications display in the the hardware, system, and network. -
Page 203: S Voice
Clearing application cache and data Note: If Unknown sources is disabled, those applications 1. From the Home screen, press and then tap without a certificate will not be allowed to download to Settings Application manager. your device. 2. Tap an application in which to clear the cache or data. Manage applications 3. -
Page 204: Samsung Apps
Note: Access to this feature requires that you already be 1. From the Home screen, tap (Apps) logged in to your Samsung account application. For (Scout). more information, refer to “Creating a Samsung 2. If prompted, read the on-screen terms of use and click Account”... -
Page 205: Settings
Settings Slacker Radio This icon navigates to the sound and phone settings for your Slacker Radio offers free, Internet radio for mobile phones. device. It includes such settings as: display, security, 1. From the Home screen, tap (Apps) memory, and any extra settings associated with your phone. (Slacker Radio). -
Page 206: T-Mobile Name Id
T-Mobile TV 3. The application screen provides several available options: T-Mobile TV is an application that allows you to get live TV • Account Info provides access to account-specific features and Video on Demand. such as: Notifications. From the Home screen, tap (Apps) •... -
Page 207: Video Player
Video Player Voice Recorder The Video Player application plays video files stored on your The Voice Recorder allows you to record an audio file up to microSD card. one minute long and then immediately send it as a message. 1. From the Home screen, tap (Apps) From the Home screen, tap (Apps) -
Page 208: Voice Search
Voice Search • Delete: allows you to delete 1 or more voice recordings. Tap the recordings to delete and tap Delete. Launches the Google Now application that is used for voice • Settings: the following settings are available: to text Internet searching. –... -
Page 209: Yelp
Yelp To configure YouTube Settings: Press and then tap Settings and configure the Yelp is an online urban city guide that helps people find cool places to eat, shop, drink, relax and play. Its the fun and easy following parameters: way to find, review and talk about what's great in your world •... - Page 210 • Search • About – – Clear search history allows you to clear previous YouTube Help provides answers to most YouTube questions. searches from showing up in the YouTube search box. – Feedback allows you to provide user feedback to YouTube. –...
-
Page 211: Section 10: Connections
Section 10: Connections Navigating with the Browser Your phone is equipped with features that allow you to quickly connect to the Web. 1. Tap an entry to select an item. 2. Sweep the screen with your finger in an up or down Your phone is equipped with a Google browser to navigate motion to scroll through a website. -
Page 212: Entering A Url
Settings menu. using the on-screen keypad. • Downloads: displays the download history. 2. Tap from the list of search results that are • Print: provides print access on compatible Samsung printers. displayed. 3. Tap a link to view the website. - Page 213 Adding and Deleting Windows Going Incognito To add a new window: The incognito feature allows you to view Internet sites outside of the normal browsing. Pages viewed in this 1. From your browser window, tap (Windows) incognito window won’t appear within your browser history (New window).
-
Page 214: Using Bookmarks
To exit from the incognito window: • Change order: Rearranges the current bookmarks. 1. From your browser window, tap (Windows). • Move to folder: Selected bookmarks are moved to a selected 2. Scroll across the available windows and locate the folder. -
Page 215: Adding Bookmarks
Adding Bookmarks Deleting Bookmarks 1. From the Home webpage, tap Add bookmark 1. From the Bookmarks page, touch and hold the bookmark you want to delete. 2. Use the on-screen keypad to enter the name of the bookmark and the URL. 2. -
Page 216: Browser Settings
Using Web History Browser Settings The History list displays a list of the most recently viewed To configure browser settings: websites. These entries can be used to return to previously 1. From the Home screen, tap (Apps) unmarked web pages. (Internet). - Page 217 • Accept cookies: Allows sites, that require cookies, to save and Accessibility: read cookies from your device. • Force zoom: Allows you to override a website’s zoom setting • Clear all cookie data: Deletes all current browser cookie files. and forces a zoom view. •...
- Page 218 Advanced: • Auto-fit pages: Allows web pages to be resized to fit as much of the screen as possible. • Select search engine: Allows you to choose a default search • Block pop-ups: Prevents popup advertisement or windows engine for your phone. Choose from: Google, Yahoo!, or Bing. from appearing on-screen.
-
Page 219: Bluetooth
Labs: To turn Bluetooth off: 1. From the Home screen, press and then tap • Quick controls: allows you to enable on-screen quick controls Settings. via the use of Swype thumb actions. 2. In a single motion touch and slide the Bluetooth slider •... - Page 220 To access the Bluetooth Settings menu: Note: Your device visibility is based on the time set within the 1. From the Home screen, press and then tap Visible time-out field (2 Minutes, 5 Minutes, 1 Hour, or Settings Bluetooth. Never). This value appears as a countdown within this 2.
-
Page 221: Pairing Bluetooth Devices
Pairing Bluetooth Devices 6. The external device must accept the connection and enter your device’s PIN code. The Bluetooth pairing process allows you to establish trusted connections between your device and another Bluetooth Once successfully paired to an external device, device. -
Page 222: Sending Contacts Via Bluetooth
Disconnecting a Paired Bluetooth Device Sending Contacts via Bluetooth Disconnecting a paired device breaks the connection Depending on your paired devices’ settings and capabilities, between the device and your phone, but retains the you may be able to send pictures, Contact information, or knowledge of the pairing. -
Page 223: Enable Downloading For Web Applications
Enable Downloading for Web PC Connections Applications You can connect your device to a PC using an optional PC data cable using various USB connection modes. Important! Before you can download a web application you Media device (MTP): allows you to transfer media files in must insert an SD into the phone and enable the Windows, or using an Android file transfer on a Mac. -
Page 224: Kies Air
Prior to using Kies air for Phone Update Enabling USB Debugging Before using Kies air to upgrade your device, it is USB debugging must be enabled before being able to use the recommended that you backup your personal data prior to Development feature. - Page 225 2. From the Home screen, press and then tap 10. From your PC, a security warning may be displayed Settings More settings Kies via Wi-Fi. asking if you want to run this application. Click Run to continue. 3. From the Kies air home screen, tap Scan devices. 11.
-
Page 226: Wi-Fi
Wi-Fi 2. In a single motion touch and slide the Wi-Fi slider to the About Wi-Fi right to turn it on . The slider color indicates the activation status. The device scans for Wi-Fi (short for "wireless fidelity") is a term used for certain available in-range wireless networks and displays types of Wireless Local Area Networks (WLAN). -
Page 227: Manually Add A New Network Connection
Wi-Fi Status Indicators Manually Add a New Network Connection 1. From the Wi-Fi network screen, tap Add Wi-Fi network. The following icons indicate the Wi-Fi connection status: 2. Enter the Network SSID (the name of your Wireless Displays when Wi-Fi is connected, active, and communicating with a Wireless Access Point Access Point). -
Page 228: Wi-Fi Advanced Settings
Deactivating Wi-Fi Wi-Fi Advanced Settings 1. From the Home screen, press and then tap The Wi-Fi settings - Advanced menu allows you to set up Settings. many of the device’s Wi-Fi services, including: • Setting the Wi-Fi sleep policy 2. In a single motion touch and slide the Wi-Fi slider to the •... -
Page 229: Usb Tethering
USB tethering feature. To disconnect tethering: If additional software or USB drivers are required, 1. From the Home screen, press and then tap navigate to: http://www.samsung.com/us/support/ downloads. Settings More settings Tethering and Mobile HotSpot. To connect using USB Tethering: 2. -
Page 230: Mobile Hotspot
Mobile HotSpot 2. In a single motion touch and slide the Mobile HotSpot slider to the right to turn it on This feature allows you to turn your device into a Wi-Fi 3. Read the on-screen notification regarding data use and HotSpot. - Page 231 To secure the Portable HotSpot service: Note: Using your Mobile HotSpot drains your device’s battery The two most common methods for securing your connection much faster. The best way to keep using the device as a to the HotSpot are to a security method (WPA2 PSK) and to HotSpot is by connecting to a Charger.
-
Page 232: Section 11: Changing Your Settings
Section 11: Changing Your Settings Activating Wi-Fi This section explains the sound and phone settings for your device. It includes such settings as: display, security, 1. From the Home screen, press and then tap memory, and any extra settings associated with your device. Settings. - Page 233 Network Notification 3. Select an available option: • Always: maintains your current active Wi-Fi connection even By default, when Wi-Fi is on, you receive notifications in the during sleep. Status bar anytime your phone detects an available Wi-Fi network. You can deactivate this feature if you do not want to •...
- Page 234 Manually Adding a Wi-Fi Network WPS Push Button 1. From the Home screen, press and then tap The WPS (Wi-Fi Protected Setup) feature (sometimes Settings Wi-Fi Add Wi-Fi network. associated with a physical or on-screen button on most WAPs) allows you to pair your device and WAP without the 2.
- Page 235 WPS PIN Entry Wi-Fi Direct Setup and Settings If a WPS Push Button does not work, there is an alternative You can configure your device to connect directly with other WPS connection method where you would use a device Wi-Fi capable devices. This is an easy way to transfer data generated PIN number to establish the connection.
-
Page 236: Bluetooth Settings
Bluetooth settings To activate your connection: 1. From the Home screen, press and then tap In this menu you can activate Bluetooth, view or assign a Settings. device name, activate your phone so other Bluetooth devices 2. In a single motion touch and slide the Wi-Fi slider to the can discover it, or scan for other, available Bluetooth devices with which to pair. -
Page 237: Activating The Device Name
Activating the Device Name Scanning for Devices 1. From the Home screen, press and then tap This option allows you to scan for active Bluetooth devices so Settings Bluetooth. you can pair with them. 1. From the Home screen, press and then tap 2. -
Page 238: Data Usage
Data Usage 4. Touch and drag the far right ends of the Red or Orange horizontal lines to manually adjust both the Warning Monitor and mange your device’s data usage capabilities. and Maximum data limits. Features include activation/deactivation or network data 5. -
Page 239: More Settings
• Mobile hotspots allows you to select available Wi-Fi networks 2. Tap Airplane mode. A check mark displayed next to the that can service as mobile hotspots. Place a checkmark on feature indicates Airplane mode is active. those entries you wish to use. The Airplane mode icon is displayed at the top of More Settings... -
Page 240: Network Mode
Network mode Data Roaming Data roaming allows you to connect to your service You can configure your phone to either manually detect and provider’s partner networks and access data services when use either a 2G (GSM), or 3G/4G (WCDMA) data network you are out of your service providers area of coverage. - Page 241 Using the 2G (EDGE) Network Network Operators If you are not using applications that require the 3G network Using this feature you can view the current network speed (any application that accesses the network or uses a connection. You can also scan and select a network operator browser), using the 2G network saves battery life.
-
Page 242: Usb Tethering And Mobile Hotspot
USB tethering feature. 2. Tap Default setup. If additional software or USB drivers are required, 3. Tap Automatic to allow the device to automatically navigate to: http://www.samsung.com/us/support/ select a network. downloads. – or – From the Home screen, press... -
Page 243: Vpn Settings
VPN settings Note: Similar setup process can be used for all available VPN The VPN settings menu allows you to set up and manage types. Virtual Private Networks (VPNs). Connecting to a VPN Important! Before using VPN, you must first set up a screen 1. -
Page 244: Delete A Vpn
Delete a VPN Wi-Fi Calling Settings 1. From the Home screen, press and then tap Important! An updated SIM card must be installed within the Settings More settings VPN. device prior to using this feature. Wi-Fi must first 2. Touch and hold the VPN that you want to delete. be active and communicating prior to launching 3. -
Page 245: Nearby Devices
Nearby devices 9. Tap Download to, then select the destination of any downloaded (shared) content. Choose from USB This option allows you to share your media files with nearby storage (Device) or SD card. devices using DLNA and connected to the same Wi-Fi. 1. -
Page 246: Call Settings
Call Settings • Call alert: allows you to assign call alert tones and activate call alerts and vibration. To access the Call settings menu: – Call vibrations: vibrates the phone when the called party 1. From the Home screen, tap (Phone). - Page 247 • Call accessories: allows you to assign headset settings during • Vibrate: configures the vibrate settings. Choose from Always, incoming calls. Only in silent mode, or Never. – Automatic answering configures the device to automatically • TTY mode: allows you to configure the TTY settings. For more answer and incoming call when a headset is detected.
-
Page 248: Set Reject Messages
Set reject messages Tap Keytones to create a checkmark if you want tones to play when the keypad is pressed. 1. From the Home screen, tap (Phone). Call alert 2. Press and then tap Call settings Set reject messages. 1. From the Home screen, tap (Phone). -
Page 249: Auto Screen Off During Calls
Auto screen off during calls Use extra vol. for calls This option turns on the proximity sensor during calls so that This option allows you to see an extra volume button on the your phone will know to turn the screen off to save power. screen during calls. -
Page 250: Tty Mode
TTY Mode HAC Mode A TTY (also known as a TDD or Text Telephone) is a This menu is used to activate or deactivate Hearing Aid telecommunications device that allows people who are deaf, Compatibility for this device. hard of hearing, or who have speech or language disabilities, 1. -
Page 251: Fixed Dialing Numbers
Fixed Dialing Numbers • Auto redial: automatically redial the dialed number if it is unable to connect or the call is cut off. Fixed Dial Number (FDN), allows you to restrict outgoing calls • Fixed Dialing Numbers: manages fixed dialing numbers. See to a limited set of phone numbers. - Page 252 Changing the PIN2 Code Managing the FDN List 1. From the Home screen, tap (Phone). When this feature is enabled, you can make calls only to phone numbers stored in the FDN list on the SIM card. 2. Press and then tap Call settings Additional 1.
-
Page 253: Home Screen Mode
Home Screen Mode Voicemail You can view your voicemail number from this menu. This application allows you to set your display to the 1. From the Home screen, tap (Phone). conventional layout of Basic mode or provide an easier user experience for the first-time smartphone users using Easy 2. -
Page 254: Blocking Mode
Blocking Mode Sound Settings When Blocking mode is enabled, notifications for selected From this menu you can control the sounds on the phone as features will be disabled. You will only receive notifications of well as configure the display settings. incoming calls from people on your allowed list. - Page 255 Adjusting the Volume Settings Setup the Device Vibration The Volume menu now provides access to various volume This option allows you to set your device to vibrate and ring. settings within one on-screen popup menu. 1. From the Home screen, press and then tap 1.
-
Page 256: Display Settings
Audible System Tone Settings Display Settings These options are used when you use the dialing pad, make In this menu, you can change various settings for the display a screen selection, lock your screen, or tap the screen. Each such as the font, orientation, pop-up notifications, puzzle time you press a key or make a selection the selected tone lock feature, animation, brightness, screen timeout, and sounds. -
Page 257: Sd Card & Device Storage
SD Card & Device Storage • Screen timeout: adjusts the delay time before the screen automatically turns off. Selections are: 15 seconds, From this menu you can view the memory allocation for the 30 seconds, 1 minute, 2 minutes, 5 minutes, 10 minutes, and memory card as well as mount or unmount the SD card. -
Page 258: Battery Usage
Battery Usage 3. Tap the following options to create a check mark and conserve power: This option allows you to view a list of those components • CPU power saving: allows you to limit the maximum using battery power. The amount of time the battery was performance of the CPU. -
Page 259: Application Manager
Application Manager Clearing Application Cache and Data This device can be used for Android development. You can Important! You must have downloaded applications installed write applications in the SDK and install them on this device, to use this feature. then run the applications using the hardware, system, and network. -
Page 260: Storage Used
Storage Used 5. Select a reason for uninstalling the application, then tap OK. This option allows you to view a list (on the current tab) of Running Services current applications as sorted by size. 1. From the Home screen, press and then tap The Running services option allows you to view and control Settings... -
Page 261: Location Services
Location Services Enabling the Location and Google Search 1. From the Home screen, press and then tap The Location services allows you to configure the device’s Settings Location services. location services. 2. Tap Location and Google search to enable the GPS Important! The more location determining functions are satellite. -
Page 262: Lock Screen
Lock Screen Using Face Unlock This feature used facial recognition to unlock your phone. This menu contains features that allows you to configure the This feature is less secure than PIN, Pattern, and Password device’s security parameters. Screen Unlock Pattern Overview locks and can be bypassed by someone else who looks similar to you. -
Page 263: Setting An Unlock Pattern
Using Face and Voice Unlock Setting an Unlock Pattern This feature used facial recognition to unlock your phone. Creating a screen unlock pattern increases security on the This feature is less secure than PIN, Pattern, and Password phone. When you enable the User visible pattern field, you locks and can be bypassed by someone else who looks will draw an unlock pattern on the screen whenever you similar to you. -
Page 264: Changing The Screen Lock Pattern
Changing the Screen Lock Pattern 5. When you have connected at least four dots in a vertical, horizontal or diagonal direction, lift your finger This feature allows you to change the previously stored from the screen and tap Continue. unlock pattern and update it if necessary. This process is similar to changing your password from time to time. -
Page 265: What If I Forget My Pattern
What If I Forget my Pattern? 4. If you have forgotten your current pattern, tap Pattern from the Screen unlock settings menu and follow the If you forget your device's lock pattern, you can unlock your procedures outlined in "Setting an Unlock Pattern" device or reset it using your Google™... - Page 266 PIN Lock and Unlock Samsung Unlock Options 1. From the Home screen, press and then tap Activate or deactivates various Unlock screen functions. Settings Lock screen. 1. From the Home screen, press and then tap 2. Tap Screen lock PIN.
- Page 267 • Set wake-up command designates your S Voice wake-up To edit these Lock screen shortcuts: commands. Tap Wake-up S Voice and follow the on-screen 1. From the Home screen, press and then tap prompts to create a new verbal command. Settings Lock screen Lock screen options.
-
Page 268: Owner Information
Locking Automatically Owner Information This option allows you to define the amount of time that must This option allows you to show user-defined information on pass before the device can automatically lock on its own. the Lock screen. 1. From the Home screen, press and then tap Note: This option only appears when a screen lock option is Settings... -
Page 269: Security
Security Setting up SIM Card Lock Prevent another user from using your SIM card to make The Security settings allow you to determine the security unauthorized calls or from accessing information stored on level for your device. Encrypt Device your SIM card by protecting the information using a PIN code. When enabled, your phone will ask for a PIN number each When enabled, this feature requires a numeric PIN or time you use the phone. -
Page 270: Unknown Sources
Password Settings Unknown Sources When you create a phone password you can also configure Before you can download a web application you must enable the phone to display the password as you type it instead of the Unknown sources feature (enables downloading). using an asterisk (*). -
Page 271: Language And Input Settings
Language and Input Settings Credential Storage This option allows certain applications to access secure This setting allows you to configure the language in which to certificates and other credentials. Certificates and display the menus. You can also set on-screen keyboard credentials can be installed to the SD card and password options. -
Page 272: Swype Settings
Swype Settings • Show complete trace: once enabled, sets wether or not to display the complete Swype path. For more information, refer to “Enabling and Configuring SWYPE” on page 79. • Pop-up on keypress: once enabled, displays a character 1. From the Home screen, press and then tap above an on-screen key while typing. - Page 273 6. Tap Swype Connect to activate social media 7. Tap Personalization to access and manage your personalization and configure data settings. personal dictionary. Log into the available accounts to • Register now: allows you register for the Swype Connect add help personalize your personal dictionary with service which allows you to backup your Swype dictionary and commonly used words or names from your available sync your Swype dictionary across multiple devices.
- Page 274 The keyboard is updated to the selected • Tutorial launches a brief on-screen tutorial covering the main language. concepts related to the Samsung keyboard. • Predictive text enables predictive text entry mode. This must • Reset settings resets the keyboard settings back to their be enabled to gain access to the advanced settings.
- Page 275 (Input Methods) and select Settings, then tap • Clear personalized data removes all personalized data entered by the user. to reveal the Samsung keyboard settings screen. 4. Press to return to the previous screen. 2. In a single motion touch and slide the Predictive text slider to the right to turn it on 3.
-
Page 276: Configuring Voice Input Recognition
Configure Google Voice Typing Configuring Voice Input Recognition 1. From the Home screen, press and then tap This feature allows the device to correctly recognize verbal Settings Language and input. input. – or – 1. From the Home screen, press and then tap Settings Language and input... -
Page 277: Configuring Text-To-Speech
Configuring Text-to-speech • Driving mode: incoming calls and new notifications are automatically read out loud. In a single motion touch and slide This feature allows the device to provide a verbal readout of to the right to turn it on. on-screen data such as messages and incoming caller information. -
Page 278: Back Up And Reset
Back up and Reset 6. Tap Collect diagnostics to collects diagnostic data for troubleshooting use. For more information, refer to Location settings, backup configurations, or reset the phone “Collect Diagnostics” on page 274. to erase all personal data. Prior to doing a Factory Reset From the Home screen, press and then tap Settings... - Page 279 Factory Data Reset Note: This software collects only diagnostic data from your From this menu you can reset your phone and sound settings device so that T-Mobile technicians can better to the factory default settings. troubleshoot issues with your device. 1.
-
Page 280: Add Account
Add Account Removing an Account This menu allows you to set up, manage, and synchronize Important! Removing an account also deletes all of its accounts, including your Google and email accounts. messages, contacts, and other data from the Adding an Account device. -
Page 281: Motion Settings
Synchronizing a Accounts Note: If Motion activation is not enabled, all motion services By default, all managed accounts are synchronized. You can are greyed-out and disabled. also manually sync all current accounts. 1. From the Home screen, press and then tap To activate different motion functions: Settings and then navigate to the Accounts area. -
Page 282: Accessory
Accessory Date and Time This menu allows you to assign external speakers when the This menu allows you to change the current time and date device is docked. displayed. 1. From the Home screen, press and then tap 1. From the Home screen, press and then tap Settings Accessory. -
Page 283: Accessibility Settings
Accessibility Settings Note: The Lock automatically function is only available if your This service lets you enable and disable downloaded device is already using the screen lock feature. accessibility applications that aid in navigating your Android device, such as TalkBack (uses synthesized speech to 5. -
Page 284: Developer Options
Developer Options 9. Tap the Font Size field to change the size of the fonts used on the device within menus, options, etc.. Use the Developer options to set options for application Choose from: Tiny, Small, Normal, Large, or Huge. development. - Page 285 • Wait for debugger: Specified apps must have debugger • Show CPU usage: Screen highlights the current CPU usage. attached before executing. • GPU rendering profile: Allows you to set the adb shell to • Show touches: Displays touch interactions on the screen. measure rendering.
-
Page 286: Allowing Mock Locations
Allowing Mock Locations 4. In the Settings screen, enter the current full backup password, the new password for full backups, then Note: This feature is used for development purposes only. enter the new password again. 5. Tap Set backup password to save the password If you are a developer who is testing a GPS applications using change. -
Page 287: About Device
About Device • Legal information: This option displays information about Open source licenses, as well as Google legal information. This This menu contains legal information, system tutorial information clearly provides copyright and distribution legal information, and other phone information such as the model information and facts as well as Google Terms of Service, number, firmware version, baseband version, kernel version, and software build number. -
Page 288: Section 12: Health And Safety Information
Section 12: Health and Safety Information with RF energy, these studies have failed to be replicated. This section outlines the safety precautions associated with The majority of studies published have failed to show an using your phone. The terms “mobile device” or “cell phone” association between exposure to radio frequency from a cell are used in this section to refer to your phone. - Page 289 Interphone Study The energy levels associated with radio frequency energy, including both radio waves and microwaves, are not great Interphone is a large international study designed to enough to cause ionization of atoms and molecules. determine whether cell phones increase the risk of head and Therefore, RF energy is a type of non-ionizing radiation.
- Page 290 International Cohort Study on Mobile Phone Users Surveillance, Epidemiology, and End Results (SEER) (COSMOS) Program of the National Cancer Institute The COSMOS study aims to conduct long-term health The National Cancer Institute (NCI) actively follows cancer monitoring of a large group of people to determine if there statistics in the United States to detect any change in rates of are any health issues linked to long-term exposure to radio new cases for brain cancer.
- Page 291 The FDA also is working with voluntary standard-setting Headsets can substantially reduce exposure because the bodies such as the Institute of Electrical and Electronics phone is held away from the head in the user's hand or in Engineers (IEEE), the International Commission on approved body-worn accessories.
-
Page 292: Children And Cell Phones
Studies have shown that these products generally do not Additional information on the safety of RF exposures from work as advertised. Unlike “hands-free” kits, these so-called various sources can be obtained from the following “shields” may interfere with proper operation of the phone. organizations (updated 10/1/2010): The phone may be forced to boost its power to compensate, •... -
Page 293: Specific Absorption Rate (Sar) Certification Information
• US Food and Drug Administration: expressed in units of watts per kilogram (W/kg). The FCC requires wireless phones to comply with a safety limit of 1.6 http://www.fda.gov/Radiation-EmittingProducts/ watts per kilogram (1.6 W/kg). RadiationEmittingProductsandProcedures/ The FCC SAR limit incorporates a substantial margin of safety HomeBusinessandEntertainment/CellPhones/default.htm. -
Page 294: Fcc Part 15 Information To User
SAR levels evaluated as in compliance with the FCC Samsung could void your authority to operate the device. RF exposure guidelines. This device has a FCC ID number: This device complies with part 15 of the FCC Rules. -
Page 295: Commercial Mobile Alerting System (Cmas)
Personal Localized Alerting impaired. Samsung is committed to promoting responsible Network ("PLAN")). If your wireless provider has chosen to driving and giving drivers the tools they need to understand participate in CMAS/PLAN, alerts are available while in the and address distractions. -
Page 296: Battery Use And Safety
Before answering calls, consider your circumstances. Let the Never mount this device in a manner that will obstruct the call go to voicemail when driving conditions require. driver's clear view of the street and traffic. Remember, driving comes first, not the call! Never use wireless data services such as text messaging, Web If you consider a call necessary and appropriate, follow these browsing, or e-mail while operating a vehicle. - Page 297 If the phone and/or battery get wet, have them checked • Never use any charger or battery that is damaged in any way. by your service provider or contact Samsung, even if they appear • Do not allow the battery to touch metal objects. Accidental to be working properly.
-
Page 298: Samsung Mobile Products And Recycling
Some websites and second-hand dealers not associated with reputable manufacturers and carriers, might be selling We've made it easy for you to recycle your old Samsung mobile device by working with respected take-back incompatible or even counterfeit batteries and chargers. -
Page 299: Ul Certified Travel Charger
Mail It In Warning! Never dispose of batteries in a fire because they may The Samsung Mobile Take-Back Program will provide explode. Samsung customers with a free recycling mailing label. Just go to UL Certified Travel Charger http://www.samsung.com/us/aboutsamsung/citizenship/ The Travel Charger for this phone has met applicable UL usactivities_environment_samsungrecyclingdirect.html?INT=ST... -
Page 300: Display / Touch-Screen
GPS & AGPS if screen is broken or cracked as this could cause injury to you. Certain Samsung mobile devices can use a Global Positioning System (GPS) signal for location-based applications. A GPS uses satellites controlled by the U.S. Government that are... -
Page 301: Emergency Calls
Always obey posted road signs. Emergency Calls service provider, applications providers, Samsung, and other third-parties providing services. This mobile device, like any wireless mobile device, operates Use of AGPS in Emergency Calls... -
Page 302: Care And Maintenance
Check with local service years: providers. Keep your Samsung Mobile Device away from: To make an emergency call: Liquids of any kind 1. If the mobile device is not on, switch it on. -
Page 303: Responsible Listening
Microwaves Damage to hearing occurs when a person is exposed to loud sounds over time. The risk of hearing loss increases as Do not try to dry your mobile device in a microwave oven. sound is played louder and for longer durations. Prolonged Doing so may cause a fire or explosion. - Page 304 • • Always turn the volume down before plugging the earphones into Avoid using headphones after exposure to extremely loud noises, an audio source. such as rock concerts, that might cause temporary hearing loss. Temporary hearing loss might cause unsafe volumes to sound •...
-
Page 305: Operating Environment
National Institute on Deafness and Other Email: cdcinfo@cdc.gov Communication Disorders Internet: National Institutes of Health http://www.cdc.gov/niosh/topics/noise/ 31 Center Drive, MSC 2320 default.html Bethesda, MD 20892-2320 1-888-232-6348 TTY Email: nidcdinfo@nih.gov Operating Environment Internet: Remember to follow any special regulations in force in any http://www.nidcd.nih.gov/ area, and always switch your mobile device off whenever it is National Institute for Occupational Safety... -
Page 306: Posted Facilities
Implantable Medical Devices Other Medical Devices A minimum separation of six (6) inches should be maintained If you use any other personal medical devices, consult the between a handheld wireless mobile device and an manufacturer of your device to determine if it is adequately implantable medical device, such as a pacemaker or shielded from external RF energy. -
Page 307: Fcc Hearing Aid Compatibility (Hac) Regulations For Wireless Devices
FCC Hearing Aid Compatibility (HAC) or fire resulting in bodily injury or even death. Users are Regulations for Wireless Devices advised to switch the mobile device off while at a refueling point (service station). The U.S. Federal Communications Commission (FCC) has Users are reminded of the need to observe restrictions on the established requirements for digital wireless mobile devices use of radio equipment in fuel depots (fuel storage and... - Page 308 be able to use a rated mobile device successfully. Trying out hearing aid meets the M2 level rating and the wireless the mobile device with your hearing device is the best way to mobile device meets the M3 level rating, the sum of the two evaluate it for your personal needs.
-
Page 309: Restricting Children's Access To Your Mobile Device
Cautions The HAC rating and measurement procedure are described in the American National Standards Institute (ANSI) C63.19 Any changes or modifications to your mobile device not standard. expressly approved in this document could void your Restricting Children's Access to Your warranty for this equipment and void your authority to Mobile Device operate this equipment. - Page 310 • • When using a headset in dry environments, static electricity can Failure to observe these instructions may lead to the suspension build up in the headset and cause a small quick static electrical or denial of cell phone services to the offender, or legal action, or shock.
-
Page 311: Section 13: Warranty Information
Case/Pouch/Holster 90 Days SAMSUNG; (g) defects or damage resulting from improper Other Phone Accessories 1 Year testing, operation, maintenance, installation, service, or adjustment not furnished or approved by SAMSUNG;... - Page 312 (iii) the battery has return the Product to an authorized phone service facility in been used in equipment other than the SAMSUNG phone for an adequate container for shipping, accompanied by the which it is specified.
- Page 313 ALLOW LIMITATIONS ON HOW LONG AN IMPLIED WARRANTY claims, whether in advertising, presentations or otherwise, LASTS, OR THE DISCLAIMER OR LIMITATION OF INCIDENTAL on behalf of SAMSUNG regarding the Products or this Limited OR CONSEQUENTIAL DAMAGES, SO THE ABOVE LIMITATIONS Warranty.
- Page 314 For any arbitration in which your total damage claims, exclusive of attorney fees and expert witness fees, are ALL DISPUTES WITH SAMSUNG ARISING IN ANY WAY FROM $5,000.00 or less (“Small Claim”), the arbitrator may, if you THIS LIMITED WARRANTY OR THE SALE, CONDITION OR...
- Page 315 You may opt out of this dispute resolution procedure by Severability providing notice to SAMSUNG no later than 30 calendar days If any portion of this Limited Warranty is held to be illegal or from the date of the first consumer purchaser’s purchase of the unenforceable, such partial illegality or unenforceability shall Product.
-
Page 316: End User License Agreement For Software
Phone: 1-800-SAMSUNG THE SOFTWARE. Phone: 1-888-987-HELP (4357) © 1. GRANT OF LICENSE. Samsung grants you the following 2012 Samsung Telecommunications America, LLC. All rights provided that you comply with all terms and conditions rights reserved. of this EULA: You may install, use, access, display and run... - Page 317 Update that Samsung may provide to you or make available to you after the date you 4. CONSENT TO USE OF DATA. You agree that Samsung and its obtain your initial copy of the Software, unless we provide affiliates may collect and use technical information gathered other terms along with such Update.
- Page 318 License will terminate automatically without restrictions imposed by your network or internet provider. notice from Samsung if you fail to comply with any of the Unless your device is connected to the internet through Wi-Fi connection, the Software will access through your mobile...
- Page 319 "AS AVAILABLE" BASIS, WITHOUT WARRANTIES OF ANY KIND agree that Samsung is not responsible for the availability of FROM SAMSUNG, EITHER EXPRESS OR IMPLIED. TO THE such applications and is not responsible or liable for any...
- Page 320 (“Samsung Account”), and your loss, including but not limited to any damage to the mobile rights and obligations will be set forth in separate Samsung device or loss of data, caused or alleged to be caused by, or Account terms and conditions and privacy policies.
- Page 321 PERMITTED BY APPLICABLE LAW, EVEN IF ANY REMEDY where you are a resident. Notwithstanding the foregoing, FAILS ITS ESSENTIAL PURPOSE. Samsung may apply for injunctive remedies (or an equivalent 14. U.S. GOVERNMENT END USERS RESTRICTED RIGHTS. The type of urgent legal relief) in any jurisdiction.
- Page 322 Opt Out." You must include in the opt out e-mail (a) your part of any award, but may not grant Samsung its attorney name and address; (b) the date on which the device was fees, expert witness fees or costs unless it is determined that purchased;...
- Page 323 Software, and you will continue to enjoy the benefits of this license. 17. ENTIRE AGREEMENT; SEVERABILITY. This EULA is the entire agreement between you and Samsung relating to the Software and supersedes all prior or contemporaneous oral or written communications, proposals and representations with respect to the Software or any other subject matter covered by this EULA.
-
Page 324: Index
Index Numerics Add 2 Sec Pause 98 AMBER alerts 124 Add 2-Sec Pause 63 Answering a call 60 2G Network Add to Favorites 113 Answering Key Using 236 Adjusting Home Key 241 2-Sec Pause Call volume 70 Application cache and data Adding 60 Airplane Clearing 198... - Page 325 Shutting Down 25 Auto Reject List 241 Battery Usage 253 Storage Used 255 Auto Reject Mode 241 Battery Use & Safety 291 Using the Camcorder 153 Auto Sync App Data 99 Bigger Font Using the Camera 145 Automatic Answering 242 Setting 279 Video Player 202 Automatic Restore 273...
- Page 326 Scan for Devices 215 Settings 211 Ending via Status Bar 58 Scanning for other Devices 232 Bubble Making a Multi-Party Call 73 Sending Contact Information 217 Options 121 Pause Dialing 63 Sending Contacts Via 217 Buddy Photo Share 146 Redialing the last number 63 Sending Namecard 105 Wait dialing 63 Set Visibility 215...
- Page 327 Last Name First 110 Shooting Video 153 Copying to SIM Card 105 Merge with Google 99 Camera 144 Creating a New 92 Merge with Samsung Account 99 Camera Options 146 Joining 101 Reject List 100 Default Storage Location 148 New From Keypad 94...
- Page 328 Contacts List 56 Data Roaming 235 Desktop Backup Password 281 Context Menus 97 Activate/Deactivate 233 Device Navigation 43 Data Usage Reset 274 Using 43 Cycle 233 Device Options Cookies Limiting 233 Screen 249 Emptying 210 Date Display Copying Contact 105 Selecting Format 277 Icons 30 CPU Usage...
- Page 329 Severe 124 Emergency Calls 296 Easy Mode 46 Face Unlock 257 Making 58 EDGE Network 236 Facebook With SIM 59 Edit Page 44 Predictive Text 90 Without SIM 58 Email 129 Swpe Connect 81 Emoticons 117 Changing Signature 132 Sync Calendar 109 Ending Composing 131 Sync Gallery 109...
- Page 330 Style 252 Gmail 139 Google Music 161 Font Size Composing a message 140 Google Now 203 Caption 204 Creating an Additional Account Google Places Changing 279 See also Local 184 Minimum Setting 212 Opening 139 Google Search 25 Forgot Pattern? 260 Other Options 139 Google Talk 201 Personalize Swype 81...
- Page 331 Internet 206 Brightness Setting 207 Health and Safety Information 283 Icons Search 207 Hearing Aids 242 Description 30 Internet Downloads 182 Hidden Applictions Indicator 30 Internet Email 129 Show 39 Status 30 IP Address 282 Hold Images Placing a call on hold 71 Assigning as a Contact icon 152 Home 36 Assigning as wallpaper 152...
- Page 332 Location and Google Services 256 Managing Applications Message Search 122 Lock Pattern Clearing Application Cache 254 Message threads 120 If I Forgot My Pattern 260 Uninstalling Third-party Messaging Lock Screen 257 Applications 254 Adding a Signature 125 Changing Wallpaper 51 Market Adding Attachments 118 Clock 261...
- Page 333 Types of Messages 114 Mobile Data 234 Music 190 Viewing new 119 Mobile Web 206 Volume 250 micro SIM Card Entering Text in the Mobile Web Music App Changing Exisitng PIN 264 Browser 207 Adding Songs to Playlists 166 Lock 264 Navigating with the Mobile Web Changing Library View 162 Setting Up Lock 264...
- Page 334 Editing a Playlist 170 New applications Owner Information 263 Making a Song a Ringtone 168 Downloading 196 Options 168 Non-Play Store Applications 197 Page Buddy 251 Playing Music 167 Notification Bar 35 Passwords Removing Music 170 Using 35 Make Visible 265 Settings 168 Notifications Pause...
- Page 335 Customizing 45 Set Wake-Up Command 262 Adding 100 Replacing 46 Using 65 Auto Reject 62 Samsung Account Removing 100 Creating 21 Rejection List Merge Contacts 99 Assigning Multiple Numbers 62 Samsung Keyboard 85 Assigning Single Numbers 62 ABC Mode 87...
- Page 336 Face and Voice Unlock 258 Wallpaper 50 Settings 88 Face Unlock 257 Setup Symbol/Numeric Mode 88 Swipe 257 Initial 16 Samsung Mobile Products and Screens Severe Alert Recycling 293 Adding and Deleting 44 Disable 126 Save a Number Customizing 44...
- Page 337 Snooze 180 Register a Number 117 SWYPE Repeat 179 123ABC Mode 83 SNS 108 Register a Phrase 125 Swype Social Network Registering a Phrase as Spam 127 Cellular Data 80 Adding Facebook Contacts 108 Settings 125 Connect 80 Resync 109 Spam Messages 117 Connect Registration 17 Social Networking...
- Page 338 Tethering 237 Tington Unknown Numbers Active Icon 224 Assigning 242 Blocking Messages 127 Disconnecting 224 Tools Unknown Sources 197 see USB Tethering 224 Camera 145 Unlock Text Touches Options 261 Adjusting Size 212 Show 280 Using Face 257 Minimum Font Size 212 TrackPad Using Voice 258 Soom Amount on Double Tap 212...
- Page 339 Web 206 Adding 238 Clear Cookies 212 Vibrate 242 Connecting To 238 History 211 Vibration Deleting 239 Set Home Page 211 Device 250 Editing 238 Web applications Video Settings 238 enable downloading 218 Volume 250 VPN Client 203 Widget Video Player Adding Widgets 38 Sharing Videos 157 Widgets...
- Page 340 Manually scan for network 223 Off 223 Yahoo! 213 On 221 YouTube Settings 227 High Quality 205 Show Usage 233 High Qulaity 173 Status icons 222 Settings 204 Wi-Fi Calling 9 Activating 68 Connection Preferences 68 Icons 69 Launching 69 Settings 68 Wi-Fi Direct 230 Activate and Connect 231...