Table of Contents
Advertisement
Quick Links
Advertisement
Table of Contents

Related Manuals for Panasonic Lumix DMC-LZ30


Summary of Contents for Panasonic Lumix DMC-LZ30
-
Page 1: Digital Camera
Owner’s Manual for advanced features Digital Camera DMC-LZ30 Model No. Please read these instructions carefully before using this product, and save this manual for future use. Register online at www.panasonic.com/register (U.S. customers only) VQT4V99 M0113KZ0... -
Page 2: Table Of Contents
Contents Before use Before use ......................... 6 Standard Accessories ...................... 8 Names and Functions of Main Parts ................9 Cursor button ............................ 11 Attaching the lens cap/shoulder strap ................. 12 Attaching the lens cap ........................12 Attaching the shoulder strap ......................13 Preparations About the batteries ...................... - Page 3 Contents Using the [Setup] menu ....................46 [Battery] .............................46 [Clock Set] ............................46 [Beep] ..............................46 [Volume] ............................46 [Monitor Display] ..........................46 [Monitor Luminance] ..........................47 [Histogram] ............................48 [Video Rec Area] ..........................48 [Economy] ............................49 [Auto Review] ............................50 [Reset] ...............................50 [Output] .............................50 [Version Disp.] ...........................51 [Format] .............................51 [Language] ............................51 Application (Record)
- Page 4 Contents Taking pictures according to the scene [Scene Mode] ..........73 [Panorama Shot] ..........................74 [Night Portrait] ...........................76 [Night Scenery] ..........................76 [HDR] ..............................77 [Food] ..............................78 [Baby] ..............................78 [Sunset] .............................79 [High Sens.] ............................79 Using the [Rec] menu ..................... 80 [Picture Size] .............................80 [Quality] .............................81 [Sensitivity] ............................81 [White Balance] ..........................82...
- Page 5 Contents Application (View) Different playback methods [Playback Mode] ............92 [Slide Show] ............................93 [Category Selection] ..........................94 [Calendar] ............................94 Retouching pictures [Creative Retouch] ..............95 [Toy Effect] ............................96 [Miniature Effect] ..........................96 [Star Filter] ............................96 [One Point Color] ..........................96 Using the [Playback] menu.................... 97 [Creative Retouch] ..........................97 [Resize] .............................97 [Cropping] ............................99...
-
Page 6: Before Use
Before use ■ Camera handling Keep the camera away from excessive vibration, force, or pressure. ● Avoid using the camera under the following conditions, which may damage the lens, LCD monitor, or camera body. This may also cause the camera to malfunction or prevent recording. - Page 7 Before use ■ Always take a test shot first Before important events when you will use the camera (at weddings, for example), always take a test shot to make sure that pictures and sound record correctly. ■ No compensation for missed shots We cannot compensate for missed shots if technical problems with the camera or card prevent recording.
-
Page 8: Standard Accessories
• If any accessories are lost, customers in the USA and Puerto Rico should contact Panasonic’s parts department at 1-800-833-9626 and customers in Canada should contact 1-800-99-LUMIX (1-800-995-8649) for further information about obtaining replacement parts. -
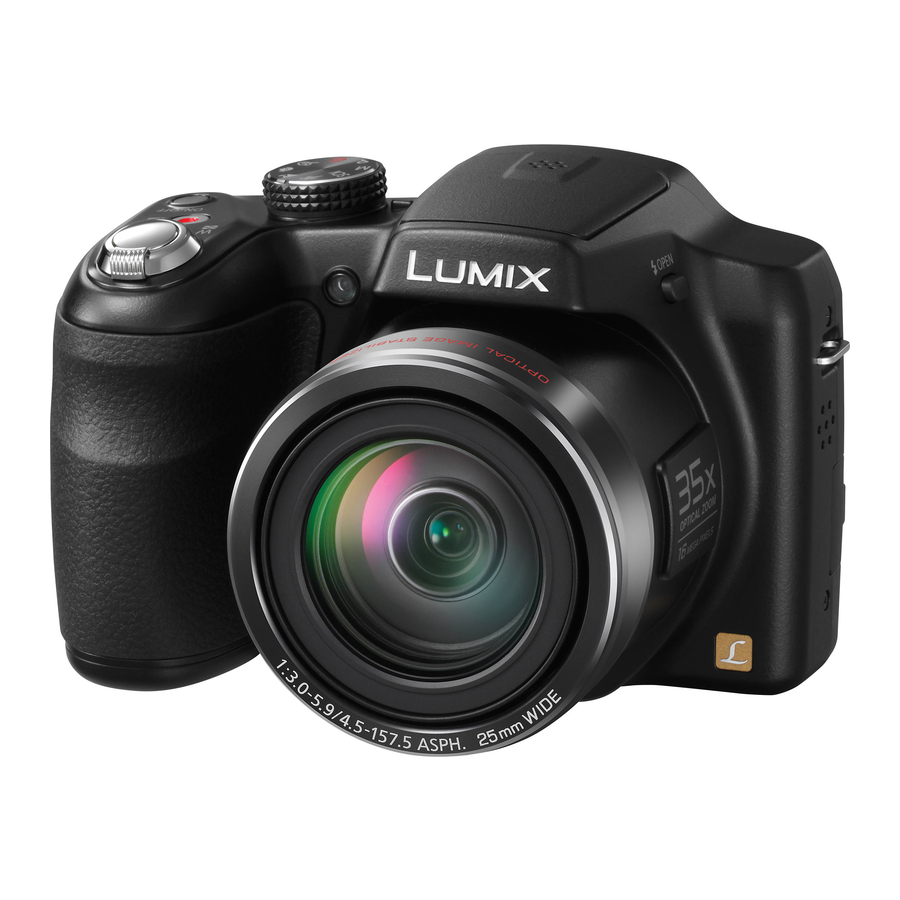
Page 9: Names And Functions Of Main Parts
Names and Functions of Main Parts Self-timer indicator (→62) AF Assist Lamp (→27, 88) Flash (→27, 55) Lens LCD monitor (→52, 113, 114) [EXPOSURE] button (→65) Operate this when setting the shutter speed or aperture value (only in the mode). Playback button (→28, 37, 92) Use this to switch to playback mode. - Page 10 Names and Functions of Main Parts Flash open button (→55) Shoulder strap eyelet (→13) Lens barrel Speaker (→46) [AV OUT/DIGITAL] socket [AV OUT/DIGITAL] socket (→102, 107, 109) ● Some methods of holding the camera may block the speaker, making it difficult to hear the beep, etc.
-
Page 11: Cursor Button
Names and Functions of Main Parts Microphone (→27, 35) Mode dial (→26) Use this to select the recording mode. Zoom lever (→53) Operate this when zooming in on a distant subject to record it larger. Shutter button (→27, 29) Use this to focus and record still pictures. -
Page 12: Attaching The Lens Cap/Shoulder Strap
Attaching the lens cap/shoulder strap Attaching the lens cap When you turn the camera off or carry the camera, attach the lens cap (supplied) to protect the surface of the lens. Pass the lens cap string through the shoulder strap eyelet on the camera body •... -
Page 13: Attaching The Shoulder Strap
Attaching the lens cap/shoulder strap Attaching the shoulder strap We recommend attaching the shoulder strap (supplied) when using the camera to prevent it from dropping. Pass the shoulder strap through the Shoulder strap eyelet shoulder strap eyelet on the camera body •... -
Page 14: About The Batteries
About batteries that you can use with this unit LR6/AA alkaline batteries or optional HR6/AA rechargeable Ni-MH (nickel metal hydride) batteries can be used with this unit. ● EVOLTA (EVOIA) batteries (Panasonic battery) can also be used. ● The following batteries cannot be used. • Manganese batteries •... -
Page 15: Inserting And Removing The Batteries
Inserting and removing the batteries Move the release lever to the [OPEN] position ( ) and slide the card/battery door in the direction ( ) to open it Insert the batteries all the way with correct orientation of poles Close the card/battery door and slide the door in until you hear a locking sound - 15 -... - Page 16 Inserting and removing the batteries Turn off the camera. ■ To remove batteries Tilt the camera and catch the batteries in your hand. Be careful not to drop them. ● To remove the batteries, turn the camera off and wait until the LUMIX indicator on the LCD monitor goes off.
-
Page 17: Remaining Battery
(when the Image • Temperature: 23 °C (73.4 °F)/Humidity: 50%RH when LCD monitor is on. Stabilizer function is set to [ON]). • Using a Panasonic SD Memory Card • Recording once every 30 seconds with full (32 MB). flash every second recording. - Page 18 Inserting and removing the batteries ■ Recording motion pictures * Fully-charged Panasonic Ni-MH Supplied batteries or optional batteries (optional, when the Panasonic alkaline batteries battery capacity is 1900 mAh) [Rec Quality] [HD] [HD] Available recording Approx. 210 min Approx. 280 min...
- Page 19 Please note that the performance of alkaline batteries significantly decreases in low temperature conditions. (When the temperature is 0 °C (32 °F)) ■ Recording still pictures Fully-charged Panasonic Ni-MH Supplied batteries or optional batteries (optional, when the Panasonic alkaline batteries battery capacity is 1900 mAh) Number of Approx.
-
Page 20: Inserting And Removing The Card (Optional)
Inserting and removing the card (optional) Turn off the camera. Move the release lever to the [OPEN] position ( ) and slide the card/battery door in the direction ( ) to open it Insert the card all the way Card (Check orientation) •... - Page 21 Inserting and removing the card (optional) Turn off the camera. ■ To remove card Press the center of the card. ● Keep the Memory Card out of reach of children to prevent swallowing. ● To remove the card, turn the camera off and wait until the LUMIX indicator on the LCD monitor goes off.
-
Page 22: About Built-In Memory/Cards
● The access time for the built-in memory may be longer than the access time for a card. ■ Compatible memory cards (optional) The following SD standard-based cards (Panasonic brand recommended) Type of Card Capacity Notes SD Memory Cards 8 MB – 2 GB •... -
Page 23: Recording Capacity Guidelines (Pictures/Recording Time)
About built-in memory/cards Recording capacity guidelines (pictures/recording time) The number of pictures you can take and the recording time vary in proportion to card capacity (and depending on recording conditions and type of card). Estimated remaining pictures or recording time capacity (press [DISP.] button to switch display) Displayed when no card is inserted (pictures will be saved to built-in memory) -
Page 24: Setting The Clock
Setting the clock The clock is not set when the camera is shipped. • Make sure to detach the lens cap when turning on the camera. Press the Camera [ON/OFF] button The camera is turned on. If the language select screen is not displayed, proceed to step Press [MENU/SET] while the message is displayed... -
Page 25: Changing Time Setting
Setting the clock Changing time setting Select [Clock Set] from the [Setup] menu or [Rec] menu to change the current time settings. • If approximately 2 hours have elapsed after installing the batteries with sufficient power in the camera, the clock settings will be retained for about 120 hours even if the batteries are removed. -
Page 26: Sequence Of Operations
Sequence of operations Make sure to detach the lens cap when turning on the camera. Press the Camera [ON/OFF] button Camera [ON/OFF] button Set to the desired recording mode Align the mode dial correctly to the mode that you want to use. → [Intelligent Auto] Mode Take pictures with automatic settings. -
Page 27: Taking Still Pictures
Sequence of operations Aim the camera and shoot Shutter button Microphone ■ Taking still pictures Press the shutter button halfway to focus Press and hold the shutter button to take the picture ■ Recording motion pictures (→35) Press the motion picture button to start recording Press the motion picture button again to finish recording... - Page 28 Sequence of operations Press the Playback button Playback button View pictures • Press to select a picture (→37, 75) • Press to play back motion pictures or panorama pictures ■ Taking pictures once again • Press Playback button to enter the recording mode Turn off the camera (Press the Camera [ON/OFF] button) ■...
-
Page 29: Taking Pictures With Automatic Settings [Intelligent Auto] Mode
Taking pictures with automatic settings [Intelligent Auto] Mode Recording mode: Optimum settings are made automatically from information such as “face”, “movement”, “brightness”, and “distance” just by pointing the camera at the subject, meaning that clear pictures can be taken without the need to make settings manually. Set to ([Intelligent Auto] Mode) Take a picture... -
Page 30: Using Flash
Taking pictures with automatic settings [Intelligent Auto] Mode Using flash Press [ ] to open the flash (→55). ● When is selected, the optimum flash ( ) is selected automatically depending on conditions. (→58) ● When is selected, the red-eye reduction function is activated. ●... -
Page 31: [Af Tracking]
Taking pictures with automatic settings [Intelligent Auto] Mode [AF Tracking] This function enables the camera to continue to focus on the subject and adjust the exposure of the subject even when the subject is moving. Press to set AF Mode to [AF Tracking] •... -
Page 32: [Intelligent Auto] Mode Restrictions
Taking pictures with automatic settings [Intelligent Auto] Mode [Intelligent Auto] Mode restrictions Only the menu items which are displayed in the [Intelligent Auto] Mode can be set. The settings selected in the [Program AE] or other modes will reflect on the menu items in the [Setup] menu that are not displayed. -
Page 33: Taking Pictures With Your Own Settings [Program Ae] Mode
Taking pictures with your own settings [Program AE] Mode Recording mode: Using the [Rec] menu to change settings and set up your own recording environment. Set to ([Program AE] Mode) Take a picture Press halfway Press fully (press lightly to focus) (press the button all the way to record) ●... -
Page 34: Adjusting Focus
Adjusting focus When [AF Mode] is set to (1-area-focusing), focus on the AF area in the center of the picture. If a subject you want to record is not in the center, follow the steps below. Adjust focus according to subject Align the AF area Focus display with the subject... -
Page 35: Recording Motion Pictures
Recording motion pictures Recording mode: You can record motion pictures with audio (monaural). Press the motion picture button to Microphone start recording [Rec Quality] (→91) Elapsed recording time Remaining recording time (approx.) ● Immediately release the motion picture button after pressing it. ●... - Page 36 Recording motion pictures ■ Recording motion pictures in A motion picture will be recorded without Automatic Scene Detection operating. ■ Recording motion pictures in Records a motion picture at your preferred settings. • Aperture and shutter speed are automatically set. ■...
-
Page 37: Viewing Your Pictures [Normal Play]
Viewing your pictures [Normal Play] When a card is in the camera, pictures are played back from the card. Without a card, pictures are played back from the built-in memory. Press the Playback button • Press again to enter the recording mode. -
Page 38: Zooming In And Viewing "Playback Zoom
Viewing your pictures [Normal Play] Zooming in and viewing “Playback Zoom” Move to T side Current zoom position Move to T side Move to W side • Move zoom position → ● Playback zoom cannot be used during motion picture playback. Viewing a list of pictures “Multi Playback”... -
Page 39: Searching Pictures By Their Recording Date "Calendar
Viewing your pictures [Normal Play] Searching pictures by their recording date “Calendar” Selected date Move to W side 1-picture 12-picture 30-picture Calendar screen screen screen screen Move to W side Move to T side • When you select a recording date using the cursor button and press [MENU/SET], the display method changes to the 30-picture screen. -
Page 40: Viewing Motion Pictures
Viewing your pictures [Normal Play] Viewing motion pictures Select a picture with the motion picture icon, and press Playback now starts. Motion picture recording time When playback starts, the elapsed playback time is displayed in the top right of the screen. Motion picture icon ■... -
Page 41: Deleting Pictures
Deleting pictures Pictures will be deleted from the card if the card is inserted, or from the built-in memory if the card is not inserted. (Deleted pictures cannot be recovered.) Press to delete displayed picture • A confirmation screen is displayed. Select [Yes] with cursor button and then press [MENU/SET]. -
Page 42: To Delete Multiple (Up To 50)/To Delete All Pictures
Deleting pictures To delete multiple (up to 50)/To delete all pictures Press [ ] while viewing a picture to select [Delete Multi]/[Delete All] and press [MENU/SET] ■ [Delete Multi] Use cursor button to select picture and press [DISP.] button • To cancel → Press [DISP.] button again. •... -
Page 43: Setting The Menu
Setting the menu Refer to the procedure below for an example on how to operate the menus. Example: Changing [AF Mode] in the [Rec] menu in [Program AE] Mode Press [MENU/SET] The menu selection screen is displayed. Press to select [Rec] menu and press [MENU/SET] Press to select [AF Mode] and press [MENU/SET]... -
Page 44: Menu Type
Setting the menu Menu type [Rec] menu (In recording mode only) Changing picture preferences (→80) • Enables you to set the coloring, picture size, and other items. [Motion Picture] menu (In recording mode only) Recording motion pictures using your own settings (→91) •... -
Page 45: Using Quick Menu
Setting the menu Using Quick menu During recording, you can easily call some of the menu items and set them. Press [Q.MENU] button Press to select a menu item Press to select the settings Press [MENU/SET] ● The menu items and setting items that are displayed differ depending on the recording mode. -
Page 46: Using The [Setup] Menu
Using the [Setup] menu [Clock Set], [Economy] and [Auto Review] are important for clock setting and battery life. Please check these before use. • For details about the setting procedure in the [Setup] menu (→43) Item Settings, notes [Battery] [Alkaline] / [Ni-MH] Select the type of batteries used. -
Page 47: [Monitor Luminance]
Using the [Setup] menu • For details about the setting procedure in the [Setup] menu (→43) Item Settings, notes [Monitor Luminance] [Auto Power Monitor]: The brightness is adjusted automatically depending on Make LCD monitor easier how bright it is around the camera. to see. -
Page 48: [Histogram]
Using the [Setup] menu • For details about the setting procedure in the [Setup] menu (→43) Item Settings, notes [ON] / [OFF] [Histogram] A peak in the center (Example) Check brightness in represents correct picture on graph. brightness (correct exposure). This can be used as a reference for exposure correction, etc. -
Page 49: [Economy]
Using the [Setup] menu • For details about the setting procedure in the [Setup] menu (→43) Item Settings, notes [Economy] [Auto Power Off] Turn off the camera or [2 MIN.] / [5 MIN.] / [10MIN.] / [OFF]: make the LCD monitor Automatically shut off the camera while not in use. -
Page 50: [Auto Review]
Using the [Setup] menu • For details about the setting procedure in the [Setup] menu (→43) Item Settings, notes [ON] / [OFF] [Auto Review] • Automatically displays still pictures immediately after Automatically display they are taken, regardless of [Auto Review] setting in still pictures immediately [Auto Bracket] and [Burst] modes. -
Page 51: [Version Disp.]
• If the card cannot be formatted, please try another card restored. Check the before contacting Panasonic. content of the card/ For USA and Puerto Rico assistance, please call: built-in memory 1-800-211-PANA(7262) or, contact us via the web at: carefully before http://www.panasonic.com/contactinfo... -
Page 52: Changing Recording Information Display
Changing recording information display Change between different LCD monitor displays, such as Histograms. Press [DISP.] button to change display ■ In Recording Mode Recording information, Recording information, Number of recordable Available recording pictures time No display Guide lines ■ In Playback Mode Picture Recording information... -
Page 53: Using Zoom
Using Zoom Recording mode: You can adjust the area of a picture to be taken using zoom. Zoom In/Out Capture a Enlarge wider area the subject (wide-angle) (telephoto) When Extended optical zoom Focus range is set Zoom ratio Optical Zoom range Digital Zoom range Zoom bar ●... -
Page 54: Zoom Types And Use
Using Zoom Zoom types and use The zoom ratio changes when the picture size is changed. (→80) ■ Optical Zoom Zooming in up to 35x is possible if pictures without have been selected by [Picture Size] on the [Rec] menu. ●... -
Page 55: Taking Pictures With Flash
Taking pictures with flash Recording mode: ■ To open the flash Flash open button Press • Be sure to close the flash when not in use. ■ To close the flash Press the flash until it clicks. • The flash setting is fixed to [Forced Flash Off] while the flash is closed. - Page 56 Taking pictures with flash Press to display [Flash] Use cursor button to select the desired type and press [MENU/ SET] Type, operations Uses [Auto] Normal use • Automatically judges when to use flash [Auto/Red-Eye] Taking pictures of subjects in dark •...
- Page 57 Taking pictures with flash ● The effect of red-eye reduction varies depending on the subject and is affected by factors such as distance to the subject, whether the subject is looking at the camera during preliminary flash, and so on. In some cases, the effect of red-eye reduction may be negligible.
- Page 58 Taking pictures with flash ■ Available types in each mode (○: Available, –: Not available, : Default setting) [Scene Mode] – ○ ○ ○ ○ ○ ○ ○ ○ – – – – – ○ ○ ○ ○ – – ○...
-
Page 59: Taking Close-Up Pictures
Taking close-up pictures Recording mode: When you want to enlarge the subject, setting to [AF Macro] ( ) enables you to take pictures at an even closer distance than the normal focus range (up to 1 cm (0.033 feet) for max. Wide). Press to display [Macro Mode] Use cursor button to select [AF Macro] and press [MENU/SET]... -
Page 60: Focus Range
Taking close-up pictures Focus range When a subject is too close to the camera, the picture may not be properly focused. The shortest recording distance differs depending on the zoom ratio and the setting in macro recording mode. ■ Shortest recording distance The shortest recording distance is the distance from the lens front to the subject. -
Page 61: [Macro Zoom]
Taking close-up pictures [Macro Zoom] To take even larger images of the subject, setting to [Macro Zoom] enables the subject to appear even larger than when using [AF Macro]. Press to display [Macro Mode] Use cursor button to select [Macro Zoom] and press [MENU/ SET] Adjust the Digital Zoom magnification with the zoom lever The zoom position is fixed at the max. -
Page 62: Taking Pictures With Self-Timer
Taking pictures with self-timer Recording mode: We recommend using a tripod. This is also effective for correcting jitter when pressing the shutter button, by setting the self-timer to 2 seconds. Press to display [Selftimer] Use cursor button to select time duration and press [MENU/ SET] Take a picture Press the shutter button fully to start recording after the preset time. -
Page 63: Taking Pictures With Exposure Compensation
Taking pictures with Exposure Compensation This feature allows the user to manually adjust the exposure when a proper auto exposure cannot be obtained. ■ Recording mode: Press to display [Exposure] Use cursor button to select a value and press [MENU/SET] •... -
Page 64: [Auto Bracket]
Taking pictures with Exposure Compensation [Auto Bracket] Records 3 pictures in continuous succession while exposure is changed automatically. After exposure adjustment, the adjustment value is set as the standard. ■ Recording mode: Press several times to display [Auto Bracket] Use cursor button to select a value and press [MENU/SET] •... -
Page 65: Determining Aperture And Shutter Speed And Recording
Determining aperture and shutter speed and recording [Manual Exposure] Mode Recording mode: This mode allows the user to manually set the aperture value and shutter speed. It may be useful when adverse conditions do not allow the auto exposure to produce an acceptable picture. -
Page 66: Taking Pictures With Different Picture Effects [Creative Control] Mode
Taking Pictures with different picture effects [Creative Control] mode Recording mode: You can select your own settings from various effects and take pictures while confirming these effects on the LCD monitor. Set mode dial to Press to select an effect, and press [MENU/SET] (→67 - 69) •... -
Page 67: [Expressive]
Taking Pictures with different picture effects [Creative Control] mode For the [Creative Control] menu setting procedures. (→66) [Expressive] This effect emphasizes the color to make a pop art picture. [Retro] This effect gives a faded image. [High Key] This effect adds a bright, airy and soft feel to the overall image. [Low Key] This effect adds a dark and relaxing feel to the overall image and enhances bright parts. -
Page 68: [Sepia]
Taking Pictures with different picture effects [Creative Control] mode For the [Creative Control] menu setting procedures. (→66) [Sepia] This effect creates a sepia image. [Dynamic Monochrome] This effect gives a higher contrast to create an impressive black and white picture. [Impressive Art] This effect gives your photo a dramatic contrast look. -
Page 69: [Cross Process]
Taking Pictures with different picture effects [Creative Control] mode For the [Creative Control] menu setting procedures. (→66) [Cross Process] This effect gives your photo a dramatic color look. ■ Adjusting color Use cursor button to adjust coloring, then press [MENU/SET] •... -
Page 70: Taking Pictures Of People [Portrait] Mode
Taking pictures of people [Portrait] Mode Recording mode: Improves the skin tone of subjects for a healthier appearance in bright daylight conditions. Set mode dial to ■ Tips • The more the zoom is drawn towards T side and the closer the camera is brought to the subject, the greater the effect will be. -
Page 71: Taking Pictures Of Scenery [Scenery] Mode
Taking pictures of scenery [Scenery] Mode Recording mode: Takes clear pictures of wide, distant subjects. Set mode dial to ■ Recording motion pictures in Records a motion picture at the optimum settings when the subject is scenery. ● The flash is set to [Forced Flash Off]. -
Page 72: Taking Pictures Of Sporting Events [Sports] Mode
Taking pictures of sporting events [Sports] Mode Recording mode: Takes pictures of scenes with fast movement, e.g. sports. Set mode dial to ■ Tips • Stand at least 5 m (16 feet) away. ■ Recording motion pictures in The recording mode changes to Normal motion picture. ●... -
Page 73: Taking Pictures According To The Scene [Scene Mode]
Taking pictures according to the scene [Scene Mode] Recording mode: Using [Scene Mode] enables you to take pictures with optimum settings (exposure, coloring, etc.) for given scenes. Set mode dial to Use cursor button to select the scene and press [MENU/SET] ■... -
Page 74: [Panorama Shot]
Taking pictures according to the scene [Scene Mode] • How to select a scene (→73) • Using flash in Scene Modes (→58) [Panorama Shot] Creates a single panorama picture by stitching 3 still pictures. Use cursor button to select the recording direction, and press [MENU/SET] to set Check the recording direction and press [MENU/SET] Special panorama guidelines will be displayed during recording. -
Page 75: About Panorama Playback
Taking pictures according to the scene [Scene Mode] ● The zoom position is fixed to the max. Wide. ● The focus, exposure and White Balance are all fixed to optimal values for the first picture. If the focusing or brightness of pictures recorded as part of a Panorama picture after the first picture are significantly different from those of the first picture, the Panorama picture as a whole (when all pictures are stitched together) may not have consistent focus and brightness. -
Page 76: [Night Portrait]
Taking pictures according to the scene [Scene Mode] • How to select a scene (→73) • Using flash in Scene Modes (→58) [Night Portrait] Takes pictures of people and nightscapes with close to actual brightness. ■ Tips • Use flash. •... -
Page 77: [Hdr]
Taking pictures according to the scene [Scene Mode] • How to select a scene (→73) • Using flash in Scene Modes (→58) [HDR] The camera can combine several still pictures taken with different exposures into a single properly exposed picture with rich gradation. The individual pictures used to create the HDR picture are not saved. -
Page 78: [Food]
Taking pictures according to the scene [Scene Mode] • How to select a scene (→73) • Using flash in Scene Modes (→58) [Food] Takes natural-looking pictures of food. [Baby] Taking pictures of a baby with a healthy complexion. Use cursor button to select [Age] and press [MENU/SET] Use cursor button to select [SET] and press [MENU/SET] Set birthday with cursor button, and press [MENU/SET] Use cursor button to select [Exit] and press [MENU/SET]... -
Page 79: [Sunset]
Taking pictures according to the scene [Scene Mode] • How to select a scene (→73) • Using flash in Scene Modes (→58) [Sunset] Takes clear pictures of scenes such as sunsets. [High Sens.] Prevents blurring of subject in dark, indoor conditions. Select the aspect ratio and the picture size with cursor button and press [MENU/SET] ■... -
Page 80: Using The [Rec] Menu
Using the [Rec] menu • For [Rec] menu setting procedures (→43) [Picture Size] Set the size (number of pixels) of still pictures. Number of pictures which can be recorded depends on this setting and on [Quality]. ■ Recording mode: ■ Settings: Recording pixel level type 4608x3456... -
Page 81: [Quality]
Using the [Rec] menu • For [Rec] menu setting procedures (→43) [Quality] Set quality of picture. ■ Recording mode: ■ Settings: High quality, priority to picture quality Standard quality, priority to the number of pictures ● The setting is fixed to in the following cases: •... -
Page 82: [White Balance]
Using the [Rec] menu • For [Rec] menu setting procedures (→43) [White Balance] Adjust the color depending on the light source to ensure natural color. ■ Recording mode: ■ Settings: [AWB] (automatic) / (outdoor, clear sky) / (outdoor, cloudy sky) / (outdoor, shade) / (Incandescent lighting) / (uses value set in... - Page 83 Using the [Rec] menu ■ Setting White Balance manually ( Select and press [MENU/SET]. Point the camera towards a white object (e.g. paper) and press [MENU/SET]. • White Balance is set to • Even if the camera is turned off, the set White Balance is remembered. •...
-
Page 84: [Af Mode]
Using the [Rec] menu • For [Rec] menu setting procedures (→43) [AF Mode] Method of aligning focus can be changed according to position and number of subjects. ■ Recording mode: ■ Settings: Taking front-on Recognizes faces (up to 10 people) and adjusts exposure and focus pictures of people accordingly. -
Page 85: [Metering Mode]
Using the [Rec] menu ● Cannot set to (Face Detection) in the following case: • Scene Modes ([Panorama Shot] [Night Scenery] [Food]) ● If the camera misinterprets a non-human subject as a face in (Face Detection) setting, switch to another setting. ●... -
Page 86: [I.exposure]
Using the [Rec] menu • For [Rec] menu setting procedures (→43) [i.Exposure] Automatically adjusts contrast and exposure to give more lifelike colors when there is significant contrast between background and subject. ■ Recording mode: ■ Settings: [ON] / [OFF] [Digital Zoom] Zoom 4x further than Optical/Extended optical zoom. -
Page 87: [Burst]
Using the [Rec] menu • For [Rec] menu setting procedures (→43) [Burst] A burst of still pictures can be recorded while the shutter button is pressed fully. ■ Recording mode: ■ Settings: Setting Description Speed: Approx. 1 picture/sec. • You can record a series of still pictures successively until the card or built-in memory is full, but at some point the burst speed drops. -
Page 88: [Color Mode]
Using the [Rec] menu ● Burst speed may be reduced if shutter speed is reduced in darker locations. ● With repeated recordings, it may take a while between recordings, depending on the usage conditions. ● It may take a while to store still pictures that were taken using the burst function. If you continue to record while storing, the number of burst pictures that can be taken will be reduced. -
Page 89: [Red-Eye Removal]
Using the [Rec] menu • For [Rec] menu setting procedures (→43) [Red-Eye Removal] Automatically detects red-eye and corrects still picture data when recording with flash red-eye reduction ( ■ Recording mode: ■ Settings: [ON] / [OFF] ● This setting will work only when [AF Mode] is (Face Detection). -
Page 90: [Date Stamp]
Using the [Rec] menu • For [Rec] menu setting procedures (→43) [Date Stamp] Still pictures can be taken with the recording date and time stamped on the still picture. ■ Recording mode: ■ Settings: [W/O TIME] / [WITH TIME] / [OFF] ●... -
Page 91: Using The [Motion Picture] Menu
Using the [Motion Picture] menu • For [Motion Picture] menu setting procedures (→43) [Rec Quality] Set the picture size of motion pictures. ■ Recording mode: ■ Settings: Picture Quality Picture Size No. of Frames Picture Aspect Ratio [HD] 1280x720 16:9 [VGA] 640x480 30 fps... -
Page 92: Different Playback Methods [Playback Mode]
Different playback methods [Playback Mode] Recorded pictures can be played back in a variety of ways. Press the Playback button Press [MENU/SET] Use cursor button to select [Playback Mode] menu and press [MENU/SET] Use cursor button to select the playback method and press [MENU/SET] •... -
Page 93: [Slide Show]
Different playback methods [Playback Mode] • For switching [Playback Mode] (→92) [Slide Show] Automatically play pictures in order. Recommended when viewing on TV screen. Use cursor button to select the playback method and press [MENU/SET] [All] Play all. [Category Select category and play back motion or still pictures. Selection] (Select category with cursor button and press [MENU/SET].) (→94) Use cursor button to set playback effects and press [MENU/... -
Page 94: [Category Selection]
Different playback methods [Playback Mode] • For switching [Playback Mode] (→92) [Category Selection] You can narrow down the pictures displayed to view only a selected category. Select category with cursor button and press [MENU/SET] Recording information such as Scene Modes [Portrait] / / [Night Portrait] / / [Baby]... -
Page 95: Retouching Pictures [Creative Retouch]
Retouching pictures [Creative Retouch] You can retouch recorded still pictures by selecting the effect that you want to apply. • New pictures are created after editing pictures with [Creative Retouch]. Before starting to edit, make sure that there is enough free space in the built-in memory or memory card. -
Page 96: [Toy Effect]
Retouching pictures [Creative Retouch] For the setting procedures of [Creative Retouch] (→95) [Toy Effect] This effect reduces peripheral brightness to give the impression of a toy camera. ■ Adjusting color Use cursor button to adjust coloring, then press [MENU/SET] • Settings: Orangish color Bluish coloring [Miniature Effect] This effect blurs peripheral areas to give the impression of a diorama. -
Page 97: Using The [Playback] Menu
Using the [Playback] menu You can edit the picture (for example, cropping), and set a protection setting in the picture. • For [Playback] menu display and operation methods (→43) ● In the following cases, new pictures are created after they have been edited. Before starting to edit, make sure that there is enough free space in the built-in memory or memory card. - Page 98 Using the [Playback] menu ■ [MULTI] Use cursor button to select [MULTI] and press [MENU/SET] Use cursor button to select size and press [MENU/SET] Use cursor button to select a still picture and press [DISP.] button (up to 50 pictures) •...
-
Page 99: [Cropping]
Using the [Playback] menu • For [Playback] menu display and operation methods (→43) [Cropping] Enlarge your still pictures and crop unwanted areas. Use cursor button to select a still picture, and then press [MENU/SET] Select area to crop and press [MENU/SET] Expand Change position •... -
Page 100: [Protect]
Using the [Playback] menu • For [Playback] menu display and operation methods (→43) [Protect] Set protection to disable picture deletion. Prevents deletion of important pictures. Use cursor button to select [SINGLE] or [MULTI] and press [MENU/SET] Use cursor button to select picture and press [MENU/SET] ●... -
Page 101: [Copy]
Identically-named files will not be copied from card to built-in memory ( ● The following setting is not copied. Set it again after copying: - [Protect] ● Only pictures from Panasonic digital cameras (LUMIX) may be copied. - 101 - VQT4V99... -
Page 102: Viewing On Tv Screen
Viewing on TV screen You can view pictures on a TV screen by connecting your camera to your TV with the AV cable (supplied). ● Do not use any other AV cables except the supplied one. Doing so may cause malfunction of the camera. - Page 103 Viewing on TV screen ■ When TVs, DVD recorders or Blu-ray disc recorders have an SD card slot Insert the SD Memory Card into the SD card slot • Still pictures can be played back. • You may not be able to play back panorama pictures. Also you cannot perform automatic scrolling playback of panorama pictures.
-
Page 104: Using With Your Pc
(Do not format the card. This will erase recorded pictures.) If the card is not recognized, refer to the following support website. http://panasonic.net/avc/sdcard/information/SDXC.html • You can use pictures copied to your computer for printing, attaching them to e-mail, or other operation. -
Page 105: Using The Supplied Software
Using with your PC Using the supplied software The supplied CD-ROM contains the following software. Install the software on your computer before using. ■ PHOTOfunSTUDIO 9.0 LE (Windows XP / Vista / 7 / 8) This software allows you to import still pictures and motion pictures to a PC as well as organize by categorizing them based on their recording date or the model name of the camera used. -
Page 106: Installing Supplied Software (Photofunstudio)
Using with your PC Installing supplied software (PHOTOfunSTUDIO) Before inserting the CD-ROM, close all running applications. Check the environment of your PC Operating environment of PHOTOfunSTUDIO 9.0 LE Windows XP (32 bit) SP3 Windows Vista (32 bit) SP2 Windows 7 (32 bit/64 bit) and SP1 Windows 8 (32 bit/64 bit) Windows XP Pentium III 500 MHz or higher... -
Page 107: Copying Still Pictures And Motion Pictures
Using with your PC Copying still pictures and motion pictures Getting Ready: • Use batteries with sufficient power. • When importing pictures from the built-in memory, remove any memory cards. • Turn on the camera and computer. Connect camera to computer Check the plug direction and insert it straight in. - Page 108 Using with your PC ■ Folder and file names on computer DCIM (Still/motion pictures) 100_PANA (Up to 999 pictures/folder) P1000001.JPG ● Windows JPG: Still pictures P1000999.JPG Drives are displayed MOV: Motion Pictures 101_PANA in “My Computer” or “Computer” folder. 999_PANA ●...
-
Page 109: Printing
Printing You can connect directly to a PictBridge-compatible printer for printing. • Some printers can print directly from the camera’s memory card. For details, see the manual for your printer. Getting Ready: • Use batteries with sufficient power. • When printing pictures from the built-in memory, remove any memory cards. •... -
Page 110: Printing Multiple Pictures
Printing ● Do not use any other USB connection cables except the supplied one. Doing so may cause malfunction of the camera. ● Disconnect USB connection cable after printing. ● Turn off the camera before inserting or removing memory cards. ●... -
Page 111: Making Print Settings On The Camera
Printing Making print settings on the camera Setting options include the number of printed pictures and their size. Make settings before selecting [Print start]. Use cursor button to select the item and press [MENU/SET] Item Settings [Print with [ON] / [OFF] Date] [Num.of Set number of pictures (up to 999 pictures) -
Page 112: Printing With Date And Text
Printing Printing with date and text ■ Printing in store Only recording date can be printed. Request date printing in store. • When printing still pictures with a 16:9 aspect ratio, check in advance that the store can accept this size. ■... -
Page 113: List Of Lcd Monitor Displays
List of LCD monitor displays Screens shown here are only examples. The actual display may vary. • Press the [DISP.] button to change display. ■ In recording Recording Mode (→26) Focus range Recording quality (→91) Zoom (→53) Picture Size (→80) Quality (→81) Flash (→56) ISO Sensitivity (→81) - Page 114 List of LCD monitor displays Screens shown here are only examples. The actual display may vary. • Press the [DISP.] button to change display. ■ In playback Playback Mode (→92) Recording date/time Age in years/months (→78) Protected picture (→100) ISO Sensitivity (→81) Date stamped display (→90) Aperture value/Shutter speed (→65) Color Mode (→88)
-
Page 115: Message Displays
Message displays Meanings of and required responses to major messages displayed on LCD monitor. [This memory card cannot be used] ● Not compatible with the camera. → Use a compatible card. [Some pictures cannot be deleted] [This picture cannot be deleted] ●... - Page 116 Message displays [Insert SD card again] [Try another card] ● Access to card has failed. → Turn off the camera and remove the card. Reinsert the card and turn the camera on again. ● Try with a different card. [Memory card parameter error] ●...
- Page 117 Q&A Troubleshooting Try checking these items (→117 - 122) first. If the problem persists, performing [Reset] in the [Setup] menu may resolve the issue. (Note that except for some items such as [Clock Set], all settings are returned to their values at the time of purchase.) Battery, power The camera turns off immediately even with full battery power.
-
Page 118: Q&A Troubleshooting
Q&A Troubleshooting Recording (continued) Recorded pictures are blurred. Image Stabilizer ineffective. ● Shutter speed is slower in dark locations and Image Stabilizer is less effective. → Hold camera firmly with both hands, keeping arms close to body. → Set [Sensitivity] to [AUTO] and [Digital Zoom] to [OFF]. (→81, 86) Cannot use [Auto Bracket]. - Page 119 Q&A Troubleshooting LCD monitor Brightness is unstable. ● Aperture value is set while shutter button is pressed halfway. (Does not affect recorded picture.) This symptom may also occur when the brightness changes because the zoom is operated or the camera is moved. This is the automatic aperture operation of the camera and is not a malfunction. Monitor flickers indoors.
- Page 120 Motion pictures (Motion JPEG) recorded with this camera may not be played on digital cameras of other manufacturers. Additionally, motion pictures recorded with this camera cannot be played on Panasonic LUMIX digital cameras sold before July 2008. (However, motion pictures recorded with LUMIX digital cameras sold before this date can be played on this camera.)
- Page 121 Computer does not recognize card. (When using an SDXC Memory Cards) → Check whether your computer is compatible with SDXC Memory Cards. http://panasonic.net/avc/sdcard/information/SDXC.html → A message prompting you to format the card may appear when you connect it. Do not format the card.
- Page 122 Q&A Troubleshooting Others Menu not displayed in desired language. ● Change [Language] setting (→51). Camera rattles if shaken. ● This sound is made by the lens movement and is not a fault. Red lamp illuminated when pressing shutter button halfway in dark locations. ●...
-
Page 123: Usage Cautions And Notes
Usage cautions and notes When in use ● Camera may become warm if used for long periods of time, but this is not a fault. ● Keep this unit as far away as possible from electromagnetic equipment (such as microwave ovens, TVs, video games etc.). •... - Page 124 Usage cautions and notes Memory cards ● To prevent damage to cards and data • Avoid high temperatures, direct sunlight, electromagnetic waves, and static electricity. • Do not bend, drop, or expose to strong impacts. • Do not touch terminals on reverse of card or allow them to become dirty or wet. ●...
- Page 125 Usage cautions and notes Batteries ● Be sure to remove the batteries from the camera if you are not using it for a long period of time. • If the batteries are left in the camera, a small electrical current continues to flow even when the camera is turned off and the batteries will be gradually drained.
- Page 126 Usage cautions and notes Rechargeable Ni-MH batteries ● You can use Ni-MH batteries after charging them with a dedicated battery charger. However, improper handling of the batteries may cause leakage, heat generation, fire or an explosion. Observe the following. • If there is dirt on the battery poles, you may not be able to charge the batteries normally.
- Page 127 • Data containing personal information can be altered or lost due to malfunction, static electricity, accidents, breakdowns, repairs, or other operations. Panasonic will not be liable for any damage that occurs, direct or indirect, as a result of the alteration or loss of data containing personal information.
- Page 128 • SDXC Logo is a trademark of SD-3C, LLC. • QuickTime and the QuickTime logo are trademarks or registered trademarks of Apple Inc., used under license therefrom. • Windows and Windows Vista are either registered trademarks or trademarks of Microsoft Corporation in the United States and/or other countries.