Advertisement
Table of Contents
- 1 Table of Contents
- 2 Introduction
- 3 Important Safety Instructions
- 4 Limited Warranty
- 5 Rear Panel Connections
- 6 Connections
- 7 Front Panel Controls
- 8 Remote Control
- 9 Custom Installation Use
- 10 CAP5 Protection System
- 11 Technical Specifications
- 12 Troubleshooting
- Download this manual
See also:
Service Manual
Advertisement
Table of Contents

Related Manuals for Cambridge Audio AZUR 550A


Summary of Contents for Cambridge Audio AZUR 550A
- Page 1 Integrated amplifier User’s manual azur 550A/650A Your music + our passion...
-
Page 2: Table Of Contents
Contents Introduction Introduction ....................2 Thank you for purchasing this Cambridge Audio Azur 550A or 650A amplifier. We are confident that you will enjoy many years of listening pleasure from it. Important safety instructions..............3 Developed as part of our on-going research and development regime, Limited warranty .................. -
Page 3: Important Safety Instructions
(2009/125/EC) Directives when used and installed according to this instruction manual. For continued compliance only Cambridge Audio the apparatus. accessories should be used with this product and servicing must be 11. -
Page 4: Limited Warranty
Cambridge Audio product, Positioning it can be returned by your dealer to Cambridge Audio or an authorised Cambridge Audio service agent. You will need to ship this product in either Choose the installation location carefully. Avoid placing it in direct sunlight its original packaging or packaging affording an equal degree of or close to a source of heat. -
Page 5: Rear Panel Connections
If you’re unsure, please consult your turntable user manual. Pre-Out Connect these sockets to the inputs on an external power amplifier(s), such as Cambridge Audio’s 840W model, or an active subwoofer, etc. -
Page 6: Connections
Connections When designing our amplifiers we include features that allow you to connect your system in various ways. The inclusion of features such as Pre-Out and Speaker B connections mean that you can flexibly configure your system depending on your requirements. Basic connection The diagram below shows the basic connection of your amplifier to a CD player and a pair of loudspeakers. - Page 7 Pre-Out connections The Pre-Out sockets are for connecting to the input sockets of a power amplifier, such as Cambridge Audio’s 840W model, or active subwoofer. The diagram below shows how to connect the amplifier to an active subwoofer via the Line In inputs on the subwoofer.
-
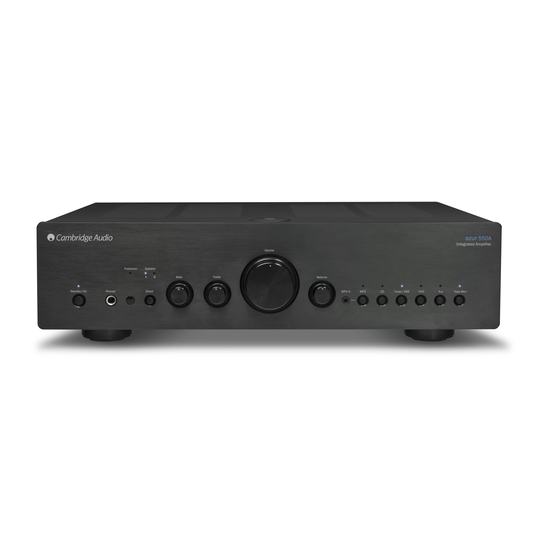
Page 8: Front Panel Controls
Front panel controls Standby/On Volume Switches the unit between Standby mode (indicated by dim power LED) Use to increase or decrease the level of the sound from the outputs of the and On (indicated by bright power LED). Standby is an eco power mode amplifier. -
Page 9: Remote Control
12 seconds a “Mute On” command will be generated. If the button is held down for a further 12 seconds, a “Mute Off” command is generated. A full code table for this product is available on the Cambridge Audio website at www.cambridge-audio.com. -
Page 10: Cap5 Protection System
CAP5: Five-way protection system Cambridge Audio has developed a proprietary protection system to 4. Short-circuit detection ensure reliability and long life of its amplifiers. This protection system Indicator – As the unit attempts to come out of Standby mode, the comprises five main protection methods:... -
Page 11: Technical Specifications
azur 550A/650A Technical specifications Troubleshooting 550A There is no power Power output 60 watts (into 8Ω) Ensure the AC power cord is connected securely. THD (unweighted) <0.002% @ 1kHz, 80% of rated power Ensure the plug is fully inserted into the wall socket and is switched on. <0.05% 20Hz - 20kHz, 80% of rated Check the unit is switched on at the rear panel. - Page 12 Cambridge Audio is a brand of Audio Partnership Plc Registered Office: Gallery Court, Hankey Place London SE1 4BB, United Kingdom Registered in England No. 2953313 www.cambridge-audio.com © 2010 Cambridge Audio Ltd...