Fluke Thermal Imagers Ti10 User Manual
Thermal imagers
Hide thumbs
Also See for Thermal Imagers Ti10:
- Manual supplement (4 pages) ,
- User manual (17 pages) ,
- Technical data (3 pages)

Related Manuals for Fluke Thermal Imagers Ti10


Summary of Contents for Fluke Thermal Imagers Ti10
-
Page 1: Users Manual
Ti10, Ti25, TiR and TiR1 Thermal Imagers Users Manual PN 2803044 August 2007 © 2007 Fluke Corporation, All rights reserved. Printed in USA All product names are trademarks of their respective companies. - Page 2 Fluke authorized resellers shall extend this warranty on new and unused products to end-user customers only but have no authority to extend a greater or different warranty on behalf of Fluke. Warranty support is available only if product is purchased through a Fluke authorized sales outlet or Buyer has paid the applicable international price.
-
Page 3: Table Of Contents
Table of Contents Introduction ... 1 Contacting Fluke ... 1 Safety Information... 2 Unpacking the Imager ... 3 Charging the Battery... 3 Turning the Imager On and Off ... 3 Features and Controls ... 3 Using the Menu ... 5 Changing the Displayed Language... - Page 4 Ti10, Ti25, TiR and TiR1 Users Manual Changing the SD Card ... 15 Setting the Backlight... 15 General Specifications ... 15 Detailed Specifications ... 17...
-
Page 5: List Of Tables
Table Symbols ... 2 Features and Controls ... 4 Figure Range and Span Settings ... 8 List of Tables Title List of Figures Title Page Page... - Page 6 Ti10, Ti25, TiR and TiR1 Users Manual...
-
Page 7: Introduction
Introduction The Fluke Ti10, Ti25, TiR, and TiR1 Thermal Imagers (hereafter “the Imager”) are handheld imaging cameras used for predictive maintenance, equipment troubleshooting, and verification. All four Imagers produce thermal and visual images on a 640 X 480 display. Thermal and visual images are displayed on the Imager LCD and can be saved to an SD Memory card. -
Page 8: Safety Information
European Free Trade Association. Imager connected to battery charger. On Off Symbol Do not dispose of this product as unsorted municipal waste. Go to Fluke's website for recycling information. W Warning Table 1. Symbols Symbol Battery charging. Important information. See manual. -
Page 9: Unpacking The Imager
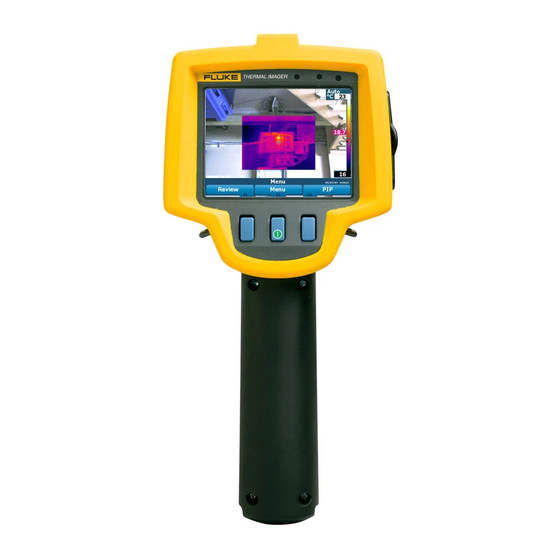
Unpacking the Imager Carefully unpack the following items: Ti10, Ti25, TiR or TiR1 Imager AC Power Adapter/Charger Rugged Carrying Case SD Memory Card SD Card Reader Soft Transport Bag User Manuals (in various languages) SmartView™ Software Warranty Registration Card Charging the Battery Before using the Imager for the first time, charge the battery for at least two hours. - Page 10 Ti10, Ti25, TiR and TiR1 Users Manual Table 2. Features and Controls Item LCD Display Function Softkeys (F1. F2, and F3) Battery Cover Speaker Microphone Auto backlight sensor Hand strap AC adapter/charger input terminal Description exj01.eps...
-
Page 11: Using The Menu
Table 2. Features and Controls (cont.) Item SD memory card compartment Retractable Lens Cover Visual camera Thermal (IR) camera Focus control Trigger Using the Menu The menus, coupled with the three softkeys (c, a, and d), provide access for setting features (date, time, language, units, backlight and spot temperatures), thermal image display, and saving and viewing stored images. -
Page 12: Setting The Date
Ti10, Ti25, TiR and TiR1 Users Manual Setting the Date To set the date: Press a until Date appears over the F1 softkey. Press the softkey labeled Date. The date can be displayed in one of two formats: MM/DD/YY or DD/MM/YY. Press the softkey labeled with the desired date format. -
Page 13: Saving Imager Data
Minimum focus distance for thermal (IR) camera is 15 cm (approx. 6 inches). Minimum focus distance for visible (visual) light camera is 46 cm (approx. 18 inches). The Imager can save the image as a simple picture or as a radiometric image that allows further temperature analysis. -
Page 14: Selecting A Palette
Ti10, Ti25, TiR and TiR1 Users Manual Selecting a Palette The palette menu provides different thermal viewing patterns. Grayscale, Blue- Red, High Contrast, and Ironbow are available in all four Imagers. The TiR1 and Ti25 add Amber and Hot Metal to the list. To select a palette: Press a until Palette appears over c. -
Page 15: Setting The Level (Manual)
Level Figure 1. Range and Span Settings Setting the Level (Manual) When put into manual ranging, the level setting adjusts the thermal span within the total temperature range of the Imager. See Figure 1. To set the level: After entering the manual range mode (See the “Setting the Range” section above), press the softkey labeled Level. -
Page 16: Switching Between Pip And Full Ir (Ti10 And Tir Only)
Ti10, Ti25, TiR and TiR1 Users Manual Press the softkey labeled Increase to widen the temperature span or Decrease to narrow it. Press the softkey labeled Done to set the Imager’s range level. Switching Between PIP and Full IR (Ti10 and TiR Only) The Imager can be set to display a full infrared image (Full IR) or an infrared image surrounded by a visual light image (Picture-in-Picture / PIP). -
Page 17: Adding Voice Annotation To Saved Data (Ti25 And Tir1 Only)
Adding Voice Annotation to Saved Data (Ti25 and TiR1 Only) Press the softkey labeled Up to display the previous image or Down to display the next stored image. To delete a single Image from the SD card: Perform the steps under viewing stored images above to bring the desired image to the display. -
Page 18: Listening To Voice Annotations (Ti25 And Tir1 Only)
Ti10, Ti25, TiR and TiR1 Users Manual Listening to Voice Annotations (Ti25 and TiR1 Only) To play the voice annotation already stored with an image on the SD card: Perform the steps in the “Reviewing and Deleting Stored Images” section to bring the desired image to the Imager’s display. -
Page 19: Setting Emissivity (Ti25 And Tir1 Only)
the object's surface. The Imager detects the infrared energy from an object and uses this information to estimate the temperature of the object. Most of the objects measured such as painted metal, wood, water, skin, and cloth are very efficient at radiating energy and it is easy to get very accurate measurements. For surfaces that are efficient at radiating energy (high emissivity), the emissivity factor is estimated to be 95% (or 0.95). -
Page 20: Setting File Format
Bitmap (.bmp) images can be transferred to a PC and used immediately in non- proprietary software and electronic documents. Images in “.is2” format can be transferred to a PC for further analysis and report generation through Fluke SmartView™ software or non-Fluke software which is available from specially approved software vendors. -
Page 21: Changing The Sd Card
Changing the SD Card To eject an SD card from the Imager, press in on the exposed edge of the SD card and then release. The card should pop partially out after releasing it. Carefully pull the card out of the slot. The SD Card can be inserted and removed while the Imager is in operation. - Page 22 Ti10, Ti25, TiR and TiR1 Users Manual Software...SmartView™ full analysis and Power Battery ...Rechargeable battery pack (included) Battery Life...3 to 4 hours continuous use (assumes Battery Charge Time ...2 hours full charge with ac adapter or AC Operation/Charging ...AC adapter/charger (110 – 220 Vac, Power Saving...Sleep Mode activated after 5 minutes Safety Standards CE Directive ...IEC/EN 61010-1 2...
-
Page 23: Detailed Specifications
Detailed Specifications Temperature Measurements Temperature Range (not calibrated below -10 C) TiR and TiR1 ... -20 C to +100 C Ti10 ... -20 C to +250 C Ti25 ... -20 C to +350 C Accuracy TiR and Ti10 ... 5 C or 5 % (whichever is greater) TiR1 and Ti25 ... - Page 24 Ti10, Ti25, TiR and TiR1 Users Manual Ti10...5 C Ti25, TiR, and TiR1 ...2.5 C Minimum span (in auto mode) Ti10...10 C Ti25, TiR, and TiR1 ...5 C ® IR-Fusion Information Visual and IR Blending (Ti25 and TiR1 only) Picture-In-Picture (PIP) Ti10 and TiR ...100 % IR displayed in center 320 x Ti25 and TiR1...Three levels of on-screen IR blending Full Screen (PIP off)