Table of Contents
Advertisement
Available languages
Available languages
Advertisement
Chapters
Table of Contents

Related Manuals for Korg Kaossilator Pro


Summary of Contents for Korg Kaossilator Pro
- Page 3 AC adapter from the wall outlet. Then con- ment. Since the correct method of disposal will tact your nearest Korg dealer or the store where the depend on the applicable laws and regulations in equipment was purchased.
-
Page 4: Table Of Contents
MIDI connections ........20 Selecting the audio input ......8 MIDI settings ......... 20 Using the gate arpeggiator ..... 8 Using the KAOSSILATOR PRO as a MIDI Specifying the scale ....... 9 controller ..........22 Specifying the key ........9 Specifications ......24... -
Page 5: Introduction
ATOR PRO dynamic phrase synthesizer / loop input. The four loop recording banks can be recorder. To enjoy the KAOSSILATOR PRO to used simultaneously, and also support BPM- the fullest potential, please read this manual synchronized loop playback. -
Page 6: Getting Ready
PHONES jack. KAOSSILATOR PRO’s LINE IN jacks. Always make connections with the power turned off. TIP: The KAOSSILATOR PRO’s sound will still be Careless operation can damage your speaker system or output from the LINE OUT jacks even if headphones cause malfunctions. -
Page 7: Operation
The input sound cannot be output directly (unprocessed by the effect) while you’re using the touch pad. 1. Connect the KAOSSILATOR PRO to your TIP: For some programs, the sound will continue other equipment as shown in the diagrams even after you take your finger off the touch pad. -
Page 8: Selecting The Audio Input
TIP: For some programs, the sound may stop even if the Hold function is enabled. Selecting the audio input When you touch the touch pad, you’ll hear the sound produced by the automatic tapping of Use the INPUT SELECT switch to select the the gate arpeggiator. -
Page 9: Specifying The Scale
Specifying the key BPM value means a faster tempo. Viewing the BPM Here’s how to specify the root note of the When you turn on the KAOSSILATOR PRO, scale. 1. Press the KEY button. the BPM will be set to 120.0. -
Page 10: Storing Settings To A Program Memory
TIP: The phrases you recorded will be lost when you TIP: If you want the KAOSSILATOR PRO to receive turn off the power. If you want to save your phrases, Timing Clock and Touch Pad On messages, go to write them to an SD card (→p.17) before you turn off... - Page 11 4. When you want to start recording again, Specifying the length of the phrase to be re- press the LOOP RECORDER BANK button corded 1. Hold down the SHIFT button and press once again to start recording. 5. When you press the REC button, record- one of the LOOP RECORDER BANK buttons.
- Page 12 Playing a recorded phrase • Phrase recording time If you change the BPM value, the change will Press the LOOP RECORDER BANK button affect the playback speed while recording a that you want to play; it will begin playing. To phrase and will be recorded.
- Page 13 TIP: If desired, you can erase more than one loop TIP: Except for the audio input source, the KAOSSILA- recorder bank at the same time. TOR PRO will not produce sound while a phrase is being deleted. TIP: Erasure will take the same length of time as the length of the phrase that’s currently assigned.
-
Page 14: Function Settings
LATOR PRO (→p.18: Loading from an SD Procedure for Function settings card). [3] SAVE 1. Hold down the SHIFT button and press one Saves data from the KAOSSILATOR PRO to of the PROGRAM MEMORY buttons 1–8. the SD card (→p.17: Saving to SD card). [4] MIDI Adjusts MIDI-related settings (→p.20: MIDI functions). - Page 15 In order to operate with SYNC turned off, you must ei- ther start just after turning on the KAOSSILATOR PRO, or initialize all banks, and then match the length of the phras- es before you record. Even if SYNC turns on automatically,...
-
Page 16: Using An Sd Card
KAOSSILATOR PRO. Don’t use your computer or digital right. camera to format (initialize) a card you plan to use with the KAOSSILATOR PRO. If the card was formatted on a differ- ent device, it may not work correctly with the KAOSSILA- TOR PRO. -
Page 17: Checking The Remaining Capacity Of The Card
Use Before you can use an SD card, you must format it on the KAOSSILATOR PRO. The card may not work if it was the PROGRAM/BPM knob to select the file formatted on another device. -
Page 18: Loading From An Sd Card
(initialize) a card that you plan to use with the KAOSSILA- 1. Hold down the SHIFT button and press the TOR PRO. You must use the KAOSSILATOR PRO to per- form the formatting operation. If the card was formatted PROGRAM MEMORY 2 (LOAD) button. - Page 19 The display will indicate “buSy.” TIP: Since WAVE and AIFF files do not contain the tempo or length settings needed for playback on the KAOSSILATOR PRO’s loop recorder, the tempo and length will automatically be set to appropriate values when the file is loaded. If the data is longer than can 3.
-
Page 20: Midi Functions
MIDI messages as via the sages are compatible between them. You can MIDI connectors. download the KAOSSILATOR PRO’s MIDI In order to use the KAOSSILATOR PRO Edi- implementation chart from the Korg website. tor, you must connect the KAOSSILATOR (http://www.korg.com) PRO to your computer via USB. -
Page 21: Applying The Midi Message Filter
Transmit/receive note messages Setting the MIDI channel – LOOP REC BANK buttons Here’s how to set the KAOSSILATOR PRO’s MIDI channel. Transmit control change messages 1. Hold down the SHIFT button and press PROGRAM MEMORY 4 (MIDI). 2. Use the PROGRAM/BPM knob to select Pad Touch “MSSG,”... -
Page 22: Using The Kaossilator Pro As A Midi Controller
Assignments for the MIDI messages transmit- ted in External Control mode are made using the KAOSSILATOR PRO Editor. TIP: The KAOSSILATOR PRO Editor can be down- loaded free of charge from the Korg website (http:// www.korg.com). For details on how to adjust these settings, please refer to the documentation included with the KAOSSILATOR PRO Editor. - Page 23 You can use the following controllers in External Control mode. If note numbers are assigned to the touch pad, you can also specify the scale, key, and note range in the same way as when the KAOSSILATOR PRO operates as a synthesizer. Controller...
-
Page 24: Specifications
Specifications Number of programs 200 (including 15 effect programs) Main controllers Touch pad, GATE ARP TIME/SPEED slider Display 4-digit LED display Connectors OUTPUT (stereo, RCA jacks), LINE IN (stereo, RCA jacks), MIC IN (unbalanced 6.3 mm phone jack), HEADPHONES (6.3 mm stereo phone jack), MIDI IN/OUT, USB (type B) Power supply DC9V... - Page 25 Veillez à ne pas laisser tomber des objets métalli- ques dans le boîtier (trombones, par ex.). Si cela se produit, débranchez l’alimentation de la prise de cou- rant et contactez votre revendeur korg le plus proche ou la surface où vous avez acheté l’instrument.
-
Page 26: Program List
PROGRAM LIST........95 Réglage du BPM ........31 SCALE LIST .......... 99 Sauvegarde des réglages dans une mé- Eléments du Kaossilator PRO et leurs moire de programme ......32 fonctions ..........100 Enregistrement en boucle ....32 Réglages de fonctions ....36 Réglage des fonctions ...... -
Page 27: Introduction
En plus des prises MIDI IN/OUT, le KAOSSI- du KAOSSILATOR PRO, veuillez lire attenti- LATOR PRO propose un port USB vous per- vement ce manuel et utiliser l’instrument de la mettant de transférer vos données de boucles manière préconisée. -
Page 28: Préparations
PHONES. ses LINE IN du KAOSSILATOR PRO. Pour effectuer les connexions, mettez toujours les ASTUCE: Le son du KAOSSILATOR PRO est toujours appareils concernés hors tension. Une mauvaise utilisa- envoyé aux prises LINE OUT même quand vous tion risque d’endommager vos enceintes ou d’entraîner un branchez un casque. -
Page 29: Fonctionnement
Si vous 1. Branchez le KAOSSILATOR PRO à votre touchez le pad tactile alors qu’il n’y a pas de signal matériel en vous référant aux illustrations des d’entrée, vous n’entendez rien. -
Page 30: Sélection De La Source Audio
Utiliser la fonction ‘Gate Arpeggiator’ Pour couper le son maintenu, appuyez à nou- veau sur le bouton SHIFT: le son s’arrête. Appuyez sur le bouton GATE ARP. Il clignote et la fonction “Gate Arpeggiator” est activée. ASTUCE: La position de la LED allumée sur le pad peut varier selon la façon dont vous avez touché... -
Page 31: Sélection De La Gamme (Scale)
1. Appuyez sur le bouton KEY. BPM est élevée, plus le tempo est rapide. Affichage du BPM Quand vous mettez le KAOSSILATOR PRO sous tension, le BPM est réglé sur 120,0. Si 2. Tournez la commande PROGRAM/BPM l’afficheur indique le numéro du programme pour choisir la tonique voulue. -
Page 32: Sauvegarde Des Réglages Dans Une Mémoire De Programme
KAOSSILATOR PRO. TAP TEMPO en suivant la pulsation du mor- 2. Appuyez sur le bouton WRITE. ceau. Le KAOSSILATOR PRO détecte la vi- Le bouton PROGRAM MEMORY et le bouton tesse à laquelle vous appuyez sur le bouton. Il WRITE clignotent. - Page 33 LOOP RECORDER BANK et REC clignotent: 3. Pour ajouter un nouvel enregistrement à la le KAOSSILATOR PRO est prêt pour l’enregis- phrase, maintenez le bouton LOOP RECOR- trement. DER BANK enfoncé et appuyez sur le bouton 2.
- Page 34 Si vous raccourcissez la durée de reproduc- maximum est de 16 temps si le réglage BPM est égal ou supérieur à 108,5, de 8 temps si le réglage BPM tion, la phrase est reproduite en boucle selon est inférieur à 108,5, de 4 temps si le réglage BPM la durée spécifiée.
- Page 35 ASTUCE: Vous pouvez effacer le contenu de plusieurs ASTUCE: A l’exception du signal d’entrée audio, le banques simultanément. KAOSSILATOR PRO ne produit aucun son durant la suppression d’une phrase. ASTUCE: La durée de l’effacement correspond à la durée de la phrase choisie.
-
Page 36: Réglages De Fonctions
ASTUCE: Vous pouvez télécharger “KAOSSILATOR nir à la page précédente. PRO Editor” du site Internet Korg. (http://www.korg. com) Scrl: Détermine la vitesse de défilement du texte. Ce paramètre règle la vitesse de défi- lement du texte. - Page 37 Même si la fonction SYNC s’active automatiquement, elle ne change pas le ré- glage SYNC. Il suffit donc de mettre le KAOSSILATOR PRO hors tension puis à nouveau sous tension pour couper la synchronisation.
-
Page 38: Utilisation D'une Carte Sd
Avant d’utiliser la carte SD, il faut la formater sur le être orientés vers le bas et le coin “écorné” se KAOSSILATOR PRO. N’utilisez pas votre ordinateur ou ap- situer à votre droite. pareil photo numérique pour formater (initialiser) la carte que vous avez l’intention d’utiliser avec le KAOSSILATOR... -
Page 39: Vérifier La Capacité Résiduelle De La Carte
Fichier de réglages MIDI, Pad Avant d’utiliser une carte SD, il faut la formater sur le LED et Utility KAOSSILATOR PRO. La carte risque de ne pas fonctionner Les données “LoP.A”~“LoP.D”, si elle a été formatée sur un autre appareil. -
Page 40: Chargement D'une Carte Sd
KAOSSILATOR PRO. Effectuez 2. Utilisez la commande PROGRAM/BPM le formatage avec le KAOSSILATOR PRO. Si la carte a été pour sélectionner le type de données à char- formatée sur un autre appareil, elle risque de ne pas fonc- ger. - Page 41 Vous risqueriez SHIFT enfoncée. L’afficheur indiquera “rdy”. d’endommager les données. 4. Pour examiner le contenu de la carte KAOSSILATOR PRO, ouvrez le disque ajouté à votre ordinateur à l’étape 2. Le contenu de la carte du KAOSSILATOR Copiez les données souhaitées dans votre or- PRO ne sera pas visible sur votre ordinateur dinateur.
- Page 42 ASTUCE: Comme les fichiers WAVE et AIFF ne contiennent pas les données de tempo ou de lon- gueur nécessaires pour la reproduction sur le KAOSSILATOR PRO, des réglages de tempo et de longueur adéquats sont automatiquement attribués lors du chargement du fichier. Si les données sont trop longues pour la banque, elles sont tronquées.
-
Page 43: L'ordinateur
Korg. Liaisons MIDI ASTUCE: Pour pouvoir établir une connexion USB, le pilote Korg USB-MIDI doit être installé sur votre ordi- Des câbles MIDI disponibles dans le commer- nateur. Téléchargez le pilote Korg USB-MIDI du site Internet de Korg (http://www.korg.com) et installez-le ce sont utilisés pour transmettre et recevoir... - Page 44 mande, fader etc.) dont l’assignation est à Si vous coupez l’alimentation sans sauvegarder vos modifier puis appuyez sur la commande PRO- réglages, les réglages par défaut sont rétablis et vous per- dez le fruit de votre travail. GRAM/BPM. Transmission/réception de messages de notes Réglage du canal MIDI Boutons LOOP REC BANK Voici comment régler le canal MIDI du KAOS- SILATOR PRO.
-
Page 45: Utilisation Du Kaossilator Pro Comme Contrôleur Midi
Les assignations des messages MIDI transmis en mode External Control sont effectuées au sein du logiciel “KAOSSILATOR PRO Editor”. ASTUCE: “KAOSSILATOR PRO Editor” peut être télé- chargé gratuitement du site Internet de Korg (http:// www.korg.com). Pour en savoir plus sur le réglage de ces paramètres, voyez la documentation accom-... - Page 46 Contrôleurs disponibles en mode External Control Vous pouvez utiliser les contrôleurs suivants en mode External Control. Si les numéros de note sont assignés au pad tactile, vous pouvez aussi déterminer la gamme, la tonique et la tessiture comme quand le KAOSSILATOR PRO fait office de synthétiseur. Controller Transmitted MIDI message (réglages d’usine) Axe X du Pad tactile Note on/off (#48–#72)* Axe Y du Pad tactile (entire range)
-
Page 47: Fiche Technique
Fiche technique Nombre de programmes 200 (dont 15 programmes d’effets) Contrôleurs principaux Pad tactile, Fader GATE ARP TIME/SPEED Ecran LED à 4 caractères Prises OUTPUT (prises stéréo RCA/cinch), LINE IN (prises stéréo RCA/cinch), MIC IN (mini-jack asymétrique de 6,3mm), HEADPHONES (mini- jack stéréo de 6,3mm), MIDI IN/OUT, USB (type B) Alimentation DC9V... - Page 48 Beschädigung des Geräts, Feuer oder ein elek-trischer Schlag die Folge sein. Beachten Sie, daß keinerlei Fremdkörper in das Gerät gelangen. Sollte ein Fremdkörper in das Gerät gelangt sein, so trennen Sie es sofort vom Netz. Wenden Sie sich dann an Ihren KORG-Fachhändler.
- Page 49 Anwahl der Tonart (KEY) .......54 PROGRAM LIST ........95 Anwahl des Notenbereichs (NOTE RAN- SCALE LIST ..........99 GE) ............54 Teile des Kaossilator PRO und ihre Funkti- Festlegen der Taktzahl (BPM) ....54 onen ............100 Speichern von Einstellungen in einem PROGRAM MEMORY ......55 Schleifenaufnahme .........56...
-
Page 50: Vorweg
Vielen Dank für Ihre Entscheidung zum dyna- ne erzeugte Signale, sondern auch die Signale mischen Phrasen-Synthesizer/Loop-Recorder der Line-Eingänge bzw. des Mikrofoneingangs KAOSSILATOR PRO von Korg. Um alle Funk- aufnehmen kann. Die vier Loop-Bänke können tionen des KAOSSILATOR PRO kennen zu simultan angesprochen werden. Die Schleifen lernen und über Jahre hinaus Freude daran zu... -
Page 51: Vorbereitungen
Sie es an die MIC-Buchse anschlie- Verbinden Sie die LINE OUT-Buchsen des ßen. KAOSSILATOR PRO mit den Eingängen eines Ein Sampler bzw. ein anderes Audiogerät muss Mischpults oder mit Ihren Aktivboxen (d.h. Bo- mit den LINE IN-Buchsen des KAOSSILATOR xen mit internem Verstärker). -
Page 52: Bedienung
Verwendung des Netzschalters liegt, werden beim Berühren des Pads keine Klänge erzeugt. Wenn Sie das Pad berühren, werden die ein- 1. Schließen Sie das KAOSSILATOR PRO gehenden Signale immer mit Effekt ausgegeben. wie auf den vorangehenden Seiten gezeigt an TIPP: Bei bestimmten Programmen wird die Tonaus- und verbinden Sie sein Netzteil mit einer Steck- gabe selbst nach Freigabe des Pads fortgesetzt. -
Page 53: Anwahl Eines Audio-Eingangssignals
TIPP: Die Position der leuchtenden Pad-Diode richtet Pad simulieren kann. Wie sich das auf die Wiederga- sich danach, wo und wie Sie das Pad drücken und be auswirkt, kann mit „Gate Time“ und „Gate Speed“ kann sich auch ändern. eingestellt werden. TIPP: Bestimmte Sounds können mit der „Hold“-Funk- Verwendung des ‘Gate Arpeggiators’... -
Page 54: Anwahl Der Skala
Betrachten der Taktzahl TIPP: Kurz nach der Anwahl dieser Einstellung zeigt das Display wieder die Speichernummer an. Wenn Beim Einschalten des KAOSSILATOR PRO ist Sie nicht so lange warten möchten, können Sie den die Taktzahl auf 120,0 eingestellt. SHIFT-Taster drücken. -
Page 55: Speichern Von Einstellungen In Einem Program Memory
Sobald die Einstellun- und stellt ihn ein. gen gespeichert sind, zeigt das KAOSSILATOR TIPP: Wenn Sie das KAOSSILATOR PRO mit einem PRO wieder die Program-Seite an. MIDI-Takt synchronisieren, steht „Tap Tempo“ nicht Schalten Sie das Gerät niemals aus, solange noch Da- zur Verfügung. -
Page 56: Schleifenaufnahme
Taster drücken, beginnen der LOOP RE- REC-Taster drücken, wird das eingehende Au- CORDER BANK- und REC-Taster zu blinken. diosignal aufgezeichnet. Das KAOSSILATOR PRO ist jetzt bereit für die 2. Geben Sie den REC-Taster wieder frei, um Aufnahme. die Aufnahme zu beenden. Sobald Sie den Tas- 2. - Page 57 3. Wählen Sie mit dem PROGRAM/BPM- Abspielen einer aufgezeichneten Phrase Knopf die gewünschte Phrasenlänge. Die Phra- Drücken Sie den LOOP RECORDER BANK- senlänge wird in Viertelnoten angegeben. Taster der gewünschten Phrase. Diese wird 4. Drücken Sie den SHIFT-Taster, um wieder jetzt abgespielt.
- Page 58 ändern. betreffende LOOP RECORDER BANK-Taster Während der Phrasenwiedergabe stellt das orange. KAOSSILATOR PRO den BPM-Wert in Abhän- 4. Wenn Sie alle überflüssigen Dinge gelöscht gigkeit jeweils eines Phrasenzyklus’ ein (d.h. für haben, müssen Sie den ERASE LOOP-Taster die Dauer zwischen dem Anfang und der an- erneut drücken (er erlischt).
- Page 59 BANK-Taster der änderungsbedürftigen Phrase ge- drückt, während Sie den ERASE LOOP-Taster betä- tigen. TIPP: Wenn Sie während des Löschvorgangs das Pad berühren, werden die gelöschten Daten durch die neuen Bewegungen ersetzt. Initialisieren einer Phrase Zum Initialisieren eines LOOP RECORDER BANK-Speichers müssen Sie folgendermaßen verfahren.
-
Page 60: Weiter Führende Funktionen
Einstellung einer Funktion wird die Beleuchtung leuchtet, können Sie die TAP TEMPO-Taste drücken, nicht aktiviert. um zur Vorseite zurückzuschalten. TIPP: Der „KAOSSILATOR PRO Editor“ steht auf der Korg-Webpage zum Download bereit. (http://www. korg.com) Scrl: Hiermit bestimmen Sie, wie schnell der Text durch das Pad rollt. - Page 61 Aufnahme für alle Phrasen dieselbe Länge wählen. Selbst wenn „SYNC“ automatisch aktiviert wird, hat sich nichts an der „SYNC“-Einstellung geändert. Wenn Sie das KAOSSILATOR PRO aus- und wieder einschal- ten, wird diese Einstellung aktiviert. [7] USB...
-
Page 62: Verwendung Einer Sd-Karte
Einlegen einer SD-Karte Neue SD-Karten kann man erst verwenden, nachdem man sie mit dem KAOSSILATOR PRO formatiert hat. For- Schieben Sie die SD-Karte richtig herum so matieren Sie Karten, die Sie mit dem KAOSSILATOR PRO weit in den Schacht, bis sie hörbar festklickt. -
Page 63: Überprüfen Der Restkapazität
M I D I , P a d - L E D u n d Neue SD-Karten kann man erst verwenden, nachdem man sie mit dem KAOSSILATOR PRO formatiert hat. Auf an- allgemeine Einstellungen deren Geräten formatierte Karten können nicht verwendet Der Inhalt von „LoP.A“–„LoP. -
Page 64: Daten Laden Von Einer Sd-Karte
Knopf den Datentyp, den Sie laden möchten. Ihrer Digital-Kamera. Alle Karten müssen grundsätzlich mit – Daten des Loop-Recorders dem KAOSSILATOR PRO formatiert werden. Karten, die Sie mit anderen Geräten formatieren, verhalten sich hinterher – Eine WAV- oder AIFF-Datei eventuell nicht erwartungsgemäß. - Page 65 4. Zum Betrachten der Inhalte der KAOSSILA- sen. TOR PRO-Karte öffnen Sie das Laufwerk, das Wenn Sie bereit sind den KAOSSILATOR PRO von Ihrem dem Computer in Schritt 2 hinzugefügt wurde. Computer abzutrennen, müssen Sie zuerst den USB-Modus Kopieren Sie die gewünschten Daten in Ihren beenden und dann das USB-Kabel abziehen.
- Page 66 TIPP: WAVE- und AIFF-Dateien enthalten weder Tem- po-, noch Längeninformationen, die vom Loop-Recor- der benötigt werden. Beim Laden einer solchen Datei nimmt das KAOSSILATOR PRO daher automatisch die notwendigen Einstellungen vor. Wenn eine Datei so lang ist, dass sie nicht in eine Bank passt, wird sie entsprechend gekürzt.
-
Page 67: Midi-Funktionen
Befehle von beiden Geräten unterstützt erlaubt auch den Austausch von MIDI-Befeh- werden. MIDI-Implementierungstabelle len. Zusätzlich bietet dieses Gerät aber MIDI- des KAOSSILATOR PRO steht auf der Korg- Buchsen. Webpage zum Download bereit. (http://www. Die USB-Verbindung des KAOSSILATOR PRO korg.com) mit dem Computer funktioniert erst nach der In- stallation von „KAOSSILATOR PRO Editor“. - Page 68 Einstellungen verwendet. BPM-Knopf. Übertragung/Empfang von Notenbefehlen Einstellen des MIDI-Kanals – LOOP REC BANK-Taster Der MIDI-Kanal des KAOSSILATOR PRO muss folgendermaßen eingestellt werden. Übertragung von Steuerbefehlen (CC) 1. Halten Sie den SHIFT-Taster gedrückt, während Sie PROGRAM MEMORY 4 (MIDI) Pad-Berührungen betätigen.
-
Page 69: Verwendung Des Kaossilator Pro Als Midi-Controller
PRO jedoch wie bei Anwahl von „Int“. 5. Wenn Sie diese Einstellung speichern TIPP: „KAOSSILATOR PRO Editor“ steht auf der Korg- Webpage kostenlos zum Download bereit (http:// möchten, müssen Sie den WRITE-Taster drü- www.korg.com). Alles Weitere zu den gebotenen Pa- cken. - Page 70 Bedienelemente im External Control-Modus Im External Control-Modus stehen folgende Bedienelemente zur Verfügung. Wenn dem Touch-Pad Notennummern zugeordnet sind, können Sie auch die Skala, die Tonart und den Notenbereich einstellen (genau wie bei Verwendung des KAOSSILATOR PRO als Synthesi- zer). Controller...
-
Page 71: Technische Daten
Technische Daten Anzahl der Speicher 200 (darunter 15 Effektprogramme) Wichtigste Bedienelemente Touch-Pad, GATE ARP TIME/SPEED-Regler Display 4 Zeichenpositionen, LED Anschlüsse OUTPUT (RCA/Cinch, stereo), LINE IN (RCA/ Cinch, stereo), MIC IN (unsymmetrische 6,3mm- K l i n k e n b u c h s e ) , H E A D P H O N E S ( 6 , 3 m m - Stereoklinkenbuchse), MIDI IN/OUT, USB (Typ B) Stromversorgung DC9V... -
Page 72: Program List
PROGRAM LIST No. Program Name X AXIS Y AXIS SCALE L.000 Synth Lead Note Cutoff L.001 Sync Note OSC Sync Pitch L.002 Sine Portamt Note Portamento L.003 LFO Squ Lead Note, LFO Speed LFO Depth L.004 PWM Lead Note Cutoff L.005 Micro Lead Note Portamento... - Page 73 No. Program Name X AXIS Y AXIS SCALE A.050 Duo Strings Note 2nd Strings Level A.051 Jazz Guitar Note Velocity A.052 Tenor Sax Note Breath Pressure A.053 Harmonica Note 2nd Reed Level A.054 Flute Note Breath Pressure B.055 House Bass Note Resonance B.056 Slap Bass...
- Page 74 No. Program Name X AXIS Y AXIS SCALE C.100 ArpeggioPuls Note Chord (Maj, min) C.101 Phaser Chord Note LFO Speed C.102 EL Chord Note Level C.103 Chord Seq Note Chord (Maj7, min7) C.104 FilterMod5th Note Cutoff, LFO Depth C.105 Pad Chord 2 Note Cutoff EG Int C.106 DecaySynChod...
- Page 75 Delay Time Delay Depth V.198 Audio-Filter LPF, HPF Cutoff V.199 Audio-Looper Looper Beat (No Assign) © 2010 KORG Inc. - all rights reserved All programs were made by KORG Inc. and "Yasushi.K" For more information about "Yasushi.K" visit http://www.net-yk.org/ http://www.myspace.com/yasushik...
-
Page 76: Scale List
SCALE LIST Display Scale Name Scale [Key C] C D � D E � E F G � G A � A B � B C CHR Chromatic ION Ionian C D E F G A B C C D E � F G A B � C DOR Dorian C D �... -
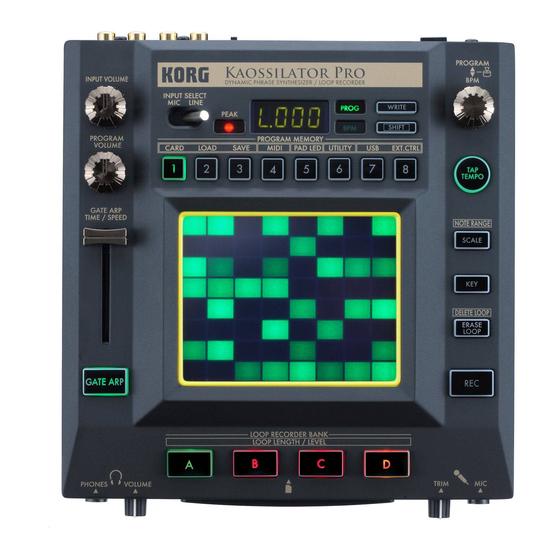
Page 77: Teile Des Kaossilator Pro Und Ihre Funktionen
Parts of the Kaossilator PRO and Eléments du Kaossilator PRO et their functions leurs fonctions Teile des Kaossilator PRO und ihre Funktionen... - Page 78 Top panel Panneau supérieur 1. Display 1. Ecran 2. PEAK indicator 2. Témoin PEAK (Crête) 3. INPUT SELECT switch 3. Commutateur INPUT SELECT (sélecteur 4. INPUT VOLUME knob d’entrée) 5. PROGRAM VOLUME knob 4. Commande INPUT VOLUME (volume en- 6. GATE ARP TIME/SPEED slider trant) 7.
- Page 79 Front panel Panneau avant 1. PHONES VOLUME knob 1. Commande PHONES VOLUME (volume du 2. PHONES output jack casque d’écoute) 3. MIC TRIM knob 2. Prise de sortie PHONES (prise pour cas- 4. MIC input jack que d’écoute) 5. SD Card Slot 3.
- Page 80 WARNUNG: Verwendung dieses Produkts in einem anderen Land als dem, für das es bestimmt ist, verwendet wird, kann gefährlich sein und die Garantie des Herstellers oder Importeurs hinfällig lassen werden. Bitte bewahren Sie diese Quittung als Kaufbeleg auf, da andernfalls 4015-2 Yanokuchi, Inagi-city, Tokyo 206-0812 Japan © 2010 KORG INC.