Table of Contents
Advertisement
Available languages
Available languages
Quick Links
Advertisement
Chapters
Table of Contents

Related Manuals for Korg Kaossilator Pro+


Summary of Contents for Korg Kaossilator Pro+
- Page 3 AC adapter from the wall outlet. Then contact with ordinary household waste. Disposing in the cor- your nearest Korg dealer or the store where the equip- rect manner will prevent harm to human health and ment was purchased.
-
Page 4: Table Of Contents
Using.an.SD.card......16 Table of Contents Inserting or removing SD cards .... 17 Checking the total capacity of the card 17 Introduction........5 Checking the remaining capacity of the Main features .......... 5 card ............17 Getting.ready........6 Formatting the SD card ......17 Connections .......... -
Page 5: Introduction
The KAOSSILATOR PRO+ contains loop re- corders that can record not only its own internal Thank you for purchasing the Korg KAOSSILA- sound, but it can also record from the line in- TOR PRO+ dynamic phrase synthesizer / loop puts or mic input. -
Page 6: Getting.ready
Getting ready Connections AC ADAPTER CD PLAYER MIXER, DJ MIXER Connecting your monitor amp or mixer to the Connecting your mic or audio source to the in- output jacks put jacks Connect the KAOSSILATOR PRO+’s LINE If you’re using a mic, connect it to the MIC jack. OUT jacks to your mixer or powered monitors If you want to connect a sampler or other audio (amplified speakers). -
Page 7: Operation
TIP: The initial factory setting is “EnA” for the Auto Operation Power Off function. Adjusting the volume Using the power switch 1. Use the PROGRAM VOLUME knob to ad- just the volume of the program. 1. Connect the KAOSSILATOR PRO+ to your 2. -
Page 8: Selecting The Audio Input
TIP: With the exception of when certain programs are Touch pad care selected, the audio that is input will be output directly. Never press the touch pad with excessive TIP: If you want to mute the audio input, you can either force, or place heavy objects on it. -
Page 9: Specifying The Scale
Specifying the scale Here’s how to specify the scale that’s assigned to the touch pad. GATE TIME: The slider will specify the duration of 1. Press the SCALE button. the sound as a percentage. Setting the GATE TIME to (100%) will produce legato play- ing. -
Page 10: Specifying The Bpm
TIP: Depending on the key and note range settings, BPM value will appear in the display, and that you might not hear sound, or noise might be heard. BPM value will be set. TIP: The note range for FULL will depend on the pro- TIP: You can’t use Tap Tempo if the KAOSSILATOR gram. -
Page 11: Loop Recording
4. When you want to start recording again, settings; the settings will be stored, and then the KAOSSILATOR PRO+ will return to the pro- press the LOOP RECORDER BANK button gram display. once again to start recording. 5. When you press the REC button, record- Never turn off the power or perform any other operations while settings are being stored. - Page 12 Specifying the length of the phrase to be recorded BANK button once again. 1. Hold down the SHIFT button and press one TIP: If you start playback from a state where all banks of the LOOP RECORDER BANK buttons. are stopped, the phrase will start playing from its be- ginning.
- Page 13 The maximum length of a phrase depends on TIP: Erasure will take the same length of time as the length of the phrase that’s currently assigned. the BPM you specified. Therefore, changing 3. If you’re finished erasing phrases, press the the BPM value during loop recording could cause an overdubbed phrase to be truncated, ERASE LOOP button and the button will go...
-
Page 14: Function.settings
TIP: Illumination will not occur if Hold is active, nor when you’re adjusting function settings. TIP: You can download the KAOSSILATOR PRO+ Editor from the Korg website. (http://www.korg.com) Scrl: Specifies the speed setting used for the text to scroll. This setting determines the speed used for the pad LED to scroll. - Page 15 MIDI controller. The MIDI message assigned to each controller using the KAOSSILATOR PRO+ Editor will be transmitted (→p.22: Using the KAOSSILATOR PRO+ as a MIDI controller). TIP: You can download the KAOSSILATOR PRO+ Editor from the Korg website. (http://www.korg.com)
-
Page 16: Using.an.sd.card
About the contents of the card Using an SD card The following files and folders will be created in the root directory of the card. You can use an SD card to save or load internal Files you can save data. -
Page 17: Inserting Or Removing Sd Cards
Inserting or removing SD cards Checking the remaining capacity of the card Inserting an SD card Here is how you can display the remaining ca- Taking care that the SD card is oriented cor- pacity of the SD card. rectly, push into the slot until it locks into place 1. -
Page 18: Saving To Sd Card
Saving to SD card Loading from an SD card Here’s how you can save the loop recorder Here’s how you can load data from an SD card. 1. Hold down the SHIFT button and press the data, program memories, and all settings onto an SD card. -
Page 19: Accessing The Sd Card From Your Computer
4. To view the contents of the KAOSSILATOR Accessing the SD card from your computer PRO+’s card, open the drive that was added to your computer in step 2. The KAOSSILATOR PRO+ has a USB connec- Copy the desired data onto your computer. You tor that can be connected to your computer, al- can also copy data from your computer onto lowing you to copy settings or loop recorder... -
Page 20: Midi.functions
MIDI messages. Con- nect these cables between the MIDI connec- tors of the KAOSSILATOR PRO+ and the MIDI TIP: To use the USB connection, the Korg USB-MIDI driver must be installed in your computer. Download connectors of the external MIDI device where the Korg USB-MIDI driver from the Korg website you want to transfer data. -
Page 21: Applying The Midi Message Filter
Transmit/receive note messages Setting the MIDI channel – LOOP REC BANK buttons Here’s how to set the KAOSSILATOR PRO+’s MIDI channel. Transmit control change messages 1. Hold down the SHIFT button and press Touch pad X-axis PROGRAM MEMORY 4 (MIDI). 2. -
Page 22: Using The Kaossilator Pro+ As A Midi Controller
External Control mode are made using the KAOSSILATOR PRO+ Editor. TIP: The KAOSSILATOR PRO+ Editor can be down- loaded free of charge from the Korg website (http:// www.korg.com). For details on how to adjust these settings, please refer to the documentation included... - Page 23 Controllers available in External Control mode You can use the following controllers in External Control mode. If note numbers are assigned to the touch pad, you can also specify the scale, key, and note range in the same way as when the KAOSSILATOR PRO+ functions as a synthesizer. Controller Transmitted MIDI message (factory setting) Touch pad X-axis...
-
Page 24: Specifications
Specifications Number of programs 250 (including 15 effect programs) Main controllers Touch pad, GATE ARP TIME/SPEED slider Display 4-digit LED display Connectors OUTPUT (stereo, RCA jacks), LINE IN (stereo, RCA jacks), MIC IN (unbalanced 6.3 mm phone jack), PHONES (6.3 mm stereo phone jack), MIDI IN/OUT, USB (type B) Power supply DC9V... - Page 25 Veillez à ne pas laisser tomber des objets métalliques dans le boîtier (trombones, par ex.). Si cela se produit, débranchez l’alimentation de la prise de courant et contactez votre revendeur korg le plus proche ou la sur- face où vous avez acheté l’instrument.
- Page 26 Utilisation.d’une.carte.SD....38 Sommaire Insertion/extraction d’une carte SD ... 39 Vérifier la capacité totale de la carte ..39 Introduction........27 Vérifier la capacité résiduelle de la carte .. 39 Caractéristiques principales ...... 27 Formater une carte SD ......39 Préparations........
-
Page 27: Introduction
Les 4 seur de phrases dynamique / enregistreur de banques de boucles peuvent être utilisées simul- boucles KAOSSILATOR PRO+ de Korg. Afin de tanément et le tempo (BPM) de reproduction des pouvoir exploiter au mieux toutes les fonctions du boucles est synchronisable. -
Page 28: Préparations
Préparations Connexions Adaptateur secteur Secteur Lecteur CD Console de mixage, mixeur DJ Connexion d’enceintes actives ou d’une console de mixage Connexion d’un micro ou d’un dispositif audio aux entrées Si vous utilisez un micro, branchez-le à la prise aux sorties Branchez les prises LINE OUT du KAOSSILA- MIC. -
Page 29: Fonctionnement
Réglage du volume Fonctionnement 1. Utilisez la commande PROGRAM VOLUME pour régler le volume du programme (son). 2. Si vous utilisez un casque, utilisez la com- Interrupteur d’alimentation mande PHONES VOLUME pour régler le volume. 1. Branchez le KAOSSILATOR PRO+ à votre ASTUCE: La commande PHONES VOLUME n’influence pas le niveau de sortie des prises LINE OUT. -
Page 30: Sélection De La Source Audio
INPUT VOLUME au minimum. Précautions liées au pad tactile N’exercez jamais de force excessive sur le pad Régler le volume d’entrée audio tactile et évitez d’y déposer des objets lourds. Il Utilisez la commande INPUT VOLUME pour ré- risque de se fêler ou de se casser en cas de gler le niveau d’entrée de la source audio. -
Page 31: Sélection De La Gamme (Scale)
tile. Sélection de la tessiture (NOTE ASTUCE: En réglant le commutateur GATE ARP sur RANGE) “SPEED” quand “GATE TIME” produit un effet legato ou coupe le son, vous annulez l’effet legato ou la coupure Voici comment spécifier la tessiture assignée au du son. -
Page 32: Sauvegarde Des Réglages Dans Une Mémoire
mande PROGRAM/BPM pour passer à l’affichage Sauvegarde des réglages dans du BPM. 2. Utilisez le commande PROGRAM/BPM pour une mémoire de programme régler la valeur du BPM par incréments de 0,1. En tournant le commande PROGRAM/BPM tout en Les boutons PROGRAM MEMORY (mémoires de maintenant la bouton SHIFT enfoncée, vous programmes) vous permettent de sauvegarder et pourrez régler la partie entière de la valeur par... -
Page 33: Enregistrement En Boucle
Enregistrement avec les programmes internes Enregistrement en boucle Vous pouvez créer et enregistrer des phrases rythmiques ou de basse avec les sons des pro- Vous pouvez créer une phrase par enregistre- grammes internes du KAOSSILATOR PRO+. Ces ments successifs avec différents sons ou signaux enregistrements peuvent vous aider à... - Page 34 2. Touchez le pad tactile pour régler le volume Longueur de la phrase Affichage de reproduction de chaque banque LOOP RE- 4 mesures CORDER BANK. 3. Appuyez sur le bouton SHIFT pour retourner 2 mesures à l’affichage du programme. 1 mesure Changer la longueur d’une phrase Vous pouvez raccourcir une phrase pour la mettre Blanche...
- Page 35 Pour éviter que votre boucle n’affiche des chan- ASTUCE: Pour effacer une phrase dès le début, arrêtez la reproduction de toutes les phrases. Maintenez le bouton gements inattendus de vitesse d’enregistrement LOOP RECORDER BANK correspondant à la phrase à ou de durée d’enregistrement suite à un chan- effacer enfoncé...
-
Page 36: Réglages.de.fonctions
ASTUCE: Quand le bouton TAP TEMPO est allumé, vous pouvez l’enfoncer pour retourner à la page précédente. ASTUCE: Vous pouvez télécharger “KAOSSILATOR PRO+ Editor” du site Internet Korg. (http://www.korg. com) Scrl: Détermine la vitesse de défilement du texte. Ce paramètre règle la vitesse de défilement du texte. - Page 37 Vous pouvez assigner des messages MIDI aux différentes commandes avec le logiciel “KAOSSI- LATOR PRO+ Editor” (“Utilisation du KAOSSILA- TOR PRO+ comme contrôleur MIDI” (→p. 44 )). ASTUCE: Vous pouvez télécharger “KAOSSILATOR PRO+ Editor” du site Internet Korg. (http://www.korg. com)
-
Page 38: Utilisation.d'une.carte.sd
A propos du contenu de la carte Utilisation d’une carte SD Les fichiers et dossiers suivants seront créés dans le répertoire racine de la carte. Vous pouvez utiliser une carte SD pour sauvegar- Fichiers que vous pouvez sauvegarder der ou charger des données internes. Données LOOP REC 00–99.o1s Les fichiers audio (de format WAVE ou AIFF) -
Page 39: Insertion/Extraction D'une Carte Sd
Insertion/extraction d’une carte SD Vérifier la capacité résiduelle de la carte Vous pouvez vérifier la capacité résiduelle de la Insertion d’une carte SD carte SD. 1. Appuyez sur la bouton PROGRAM MEMORY Orientez la carte SD correctement et insérez-la 1 (CARD) tout en maintenant la bouton SHIFT en- dans la fente jusqu’à... -
Page 40: Sauvegarde Sur Carte Sd
Sauvegarde sur carte SD Chargement d’une carte SD Vous pouvez sauvegarder des boucles, le conte- Voici comment charger des données d’une carte nu de mémoires de programme et tous vos ré- 1. Maintenez le bouton SHIFT enfoncé et ap- glages sur carte SD. 1. - Page 41 5. Quittez le mode USB. gramme et le KAOSSILATOR PRO+ fonctionne alors comme un synthétiseur. Si vous appuyez sur le bouton Dans Explorer ou Mon ordinateur, cliquez avec le SHIFT en cours de communication, un avertissement bouton droit de la souris sur l’icône “Disque amo- apparaît et il est impossible de quitter le mode USB.
-
Page 42: Fonctions.midi
ASTUCE: Vous pouvez télécharger le tableau d’équipe- Ordinateur ment MIDI (“MIDI Implementation Chart”) du KAOSSILA- TOR PRO+ sur le site Internet de Korg. (http://www.korg. com) * Pour en savoir plus sur les fonctions MIDI, voyez ce tableau d’équipement MIDI. Pour vous procurer le tableau d’équipement Computer MIDI, consultez votre revendeur ou distributeur Korg. - Page 43 Réglage du canal MIDI Transmission/réception de messages de notes Boutons LOOP REC BANK Voici comment régler le canal MIDI du KAOSSI- LATOR PRO+. Transmission de commandes de contrôle 1. Maintenez le bouton SHIFT enfoncé et ap- puyez sur le bouton PROGRAM MEMORY 4 Axe X du Pad tactile (MIDI).
-
Page 44: Utilisation Du Kaossilator Pro+ Comme
“KAOSSILATOR PRO+ Editor”. ASTUCE: “KAOSSILATOR PRO+ Editor” peut être télé- chargé gratuitement du site Internet de Korg (http://www. korg.com). Pour en savoir plus sur le réglage de ces pa- ramètres, voyez la documentation accompagnant le logi- ciel “KAOSSILATOR PRO+ Editor”. - Page 45 Contrôleurs disponibles en mode External Control Vous pouvez utiliser les contrôleurs suivants en mode External Control. Si les numéros de note sont assignés au pad tactile, vous pouvez aussi déterminer la gamme, la tonique et la tessiture comme quand le KAOSSILATOR PRO+ fait office de synthétiseur. Controller Transmitted MIDI message (réglages d’usine) Axe X du Pad tactile...
-
Page 46: Fiche.technique
Fiche technique Nombre de programmes 250 (dont 15 programmes d’effets) Contrôleurs principaux Pad tactile, Fader GATE ARP TIME/SPEED Ecran LED à 4 caractères Prises OUTPUT (prises stéréo RCA/cinch), LINE IN (prises stéréo RCA/cinch), MIC IN (mini-jack asymétrique de 6,3mm), PHONES (mini-jack stéréo de 6,3mm), MIDI IN/OUT, USB (type B) Alimentation DC9V... - Page 47 Beschädigung des Geräts, Feuer oder gentümer. ein elek-trischer Schlag die Folge sein. Beachten Sie, daß keinerlei Fremdkörper in das Gerät gelangen. Sollte ein Fremdkörper in das Gerät gelangt sein, so trennen Sie es sofort vom Netz. Wenden Sie sich dann an Ihren KORG-Fachhändler.
- Page 48 Verwendung.einer.SD-Karte..60 Inhalt Einlegen/Entnehmen von SD-Karten ....61 Überprüfen der Kartenkapazität ......61 Überprüfen der Restkapazität ......61 Vorweg..........49 Formatieren der SD-Karte .........61 Die wichtigsten Funktionen .......49 Datensicherung auf einer SD-Karte ....62 Vorbereitungen......50 Daten laden von einer SD-Karte .......62 Datentransfer zwischen einer SD-Karte und Ihrem Anschlüsse ............50 Computer ............63...
-
Page 49: Vorweg
Archivierung der aufgezeichneten Loops. Außerdem Phrasen-Synthesizer/Loop-Recorder KAOSSILATOR lässt er sich zum Ansteuern von Software oder externer PRO+ von Korg. Um alle Funktionen des KAOSSILA- MIDI-Geräte nutzen. TOR PRO+ kennen zu lernen und über Jahre hinaus Phrasen und Einstellungen speicherbar auf SD-Karten Freude daran zu haben, müssen Sie sich diese Bedie-... -
Page 50: Vorbereitungen
Vorbereitungen Anschlüsse Netzteil Steckdose CD-Player Mischpult, DJ-Mixer Anschließen eines Verstärkers, Mischpults usw. an die Anschließen eines Mikrofons oder einer Audioquelle Ausgänge an die Eingänge Verbinden Sie die LINE OUT-Buchsen des KAOSSILA- Wenn Sie ein Mikrofon verwenden möchten, müssen TOR PRO+ mit den Eingängen eines Mischpults oder Sie es an die MIC-Buchse anschließen. -
Page 51: Bedienung
Einstellen der Lautstärke Bedienung 1. Stellen Sie mit dem PROGRAM VOLUME-Regler die Lautstärke des Programs ein. 2. Stellen Sie mit dem PHONES VOLUME-Regler bei Verwendung des Netzschalters Bedarf den Kopfhörerpegel ein. 1. Schließen Sie das KAOSSILATOR PRO+ wie auf TIPP: Die Lautstärke der an LINE OUT anliegenden Si- gnale wird vom PHONES VOLUME-Regler nicht beein- den vorangehenden Seiten gezeigt an und verbinden flusst. -
Page 52: Anwahl Eines Audio-Eingangssignals
Einstellen des Eingangspegels Pflege des Touch-Pads Mit dem INPUT VOLUME-Regler können Sie den Ein- Drücken Sie niemals mit Gewalt auf das Pad und gangspegel der externen Audio-Signalquelle einstel- stellen Sie keine schweren Gegenstände darauf. Bei len. einer all zu forschen Handhabung wird es beschä- Starten Sie die Tonausgabe des angeschlossenen Ge- digt. -
Page 53: Anwahl Der Skala
selbst mit Berührungen des Pads nicht aktiviert wer- Anwahl des Notenbereichs (NOTE den. TIPP: Wenn Sie den GATE ARP-Schalter auf „SPEED“ RANGE) stellen, während die Legato- oder Stummschaltungs- einstellung gewählt ist, wird ein anderer Wert gewählt. Schauen wir uns jetzt an, wie man dem Touch-Pad den gewünschten Notenbereich zuordnet. -
Page 54: Speichern Von Einstellungen In Einem Program Memory
Manuelles Festlegen der Taktzahl (BPM) Speichern von Einstellungen in ei- 1. Wenn das Display das aktuelle Programm zeigt, drücken Sie den PROGRAM/BPM-Regler zum Um- nem PROGRAM MEMORY schalten auf BPM-Anzeige. 2. Stellen Sie mit dem PROGRAM/BPM-Regler den Die Tasten PROGRAM MEMORY erlauben es, Ihre BPM-Wert in Schritten von 0, 1 ein. - Page 55 Aufnahme 2. Geben Sie den REC-Taster wieder frei, um die Auf- nahme zu beenden. Sobald Sie den Taster freigeben, Aufnahme des Program-Sounds und externer Signale wechselt jene Bank wieder in den Wiedergabebetrieb. 1. Drücken Sie den REC-Taster. Wenn Sie den Taster 3.
- Page 56 TIPP: Die hier gewählte Phrasenlänge wird beim Aus- TIPP: Der ausgeblendete Teil einer gekürzten Phrase schalten des Geräts zurückgestellt. bleibt erhalten und kann später wiederhergestellt wer- den. Das ist jedoch nicht der Fall, wenn Sie eine ge- TIPP: Wenn ein LOOP RECORDER BANK-Taster oran- kürzte Phrase um weitere Parts ergänzen bzw.
- Page 57 3. Drücken Sie den WRITE-Taster, um den gewählten LOOP RECORDER BANK-speicher zu initialisieren. Nach der Initialisierung erscheint wieder die Program- Nummer. 2. Drücken Sie den LOOP RECORDER BANK-Taster TIPP: Während eines Löschvorgangs kann das KAOS- der Phrase, die Sie löschen möchten, um den Vorgang SILATOR PRO+ nur die eingehenden Audiosignale ausgeben.
-
Page 58: Weiter.führende.funktionen
Seite zurückkehren. der Einstellung einer Funktion wird die Beleuchtung nicht aktiviert. TIPP: Der „KAOSSILATOR PRO+ Editor“ steht auf der Korg-Webpage zum Download bereit. (http://www.korg. com) Scrl: Hiermit bestimmen Sie, wie schnell der Text durch das Pad rollt. Mit dieser Einstellung bestimmen Sie, wie schnell die Pad-Diode „scrollt“. - Page 59 Erlaubt die Verwendung des KAOSSILATOR PRO+ als MIDI-Controller. Die von den Bedienelementen gesendeten MIDI-Be- fehle können mit „KAOSSILATOR PRO+ Editor“ ge- wählt werden (S.66: Verwendung des KAOSSILATOR PRO+ als MIDI-Controller). TIPP: „KAOSSILATOR PRO+ Editor“ steht auf der Korg- Webpage zum Download bereit. (http://www.korg.com)
-
Page 60: Verwendung.einer.sd-Karte
Über die Inhalte der Karte Verwendung einer SD-Karte Die folgenden Dateien und Ordner werden im Grund- verzeichnis der Karte angelegt. Die internen Daten können auf einer SD-Karte gesi- Dateien, die Sie speichern können chert und von dort geladen werden. LOOP REC-Daten 00–99.o1s Außerdem können Sie Audiodateien (WAVE oder AIFF) GLOBAL-Daten... -
Page 61: Einlegen/Entnehmen Von Sd-Karten
Einlegen/Entnehmen von SD-Kar- Überprüfen der Restkapazität Mit folgendem Verfahren können Sie die verbleibende Kapazität der SD-Karte ermitteln. 1. Halten Sie die SHIFT-Taster gedrückt und drücken Einlegen einer SD-Karte Sie die Taster PROGRAM MEMORY 1 (CARD). 2. Wählen Sie mit dem PROGRAM/BPM-Regler Schieben Sie die SD-Karte richtig herum so weit in den „FrEE“... -
Page 62: Datensicherung Auf Einer Sd-Karte
Datensicherung auf einer SD-Karte Daten laden von einer SD-Karte Zum Sichern der Loop-Daten, Program-Speicher und Zum Laden von Daten einer SD-Karte verfahren Sie anderer Einstellungen auf der SD-Karte verfahren Sie bitte folgendermaßen. 1. Halten Sie den SHIFT-Taster gedrückt, während bitte folgendermaßen. 1. -
Page 63: Datentransfer Zwischen Einer Sd-Karte Und Ihrem Computer
4. Zum Betrachten der Inhalte der KAOSSILATOR Datentransfer zwischen einer SD- PRO+-Karte öffnen Sie das Laufwerk, das dem Com- puter in Schritt 2 hinzugefügt wurde. Karte und Ihrem Computer Kopieren Sie die gewünschten Daten in Ihren Compu- ter. Sie können auch Daten von Ihrem Computer auf Das KAOSSILATOR PRO+ bietet einen USB-Port, der die Karte kopieren. -
Page 64: Midi-Funktionen
Zeit, welche Befehle von beiden Gerä- ten unterstützt werden. TIPP: Die MIDI-Implementierungstabelle des KAOSSI- LATOR PRO+ steht auf der Korg-Webpage zum Down- load bereit. (http://www.korg.com) TIPP: Die USB-Kommunikation klappt nur, wenn Sie * Eine ausführliche Beschreibung der MIDI-Funktionen finden den Korg USB–MIDI-Treiber auf dem Computer instal-... - Page 65 3. Wählen Sie mit dem PROGRAM/BPM-Regler „GL. behalten, senden beide Bedienelemente denselben Ch“ (allgemeiner MIDI-Kanal) und drücken Sie den Steuerbefehl (CC). 5. Wenn Sie diese Einstellung speichern möchten, PROGRAM/BPM-Regler anschließend. müssen Sie den WRITE-Taster drücken. Wenn Sie die Einstellung nicht speichern möchten, müssen Sie den SHIFT-Taster drücken.
-
Page 66: Verwendung Des Kaossilator Pro+ Als Midi-Controller
Welche MIDI-Befehl im External Control-Modus gesen- det werden, kann mit dem „KAOSSILATOR PRO+ Editor“-Programm eingestellt werden. TIPP: „KAOSSILATOR PRO+ Editor“ steht auf der Korg- Webpage kostenlos zum Download bereit (http://www. korg.com). Alles Weitere zu den gebotenen Parame- tern finden Sie in der Bedienungsanleitung von „KAOS-... - Page 67 Bedienelemente im External Control-Modus Im External Control-Modus stehen folgende Bedienelemente zur Verfügung. Wenn dem Touch-Pad Notennummern zugeordnet sind, können Sie auch die Skala, die Tonart und den Notenbe- reich einstellen (genau wie bei Verwendung des KAOSSILATOR PRO+ als Synthesizer). Controller Daten gesendete MIDI-Meldung (werkseitige Einstellung) Touch-Pad X-Achse Note ein/aus (#48–#72)*...
-
Page 68: Technische.daten
Technische Daten Anzahl.der.Speicher 250 (darunter 15 Effektprogramme) Wichtigste.Bedienelemente Touch-Pad, GATE ARP TIME/SPEED-Regler Display 4 Zeichenpositionen, LED Anschlüsse OUTPUT (RCA/Cinch, stereo), LINE IN (RCA/ Cinch, stereo), MIC IN (unsymmetrische 6,3mm- K l i n k e n b u c h s e ) , P H O N E S ( 6 , 3 m m - Stereoklinkenbuchse), MIDI IN/OUT, USB (Typ B) Stromversorgung DC9V... - Page 69 Precauciones Nota respecto a residuos y deshechos (solo UE) Cuando aparezca el símbolo del cubo de Ubicación basura tachado sobre un producto, su ma- El uso de la unidad en las siguientes ubicaciones pue- nual de usuario, la batería, o el embalaje de de dar como resultado un mal funcionamiento: cualquiera de éstos, significa que cuando •...
- Page 70 Configuración.de.funciones..80 Table of Contents Procedimiento para configurar las funcio- Introducción......... 71 nes ............80 Acerca de cada función ......80 Principales características ....71 Utilización.de.una.tarjeta.SD..82 Primeros.pasos......72 Inserción o extracción de tarjetas SD .. 83 Conexiones ........... 72 Funcionamiento......73 Comprobación de la capacidad total de la tarjeta ............
-
Page 71: Introducción
MIDI que se puede configurar exactamente como de- see. El KAOSSILATOR PRO+ Editor se puede des- La función de escalas le permite asignar una escala al cargar de forma gratuita desde la página web de Korg panel táctil. (http:// www.korg.com). -
Page 72: Primeros.pasos
Primeros pasos Conexiones ADAPTA- DOR DE CA REPRODUCTOR DE CD MESA DE MEZCLAS, MESA DE MEZCLAS PARA DJ Conexión de su mesa de mezclas o amplificador moni- Conexión de su micrófono o fuente de audio con las tor con las tomas de salida tomas de entrada Conecte las tomas LINE OUT del KAOSSILATOR Si está... -
Page 73: Funcionamiento
Ajuste del volumen Funcionamiento 1. Utilice el mando PROGRAM VOLUME para ajus- tar el volumen del programa. Utilización del interruptor de ali- 2. Si está utilizando auriculares, utilice el mando PHONES VOLUME para ajustar el volumen. mentación NOTA: El mando PHONES VOLUME no afecta al volu- men de las tomas LINE OUT. -
Page 74: Selección De Entradas De Audio
Ajuste del volumen de la entrada de audio Cuidado del panel táctil Utilice el mando INPUT VOLUME para ajustar el nivel No ejerza nunca demasiada presión ni coloque de entrada de la fuente de entrada de audio. objetos pesados encima del panel táctil. Podría Introduzca el audio de su dispositivo fuente conecta- agrietarse o romperse si se maneja bruscamente. -
Page 75: Especificación De La Escala
NOTA: Si cambia el interruptor GATE ARP a SPEED sar el botón SHIFT para volver inmediatamente a la cuando este parámetro está configurado en legato o indicación de programas. parado, el legato o estado de silenciamiento se can- celarán. Especificación de la tesitura NOTA: Poco después de haber seleccionado este Aquí... -
Page 76: Almacenamiento De Los Ajustes En Una Program Memory
Configuración manual del BPM Almacenamiento de los ajustes en 1. Si la pantalla muestra el programa actual, pulse el mando PROGRAM/BPM para cambiar a la pantalla una PROGRAM MEMORY BPM. 2. Utilice el mando PROGRAM/BPM para ajustar el Los botones PROGRAM MEMORY le permiten guar- valor BPM en pasos de 0.1. - Page 77 Grabación 2. Cuando desee detener la grabación, suelte el bo- tón REC. Cuando suelte el botón, el banco volverá a reproducción. Grabación de una mezcla del sonido del programa y la 3. Si desea sobreescribir otra capa encima de la fra- entrada de audio se grabada, mantenga pulsado el botón LOOP RE- 1.
- Page 78 BANK, esto significa que este banco no ha terminado de la frase original se perderán, y no podrá volver a el procesamiento después de la grabación y, por lo cambiar a su duración original. tanto, la longitud de la frase no se puede cambiar. Es- Configuración de BPM durante la reproducción de pere hasta que el botón LOOP RECORDER BANK loops...
- Page 79 do se haya borrado la frase, el botón LOOP RECOR- DER BANK se iluminará en verde. NOTA: Si lo desea, puede borrar más de un banco de grabación de loops al mismo tiempo. NOTA: El borrado ocupará el mismo tiempo que la lon- gitud de la frase que está...
-
Page 80: Configuración.de.funciones
PROGRAM MEMORY 1–8. NOTA: Puede descargar KAOSSILATOR PRO+ Editor desde la página web de Korg. (http://www.korg.com) Scrl: Especifica la configuración de la velocidad utili- 2. Use el mando PROGRAM/BPM para seleccionar zada para el desplazamiento del texto. Esta configu- un parámetro secundario. - Page 81 MIDI. Se transmitirá el mensaje MIDI asignado a cada con- trolador utilizando el KAOSSILATOR PRO+ Editor (→pág. 88 : Utilización del KAOSSILATOR PRO+ como controlador MIDI). NOTA: Puede descargar KAOSSILATOR PRO+ Editor desde la página web de Korg. (http://www.korg.com)
-
Page 82: Utilización.de.una.tarjeta.sd
Archivos que se pueden guardar Utilización de una tarjeta SD Datos LOOP REC 00–99.o1s GLOBAL 0–9.o1g Configuración PROGRAM ME- 0–9.o1p Puede utilizar una tarjeta SD para guardar o cargar MORY los datos internos. Todos los datos 0–9.o1a También se pueden cargar los archivos de audio (en Archivos de la grabadora de KO2D00–99_1.wav formato WAVE o AIFF) que ha creado en su ordena-... -
Page 83: Inserción O Extracción De Tarjetas Sd
Inserción o extracción de tarjetas SD Inserción de una tarjeta SD 3. Pulse el mando PROGRAM/BPM para ver la ca- Tenga cuidado para que la tarjeta SD esté correcta- pacidad restante de la tarjeta. mente orientada, e introdúzcala en la ranura hasta Pulse el botón TAP TEMPO (iluminado) para volver a que se bloquee en su lugar con un clic. -
Page 84: Guardar En Una Tarjeta Sd
Guardar en una tarjeta SD Carga desde una tarjeta SD Aquí se muestra cómo guardar en una tarjeta SD los Aquí se muestra la forma de cargar datos desde una datos de la grabadora de loops, las memorias de pro- tarjeta SD. -
Page 85: Acceso A La Tarjeta Sd Desde Su Ordena- Dor
ranura, o apagar o encender su ordenador. Hacerlo puede Acceso a la tarjeta SD desde su or- dañar los datos. denador 4. Para ver los contenidos de la tarjeta del KAOSSI- LATOR PRO+, abra la unidad que se añadió a su or- El KAOSSILATOR PRO+ cuenta con un conector denador en el paso 2. -
Page 86: Funciones.midi
MIDI para ver qué mensaje son compa- tibles entre esos dispositivos. NOTA Puede descargar la tabla de implementación NOTA: Para utilizar la conexión USB, el driver Korg MIDI del KAOSSILATOR PRO+ desde la página web USB-MIDI tiene que estar instalado en su ordenador. - Page 87 5. Si desea almacenar el ajuste, pulse el botón WRITE. Si no desea almacenar el ajuste, pulse el botón SHIFT. Aplicación del filtro de mensajes MIDI Se visualiza el canal MIDI seleccionado en este mo- 1. Mantenga pulsado el botón SHIFT y pulse PRO- mento.
-
Page 88: Utilización Del Kaossilator Pro+ Como Controlador Midi
MIDI externo como un sinteti- NOTA: El KAOSSILATOR PRO+ Editor se puede des- zador o un sintetizador de software en su cargar de forma gratuita de la página web de Korg ordenador. (http:// www.korg.com). Para obtener detalles acerca Conexiones de ejemplo para el modo Control Externo de cómo ajustar estas configuraciones, consulte la... - Page 89 Controladores disponibles en el modo de Control Externo En el modo de Control Externo se pueden utilizar los siguientes controladores. Si hay números de notas asignados al panel táctil, también puede especificar la escala, tono y tesitura de la mis- ma forma que cuando el KAOSSILATOR PRO+ funciona como sintetizador.
-
Page 90: Especificaciones
Especificaciones Número de programas 250 (incluidos 15 programas de efectos) Controladores principales Panel táctil, deslizador GATE ARP TIME/SPEED Pantalla Pilotos de 4 dígitos Conectores OUTPUT (estéreo, tomas RCA), LINE IN (estéreo, tomas RCA), MIC IN (toma Phone de 6,3 mm no equilibrada), PHONES (toma Phone estéreo de 6,3 mm), MIDI IN/OUT, USB (tipo B) Alimentación... -
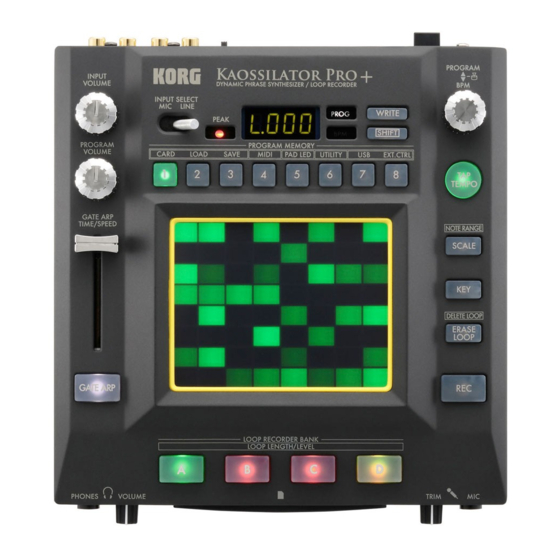
Page 91: Parts Of The Kaossilator Pro
Parts of the Kaossilator PRO+ Eléments du Kaossilator PRO+ Top panel Panneau supérieur 1. Display 1. Ecran 2. PEAK indicator 2. Témoin PEAK (Crête) 3. INPUT SELECT switch 3. Commutateur INPUT SELECT (sélecteur 4. INPUT VOLUME knob d’entrée) 5. PROGRAM VOLUME knob 4. -
Page 92: Teile Des Kaossilator Pro
Teile des Kaossilator PRO+ Partes del Kaossilator PRO+ Oberseite Panel superior 1. Display 1. Visualización 2. PEAK-Anzeige 2. Indicador PEAK 3. INPUT SELECT-Wahlschalter 3. Interruptor INPUT SELECT 4. INPUT VOLUME-Regler 4. Mando INPUT VOLUME 5. PROGRAM VOLUME-Regler 5. Mando PROGRAM VOLUME 6. - Page 93 Front panel Panneau avant 1. PHONES VOLUME knob 1. Commande PHONES VOLUME (volume du 2. PHONES jack casque d’écoute) 3. MIC TRIM knob 2. Prise PHONES (prise pour casque 4. MIC jack d’écoute) 5. SD Card Slot 3. Commande MIC TRIM (épuration des sons) 4.
- Page 94 Rear panel Panneau arrière 1. MIDI IN, MIDI OUT connectors 1. Bornes MIDI IN, MIDI OUT 2. DC 9V jack 2. Prise DC 9V 3. POWER switch 3. Interrupteur d’alimentation POWER 4. Grounding Screw 4. Vis de terre →p →p .118) .118) 5.
- Page 95 Grounding Screw Vis de terre Use this screw to ground the unit. To do so, Utilisez cette vis pour relier l’appareil à la loosen the screw and attach a grounding wire. terre. Pour cela, desserrez la vis et fixez un fil de After loosening the screw and attaching the ground- mise à...
-
Page 96: Program List
PROGRAM LIST Program Name X AXIS Y AXIS Scale Note Range L.000 Pulse Verb Note Reverb Depth L.001 Synth Lead Note Cutoff L.002 Unison Lead Note Cutoff L.003 Force Lead Note Cutoff L.004 Sync Saw LD Note OSC Sync Pitch L.005 Sine Portamt Note Portamento... - Page 97 Program Name X AXIS Y AXIS Scale Note Range A.040 Vibraphone Note Velocity A.041 Trumpet Note Breath Pressure A.042 Piano Note Velocity A.043 Tape Flute Note Chord (Maj) A.044 Dist Guitar Note Picking Position A.045 E.Piano Note Velocity A.046 Glass Bell Note Attack PCM A.047 Phase Clav...
- Page 98 Program Name X AXIS Y AXIS Scale Note Range B.080 Simple Bass Note Cutoff B.081 Fat Bass Note Cutoff B.082 Elec Bass Note Velocity B.083 Big Bass Note Cutoff EG Int B.084 Sexy Bass Note Cutoff B.085 Reso Bass Note Cutoff B.086 Unison Bass Note...
- Page 99 Program Name X AXIS Y AXIS Scale Note Range C.120 ArpeggioPuls Note Chord (Maj, min) C.121 Phaser Chord Note LFO Speed C.122 EL Chord Note Level C.123 Chord Seq Note Chord (Maj7, min7) C.124 FilterMod5th Note Cutoff, LFO Depth C.125 Pad Chord 2 Note Cutoff EG Int C.126 DecaySynChod...
- Page 100 Program Name X AXIS Y AXIS Scale Note Range S.160 Beam Saber Modulator Note Mod Depth S.161 Synth Looper Cutoff, Looper Speed Looper, Noise Level S.162 Ring Mod SFX Note LFO Depth S.163 Voice Looper Note, Looper Speed, Pan Looper, Formant S.164 Drop Cutoff Impulse Speed...
- Page 101 Program Name X AXIS Y AXIS Scale Note Range P.200 Gate Pattern Delay P.201 Breaks Pattern Decimator P.202 Chip 1 Pattern Decimator, Short Dealy P.203 Electronic Pattern Short Dealy P.204 FactorY Pattern Gate Reverb P.205 NoKick 1 Pattern Delay P.206 Chip 2 Pattern Delay P.207 Mini...
- Page 102 V.248 Audio-Filter LPF, HPF Cutoff V.249 Audio-Looper Looper Beat (No Assign) © 2012 KORG Inc. —all rights reserved All PCM samples, drum patterns and programs were produced by Yasushi.K and KORG Inc. For more information about “Yasushi.K” visit http://www.net-yk.org/ http://www.facebook.com/yasushik1977...
-
Page 103: Scale List
SCALE LIST Scale Name Scale [Key C] -- (O ) 1 Chromatic C, D , D, E , E, F, G , G, A , A, B , B 2 Ionian C, D, E, F, G, A, B 3 Dorian C, D, E , F, G, A, B 4 Phrygian C, D , E , F, G, A , B... - Page 104 Por favor guarde su recibo como prueba de compra ya que de otro modo el producto puede verse privado de la garantía del fabricante o distribuidor. 4015-2 Yanokuchi, Inagi-city, Tokyo 206-0812 Japan © 2012 KORG INC.