Table of Contents
Advertisement
Available languages
Available languages
Quick Links
Cyborg evo Wireless User Manual
Getting Started
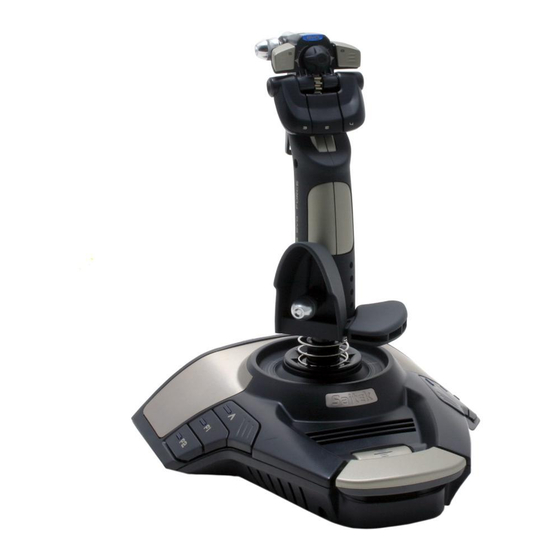
Features:
Battery
Your Cyborg evo Wireless uses one AA alkaline battery (supplied) which should give up to 50 hours of
use. To fit the battery, open the battery compartment on the bottom of your joystick by sliding back the
cover. Insert the AA battery in the direction shown and replace the cover.
LED power status
The Saitek Cyborg evo Wireless features an LED (Light Emitting Diode) on the top of the stick which
shows how much power is left in the battery. A green light means there is between 20-80% of power
remaining; amber means there is between 10-20% power remaining; and red means there is less than
10% power and you will soon have to replace the battery.
Plugging in the wireless receiver
Unclip the wireless receiver (or dongle) from the bottom of the evo Wireless joystick and plug into one
of your computer's USB ports.
Sleep mode
Your Cyborg evo Wireless features a sleep mode to conserve battery life. After ten minutes of no
activity, the stick will power down and the head LED will switch off. Press any of the buttons to wake
the stick.
Scan Button
In certain circumstances, there may be interference to the signal between your stick and the wireless
receiver dongle in your computer caused by other wireless devices nearby. To switch to an
interference-free wireless channel, press the scan button on the underside of your stick once.
Radio frequency
The Cyborg evo Wireless operates at a frequency of 2.402 – 2.480 GHz
Installing joystick driver software
Important note: Calibrating your joystick
The Saitek Cyborg evo Wireless stick uses a dynamic auto-calibration system, which is designed to
give you more accurate control. To maximise the effectiveness of calibration, ensure that the stick is
moved fully forwards, backwards and to both sides after booting up your PC and before loading up
your game.
Installation for users of Windows® XP
a) Drivers only for typical users
The software on the CD supplied with this product has been thoroughly tested and complies with all
Microsoft standards. However, we recommend that prior to installing any 3rd party software you create
a restore point to return to should you encounter any difficulties.
Windows®XP users can do this by clicking on Start followed by Programs, then Accessories,
System Tools and finally on System Restore. In the window that appears select Create a restore
point and then click on Next. You will be prompted to supply a name for this set-up.
Should you then encounter any difficulties during the installation process you can follow the same path
to restore your PC to its pre-installed state.
1.
With your computer switched on, close down any programs that are currently running and insert
the Saitek Smart Technology CD into your CD-ROM drive.
2.
When the Introduction Screen appears, click Install Software to continue.
3.
When the Welcome screen appears, click Next to continue. (If the CD does not run
automatically, select Start from the Windows® Taskbar, then Run and type D:\Setup.exe and
click OK - where D:\ is letter of your CD-ROM drive).
4.
After reading the Disclaimer, select the I accept the terms of the Disclaimer option and click
Next to continue.
Advertisement
Table of Contents

Related Manuals for Saitek Cyborg evo Wireless


Summary of Contents for Saitek Cyborg evo Wireless
-
Page 1: Getting Started
Features: Battery Your Cyborg evo Wireless uses one AA alkaline battery (supplied) which should give up to 50 hours of use. To fit the battery, open the battery compartment on the bottom of your joystick by sliding back the cover. Insert the AA battery in the direction shown and replace the cover. - Page 2 Saitek Magic Mouse, HID-compliant mouse, Saitek Magic Keyboard and HID Keyboard Device (these are what XP calls the various elements of your Saitek controller). Continue to click on Next and Finish to accept the installation until the Registration screen appears.
- Page 3 The installer will automatically recognize if this software needs to be added, and will allow you to install it directly from the Saitek Product Companion CD, if necessary. If you are asked to install Microsoft® DirectX® 8.1, click Install and follow the on-screen instructions, and then restart your computer when prompted.
- Page 4 Programming Your Saitek Controller with Saitek Smart Technology Programming Software section in this manual. Troubleshooting I haven’t used my Cyborg evo Wireless joystick for some time, there are no LEDs illuminated and the joystick doesn’t work. Replace the battery on the underside of the joystick.
- Page 5 How do I program my controller? After getting to know your controller, you can start creating your own personal Profiles with the Saitek Smart Technology programming software (SST). This software has virtually unlimited programming capabilities and allows you to customize the controller to your exact gaming needs.
- Page 6 Saitek plc. Obligations of Saitek shall be limited to repair or replacement with the same or similar unit, at our option. To obtain repairs under this warranty, present the product and proof of purchase (eg, bill or invoice) to the authorized Saitek Technical Support Center (listed on the separate sheet packaged with this product) transportation charges prepaid.
- Page 7 Must be disposed of properly May explode if damaged or disposed of in fire Do not short circuit Saitek Industries, 2295 Jefferson Street, Torrance, CA 90501, USA Canada 210 Operation is subject to the following two conditions: This device may not cause interference, and;...
- Page 8 Great Park Road Almondsbury Bristol BS 32 4QG United Kingdom Identification of Equipment: PS30 – Cyborg Evo wireless Joystick for PC Intended usage: For home use Conformity specification: Reference to European harmonised standards EN 600 65 :1998 EN 300 440-2 :2001 EN 301 489-17:2000 Technical Construction File Ref.:PC joysticks/PS30...
- Page 9 Caractéristiques : Piles Votre joystick Cyborg Evo Wireless fonctionne avec une pile alcaline AA qui vous est fournie, et qui devrait vous permettre de jouer durant 50 heures. Afin d’insérer la pile, ouvrez le compartiment à pile situé au bas de votre joystick en faisant glisser le couvercle en arrière. Insérez la pile AA dans le sens indiqué...
- Page 10 Vous êtes alors invité(e) à installer des fonctions telles que la souris Saitek Magic Mouse ou le clavier Saitek Magic Keyboard (c’est le nom que XP donne aux différents éléments de votre contrôleur Saitek). Cliquez toujours sur Suivant, Continuer de toute façon et Terminer pour accepter l’installation jusqu’à...
- Page 11 à l'écran. Redémarrez votre ordinateur lorsqu'on vous y invite. Vérifiez que votre CD Saitek est dans votre lecteur de CD-Rom avant de redémarrer votre ordinateur. Une fois ce logiciel installé, l'installation de votre pilote reprend automatiquement à l'étape suivante.
- Page 12 De temps à autre, il peut y avoir des mises à jour du pilote et du logiciel de programmation pour ce produit. Vous pouvez vous tenir informé(e) des toutes dernières mises à jour en vous rendant sur le site Internet de Saitek et en cliquant sur Téléchargements. Un menu déroulant va apparaître. Sélectionnez « Pilotes + Logiciels ».
- Page 13 Saitek à l’aide du logiciel Saitek Smart Technology. Dépannage Question : Je n’ai pas utilisé mon joystick Cyborg Evo Wireless depuis un certain temps, les diodes LED ne sont pas allumées, et le joystick ne fonctionne pas.
- Page 14 à portée de main. Pour trouver votre équipe locale du Support Technique Saitek, merci de vous référer à la feuille " Centre de Support Technique " qui vous a été fournie dans l'emballage de ce produit.
- Page 15 Saitek, ou la modification du produit de quelque manière que ce soit, ou l'introduction de ce produit dans n'importe quel autre produit, ou des dommages causés au produit par un accident, le feu, des inondations, la foudre, les catastrophes naturelles, ou toute utilisation allant à...
-
Page 16: Erste Schritte
Sie die Batterie gemäß der Abbildung ein und schließen Sie das Batteriefach wieder. Energieanzeige per Leuchtdiode Der Saitek Cyborg evo Wireless besitzt eine Leuchtdiode am obersten Teil des Sticks, die Auskunft über den Ladezustand der Batterie gibt. Bei grünem Licht liegt die Restenergie zwischen 20% und 80%, gelbes Licht erscheint bei einer Restenergie zwischen 10% und 20% und bei Rot sollten Sie so bald wie möglich die Batterie ersetzen, da nur noch weniger als 10% Energie vorhanden ist. - Page 17 Im Fenster Registrieren wählen Sie bitte Markieren Sie dieses Feld, um sich zu registrieren und folgen Sie den Bildschirmanweisungen. Wenn Sie sich später registrieren möchten, dann markieren Sie diese Box nicht.. 10. Um die Installation zu beenden, klicken Sie auf Fertig stellen. Ihr Saitek Controller ist nun spielbereit! b) Komplette Installation (Treiber und Programmier-Software) Führen Sie die oberen Schritte 1-7 aus bis das Fenster zur Einrichtung der Programmiersoftware...
- Page 18 Installieren, folgen Sie anschließend den Bildschirmanweisungen und starten Sie danach Ihren PC neu. Bitte versichern Sie sich, dass sich die Saitek CD noch in Ihrem CD-ROM Laufwerk befindet, wenn Sie den PC neustarten. Sobald MicrosoftÒ DirectXÒ 8.1 installiert ist, wird die Installation automatisch mit dem nächsten Schritt fortfahren.
- Page 19 Klicken Sie dann Weiter und folgen Sie den Bildschirmanweisungen oder wählen Sie Später Registrieren und klicken Sie Weiter. 12. Klicken Sie anschließend auf Fertigstellen um die Installation zu beenden. Ihr Saitek Controller ist nun fertig installiert und spielbereit. a) Komplette Installation (Treiber und Programmier-Software) Diese Installation wird den entsprechenden Treiber und die Saitek Smart Technology Programmierungssoftware für Saitek Controller installieren.
- Page 20 „Einführung in die Programmier-Software“ in dieser Anleitung.. Problemlösungen Ich habe meinen Cyborg evo Wireless Joystick für einige Zeit nicht mehr verwendet, der Joystick funktioniert nicht und es leuchten keine LEDs Ersetzten Sie die Batterie im Fach an der Unterseite des Joysticks.
- Page 21 • Die aktuellste Version der Saitek Smart Technology Software finden Sie zum Download auf der Saitek Homepage. Was ist ein Profil? Ein Profil ist eine spezielle Einstellung für verbesserten Spielablauf, bestehend aus einer Reihe von Befehlen, die den Buttons oder Achsen an Ihrem Controller im Voraus zugeteilt werden. Auf der dem Gerät beiliegenden CD-ROM oder auf der Saitek-Website, www.saitek.com, finden Sie über 200...
- Page 22 Die Garantiepflicht beschränkt sich darauf, dass Saitek das Gerät nach eigener Wahl entweder repariert oder durch ein gleiches oder ähnliches Gerät ersetzt. Zur Inanspruchnahme der Garantie sind dem autorisierten Saitek Technical Support Center (Anschrift liegt dem Gerät in der Verpackung bei) Gerät und Kaufbeleg (z.B. Kassenzettel oder Rechnung) frachtfrei zu übersenden.
- Page 23 Funzionalità: Batteria Il Cyborg Evo Wireless utilizza una batteria AA alcalina (fornita) che dovrebbe fornire fino a 50 ore di utilizzo. Per inserire la batteria, spostare il coperchio e aprire il vano apposito sulla parte inferiore del joystick. Inserire la batteria AA osservando la polarità indicata e richiudere il coperchio.
- Page 24 Alla schermata Software Setup, fate clic su Avanti e seguite le istruzioni a schermo. A questo tempo vi sarà chiesto di installare funzionalità come il Saitek Magic Mouse e Saitek Magic Keyboard (XP chiama così i vari elementi della periferica Saitek). Continuate a cliccare su Avanti, Continua comunque e Finisci per accettare l'installazione fino a quando visualizzate la schermata Installazione del software di programmazione riuscita.
- Page 25 Se viene richiesto di installare Microsoft® DirectX® 8.1, fare clic su Install e seguire le istruzioni a schermo, e riavvia poi il computer quando viene richiesto. Accertarsi di aver lasciato il Saitek CD nel lettore quando si riavvia il computer. Quando questo software è installato, guida l'utente automaticamente all'installazione per passare allo stadio successivo.
- Page 26 Periodicamente sono disponibili aggiornamenti dei driver e del software di programmazione per questo prodotto. Potete verificare la disponibilità degli aggiornamenti più recenti visitando il sito web Saitek e facendo clic su Download. Visualizzate un menu a discesa. Selezionate "Driver e Software"...
- Page 27 Il Product Companion Disk fornito con questa periferica e il sito Web di Saitek - www.saitek.com contengono oltre 200 profili prescritti. (Visitare il sito Web per avere profili nuovi o migliorati, che vengono aggiunti regolarmente).
- Page 28 Quasi tutti i prodotti che ci vengono resi come difettosi non sono affatto difettosi - non sono stati semplicemente installati correttamente. Se avete delle difficoltà con questo prodotto, visitate prima di tutto il nostro sito Web www.saitek.com. L'area dell'assistenza tecnica vi fornirà tutte le informazioni che vi occorrono per ottenere il meglio dal vostro prodotto e per risolvere qualsiasi problema da voi riscontrato.
- Page 29 MA NON LIMITATI ALLE GARANZIE IMPLICITE DI RESPONSABILITÀ E IDONEITÀ PER UNO SCOPO PARTICOLARE, SARÀ LIMITATA ALLA DURATA DELLA PRESENTE GARANZIA LIMITATA SCRITTA. Alcuni Stati non consentono limitazioni sulla durata di una garanzia implicita, perciò le suddette limitazioni possono non essere pertinenti nel vostro caso. NON SAREMO MAI RESPONSABILI PER QUALSIASI DANNO SPECIALE O CONSEGUENTE PER VIOLAZIONE DI QUESTA O DI QUALSIASI ALTRA GARANZIA, ESPLICITA O IMPLICITA, DI QUALSIASI TIPO.
- Page 30 DEL de estado de corriente El Cyborg Evo inalámbrico de Saitek presenta un DEL (diodo electroluminiscente) en la parte superior del joystick que muestra cuánta energía le queda a la pila. Una luz verde significa que hay entre un 20 y un 80% de carga en la pila;...
- Page 31 En la pantalla de Software Setup haga clic en Next y siga las instrucciones de pantalla. En esta fase se le pedirá instalar prestaciones como el Ratón mágico de Saitek y el Teclado mágico de Saitek (esto es lo que XP denomina los diferentes elementos del controlador de Saitek). Prosiga haciendo clic en Siguiente, Continuar de cualquier manera y Finalizar para aceptar la instalación...
- Page 32 Asegúrese de dejar el CD de Saitek en la unidad cuando reinicie el sistema. Una vez que se haya instalado este software, se le llevará automáticamente al proceso de instalación para proseguir en el paso siguiente.
- Page 33 11. En la pantalla de Registro, seleccione Registrar mi controlador Saitek en-línea, haga clic en Siguiente y siga las instrucciones de pantalla o seleccione Registrar más adelante y haga clic en Siguiente. 12. Haga clic en Finalizar para completar la instalación.
- Page 34 A pesar del nivel de sofisticación, nunca antes visto en el mercado, gracias a la Saitek Smart Technology incorporada el software permanece sencillo de utilizar e intuitivo. Para una guía completa de cómo programar el controlador de Saitek, visite el sitio web de Saitek www.saitek.com.
- Page 35 Para hallar el Centro de asistencia técnica de Saitek de su localidad, rogamos que consulte la hoja de Centros de asistencia técnica incluida en el paquete de este producto.
- Page 36 Saitek k plc. Las obligaciones de Saitek se limitarán a reparar o sustituir la unidad por otra igual o similar, según optemos. Para obtener reparaciones de acuerdo a esta garantía, deberá presentar el producto y comprobante de compra (p.