Table of Contents
Advertisement
Quick Links
Advertisement
Table of Contents

Related Manuals for EVGA Classified SR-X


Summary of Contents for EVGA Classified SR-X
- Page 1 User Guide EVGA Classified SR-X...
-
Page 2: Table Of Contents
EVGA Classified SR-X Motherboard Table of Contents Before You Begin… ....................4 Motherboard Specifications ..................5 Unpacking and Parts Descriptions ..............6-7 Equipment ......................8-9 Hardware Installation ..................10 Installing the CPU ..................11-12 Installing the Cooling Device ................13 Installing DIMMs .................... - Page 3 PCIE-E Disable Swtiches ..................27 CPU1 Disable Swtiches ..................28 DIMM Disable Swtiches ..................29 Voltage Measure Point ..................30 Installing Drivers and Software ................31 POST Codes ....................32-33 EVGA Glossary of Terms ................. 34-36 Compliance Information ..................37...
-
Page 4: Before You Begin
EVGA Classified SR-X Motherboard Before You Begin… Thank you for purchasing the EVGA Classified SR-X Motherboard. This is the premier dual socket enthusiast class motherboard. With this purchase you not only receive the best dual Xeon motherboard built ® for the enthusiast, by the enthusiast, you also receive our industry leading 24/7 technical support. -
Page 5: Motherboard Specifications
EVGA Classified SR-X Motherboard Intentions of the Kit This kit provides you with the motherboard and all connecting cables necessary to install the motherboard into a PC case. If you are building a PC, you will use most of the cables provided in the kit. If however, you are replacing a motherboard, you will not need many of the cables. -
Page 6: Unpacking And Parts Descriptions
Unpacking and Parts Descriptions Unpacking The EVGA Classified SR-X motherboard comes with all the necessary cables for adding a motherboard to a new chassis. Be sure to inspect each piece of equipment shipped in the packing box. If anything is missing or damaged, contact your reseller. - Page 7 EVGA Classified SR-X Motherboard I/O Shield Installs in the system case to block radio frequency transmissions, protect internal components from dust, foreign objects, and aids in proper airflow within the chassis. 3 - 2-Port SATA Power Cables Allows a Molex power connector to adapt to a SATA power connector.
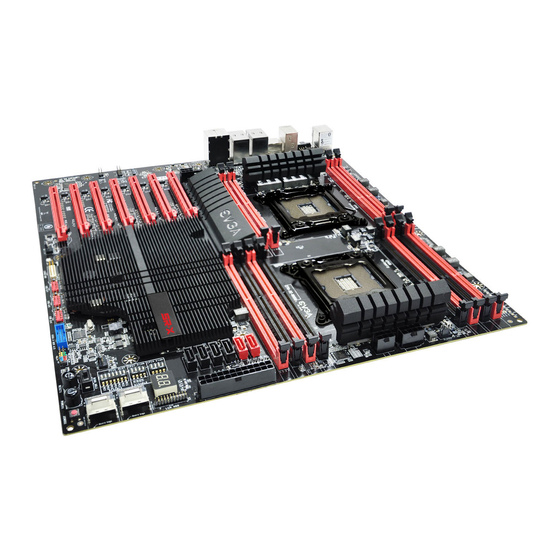
- Page 8 EVGA Classified SR-X Motherboard Figure 1. EVGA Classified SR-X Motherboard Layout 19 18 17 Primary CPU socket 10. Serial-ATA (SATA) connectors 19. Reset button Secondary CPU socket 11. USB 3.0 header 20. PC Speaker 1394B header 12. Front panel connector 21.
- Page 9 EVGA Classified SR-X Motherboard Figure 2. Motherboard I/O Panel Connectors 1. Bluetooth 2. USB 2.0 ports (Four) 3. CMOS Clear Button 4. EVBot Connector 5. E-SATA ports (Two) 6. USB 3.0/2.0 ports (Four) 7. Dual Lan Ports with LEDs to indicate status 8.
-
Page 10: Hardware Installation
EVGA Classified SR-X Motherboard Hardware Installation This section will guide you through the installation of the motherboard. The topics covered in this section are: Preparing the motherboard Installing the CPUs Installing the CPU fans Installing the memory ... -
Page 11: Installing The Cpu
EVGA Classified SR-X Motherboard Preparing the Motherboard Installing the CPU Be very careful when handling the CPU. Hold the processor only by the edges and do not touch the bottom of the processor. Use the following procedure to install the CPU onto the motherboard. - Page 12 EVGA Classified SR-X Motherboard Align the notches on the CPU to the notches in the socket. Lower the processor straight down into the socket. Note: Make sure the CPU is fully seated and level in the socket. Lower the load plate so it is resting on the CPU.
-
Page 13: Installing The Cooling Device
EVGA Classified SR-X Motherboard Installing the Cooling Device There are many different cooling devices that can be used with this motherboard. Follow the instructions that came with your cooling assembly. Installing DIMMs Your new motherboard has twelve (12) 240-pin slots for DDR3 DIMMs (ECC or Non ECC). -
Page 14: Installing The Motherboard
EVGA Classified SR-X Motherboard Align the memory module to the DIMM slot, and insert the module vertically into the DIMM slot. The plastic clips at both sides of the DIMM slot automatically lock the DIMM into the connector. Installing the Motherboard... -
Page 15: Securing The Motherboard Into The Chassis
EVGA Classified SR-X Motherboard Securing the Motherboard into the Chassis Most computer chassis have a base with mounting studs or spacers to allow the motherboard to be secured to the chassis and help to prevent short circuits. If there are studs that do not align with a mounting hole on the motherboard, it is recommended that you remove that stud to prevent the possibility of a short circuit. -
Page 16: Connecting Cables And Setting Switches
EVGA Classified SR-X Motherboard Connecting Cables and Setting Switches This section takes you through all the connections and switch settings on the motherboard. This will include: Power Connections 24-pin ATX power (PW1) 8-pin ATX 12V power (PW12-P0-1, PW12-P1-1) ... -
Page 17: 8-Pin Atx 12V Power (Pw12-P0-1, Pw12-P1-1)
EVGA Classified SR-X Motherboard Table 1. PW1 Pin Assignments Connector Signal Signal +3.3V +3.3V Board edge +3.3V -12V PS_ON PWROK RSVD +5V_AUX +12V +12V +3.3V 8-pin ATX 12V Power ( PW12-P0-1, PW12-P1-1 , the 8-pin ATX 12V power connections, are used PW12-P0-1, PW12-P1-1 to provide power to the CPU. -
Page 18: Connecting Serial Ata Cables
EVGA Classified SR-X Motherboard Connecting Serial ATA Cables The Serial ATA II connector is used to connect a Serial ATA II device to the motherboard. These connectors support the thin Serial ATA II cables for primary storage devices. The Serial ATA II interface allows up to 300MB/s data transfer rate. -
Page 19: Front Panel Header
EVGA Classified SR-X Motherboard Connecting Internal Headers Front Panel Header The front panel header on this motherboard is used to connect the following four cables. (see Table 2 for pin definitions): PWRLED Attach the front panel power LED cable to these two pins of the connector. -
Page 20: Usb Headers
EVGA Classified SR-X Motherboard USB Headers This motherboard contains four (4) USB 2.0 ports that are exposed on the back panel of the chassis. It also supports four (4) USB 3.0 ports on the back panel which can operate at USB 2.0 or USB 3.0 specifications. -
Page 21: Audio Header
EVGA Classified SR-X Motherboard Audio Header The audio connector supports HD audio standard and provides two kinds of audio output choices: The Front Audio & the Rear Audio. The front Audio supports re-tasking function. Table 4. Front Audio Header Connector... -
Page 22: Fan Connections
EVGA Classified SR-X Motherboard Fan Connections There are seven fan connections on the motherboard. The fan speed can be detected and viewed on select ports in the PC Health Status section of the CMOS Setup. The fans are automatically turned off after the system enters S3, S4 or S5 mode. -
Page 23: Expansion Slots
EVGA Classified SR-X Motherboard Expansion Slots The EVGA Classified SR-X motherboard contains seven (7) PCI-E expansion slots. PCI-E Slot Listing 1 – PCI-E x16/8 slot 2 – PCI-E x8 slot 3 – PCI-E x16/8 slot 4 – PCI-E x8 slot 5 –... - Page 24 EVGA Classified SR-X Motherboard E 3.0 graphics card. The design of this motherboard supports up to Four PCI-E graphics cards using NVIDIA’s SLI® technology. When installing a PCI-E x16 card, be sure the retention clip snaps and locks the card into place. If the card is not seated properly, it could cause a short across the pins.
-
Page 25: Onboard Buttons
EVGA Classified SR-X Motherboard Onboard Buttons These onboard buttons include RESET, POWER and Clear CMOS. These functions allow you to easily reset the system, turn on/off the system, or clear the CMOS. Clear CMOS Button The motherboard uses the CMOS to store all the set parameters. -
Page 26: Post Port Debug Led And Led Status Indicators
EVGA Classified SR-X Motherboard 26Post Port Debug LED and LED Status Indicators Post Port Debug LED The Debug LED provides two-digit POST codes to show why the system may be failing to boot. It is useful during troubleshooting situations. This Debug LED will also display current CPU temperatures after the system has fully booted into the Operating System. -
Page 27: Pcie-E Disable Swtiches
PCI-E Disable Switches For the ease of troubleshooting multiple graphics cards or testing an individual graphics card’s overclocking, EVGA has implemented seven switches you can use to disable individual PCI-E slots. You don’t need to remove any of your graphics cards but simply disable the slot the particular card is in. -
Page 28: Cpu1 Disable Swtiches
EVGA Classified SR-X Motherboard CPU1 Disable Switch For the ease of troubleshooting Dual CPUs, EVGA has implemented one switch you can use to disable CPU1. You don’t need to remove the CPU to disable it. You see the location of the switch in the above diagram. It is located at the top middle of the board. -
Page 29: Dimm Disable Swtiches
EVGA Classified SR-X Motherboard DIMM Disable Switches For the ease of troubleshooting memory or testing individual slots, EVGA has implemented switches to disable any DIMM slot. To disable a DIMM slot move the switch to the right position. You see the location of the switch in the above diagram. It is located right above the reset and BIOS selector switch. -
Page 30: Voltage Measure Point
EVGA Classified SR-X Motherboard Voltage Measure Point The motherboard is equipped with thirteen voltage measure point pads. You can use a voltmeter or multimeter to measure the voltage at each pad. CPU 0 Vcore voltage CPU 0 VSA voltage CPU 1 DIMM1 voltage... -
Page 31: Installing Drivers And Software
The motherboard supports Windows 7/Vista. The kit comes with a CD that contains utilities, drivers. The CD that has been shipped with your EVGA Classified SR-X motherboard contains the following software and drivers: Chipset Drivers ... -
Page 32: Post Codes
EVGA Classified SR-X Motherboard AMI POST Code Code Description Initialize BIOS. Check Battery Power and CMOS Initialize interrupt controlling hardware/vector table Initialize system timer Fixes CPU POST interface calling pointer Primary initialization of CPU Secondary initialization of CPU Set up boot strap processor information... - Page 33 EVGA Classified SR-X Motherboard Code Description Initialize real time clock Test system memory Initialization of chipset registers Detect coprocessor Update CMOS memory size Initialize NUM-LOCK Initialize Int-13 Initialize IPL devices Generate and write contents of ESCD Log errors encountered Display errors, if no display check monitor/graphics...
-
Page 34: Evga Glossary Of Terms
EVGA Classified SR-X Motherboard EVGA Glossary of Terms AC – Alternating Current ACPI - Advanced Configuration and Power Interface AFR – Alternate Frame Rendering APIC - Advanced Programmable Interrupt Controller ACPI – Advanced Configuration and Power Interface BCLK – Base Clock (or operating frequency of base system bus) - Page 35 NIC - Network Interface Card NTFS - New Technology File System OEM - Original Equipment Manufacturer PATA - Parallel Advanced Technology Attachment EVGA X79 Motherboard PCB - Printed Circuit Board PCH – Platform Controller Hub PCI - Peripheral Component Interconnect...
- Page 36 SPP - System Platform Processors SSD – Solid State Drive TCP/IP - Transmission Control Protocol/Internet Protocol USB - Universal Serial Bus VDroop - VCore Voltage Drop VGA - Video Graphics Array VREG – Voltage Regulator 1337 – This is reserved for the EVGA Elite!
-
Page 37: Compliance Information
Original Purchaser. Upon termination, for any reason, all copies of Software and materials must be immediately returned to EVGA and the Original Purchaser shall be liable to EVGA.com CORP for any and all damages suffered as a result of the violation or default.